Quote:
Originally Posted by sracer5

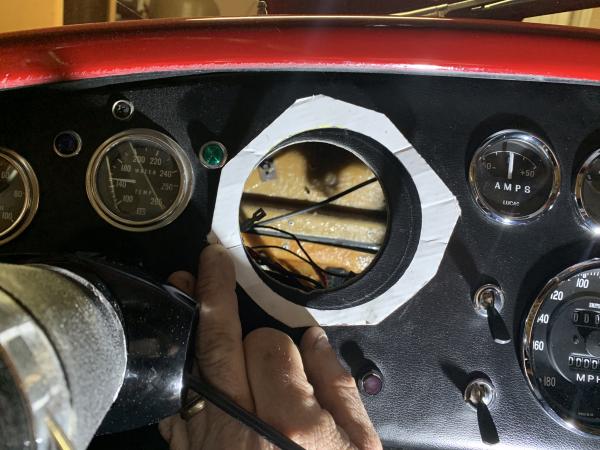
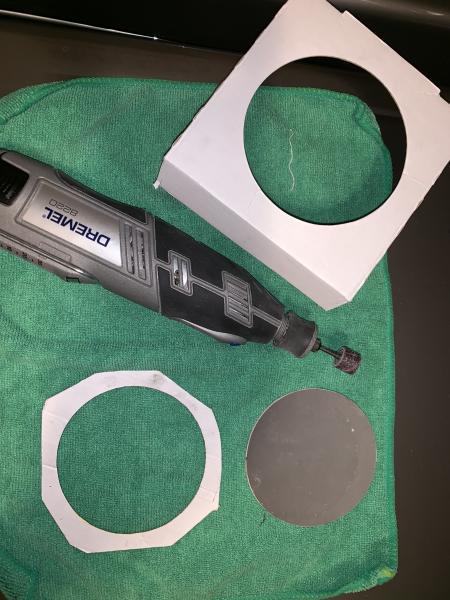
You guys are wrong ! Upgrade was easy. I used a 100mm paper form I measured and made to relocate and enlarge the holes for the speedometer and tachometer. I then used the paper hole that was aprox. 105mm that came with the gauge to mark the hole position then used a dremel tool with a drum sanding disc to follow the marks.Quick , but dirty. I wouldnt try it with a leather covered dash , no problem with vinal . I didnt pull the dash or steering wheel. I spent no more than 3 hours total start to finish. Only downside is that it was messy. The smaller gauges are slightly smaller in diameter , but work fine. Ill post pictures ! BIG THANKS TO ROCKBIT FOR HIS MEASUREMENTS FROM HIS ERA WITH SMITHS GAUGES. I WAS ABLE TO GET TO LESS THAN A .25 INCH FOR THE TACH AND EXACTLY THE SAME ON THE SPEEDO.
 |
I am impressed that you are able to do this modification without pulling the dash out. I recently completed wiring and the installation of the dash on 821. I thought I should write up the steps to remove it if, for some reason, in the future that becomes necessary. After writing this up it is me hope that I never ever have to remove the dash again. This is the first draft, constructive comments are welcome.
1. Disconnect the battery from the cars electrical system.
2. If the car is equipped with an under hood battery the battery should be removed to facilitate disconnecting the passenger side vent control cable.
a. Jack the front of the car up and remove the right side wheel.
b. Disconnect the fresh air vent tube from the battery enclosure panel and slide it forward.
c. Remove battery wheel well enclosure panel by remove the mounting screws.
d. Remove the battery
3. Disconnect the passenger side fresh air vent control cable.
4. Disconnect the driver side fresh air vent control cable.
5. Push the ventilation valve control cables through their firewall penetration holes
6. Remove the lube
oil temp sensor from the
oil pan by first draining the
oil from the engine then removing the sensor from the front of the oil pan.
7. Loosen the oil temp sensing line from its anchor points in the engine compartment so that slack in the line will allow feeding the sensing line through the fire wall penetration.
8. Do the same with the engine coolant temperature sensor.
9. Disconnect the dash wiring harness from the rest of the cars wiring harness by unplugging plugs #27/#54 and #28/#53.
10. Remove the steering column by
a. Removing the steering wheel
b. Remove the steering wheel hub
c. Disconnecting the turn signal switch wires
d. Remove the turn signal switch
e. Unplug the harness connecting the tail light relay/fuse panel (attached to the upper steering column support).
f. Remove the tail light relay/fuse panel
g. Remove the steering column half coupling near the floor of the car
h. Slide the steering column out through the hole in the dash
11. Remove the radio from the glove box
a. Remove the Velcro straps anchoring the radio to the glove box
b. Disconnect the radio wiring harness from the radio
c. Disconnect the antennae lead from the radio
12. Remove the MSD control box by -
a. Disconnecting the MSD control box wiring harness plug
b. Remove the screws holding the MSD to the glove box
13. Remove the MSD capacitor from the bottom of the glove box by following the same steps used to remove the MSD box
14. Remove the 2 screws holding the glove box to the firewall. They are visible at the back of the box.
15. Remove the hoses connected to the manual operated windshield washer pump. These are directly behind the dash mounted pump under the dash.
16. Cut all wire ties holding the wiring harness up under the dash to allow slack to extract the dash part way.
17. Loosen/remove the dash anchor bolts/screws to allow the bottom edge of the dash to be tilted out. There are bolts located at the right and left side end of the dash and 3 screws spread across the top edge of the dash.
18. With the bottom edge of the dash tilted out the glove compartment can be removed from behind the dash.
19. The dash can now be removed provided there is enough slack in the remaining wires and temperature sensing leads.
20. Holding the dash in your lap remove the sensing line from behind the oil pressure gauge.
21. The heater fan has a separate wire connecting it to the dash mounted switch. It has short lead and will need to be removed now also if not already done so.
22. If the oil and water temperature sensors have been pushed through their respective firewall penetrations they dash can be completely removed from the vehicle.
BD