Well, I finally have one completed component on the car. I am close on many different areas, but the rear suspension is the first to be done and finished. The radius rods finally came in and after assembling the heim joints onto them, it was time to attach the sway bar to the suspension. At first look this would appear to be easy, but if you think so, then you have obviously forgotten that this is a British rear suspension. Hah! Not so fast!

The bolt that holds the lower heim joint to the lower control arm mounts from the lower control arm saddle inward toward the center of the car. What this means is that you must remove the aluminum hub carrier from the lower control arm saddle, insert the proprietary Jaguar bolt with the very shallow head into it's countersunk hole behind the hub carrier saddle, and at the same time hold in place all the spacers, heim joint etc. while you slide the bolt through everything and out through the inner bracket. Not the worst job in the world but nowhere as easy as it could be. Once you have this entire assembly in place, the bolt head needs to be checked that it is fully seated and flush with the face of the saddle that it passes through. The bolt has a very shallow head and is countersunk into the inner face of the saddle so that once the hub carrier is in place it can rotate freely in the saddle as the suspension rises and falls without interfering with the aluminum hub carrier. There are all types of shims and bearings in the hub carrier that must be kept in place while you do this, and clearances must be checked again when completed.
Personally, had I engineered it (yeah, like I know more than the guys from Jaguar, right?) I would have just threaded the hole in the saddle from the inner surface outward, and inserted the mounting bolt for the lower heim joint from the center of the car outward so that this simple assembly could be removed and installed without disassembly of the whole outer part of the rear suspension being required. Then again, that would be easier, but so much less "British", no?

Next, I had to re-install the rear shocks. Not much to say there, it really is as easy as it looks. Right now the lock nuts on the lower studs are too deep, the stud is too short to reach all the way out to the vinyl locking ring. I have them on there for now and I placed an order last night from McMaster-Carr for some metal center punched lock nuts - they should do the trick. I'll just spin them on when they come and that will take care of the minor problem. It turns out that this simple job was a welcome respite and opportunity for everything to go right, in preparation for what was to come next - the damned brake lines again. Guys, I have to say, I am enjoying building this car, and it is welcome therapy for me to distract me from what I am going through health wise now. However, to be honest, if I never saw another brake line again it would be too soon. I honestly hate this job, and being somewhat of a perfectionist, I go through lots of lines just to get one right. Now don't get me wrong, my brake lines aren't perfect, I just don't have the talent to reach perfection in this area. However, I think I got them pretty darned good. They look good and they're safe, so were done.
Here is my pile of rejected and misshapen lines, all for just the two little lines in the rear from the calipers to the brass T fitting.
It took all this aggravation:

To finally get to this point:

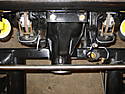
As I said, they're not the perfect works of art that I see from some, but they're not half bad.
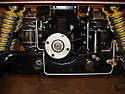
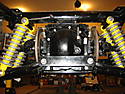
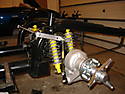
Here is a few shots of the completed rear suspension:

That's it for tonight. Tomorrow it's on to front brake lines. I completed a pair of lines that go from the front stainless braided lines to the brass T fitting, but I put the wrong darned ends on them. I used the short fittings and the brass T fitting requires the longer ends. Boy, was I unhappy.....

Anyway, I'll get that completed tomorrow, and then once Nick gets the front radius rods welded up for me, I'll mount the front sway bar and the front suspension will be competed as well, and then it's off to the body and electrical.
By the way, speaking of electrical, what plugs can I use on the headlights, taillights and parking lights? I was thinking about the weatherpak plugs, I believe they're called. I have never used them before. In looking briefly at them, it would appear that I have to assemble the pins into the plugs myself and buy special tools and all - is that true? What is involved in this? Is it difficult, and are the tools expensive? Is there a better alternative for me? Thanks!
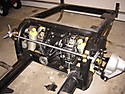
Oh, by the way, my Genesis block is on it's way. It should be here tomorrow.