Welcome to Club Cobra! The World's largest
non biased Shelby Cobra related site!
- » Representation from nearly all
Cobra/Daytona/GT40 manufacturers
- » Help from all over the world for your
questions
- » Build logs for you and all members
- » Blogs
- » Image Gallery
- » Many thousands of members and nearly 1
million posts!
YES! I want to register an account for free right now!
p.s.: For registered members this ad will NOT show
 
 Main Menu
|
|
Nevada Classics
|
|
Advertise at CC
|
|
April 2026
|
| S |
M |
T |
W |
T |
F |
S |
| |
|
|
1 |
2 |
3 |
4 |
| 5 |
6 |
7 |
8 |
9 |
10 |
11 |
| 12 |
13 |
14 |
15 |
16 |
17 |
18 |
| 19 |
20 |
21 |
22 |
23 |
24 |
25 |
| 26 |
27 |
28 |
29 |
30 |
|
|
|
|
CC Advertisers
|
|

11-26-2006, 01:11 AM
|
 |
CC Member

|
|
|
Join Date: Aug 2001
Location: Melbourne, Australia,
Vic
Cobra Make, Engine: G-Force Mk I, 5L Windsor, TKO 600, enhanced Jag / Koni suspension & LSD Diff.
Posts: 2,304
|
|

 Not Ranked
 Slowy's progress pics
Some more progress pics. for my G-Force build.
Despire recent extractor woes I've had a few other things on the go. It's amazing how sequential some of the build gets - particularly for the cockpit.
Realised early on that any cockpit set up was going to first need seats. Got MX5 seats and shrunk them 50mm to make them better fit the GF cockpit that seems to have some very strange profiles. Very happy with the trimmer's efforts and you wouldn't know from looking at them that they've been touched.
Pic isn't too detailed but gives the gist of the seat. You can also just see the gearshifter set up. Made up a billet blank to attach between gearbox selector arm and the AU shift that I cut down. Had to angle the shifter down as the T5 box sits a long way back and it needed this angle to create a comfortable gearshift location. Can't wait to use it in anger.
Attachment 12056
With the seat in place I could then play with the steering location. Have had a wheel for some time, a 4 spoke Momo, but have also been chasing a saas boss. Reason for the saas boss is that it is solid aluminium and can easily be shortened. This I did to a s/h special I found, lopping 35mm off the end. Have included a pic of the bit I cut off to show how chunky the saas boss is.
Attachment 12053
Managed to redrill and tap the boss to attach the wheel without a hitch and fitted the Hyundai combi switches for an initial fit up after the mod. Found the distance from wheel to the stalks perfect however the indicator stalk was hitting the door and dash underside body work. Figured out how to strip down the indicator stalk with the intent of shorten it but this wasn't possible, so I just bent the stalk down and out (back towards the driver) so that it would work in position and it all works well now including the cancelling function on the indicators.
Attachment 12052
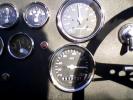
Made a dummy plywood dash today as the aluminium version that came with the kit had all the gauge holes cut and they don't quite meet my needs. Also had to enlarge the steering column area to accept the shroud. Once I achieve what I need with the ply dash I will get this transferred onto aluminium. I also plan to make it in the style where the centre drops down to the tranny tunnel. I figure this will allow more room for the gauge set up and for stereo equipment. Pic. show the dash and the wheel and stalks better.
Attachment 12054
Not going to make any holes in the dash until I get my gauges. Have just ordered the Cobra style VDO's from Howard Instruments as I do like the old smiths style look. Don't believe I will get the gauges until after Xmas now but they make a great excuse for family donations towards the cause as my Chrissy present!
Had also been tinkering in the engine bay, post extractor swearing, fitting up my fuel line linkages including filter and vapour lines. Have mounted an AU carbon cannister into the passenger side recess above the side vent but it is not terribly visible in the pic. though the whitish tube in the middle top of the pic. does go to the cannister. Also plan to run a pod filter into the same recess to suck cold air through the vent.
Bought some very nice Earl brand aluminium filters for my fuel system. The initial filter is bolted up above the diff. but the finer filter is that blue fitting on the RHS at the end of the black fuel line.
Attachment 12055
Anyway have spent enough time here, its time to go tinkering again.
Cheers
__________________
slowy
Last edited by stephen low; 08-27-2008 at 02:27 AM..
|
-
Advertising

11-26-2006, 02:52 PM
|
 |
CC Member
|
|
|
Join Date: Feb 2002
Location: Alice Springs, central Australia,
NT
Cobra Make, Engine: Classic revival kit (CR3181), gen III engine, T56 6 speed box, AU XR8 lsd diff
Posts: 5,699
|
|
Not Ranked
It really looks like your making some good progress there Slowy.
Keep the pics rolling.
All you Melbourne guys - I will be at the December meeting at the Tivoli, so look out for me (I am hard to miss)
__________________
Cruising in 5th

---------------------------------------------
Never be afraid to do something new, Remember, Amateurs built the Ark: Professionals built the Titanic.
|
11-26-2006, 11:05 PM
|
|
CC Member
|
|
|
Join Date: Feb 2006
Location: Perth,
WA
Cobra Make, Engine: G-Force kit, LS1, 4L60, 4.09 LSD... Gone to Queensland!!!
Posts: 588
|
|
Not Ranked
Coming along real well I reckon Steve!!!
My progress has slowed dramatically in the last couple of months due to the acquisition of a girlfriend....
|
11-26-2006, 11:39 PM
|
|
CC Member
|
|
|
Join Date: Aug 2001
Location: Melbourne, Australia,
Vic
Cobra Make, Engine: G-Force Mk I, 5L Windsor, TKO 600, enhanced Jag / Koni suspension & LSD Diff.
Posts: 2,304
|
|
Not Ranked
Thanks guys - not bad when you consider I was unemployed for all of September!
Strange that though, lots of time but it wasn't a lack of money that slowed me down, it was busily searching for jobs that kept me out of the garage. Anyway have a sorta job working for one of our Councils, not one that is close either and well underpayed but at least some $$ are coming in. Will just have to slow the cobra expenditure a tad for now!!
Hey Plums you have no hope now, two girls in the stable whoo hoo - look out, no money, no progress and Xmas is coming - you said ready by then remember!?!! Anyway you're miles ahead of Aussie Mike he doesn't even have paint!
Hey Boxhead, are you still bringing the 105 degree cam? I cut a template and now wonder if this sweep will be too little but if you are still going to bring it, I will borrow and give it a try. I will see you at the meeting next week - what are those distinguishing features I need to look for??
Cheers
__________________
slowy
|
11-27-2006, 12:43 AM
|
|
CC Member
|
|
|
Join Date: Feb 2006
Location: Perth,
WA
Cobra Make, Engine: G-Force kit, LS1, 4L60, 4.09 LSD... Gone to Queensland!!!
Posts: 588
|
|
Not Ranked
I reckon if I didn't paint it AND didn't have the girlfriend, I possibly could have had it running by christmas. For a while there I was spending around 40 hours a week on it... I've almost finished it financially, I have nearly everything needed to complete it, except time.......
|
11-27-2006, 04:38 AM
|
|
CC Member
|
|
|
Join Date: Nov 2003
Cobra Make, Engine: RCM, 4 wheels, two doors
Posts: 704
|
|
Not Ranked
Great stuff Steve. Keep 'em comming  |
11-27-2006, 06:16 PM
|
|
CC Member
|
|
|
Join Date: Feb 2002
Location: Alice Springs, central Australia,
NT
Cobra Make, Engine: Classic revival kit (CR3181), gen III engine, T56 6 speed box, AU XR8 lsd diff
Posts: 5,699
|
|
Not Ranked
Hey Steve, the distinguishing features are most likely to be
1 - Fat bastard
2 - Not much hair on my head
3 - Goatee beard.
I will duck my head under the covers now and admit that I forgot to grab the wiper gear wheel, I will get an address from you at the meeting and post it out when I get home.
__________________
Cruising in 5th
---------------------------------------------
Never be afraid to do something new, Remember, Amateurs built the Ark: Professionals built the Titanic.
|
11-28-2006, 01:19 AM
|
|
CC Member
|
|
|
Join Date: Aug 2001
Location: Melbourne, Australia,
Vic
Cobra Make, Engine: G-Force Mk I, 5L Windsor, TKO 600, enhanced Jag / Koni suspension & LSD Diff.
Posts: 2,304
|
|
Not Ranked
Thanks guys for the comments.
Boxhead what are we to do with you? Nobody at home you could get to send the gear or is it a case that it is still inside the mechanism as well?
By that description you'll fit right in. Well I'll just look for the new face with a goatee!!
Cheers
__________________
slowy
|
11-28-2006, 01:07 PM
|
|
CC Member
|
|
|
Join Date: May 2004
Location: Melbourne,
Vic
Cobra Make, Engine: Cobra RMC 377ci Windsor, Harrison Daytona Coupe, Ford XC Coupe.
Posts: 1,588
|
|
Not Ranked
Boxhead
Looking forward to seeing you at the next meeting,
I will keep an Eishban (for arm of a baby pig) aside for you 
STIFFY |
11-28-2006, 01:30 PM
|
 |
CC Member
|
|
|
Join Date: Aug 2003
Location: Hunter valley wine country,
NSW
Cobra Make, Engine: Homebush. Lexus quad cam V8, R154 Supra box. Oh what a feeling.
Posts: 363
|
|
Not Ranked
You guys down there have some strange rituals?
__________________
 !!Its good to be stroked but i'd rather be blown!!
Proud member of the Bclub Central Coast chapter
|
11-28-2006, 02:49 PM
|
|
CC Member
|
|
|
Join Date: Feb 2002
Location: Alice Springs, central Australia,
NT
Cobra Make, Engine: Classic revival kit (CR3181), gen III engine, T56 6 speed box, AU XR8 lsd diff
Posts: 5,699
|
|
Not Ranked
The gear is out and sitting on my work bench, but the shed is locked up tighter than Fort Knox.
__________________
Cruising in 5th
---------------------------------------------
Never be afraid to do something new, Remember, Amateurs built the Ark: Professionals built the Titanic.
|
12-06-2006, 04:26 AM
|
|
CC Member
|
|
|
Join Date: Feb 2002
Location: Alice Springs, central Australia,
NT
Cobra Make, Engine: Classic revival kit (CR3181), gen III engine, T56 6 speed box, AU XR8 lsd diff
Posts: 5,699
|
|
Not Ranked
Not sure if I am going to make it to the club meeting or not tomorrow.
I am trying to catch up with a good mate and it is looking like Thursday night might be my only chance.
So if I get there then I will see you guys, but I cant promise I will.
__________________
Cruising in 5th
---------------------------------------------
Never be afraid to do something new, Remember, Amateurs built the Ark: Professionals built the Titanic.
|
12-06-2006, 01:04 PM
|
|
CC Member
|
|
|
Join Date: May 2004
Location: Melbourne,
Vic
Cobra Make, Engine: Cobra RMC 377ci Windsor, Harrison Daytona Coupe, Ford XC Coupe.
Posts: 1,588
|
|
Not Ranked
Hope you can make it.......
|
 Posting Rules
|
You may not post new threads
You may not post replies
You may not post attachments
You may not edit your posts
HTML code is Off
|
|
|
All times are GMT -7. The time now is 10:34 AM.
|
|


 Linear Mode


