 
 Main Menu
|
|
Nevada Classics
|
|
Advertise at CC
|
| S |
M |
T |
W |
T |
F |
S |
| |
1 |
2 |
3 |
4 |
5 |
6 |
| 7 |
8 |
9 |
10 |
11 |
12 |
13 |
| 14 |
15 |
16 |
17 |
18 |
19 |
20 |
| 21 |
22 |
23 |
24 |
25 |
26 |
27 |
| 28 |
29 |
30 |
|
|
|
|
|
|
CC Advertisers
|
|

01-20-2013, 06:11 AM
|
|
CC Member

|
|
|
Join Date: Oct 2009
Location: annapolis,
md
Cobra Make, Engine: SPF Coupe 0130 427polished roush
Posts: 3
|
|

 Not Ranked
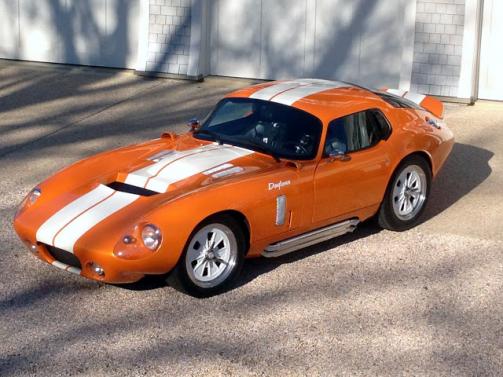
 CSX headlight cover to Series 1 Coupe???
Has anyone tried to adapt the new CSX headlight cover to the earlier SPF Daytona coupe. I know that BRE has a clear lens conversion but it requires repaint. Could it be possible that the new CSX cover is more easily installed on earlier coupes?
|
01-21-2013, 04:33 AM
|
|
CC Member
|
|
|
Join Date: Jan 2009
Location: Harrison Twp,
MI
Cobra Make, Engine: SPF Coupe #136, 427SR FI
Posts: 301
|
|
Not Ranked
Quote:
Originally Posted by rbkell

Has anyone tried to adapt the new CSX headlight cover to the earlier SPF Daytona coupe. I know that BRE has a clear lens conversion but it requires repaint. Could it be possible that the new CSX cover is more easily installed on earlier coupes?
|
Great to meet another Brock Coupe Owner!!!
Drop me an email to jjgrice55@gmail.com so we can connect offline.
The Shelby light looks very similiar to the Brock light cover. If you want to cover-up the slots from the MK1 light then I think both would require paint.
Maybe drop Lance a note at hillbank and one of his guys can check from the factory.
Send me details on your car and I will do the same. Mine is SPC0136.
Jeff |
01-21-2013, 06:37 AM
|
|
CC Member
|
|
|
Join Date: Jul 2005
Location: Agoura,
CA
Cobra Make, Engine: SPC Brock/Shelby Cobra Daytona Coupe 51, Roush 427IR, also full custom 600+ HP Austin Healey and Ferrari Daytona spyder
Posts: 109
|
|
Not Ranked
From what I can tell, the factory covers seem to be a thinner material than Pete's. It doesn't matter which covers are used, the repaint (which can be avoided) is because the slots in the body for the original headlight cover tabs to fit get filled in which, unless this is done almost surgically, requires a bit of body work and paint. I developed an improved technique to fit Pete's covers without having to repaint the headlight buckets. Pete incorporated some of my technique in his revised installation instructions. Candidly, I have seen Pete's car with his covers and the factory cars and did not like the fit which is why I developed my technique. It made the installation a lot easier, quicker, and much, much better fitting. If you run your finger along my car without looking, you cannot feel the transition from body to headlight cover the fit is that good. So, irrespective of whose covers you get (and I prefer Pete's), installation is the same although Pete's requires trimming and, if done right, results in a better fit. Body/paint work only if you hack filling in the slots for the original covers.

|
01-28-2013, 09:03 PM
|
 |
CC Member
|
|
|
Join Date: May 2008
Location: San Jose CA,
CA
Cobra Make, Engine: SPF_R_/BRG/FRBoss302/327CI/FordEFI/Under_Car_Exh/
Posts: 2,523
|
|
Not Ranked
I would just get the BRE ones and call Ron for a tutorial - that way it gets done ! - don't be afraid of a tick of spot paint with a brush....can be done well.
__________________
Steve SPF 2734 MK3 / Brock Coupe #54- panavia.com
|
02-01-2013, 10:47 AM
|
|
CC Member
|
|
|
Join Date: Apr 2011
Cobra Make, Engine: Superformance Coupe
Posts: 20
|
|
Not Ranked
I note that there doesn't seem to be a proper seal between the newer headlamp covers and the car body. Do you keep having to remove the covers to clean out the water marks from condensation?
|
02-01-2013, 02:58 PM
|
|
CC Member
|
|
|
Join Date: Jul 2005
Location: Agoura,
CA
Cobra Make, Engine: SPC Brock/Shelby Cobra Daytona Coupe 51, Roush 427IR, also full custom 600+ HP Austin Healey and Ferrari Daytona spyder
Posts: 109
|
|
Not Ranked
Funny you should ask . . . one of the considerations of the original headlight cover design with the rubber trim was to seal out dirt and such and the factory went even beyond that in their Coupe instructions. Most, if not all the other customers had their cars assembled for them and were not given the instructions but they also called for a silicon bead to be applied betwen the cover and the body to assist the rubber trim in sealing out the dirt and such. The problem was that no matter what you did, rubber trim with or without the silicon, water, dust and dirt always got in and you still had to clean out the bucket. If your car has or had the added silicon sealing, it was that much harder to remover the cover to access and clean the bucket so early on the assemblers stopped applying the silicon - assuming they ever bothered to apply it in the first place. So - the ultimate answer to your question is irrespective of a car with or without the rubber seal, with or without the added silicon sealing under the rubber trim, or the new rubberless covers, yes, they have to be periodically removed to clean any dust or dirt and/or water spots that might get inside the headlight buckets. Obviously the better the headlight cover fit, the less frequently you have to do and so the less dusty or rainy your driving conditions and the less you wash your car or at least allow running water to get down inside the buckets, the less often you have to remove the covers and clean inside.
|
02-02-2013, 01:07 PM
|
|
CC Member
|
|
|
Join Date: Apr 2011
Cobra Make, Engine: Superformance Coupe
Posts: 20
|
|
Not Ranked
Very fair point. I no longer bother with the silicone; I can get them off, clean them and put them on again all in a couple of minutes - it's only 1 screw! But the newer one does look better... I just might have to do it.
|
02-02-2013, 01:48 PM
|
|
CC Member
|
|
|
Join Date: Jul 2005
Location: Agoura,
CA
Cobra Make, Engine: SPC Brock/Shelby Cobra Daytona Coupe 51, Roush 427IR, also full custom 600+ HP Austin Healey and Ferrari Daytona spyder
Posts: 109
|
|
Not Ranked
Personally I don't think there is any doubt that Pete Brock's headlight covers look terrific. You can also simply remove the rubber ring around the driving lights as well. Just clean up the edge of the lens cover where the rubber seal rested on it and it looks perfect. Not that Pete's driving light covers aren't nice but you don't have to go to all the work it takes to install them and the look is exactly the same. You can also remove the rubber trim around the side scoops for a cleaner look there as well. A few things to note though, the side scoops are held on by small counter sunk screws right at the edge of the scoop flange and this is where the side scoops break away and fly off. Before I made my smoke grey scoops (to match Pete's smoke grey rear hatch), I drilled and screwed in larger pan or button head screws in the center of the factory scoop flange (I first cleaned them off and smoothed them out a bit) positioned so the the edge of the screw head covered the old counter sunk screws. The added bearing surface of the pan/button head screws and the relocated position in the center of the flange better secured the scoops with a stronger hold. The hole in the scoop should be larger than the teeth of the screw and the screws should just kiss then back off slightly so the acylic isn't stressed and thus be prone to cracking. If you are using the factory scoops, there will be a 1/8" gap give or take between the edge of the flange and the continuation of the top of the door to roof line where the rubber seal nested. You can paint the gap black to fill it in if it bothers you. I made the flange on my scoops a bit wider to fill the gap and my scoops nestle right to the window/roof body line.
|
02-07-2013, 02:05 AM
|
|
CC Member
|
|
|
Join Date: Apr 2011
Cobra Make, Engine: Superformance Coupe
Posts: 20
|
|
Not Ranked
Thanks for that info, definitely worth me trying it out.
I might look into removing the sidescoops in a smilar way to the MkII, as it can be quite noisy there when cruising at 70+mph (and creates more drag when doing very high speed driving).
|
02-07-2013, 06:16 AM
|
|
CC Member
|
|
|
Join Date: Jul 2005
Location: Agoura,
CA
Cobra Make, Engine: SPC Brock/Shelby Cobra Daytona Coupe 51, Roush 427IR, also full custom 600+ HP Austin Healey and Ferrari Daytona spyder
Posts: 109
|
|
Not Ranked
Doug Campbell removed his side scoops (they blew off at speed and he left them off) and it is a matter of taste if/how much you like the look. Remove your scoops. All you have to do is pull off the rubber trim, unscrew the countersunk screws and the scoop comes right off. The black plastic duct and surround (a somewhat dinky duct at that, more surround than duct to me) will be quite visible. I personally do not like how it looks but if your car is dark and the black plastic isn't as obvious, it might look a lot better than on a light bodied car where it standouts out.
|
02-13-2013, 06:38 AM
|
|
CC Member
|
|
|
Join Date: Oct 2009
Location: annapolis,
md
Cobra Make, Engine: SPF Coupe 0130 427polished roush
Posts: 3
|
|
Not Ranked
 Headlight Install
 I went with the BRE headlight and running light covers and the new BRE rear window. Also added the side window scoop from Ron Weingart. It was a lot of work but looks good. See pictures at https://picasaweb.google.com/1166018...eat=directlink.
|
02-16-2013, 05:23 AM
|
|
CC Member
|
|
|
Join Date: Jan 2009
Location: Harrison Twp,
MI
Cobra Make, Engine: SPF Coupe #136, 427SR FI
Posts: 301
|
|
Not Ranked
Quote:
Originally Posted by rbkell
|
Very Cool! Glad you are enjoying your new Coupe! Jeff |
04-29-2013, 10:33 AM
|
|
CC Member
|
|
|
Join Date: Apr 2006
Location: Blacklick,
OH
Cobra Make, Engine: Superformance Daytona Coupe SPC0057 Ford 392
Posts: 60
|
|
Not Ranked
Getting back
Quote:
Originally Posted by rcweingart
Personally I don't think there is any doubt that Pete Brock's headlight covers look terrific. You can also simply remove the rubber ring around the driving lights as well. Just clean up the edge of the lens cover where the rubber seal rested on it and it looks perfect. Not that Pete's driving light covers aren't nice but you don't have to go to all the work it takes to install them and the look is exactly the same. You can also remove the rubber trim around the side scoops for a cleaner look there as well. A few things to note though, the side scoops are held on by small counter sunk screws right at the edge of the scoop flange and this is where the side scoops break away and fly off. Before I made my smoke grey scoops (to match Pete's smoke grey rear hatch), I drilled and screwed in larger pan or button head screws in the center of the factory scoop flange (I first cleaned them off and smoothed them out a bit) positioned so the the edge of the screw head covered the old counter sunk screws. The added bearing surface of the pan/button head screws and the relocated position in the center of the flange better secured the scoops with a stronger hold. The hole in the scoop should be larger than the teeth of the screw and the screws should just kiss then back off slightly so the acylic isn't stressed and thus be prone to cracking. If you are using the factory scoops, there will be a 1/8" gap give or take between the edge of the flange and the continuation of the top of the door to roof line where the rubber seal nested. You can paint the gap black to fill it in if it bothers you. I made the flange on my scoops a bit wider to fill the gap and my scoops nestle right to the window/roof body line.
|
Hi Ron, thanks for the rply on the covers and the vent windows, I am considering Pete's rear window as well, good to hear that you have vent windows to match. I like the look of Pete's rear window, just concerned about adhesive staying put.
Sorry to be away so long, lots going on.
Larry SPC0057
|
04-29-2013, 12:10 PM
|
|
CC Member
|
|
|
Join Date: Jul 2005
Location: Agoura,
CA
Cobra Make, Engine: SPC Brock/Shelby Cobra Daytona Coupe 51, Roush 427IR, also full custom 600+ HP Austin Healey and Ferrari Daytona spyder
Posts: 109
|
|
Not Ranked
Hi Larry,
I haven't heard of any negative reports about the adhesive not holding the rear hatch in place. There are a few techniques/tricks to ensure a perfect fit so that the hatch lies just right without a raised edge and constant gap all around so let me know if you are installing Peter's hatch and I'll send you what I've learned. The shape, contour and color of Peter's hatch really complements the coupe - but would you expect anything but from Peter?
Best,
Ron
|
 Posting Rules
|
You may not post new threads
You may not post replies
You may not post attachments
You may not edit your posts
HTML code is Off
|
|
|
All times are GMT -7. The time now is 04:24 PM.
Links monetized by VigLink
|


 Linear Mode


