Club Cobra Gas-N Exhaust  

Go Back   Club Cobra > Manufacturers, Engine Builders, tools, and parts. > JBL-- JBL Larry G.

Keith Craft Racing
Nevada Classics
Keith Craft Racing
Main Menu
Module Jump:
Nevada Classics
Nevada Classics
Keith Craft Racing
Advertise at CC
Banner Ad Rates
MMG Superformance
Keith Craft Racing
MMG Superformance
MMG Superformance
March 2024
S M T W T F S
          1 2
3 4 5 6 7 8 9
10 11 12 13 14 15 16
17 18 19 20 21 22 23
24 25 26 27 28 29 30
31            
  #1 (permalink)  
Old 07-12-2003, 11:40 PM
jmarsey's Avatar
Senior Club Cobra Member
Visit my Photo Gallery

 
Join Date: Mar 2001
Location: NorCal, CA
Cobra Make, Engine: A Blue Car
Posts: 949
Not Ranked     
Default Boss JBL is back in the barn

Hi Richard,

Just wanted to make it official. I picked up chassis from the paint shop and delivered it to the shop on Friday. The process has been so far to date:
1. Run car through horse pasture
2. Wreck car (April 26th)
3. Stip car to bare chassis
4. Remove 7 shear panels
5. Take chassis to frame shop and straighten
6. Chassis back to shop, prep repair areas, fabricate panels and mods
7. Weld panels and mods
8. Dress up fab work
9. Take chassis to paint shop and paint entire chassis
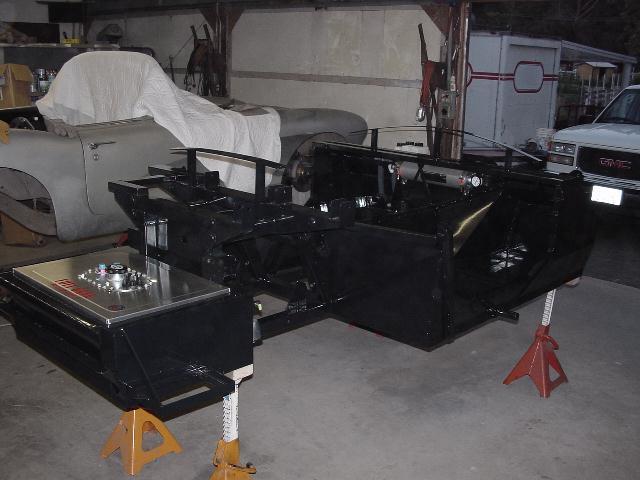
10. Bring chassis back to shop for re-assembly (July 11)
There's a lot of crap not mentioned here but this is the basic break down.

The worst was maybe 3/8" over all.


This is a 40 ton machine and they used every bit of it. Both of these guys had never worked on a frame this ridgid or precise.


Back from the frame shop. Fitting tubes and panels.


Fitting and dressing.


Sorry these are so dark. I just wanted to show the progress. I'm really very happy with how well the chassis came out. Oh, the grey had to go. I think it was bad luck on my car or something.


I'm starting to feel good about this project again. Ok, one more time.


I wanted to thank Richard & Dave at JBL, Duane, Dave Biele, Cobrajeff and Excaliber for your bits of support and encouragement. Thanks, I think the worst is over. I'll post some better pics next weekend.

John
__________________
NASA - Instructor - 2012 TTA Champion - We Drive Harder!
Reply With Quote
  #2 (permalink)  
Old 07-13-2003, 01:55 AM
decooney's Avatar
Senior Club Cobra Member
Visit my Photo Gallery

 
Join Date: Nov 1999
Location: Folsom, CA
Cobra Make, Engine: ERA 623, 427 S/C Cobra. Ford FE 428 Cobra Jet, Ford Nascar TL 4speed - with a touch of raw; "less is more" theme
Posts: 3,880
Not Ranked     
Default Hey, you're back!

Hey John,
Nice to see you're back. All involved are still here and well to talk about it (thank goodness), and able to see this car back to the future. What the heck, it was time for a chassis color change anyhow right... Much better now and it looks Grrrreat!

Hence, a new policy is created: any future unsuspecting drivers will require BOSS Cobra 101 class instruction for $100,000 by John Marsey personally. Chapter 1 includes a lecture on "The pedal to the far right on BOSS JBL Cobra is meant for horsepower, not horsepasture". AND No WingTip shoes allowed anywhere near the gas & brake pedals!

HeHeHe...we can kid just a little now. Welcome back. Nice to see John...
__________________
Duane
Western States Cobra Group 1998-2016.

Last edited by decooney; 07-13-2003 at 02:14 AM..
Reply With Quote
  #3 (permalink)  
Old 07-13-2003, 06:16 AM
cobrajeff's Avatar
Senior Club Cobra Member
Visit my Photo Gallery

 
Join Date: Dec 1999
Location: Edgewater, FL
Cobra Make, Engine: ERA FIA, BOSS 351C/Webers
Posts: 1,304
Not Ranked     
Default

John -

Glad you're back again - the chassis looks good - I think I like the black paint.

Hope you are able to get the BOSS JBL back on the road again without any more off-road excursions. (if you go off AGAIN, you might want to speak to Richard about console-mounted control levers for RIDE HEIGHT adjustment instead of roll control)

It's got to be frustrating (not to mention expensive) to do everything all over again - hope this time is for keeps. Good Luck!

regards,

Jeff
__________________
CobraJeff
ERA P 202
Reply With Quote
  #4 (permalink)  
Old 07-13-2003, 07:41 AM
Senior Club Cobra Member
Visit my Photo Gallery

 
Join Date: Jul 2002
Cobra Make, Engine:
Posts: 15,712
Not Ranked     
Default

Well looks like things are coming along nicely!

Ernie
Reply With Quote
  #5 (permalink)  
Old 07-13-2003, 09:34 AM
Richard Hudgins's Avatar
Senior Club Cobra Member
Visit my Photo Gallery

 
Join Date: Jun 1999
Location: Fallbrook, CA USA, CA
Cobra Make, Engine: Porsche 928 S4
Posts: 739
Not Ranked     
Default

Hi John,

The chassis looks very good. I am quite pleased that it was not damaged beyond repair. The black looks very good!!!!!

That chassis sure is a pain to straighten, isn't it? That is one of the drawbacks of a rigid stressed skin design, prang it and you pay the price in time and effort to get it right again. (But conversely, the initial damage in a non rigid chassis could well not be repairable in a like crash scenario.)

I bet it was a lot of fun to weld the shear panels on. The first time you do this you start wondering if you will ever finish with the stitch welds. As I am sure you found out, the stitch weld cooling process is very critical to the pre-stressing of the panels. (Dave asks if you need a job doing fab work now that you are trained?)

Also, a quick question. It appears that you have added some structure to the two rear crossmembers on the driver side. What are you planning on doing in that area? If it is a modification that you feel is needed on the chassis, please let me know and we can see about incorporating it into future chassis.

Please note: we have already added a vertical tube at the rear of the tunnel at the panel kickout to increase panel stiffness at the bend as you have done per our discussions. This is a very good addition to the strength of the chassis in mid beam loading under crash conditions..

Therefore, JBL thanks you for the R&D work, but from now on, let’s try to do these tests with computer simulations as opposed to pastures and fence posts. (It is much easier on everyone involved. Particularly the test operator.)

I do not remember if we spoke about the rod ends on the right rear. I know that you said that there was no damage to the suspension, only the wheel. But you may wish to magnaflux the inner rod ends to make sure that they did not develop any cracks in the fillet between the threads and the head.

I would also look at the rear upright very carefully. Make sure that the casting did not bend any. It is a vacuum cast part and quite ductile. (Dave has plenty of these in stock if you need to replace the unit.)

Now all the above said, when are you going to get that beast out to Sears Point?
__________________
Best regards,

Richard Hudgins
Reply With Quote
  #6 (permalink)  
Old 07-15-2003, 08:41 AM
jmarsey's Avatar
Senior Club Cobra Member
Visit my Photo Gallery

 
Join Date: Mar 2001
Location: NorCal, CA
Cobra Make, Engine: A Blue Car
Posts: 949
Not Ranked     
Default

Quote:
Originally posted by Richard Hudgins


Hi John,

The chassis looks very good. I am quite pleased that it was not damaged beyond repair. The black looks very good!!!!!

That chassis sure is a pain to straighten, isn't it? That is one of the drawbacks of a rigid stressed skin design, prang it and you pay the price in time and effort to get it right again. (But conversely, the initial damage in a non rigid chassis could well not be repairable in a like crash scenario.)

I bet it was a lot of fun to weld the shear panels on. The first time you do this you start wondering if you will ever finish with the stitch welds. As I am sure you found out, the stitch weld cooling process is very critical to the pre-stressing of the panels. (Dave asks if you need a job doing fab work now that you are trained?)

Also, a quick question. It appears that you have added some structure to the two rear crossmembers on the driver side. What are you planning on doing in that area? If it is a modification that you feel is needed on the chassis, please let me know and we can see about incorporating it into future chassis.

Please note: we have already added a vertical tube at the rear of the tunnel at the panel kickout to increase panel stiffness at the bend as you have done per our discussions. This is a very good addition to the strength of the chassis in mid beam loading under crash conditions..

Therefore, JBL thanks you for the R&D work, but from now on, let’s try to do these tests with computer simulations as opposed to pastures and fence posts. (It is much easier on everyone involved. Particularly the test operator.)

I do not remember if we spoke about the rod ends on the right rear. I know that you said that there was no damage to the suspension, only the wheel. But you may wish to magnaflux the inner rod ends to make sure that they did not develop any cracks in the fillet between the threads and the head.

I would also look at the rear upright very carefully. Make sure that the casting did not bend any. It is a vacuum cast part and quite ductile. (Dave has plenty of these in stock if you need to replace the unit.)

Now all the above said, when are you going to get that beast out to Sears Point?


Richard,

The funny thing is that the chassis did not look that bad at first. But when I took a straight edge to it I could see how bad it really was. Cutting the panels off was a total pain. As you know there's not much there with .065 wall. You're trying to carefully cut through and grind smooth a weld with out taking material off the tubing. That was the worst. Multiply by what, 100 or so?

My fabricator had the chassis on the frame machine for 2 full days. That work is tricky. It's all how you block and hold. I was such a mother-hen they finally told me to leave the shop, that I wouldn't be able to handle the sight of what they had to in order to fix the car. I was so nervous. I left and came back with my check book when done. The back cage area around the pumpkin was twisted slightly. They had the machine in the red zone trying to tweak it back. Very strong back there.

Putting the new panels on went fairly quickly. Cold weld and air. Not too bad. I think you would be very happy with the over all repair work. The panels look great, wow, just like they're suppose to.

The added structure just behind driver's side is were my roll bar will weld in. This is just for added saftey should I need to rely on this area one day. I tied the frame together, as you can see, with some box tube to beef up roll bar support.

With respect to the right-rear: I checked the rod ends which are fine. I will further check the rear upright once I get the rear all assembled. Visually it looks fine. I swept the rotor before removing and it was within .003. That was hard to believe after seeing the completely destroyed wheel.

My goal is to have car basically complete for next father's day. With a little luck. Sears has a few open track functions I can hopefully attend next year. I will take some better pics so you can see the work.

Thanks again for your support, John
__________________
NASA - Instructor - 2012 TTA Champion - We Drive Harder!
Reply With Quote
  #7 (permalink)  
Old 07-20-2003, 12:42 PM
jmarsey's Avatar
Senior Club Cobra Member
Visit my Photo Gallery

 
Join Date: Mar 2001
Location: NorCal, CA
Cobra Make, Engine: A Blue Car
Posts: 949
Not Ranked     
Default

Quote:
Originally posted by Richard Hudgins


I would also look at the rear upright very carefully. Make sure that the casting did not bend any. It is a vacuum cast part and quite ductile. (Dave has plenty of these in stock if you need to replace the unit.)

Now all the above said, when are you going to get that beast out to Sears Point?
Richard,

After checking all components I assembled the rear suspension and re-checked alignment and camber (at ride height). The driver's side alignment is right on and camber is 0.0 degrees as it was before the off-road adventure. However, the passenger side camber is 89.0 degrees or 1 degree positive. Much of the impact to this particular area was taken by the wheel, which you saw, and apparently the upright. The bearings that carry the axle actually tweaked inside the upright. All other pieces measure identical on right and left side.

I will call Dave in the morning about getting a new upright for the passenger side. Thanks for the insight, you called it.

John
__________________
NASA - Instructor - 2012 TTA Champion - We Drive Harder!
Reply With Quote
Reply
Thread Tools
Display Modes

Posting Rules
You may not post new threads
You may not post replies
You may not post attachments
You may not edit your posts

BB code is On
Smilies are On
[IMG] code is On
HTML code is Off
Trackbacks are On
Pingbacks are On
Refbacks are On


All times are GMT -7. The time now is 12:22 AM.


Powered by vBulletin® Version 3.8.0
Copyright ©2000 - 2024, Jelsoft Enterprises Ltd.
Search Engine Friendly URLs by vBSEO 3.6.0
The representations expressed are the representations and opinions of the clubcobra.com forum members and do not necessarily reflect the opinions and viewpoints of the site owners, moderators, Shelby American, any other replica manufacturer, Ford Motor Company. This website has been planned and developed by clubcobra.com and its forum members and should not be construed as being endorsed by Ford Motor Company, or Shelby American or any other manufacturer unless expressly noted by that entity. "Cobra" and the Cobra logo are registered trademarks for Ford Motor Co., Inc. clubcobra.com forum members agree not to post any copyrighted material unless the copyrighted material is owned by you. Although we do not and cannot review the messages posted and are not responsible for the content of any of these messages, we reserve the right to delete any message for any reason whatsoever. You remain solely responsible for the content of your messages, and you agree to indemnify and hold us harmless with respect to any claim based upon transmission of your message(s). Thank you for visiting clubcobra.com. For full policy documentation refer to the following link: CC Policy
Links monetized by VigLink