 
 Main Menu
|
|
Nevada Classics
|
|
Advertise at CC
|
| S |
M |
T |
W |
T |
F |
S |
| |
|
|
|
|
1 |
2 |
| 3 |
4 |
5 |
6 |
7 |
8 |
9 |
| 10 |
11 |
12 |
13 |
14 |
15 |
16 |
| 17 |
18 |
19 |
20 |
21 |
22 |
23 |
| 24 |
25 |
26 |
27 |
28 |
29 |
30 |
| 31 |
|
|
|
|
|
|
|
|
CC Advertisers
|
|
 2Likes 2Likes

03-22-2011, 09:24 AM
|
 |
CC Member

|
|
|
Join Date: Mar 2003
Location: McConnellsburg,
PA
Cobra Make, Engine: ERA FIA #2124
Posts: 687
|
|

 Not Ranked
 Home-made Side Curtains for Lemans Top How To.
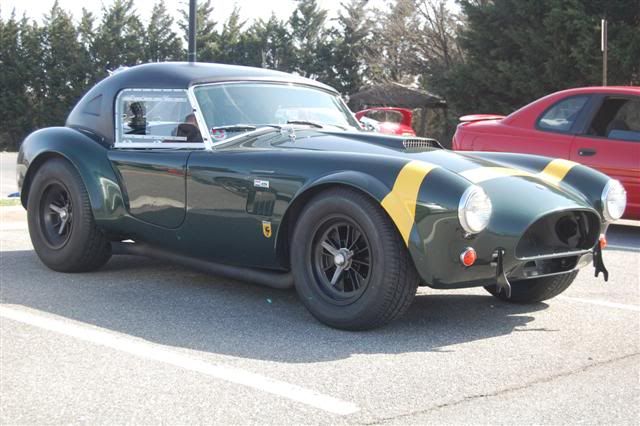
I like to drive my Cobra, and I also like to be able to take my car out of the garage in the morning and not worry if its going to rain. So to get to this happy place, I decided to take on the task of fabricating side curtains or screens as youll find me calling them that fit the side window opening profile of the LeMans Hard Top thats fitted to my car. In this little how to, Ill explain what inspired me to go the design direction I chose and provide a little step-by-step of the construction process
|
03-22-2011, 09:26 AM
|
|
CC Member
|
|
|
Join Date: Mar 2003
Location: McConnellsburg,
PA
Cobra Make, Engine: ERA FIA #2124
Posts: 687
|
|
Not Ranked
Background:
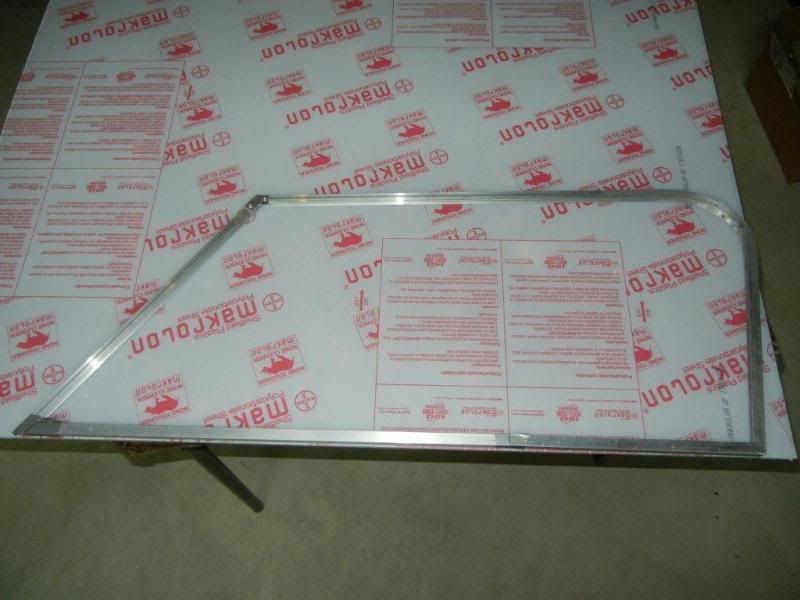
The main criteria for these side screens was that they had to be made with the tools I either owned or had easy access to. Its all pretty common stuff like saws, drills, propane torch, measuring tape, taps, riveters, and things of that nature. The second criteria was that when finished, they needed to represent a style that would not look out of place on a Cobra. Two pictures that inspired me to proceed with my intended design direction are shown here:
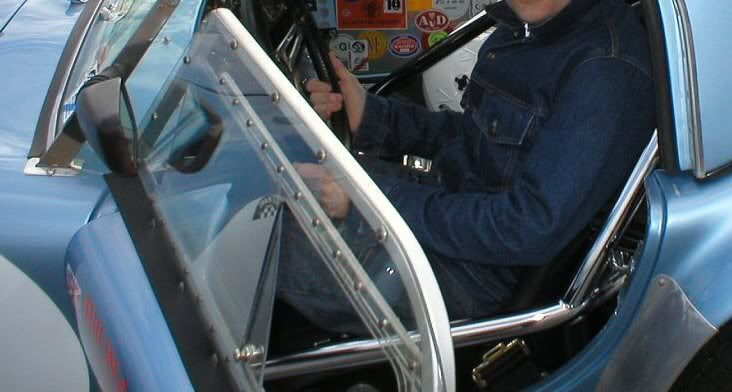

Notice that in the top photo there is a simple panel that slides in a track to allow access/ventilation, etc a la Daytona coupe. Theres no access panel in the screen shown in the second photo, but rather an Aircraft window snap vent for ventilation and some sort of extension on the interior door latch accessible through a small hole in the screen for opening the door. I chose to go the direction of the top photo. |
03-22-2011, 09:27 AM
|
|
CC Member
|
|
|
Join Date: Mar 2003
Location: McConnellsburg,
PA
Cobra Make, Engine: ERA FIA #2124
Posts: 687
|
|
Not Ranked
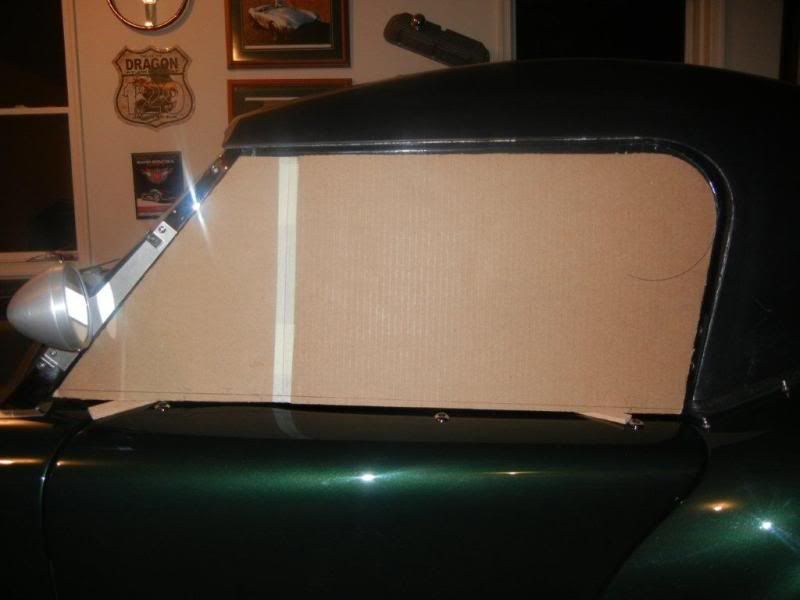
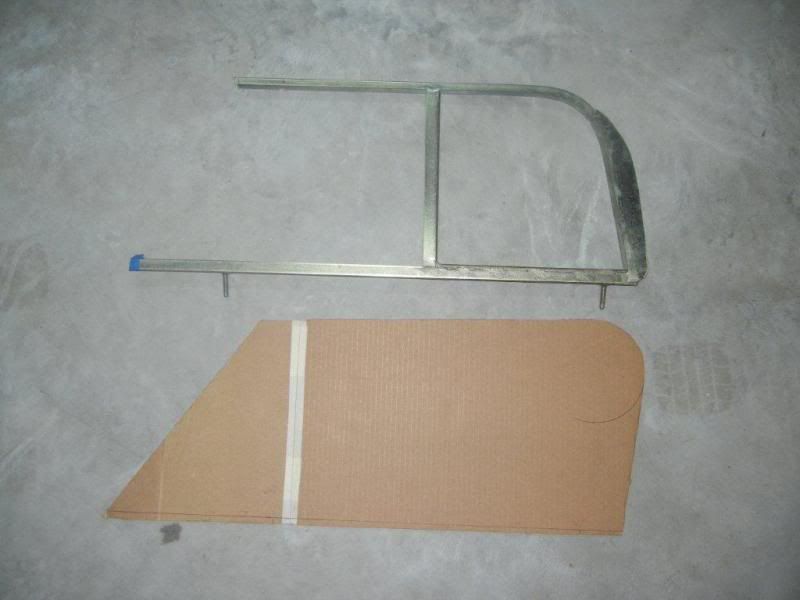
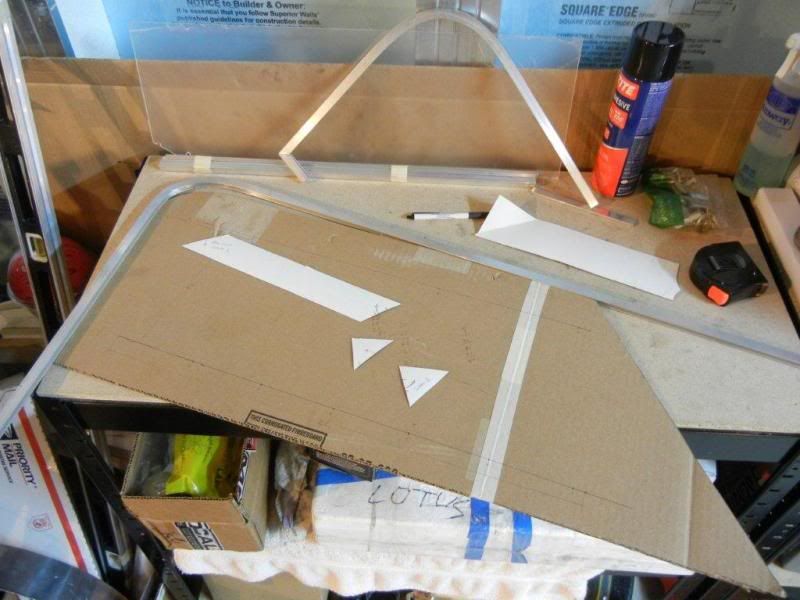
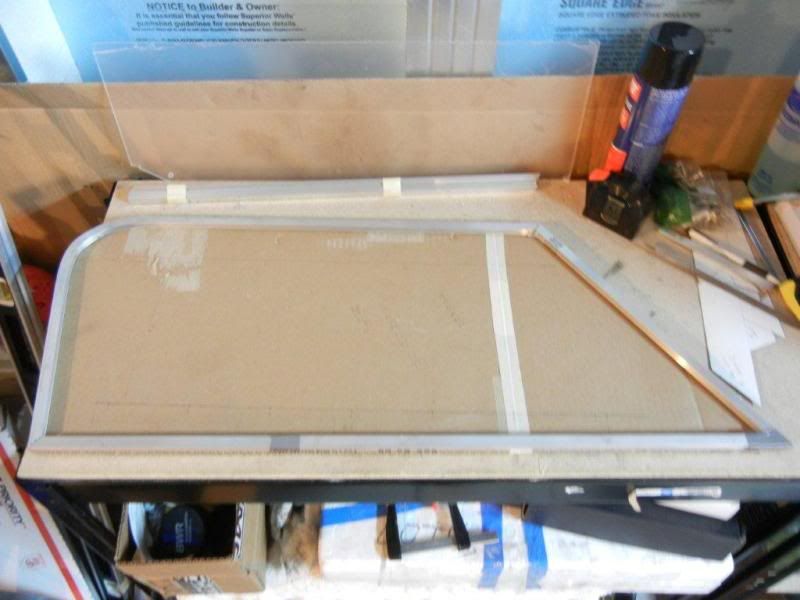
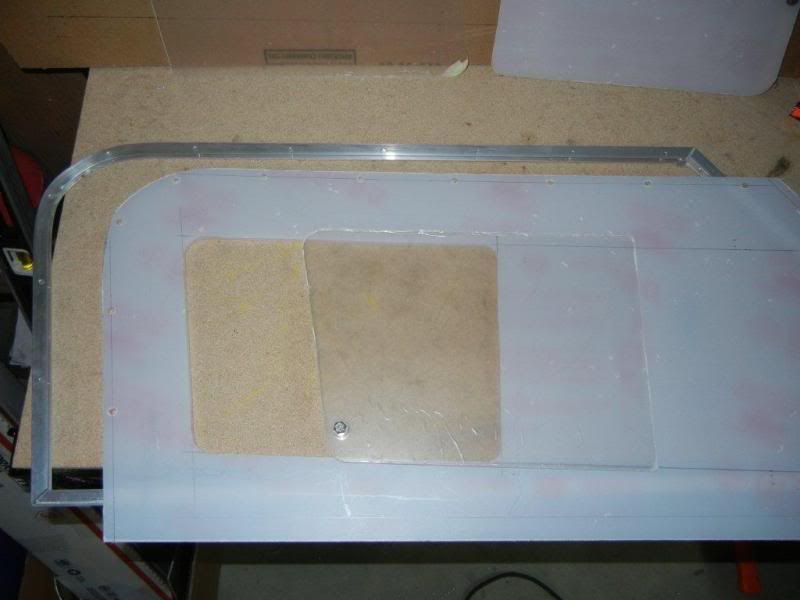
Step 1 Making the pattern.
Now you might be asking yourself why I chose to go through all the trouble of making my own screens when there are folks with soft tops using them all day long. The reason for this is that the Lemans Hard Top has a different window opening profile than the standard Cobra Soft Top does. I realized this up front, but thought I could acquire a set of screen frames from Europa Spares and afford myself a jump-start on the fabrication process. Turned out, modifying the soft top frames was more trouble than it was worth and I aborted that option. Heres a picture showing the cardboard pattern sitting in the side window opening followed by a picture of the soft top frame sitting next to it. The difference in the rear profile is pretty clear..
 |
03-22-2011, 09:29 AM
|
|
CC Member
|
|
|
Join Date: Mar 2003
Location: McConnellsburg,
PA
Cobra Make, Engine: ERA FIA #2124
Posts: 687
|
|
Not Ranked
Step 2 Materials.
The materials chosen for the construction included ¼ aluminum channel to make the boarder frame, 3/16 Polycarbonate sheet for the main window panel, thinner 0.080 sheet for the sliding window, 1/8x ½ and 1/16x ¾ stock for the sliding window tracks, some 1/16 sheet that would be bent to create the curtain base and provide a flange for the 5/16 aluminum rods to attach to which slot into the furrels located in the door. In addition to these items, I utilized some No8 and No10 machine screws, 1/8 rivets, and some assorted foam rubber seals. All this stuff can be acquired at McMaster Carr and Lowes.
|
03-22-2011, 09:31 AM
|
|
CC Member
|
|
|
Join Date: Mar 2003
Location: McConnellsburg,
PA
Cobra Make, Engine: ERA FIA #2124
Posts: 687
|
|
Not Ranked
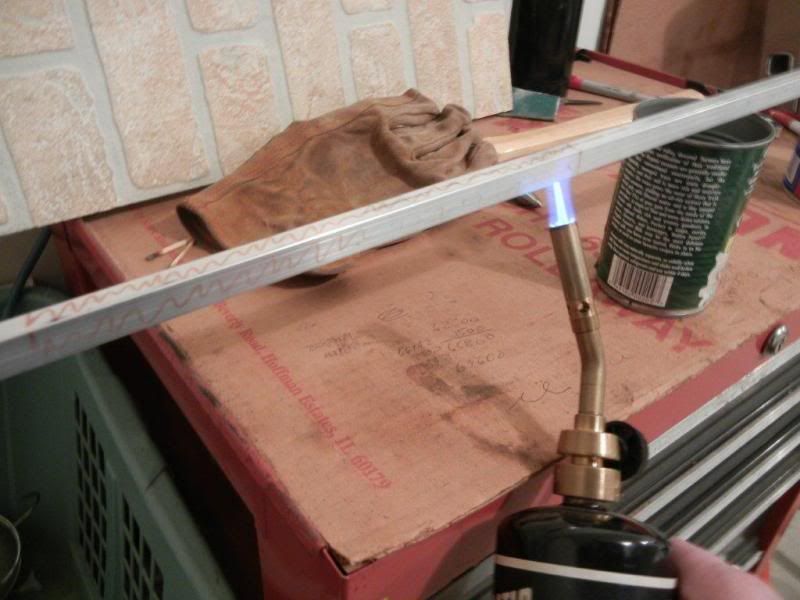
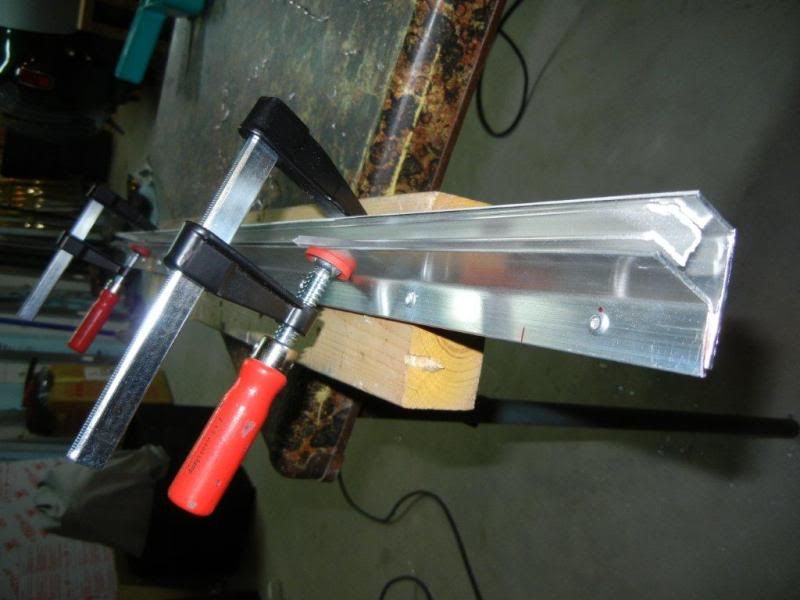
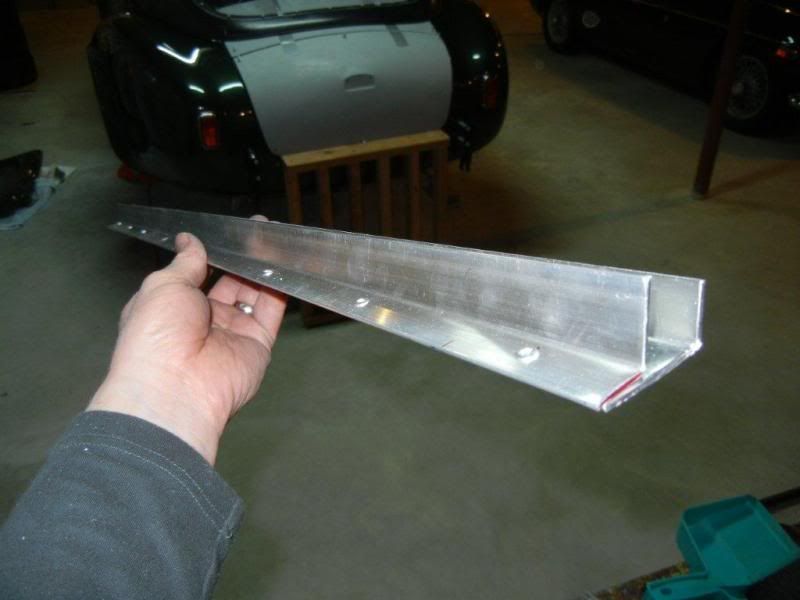
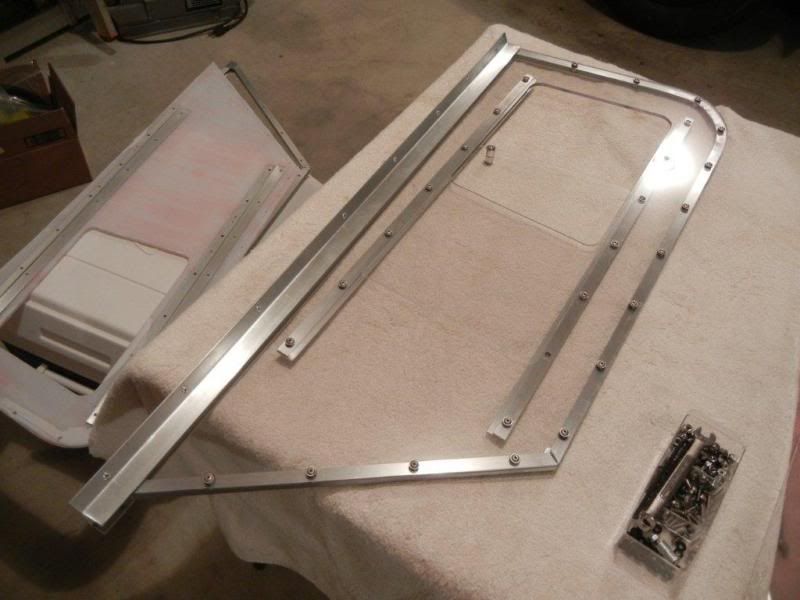
Step 3 Construction.
The thing that concerned me most about the screen design was the formed section of aluminum channel at the rear of the screens. I did a bit of google searching on this topic and found that the Locost guys have a cool way of doing it that utilizes a permanent marker (sharpie), a propane torch, and a piece of wood that slots in to the channel opening cut to the profile you wish to shape the channel to. Heres the link to the Locost builders method that I borrowed:
http://www.locostusa.com/forums/view...t=6299&start=0
Basically, using the sharpie, you put some scribbly marks on the outside of the channel in the area you want to form and heat the channel from the inside. When the marks fade and disappear, the aluminum is annealed enough to form. I took it kind of slow and ended up annealing the channel a extra time or two to minimize the wrinkling. It takes a bit of trial and error. Here are my pics of the process:
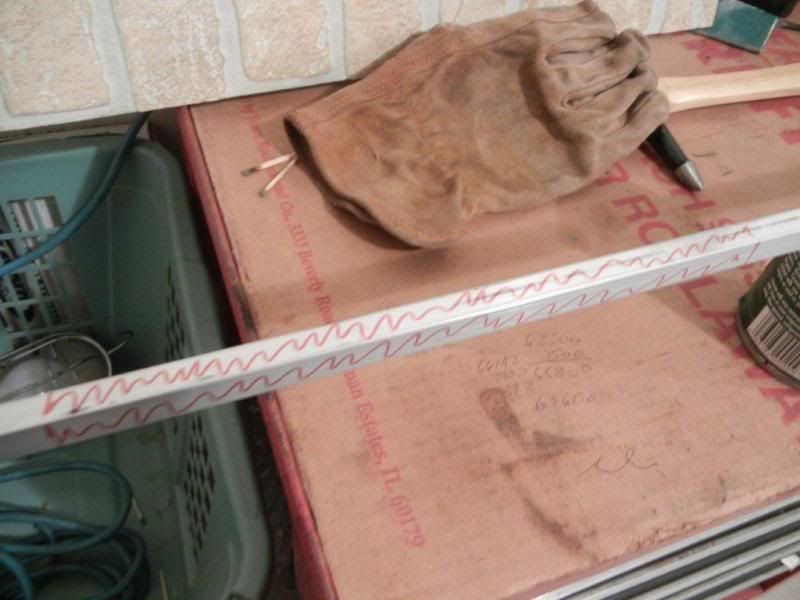
You can see the marks starting to fade here:
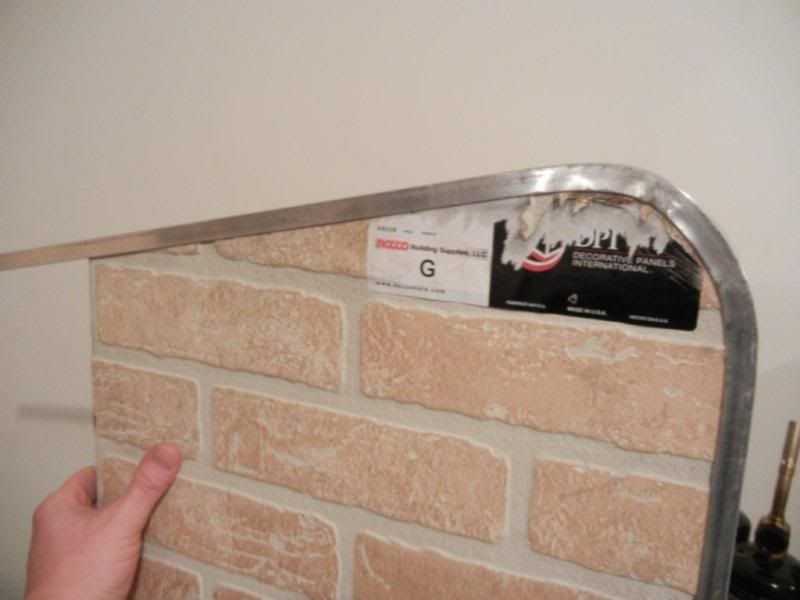
After I was satisfied with the forming of the upper rear channel radius, I set off using my cardboard pattern to guide me in making the remainder of the frame. Here you can see some of that process. To make the angle bends, I just cut out V sections in the flange of the channel and bent to the desired angles:
After finishing both LH/RH frames, I used the frames to trace a cut-line on the piece of polycarbonate. I then used a fine-tooth blade on a jigsaw to cut out the main window panel. It cut like butter.
I then measured and cut the hole for my sliding window panel as well as the sliding panel itself. I drilled holes in the frames and the main window panel for attaching the two together with No8 machine screws.
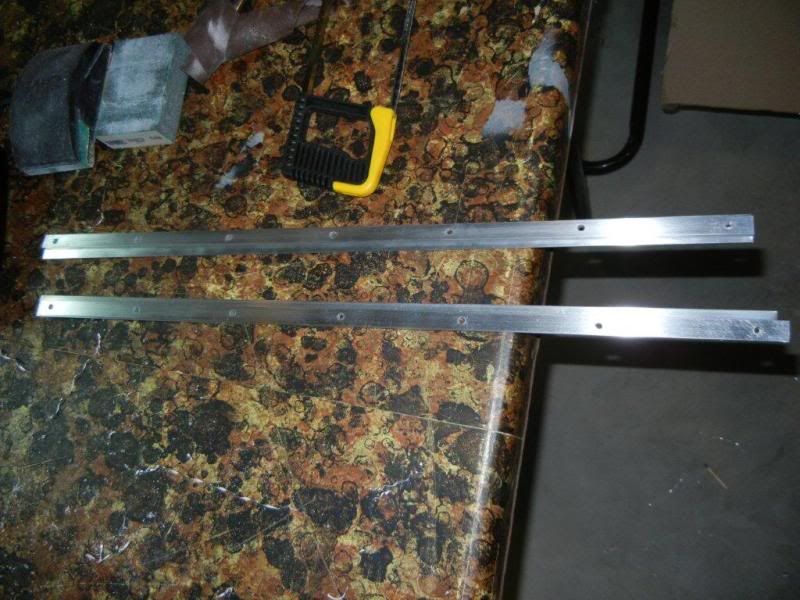
This photo shows the 1/8x ½ and 1/16x ¾ stock for the sliding window tracks. The 1/8x ½ piece gets sandwiched between the 1/16x 3/4 piece and the main window panel to create a track for the sliding panel to slide in.
This next photo shows the two pieces of 1/16 sheet that was cut and bent to form the base of the screens. This piece also provides a flange for anchoring and attaching the screens to the top of the door.

|
03-22-2011, 09:35 AM
|
|
CC Member
|
|
|
Join Date: Mar 2003
Location: McConnellsburg,
PA
Cobra Make, Engine: ERA FIA #2124
Posts: 687
|
|
Not Ranked
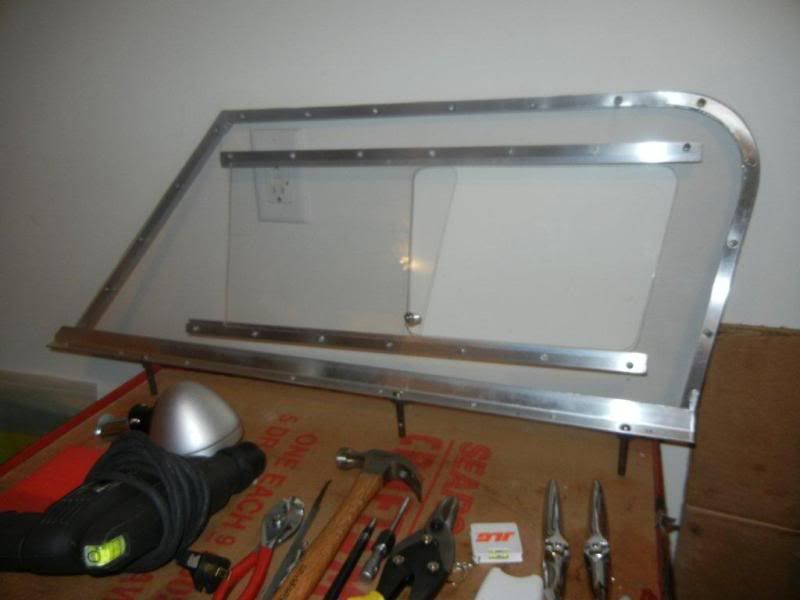
Step 4 Assembly.
|
03-22-2011, 09:36 AM
|
|
CC Member
|
|
|
Join Date: Mar 2003
Location: McConnellsburg,
PA
Cobra Make, Engine: ERA FIA #2124
Posts: 687
|
|
Not Ranked
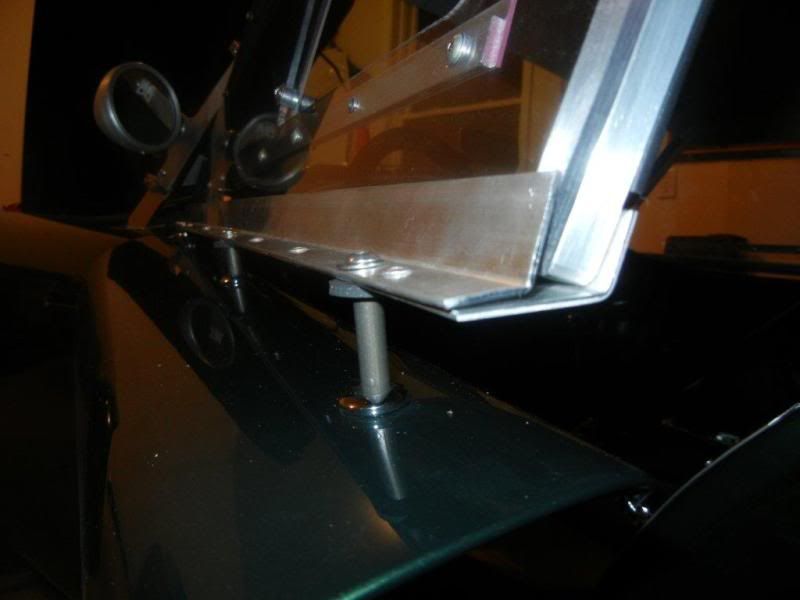
Result.
And heres what they look like fitted to the door:
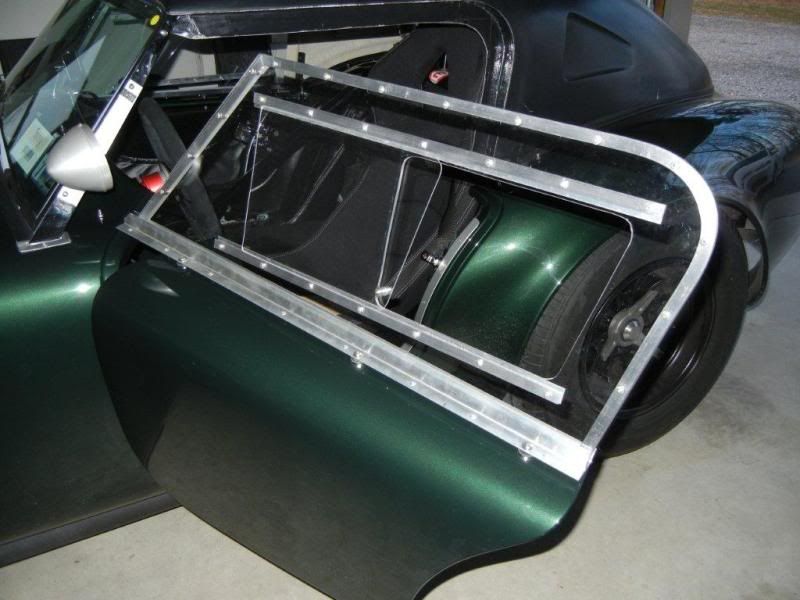

They still require the rubber seal at the bottom flange of the screen as quite a bit of air comes in from under the screen while driving, Ill update this thread with a photo once that is completed
Im very pleased with the end result:
- Allen. |
03-22-2011, 10:27 AM
|
|
CC Member
|
|
|
Join Date: Mar 1999
Location: penn.,
Posts: 2,566
|
|
Not Ranked
rocket science
|
03-22-2011, 10:58 AM
|
 |
CC Member
|
|
|
Join Date: Dec 2010
Location: San Anselmo, Ca,
Ca
Cobra Make, Engine: Unique 289 FIA, 302
Posts: 80
|
|
Not Ranked
Your car looks fantastic !!!!!
|
03-22-2011, 11:13 AM
|
|
CC Member
|
|
|
Join Date: Oct 2003
Posts: 4,078
|
|
Not Ranked
Dude,
Seriously good concept, presentation and description-both text and photo. Have you done any technical writing professionally?
__________________
Chas.
|
03-22-2011, 01:08 PM
|
|
CC Member
|
|
|
Join Date: Mar 2003
Location: McConnellsburg,
PA
Cobra Make, Engine: ERA FIA #2124
Posts: 687
|
|
Not Ranked
Technical writing....
Quote:
Originally Posted by ERA Chas

Dude,
Seriously good concept, presentation and description-both text and photo. Have you done any technical writing professionally?
|
Thanks, Chas. Never been a technical writer, but I enjoy build threads, and as I remember, PSU required me to take a Technical Writing class as part of my BSME course work. BTW, I enjoyed the help you gave me in taking photos of your side curtains. I referred to them several times as I tried to wrap my head around which way I wanted to go.
I would like to see more technical stuff on this forum and thought I would make a contribution parallel to my ownership log for #2124. I also like to make things with my hands and this was a cool project that turned out really well. I'm glad I could make the contribution and maybe it will inspire someone else to do it too and maybe make some improvements!
- Allen. |
03-22-2011, 02:17 PM
|
|
CC Member
|
|
|
Join Date: Oct 2003
Posts: 4,078
|
|
Not Ranked
Quote:
Originally Posted by Fullchat289
Thanks, Chas. Never been a technical writer, but I enjoy build threads, and as I remember, PSU required me to take a Technical Writing class as part of my BSME course work. BTW, I enjoyed the help you gave me in taking photos of your side curtains. I referred to them several times as I tried to wrap my head around which way I wanted to go. Can't take credit for that Allen-you're thinking of someone else. I killed you about the ride-height. I don't have Mary stuff like top or curtains...:
I would like to see more technical stuff on this forum and thought I would make a contribution parallel to my ownership log for #2124. Me too X 1000. I also like to make things with my hands and this was a cool project that turned out really well. I'm glad I could make the contribution and maybe it will inspire someone else to do it too and maybe make some improvements!
- Allen. |
Hands-on guys appreciate you efforts-keep 'em coming.
__________________
Chas.
|
03-22-2011, 03:01 PM
|
 |
CC Member
|
|
|
Join Date: Oct 2007
Location: Near Emerald,
Qld
Cobra Make, Engine: Evans kit, 6 litre, 6 speed, Jag F/R,
Posts: 366
|
|
Not Ranked
Very clever and very informative.
Puts some ideas in my head now.
Great stuff, Thankyou.
__________________
Missed my Cobra budget by thaaaat much.
Ya get that on big jobs.
|
03-22-2011, 03:46 PM
|
|
CC Member
|
|
|
Join Date: Nov 2003
Location: New Britain,
CT
Cobra Make, Engine: Size 10 Feet
Posts: 3,031
|
|
Not Ranked
Very nice. The main thing that I would have done differently is to substitute clear plexi for the aluminum channels for the sliding window. The channels could be made by machining a thicker piece into an "L" shape (with a very deep lower part) or gluing two pieces of plexi together. You just have to be very careful masking when you glue the channel onto the main window.
|
03-22-2011, 04:04 PM
|
 |
Stolen Avitar
|
|
|
Join Date: Oct 2004
Location: Brunswick,
GA
Cobra Make, Engine: BDR 1311 428PI
Posts: 3,044
|
|
Not Ranked
Great post and result man!
Steve
|
03-22-2011, 07:18 PM
|
|
Senior Club Cobra Member
|
|
|
Join Date: Dec 2007
Cobra Make, Engine: ERA FIA 'Street' Build
Posts: 2,129
|
|
Not Ranked
Allen,
Like the guys said, very well presented.
The step by step detail, photos and reasoning behind the fabrication is first rate. Something that a lot of folks could attempt with a very good likely hood of success, especially for those with more hands on experience.
It's easy to see that you have an engineering background and very cool to be able to fabricate some neat parts for your car.
What's next ? 
- Tim |
03-23-2011, 07:21 AM
|
|
CC Member
|
|
|
Join Date: Mar 2003
Location: McConnellsburg,
PA
Cobra Make, Engine: ERA FIA #2124
Posts: 687
|
|
Not Ranked
Chas:
You are right. It hit me on the ride home last night that you weren't the one who took pictures of the sidescreens for me. It was Patrick!!! 5 x 10^23 appologies for the mix-up. (Thanks again, Patrick!!)
Quote:
Originally Posted by strictlypersonl
Very nice. The main thing that I would have done differently is to substitute clear plexi for the aluminum channels for the sliding window. The channels could be made by machining a thicker piece into an "L" shape (with a very deep lower part) or gluing two pieces of plexi together. You just have to be very careful masking when you glue the channel onto the main window.
|
Bob: excellent suggestion. I'm pretty sure I could get the pieces from TAP Plastics and give it a shot. I like to be able to take stuff apart, so I would likely just get stock in the same sizes I did in aluminum and glue the two pieces together to create the "track" and still use the No8 hdwr to bolt them to the main window panel. I just may do that in my efforts to refine the screens..
Tim: What's next? Keep your eyes on my Ownership Log..... I know you are!
Everyone else: Thanks so much for the positive comments!
- Allen.
|
03-23-2011, 07:40 AM
|
|
CC Member
|
|
|
Join Date: Oct 2003
Posts: 4,078
|
|
Not Ranked
Quote:
Originally Posted by Fullchat289
Chas:
You are right. It hit me on the ride home last night that you weren't the one who took pictures of the sidescreens for me. It was Patrick!!! 5 x 10^23 appologies for the mix-up. (Thanks again, Patrick!!)
|
Oh great-now I've been confused with the Village Idiot... 
__________________
Chas.
|
03-28-2011, 05:36 PM
|
 |
Senior Club Cobra Member
|
|
|
Join Date: Mar 2005
Location: Manchester,
NH
Cobra Make, Engine: AK1085 (302 Street), HTM111 (427 Comp), CSX2375R (289 Comp) and COB5999 (427 S/C)
Posts: 19,111
|
|
Not Ranked
Great stuff, very informative and perfect for this forum. If I ever add a top to mine this will be usefull. Thanks for the post!
 |
04-25-2011, 06:45 AM
|
 |
CC Member
|
|
|
Join Date: Jan 2002
Location: Melbourne, Australia,
VIC
Cobra Make, Engine: AP Pace427 (AP4033) GM L77 6.0L TR6060
Posts: 838
|
|
Not Ranked
Great work Allen! Like the others said, this will be a definite reference point when I get to that stage of my build!
Have you taken her out with these windows yet? How is the wind noise? Do you get any/much whistle?
And have you tried them in the wet? I am interested to know how much water gets through behind the sliding panel? (In any case, less than having NO windows - I imagine!).
__________________
Guy
Cobra Progress guye-cobra.blogspot.com
|
 Posting Rules
|
You may not post new threads
You may not post replies
You may not post attachments
You may not edit your posts
HTML code is On
|
|
|
All times are GMT -7. The time now is 05:46 PM.
Links monetized by VigLink
|


 Linear Mode


