Bellhousing and block alignment from time to time become a hot topic and then disappear only to resurface at some future date. There is a fair amount of confusion about why it is necessary and how best to do it. Here is a bit more information on the Why and How sorts of questions.
The reasons for aligning the Bellhousing transmission register bore and the crank bore have been represented as better shifting, more repeatable clutch engagement and probably a number of other lesser benefits. The really important reason for the alignment effort however is the meshing of the teeth on the input shaft and the front most gear on the counter shaft.
With the exception of 4th gear, and reverse all the engine torque is always transmitted through the input shaft gear and the first gear on the countershaft. The alignment of the input shaft gear and the countershaft gear is critical in high torque applications for durability and silence. In lower powered applications it is primarily silence although service life in fact is shortened with misalignment.
Ideally you want the centerline of the intake shaft to be colinear with the centerline of the countershaft. To the extent they are not you get less than full tooth contact between the two gears and reduced torque capacity before breaking gear teeth.
So how much angular displacement can the transmission tolerate before damage begins to set in? Most of the time you will get a recommendation of 0.005 total indicator run out as the target you are shooting for. To help put this into angular terms a 1˚ misalignment will amount to 0.017 of an inch per inch of length.
When we talk about TKO transmissions Tremec lists the input shaft length at 7.21 inches. That means a 1˚ misalignment over the 7.21 inch length of the input shaft would be 0.017 inches x 7.21 inches or 0.123 inches! Remember the target misalignment was 0.005 inches. A 0.005 inch misalignment over 7.21 inches amounts to 0.041˚ of misalignment. That is 41 thousandths of 1 degree! The reason for the precise alignment requirement again is the meshing of the gear teeth.
For discussion if we assume the transmission register in the bell housing was machined low then the pilot bearing would pull the nose of the input shaft upwards and mash the backside of the input shaft gear teeth into the back of the countershaft gear teeth unloading the front of both gears and overloading the back of both gears.
This will cause the input shaft to shear the teeth at the back of the shaft off killing itself and the countershaft. The front most portion of the gears teeth will fail if the transmission register was bored too high on the bell housing forcing the input shaft nose downward.
As luck would have it the transmission registers are never bored just too high or too low. They are also offset left and or right of center so you can quickly see how the alignment difficulty can go skyward especially if you use the frequently recommended offset dowels.
The best way to perform this alignment job is with the empty block on a bench or shop cart with only the crank installed. The first thing you want to do is drill out the dowel pin holes in the bell housing. I like to go 1/16 inch oversize which will give me a 1/32 of an inch movement about the hole center. Here is a picture of my bellhousing as I drill out the Lakewood dowel pin registers;
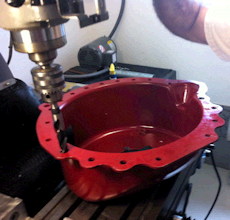
No real rocket science required here, just a drill press, a clamp to hold the can down and a drill. Zip, zip and you are done.
Next thing I do is mount the can to the block and lightly snug down the attaching bolts so that I can still move the housing around on the back of the block. This is what it looks like;
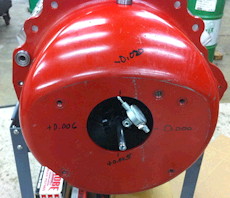
I use a magnetic stand to mount a dial indicator to the crank flange. If you want to simplify the deal order a long stud from McMaster turn one end of it down to fit your dial indicator clamping gizmo and slip your dial indicator gizmo onto the machined stud.
I like to measure the runout at 12, 3, 6 and 9 oclock. I write it on the can as I measure it. The next step is to make up a bushing for the new dowel pin register. I used a piece of 1040 mild steel bar stock. I like it because it machines and welds nicely. Ill drill a hole 1/32 smaller that the dowel pin and use a reamer to ream it to size. Then Ill cut off what amounts to two dounuts and check them on the dowel pins for fit.
This is a close up of the steel donuts;
The next step requires extreme care and a high precision instrument. My personal preference is a short handled 5 lb sledge hammer.
Where I show a positive measurement I will tap the can with the hammer to move it closer to center. After each tap I rotate the crank to check where I am before going any further. This stage of the adjustment takes a long time. I will sometimes spend as much as 5 minutes before I have centered the can. I typically get the misalignment down to somewhere between 0.000 and 0.001 inches.
Once centered I snug up the bolts that hold the can to the block and check alignment one more time to be sure nothing has moved. If it is still good to go, I slip the steel donuts on the dowels and weld them in place. When everything cools a bit I check the alignment one more time. If it is good (which it always has been), I am done.
As you can see this is a very time consuming and tedious process. Sometimes I will spend the better part of an hour drilling the can, making the donuts, zeroing the can and welding the donuts to the can before the job is complete. Your mileage may vary.


 13Likes


 Hybrid Mode


