 
 Main Menu
|
|
Nevada Classics
|
|
Advertise at CC
|
| S |
M |
T |
W |
T |
F |
S |
| 1 |
2 |
3 |
4 |
5 |
6 |
7 |
| 8 |
9 |
10 |
11 |
12 |
13 |
14 |
| 15 |
16 |
17 |
18 |
19 |
20 |
21 |
| 22 |
23 |
24 |
25 |
26 |
27 |
28 |
| 29 |
30 |
31 |
|
|
|
|
|
|
CC Advertisers
|
|
 16Likes 16Likes

06-19-2023, 06:02 PM
|
 |
CC Member

|
|
|
Join Date: Jul 2013
Location: South Bend,
In
Cobra Make, Engine: B & B 289
Posts: 201
|
|

 Not Ranked
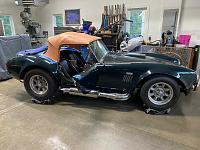
 And another hardtop project.
Picked up the Butler hardtop a whole back that was for sale on here, and have finally gotten around to installing it. My car is a B&B and it is amazing how well the top fits. Had to tilt the windshield back a bit (Hey!! it's a B&B huh?) but the area in back fits nearly perfect and the sides will only take a bit of tweaking. I will need to machine up some pieces to fit into the soft top ferrules and will install some stainless steel over center clamps entering into the bottom of the ferrules to hold the rear of the top down. In front, the top came with come formed sheet metal pieces similar to the ones that attach a soft top. Think that I will use these and make a couple of stainless steel angle brackets to bolt to the top of them and epoxy to the underside of the hard top in the front. Question that I have for those of you versed in fiberglass work is: What kind of resin should I use? Haven't done any of this kind of work in about 30 years and have no idea what is on the market nowadays.
Thanx in advance and more pics coming.
   |
06-20-2023, 02:06 PM
|
|
CC Member
|
|
|
Join Date: Jul 2013
Location: South Bend,
In
Cobra Make, Engine: B & B 289
Posts: 201
|
|
Not Ranked
Clamps for the rear
Just got these in and bent up to fit. They are going to work extremely well. The swingy thingy will enter the bottom of the ferrule for the top and clamp perfectly. All stainless, made in the USA and with standard threads. Making the aluminum blocks to epoxy to the hardtop now.   |
06-20-2023, 05:56 PM
|
|
CC Member
|
|
|
Join Date: Jul 2013
Location: South Bend,
In
Cobra Make, Engine: B & B 289
Posts: 201
|
|
Not Ranked
First job off the new lathe.
|
06-24-2023, 03:53 PM
|
|
CC Member
|
|
|
Join Date: Jul 2013
Location: South Bend,
In
Cobra Make, Engine: B & B 289
Posts: 201
|
|
Not Ranked
Little more progress today, rear clamp assemblies.
Last edited by indianamoon; 06-24-2023 at 03:56 PM..
|
07-05-2023, 05:38 PM
|
|
CC Member
|
|
|
Join Date: Jul 2013
Location: South Bend,
In
Cobra Make, Engine: B & B 289
Posts: 201
|
|
Not Ranked
Stainless hardware
Well, all of the hardware for this project is going to be stainless, and the order showed up today. 
For those of you looking for a decent source for stainless: 
And they send you at no charge, one of these very cool gages for imperial and metric screws, bolts, nuts, etc.  |
07-05-2023, 05:51 PM
|
|
CC Member
|
|
|
Join Date: Jul 2013
Location: South Bend,
In
Cobra Make, Engine: B & B 289
Posts: 201
|
|
Not Ranked
Unused stainless steel clamps for sale. Or trade
|
07-05-2023, 05:58 PM
|
|
CC Member
|
|
|
Join Date: Jul 2013
Location: South Bend,
In
Cobra Make, Engine: B & B 289
Posts: 201
|
|
Not Ranked
Front windshield fitting, clamps, and glue thingie ready to go on.
|
07-09-2023, 04:26 PM
|
|
CC Member
|
|
|
Join Date: Jul 2013
Location: South Bend,
In
Cobra Make, Engine: B & B 289
Posts: 201
|
|
Not Ranked
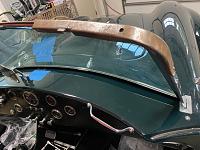
Front fittings glued and glassed in
Mixed up a bit of epoxy, and with the front mounts securely in place with the clamps clamped, glued the formed stainless angle iron pieces to each side of the top. When that was cured, took it all apart and added a layer of glass cloth to both sides of the stainless angles. Looks like a lot of epoxy to me, but just to be safe, I drilled and installed two button head stainless screws on each side also.   |
07-09-2023, 04:44 PM
|
|
CC Member
|
|
|
Join Date: Jul 2013
Location: South Bend,
In
Cobra Make, Engine: B & B 289
Posts: 201
|
|
Not Ranked
Time to fit the back of the top to the body
Alright, can't put this off any longer. The fit all across the back is as near perfect as I could hope for.  Fit on the passenger side is good enough to seal with the bulb seal.  However, (and I knew this) the fit on the driver side was just terrible, with a gap of at least 3/4 inch in places. Time to bend the fiberglass. Found a 4x4 and cut it to the contour of the bottom of the top as was.  
Then scribed and did a matching angle cut to fit the pieces inside and outside the top at the flange. 
Probably spent an hour with the belt sander getting the fit just about exact and then clamped everything up. Cut some small wedges to insert under the lip and started heating the lip of the top to about 375 degrees F. Worked it up and inserted the wedges, heated some more, wedges in further, until I had moved it about 3/4 inch where it needed to be.


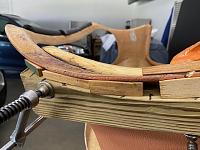 Left it sit overnight and next morning the fit to the body was, while not perfect, certainly good enough for the seal to work properly
Last edited by indianamoon; 07-09-2023 at 04:57 PM..
|
07-09-2023, 04:54 PM
|
|
CC Member
|
|
|
Join Date: Jul 2013
Location: South Bend,
In
Cobra Make, Engine: B & B 289
Posts: 201
|
|
Not Ranked
Rear mounts epoxied and glassed in
Got the rear mounts in today. Marked the top for location with everything in place, took it all off (for about the leventeenth time) glued the mounts in, and when that was cured, added a layer of glass cloth on each side of each block. With all the epoxy and the holes I drilled in the blocks, I am pretty certain that they will be going nowhere. 
Now it is on to forming the rear window.
Last edited by indianamoon; 07-09-2023 at 04:58 PM..
|
07-09-2023, 11:05 PM
|
|
CC Member
|
|
|
Join Date: Jul 2003
Cobra Make, Engine: Unique Motorcars 289 USRRC, 1964 289 stroked to 331, toploader
Posts: 1,135
|
|
Not Ranked
 Wow!
Wow!
That is impressive effort!
__________________
Paul
Unique Motorcars 289 USRRC
1964 289 5-bolt block
Toploader and 3.31 rear
|
07-13-2023, 06:43 AM
|
|
CC Member
|
|
|
Join Date: Jul 2013
Location: South Bend,
In
Cobra Make, Engine: B & B 289
Posts: 201
|
|
Not Ranked
Unexpected benefits
Discovered that I can pin the rear mount over center clamps in the up position, keeping them off the bodywork when installing the top
 |
07-17-2023, 12:13 PM
|
|
CC Member
|
|
|
Join Date: Jul 2013
Location: South Bend,
In
Cobra Make, Engine: B & B 289
Posts: 201
|
|
Not Ranked
PITA solution
Still moving forward with the installation. As I mentioned earlier, I had to pull the top of the windshield back about 2 inches. That necessitated moving that miserable little angle bracket on top of the dash. You know, the one with hardware that is so difficult to turn that you invent previously unheard swear word phrases to describe. Well, I was out of words, so ordered some teeny tiny stainless steel hex head machine screws to go into the bottom of the windshield frame. And some stainless phillips pan head sheet metal screws to go vertical into the top of the cowl. Knowing how hard it is to tighten these without a hole thru the windshield, I set them up in the mill and cut a hex on the head. Smiled all the way thru the installation 😃. I have more if anyone else needs their mood improved.   |
07-19-2023, 01:51 PM
|
|
CC Member
|
|
|
Join Date: Apr 2008
Location: Near Chichester, Sussex by the sea......,
UK
Cobra Make, Engine: Crendon 427 S/C 428 FE+toploader
Posts: 668
|
|
Not Ranked
Interesting thread, and great work.
I bought a 289-style hardtop a few years ago. To fit the 427-style body, the roll bar and its rear leg, had to be cut into 4 pieces, new rear skirt to fit the 427 bodyshape and glassed back together. Prepped and painted it with 2k paint. Just finishing off the fixings, and will need to fix a few paint issues you can see here:
https://www.youtube.com/shorts/0B_9zDOgmKk
Heard these hardtop are notorious for leaking at the middle of the windscreen. To address this I bought a pair of standard soft top hood bows, pinged off the locator pins, and then cut a piece of curved channel to fill the gap between the 2 bows. I used polyurethane sealant/adhesive to fix these pieces together and to bond the hardtop to the bows. Some grp ribbon still to be added along the top to make sure it doesn't blow off t high speed.
If anyone's interested I can post some more, or start a new thread.
Last edited by KevinW; 07-19-2023 at 02:32 PM..
|
07-20-2023, 05:44 AM
|
|
CC Member
|
|
|
Join Date: Jul 2013
Location: South Bend,
In
Cobra Make, Engine: B & B 289
Posts: 201
|
|
Not Ranked
Please post more, or a new thread. I would like to know more about sealing the front. I also have soft top front pieces incorporated in my installation. However, the front edge of the top doesn’t mate well with the top of the windshield. Difference shapes and with the textured outer face of the top, I decided to leave it as is. Picked up some different bulb trim for the front edge and will see how that works.
|
07-20-2023, 07:02 AM
|
 |
CC Member
|
|
|
Join Date: May 2009
Location: Copperhill,
TN
Cobra Make, Engine: Factory Five Racing, 306, E cam
Posts: 178
|
|
Not Ranked
My hardtop experience is covered here.
Hardtop Project
For the front seal at the top of the windscreen, I'm using a 1/8 inch thick adhesive rubber seal that I found on Amazon. I haven't road tested it, but while fitting the top the imprint of the windscreen frame was pretty even all the way across, so I'm hopeful that it will seal pretty well.
Edit: Here's the seal
https://www.amazon.com/Neoprene-Weat..._rp_0_8_t&th=1
Last edited by john4337; 07-20-2023 at 10:42 AM..
|
07-21-2023, 07:32 AM
|
|
CC Member
|
|
|
Join Date: Apr 2008
Location: Near Chichester, Sussex by the sea......,
UK
Cobra Make, Engine: Crendon 427 S/C 428 FE+toploader
Posts: 668
|
|
Not Ranked
Quote:
Originally Posted by indianamoon

Please post more, or a new thread. I would like to know more about sealing the front. I also have soft top front pieces incorporated in my installation. However, the front edge of the top doesnt mate well with the top of the windshield. Difference shapes and with the textured outer face of the top, I decided to leave it as is. Picked up some different bulb trim for the front edge and will see how that works.
|
Thanks, will start a new thread when I get a bit more time work-wise.
Don't want to dog-leg the OPs great thread! |
07-21-2023, 04:38 PM
|
|
CC Member
|
|
|
Join Date: Jul 2013
Location: South Bend,
In
Cobra Make, Engine: B & B 289
Posts: 201
|
|
Not Ranked
And now the really dreaded part......
|
08-02-2023, 05:02 AM
|
|
CC Member
|
|
|
Join Date: Apr 2008
Location: Near Chichester, Sussex by the sea......,
UK
Cobra Make, Engine: Crendon 427 S/C 428 FE+toploader
Posts: 668
|
|
Not Ranked
I'm impressed. Interesting to hear how you applied heat. Blow torch?
|
08-02-2023, 03:50 PM
|
|
CC Member
|
|
|
Join Date: Jul 2013
Location: South Bend,
In
Cobra Make, Engine: B & B 289
Posts: 201
|
|
Not Ranked
Industrial heat gun and took the temperature regularly.
|
 Posting Rules
|
You may not post new threads
You may not post replies
You may not post attachments
You may not edit your posts
HTML code is Off
|
|
|
All times are GMT -7. The time now is 06:17 PM.
Links monetized by VigLink
|


 Linear Mode


