Tips on Picture Uploads and Image Sizes
Many newcomers, and some old-timers, have a common problem here on Club Cobra...that is, taking the pictures from a digital camera and either including them in a post (attached image) or placing them in their Gallery (uploaded image).
Today's multi-megapixel digital cameras often default to a very hi-res image, and taking that image file and attempting to directly use it in a post results in errors about a
"file too large".
First, here are the guidelines.
For attaching images directly to a post, we have set some tight filesize constraints. This is because we want our users to have a speedy load time when browsing threads.
If we allowed massive images to be made part of posts, you would have an interesting wait as you changed pages.
As such...we limit the file size of attached images to
39K. Ideal picture size for attachments is
640 x 480.
The Gallery allows for larger, more hi-res images to be uploaded. The ideal picture size for Gallery uploads is
800 x 600, or 1024 x 768 if you have a really detailed picture.
Although the Gallery is more tolerent for file sizes,
80k - 140k is a good upper limit to try and achieve. You can go much larger, but that will quickly consume your Gallery space quota, and often is unnecessary, as the higher resolution may be of no advantage to a displayed picture.
You can go upwards to 1 megabyte in file size if necessary.
Many users have difficulty converting the large, raw image files that come directly from a camera or scanner.
Usually, all cameras and scanners come with some image-editing software. What you want to do, in order to process that raw image, is to:
- convert to a JPEG (if the raw file is a BMP)
- resize the image to 640x480 or 800x600 where appropriate.
Unfortunately, many of these programs get complicated and are difficult to master.
As an alternative, here is a little tool that Microsoft has available for
Windows XP that will let you instantly resize a picture in a very simple fashion.
Microsoft has a drawer full of little utilities that never made it into the formal releases of Windows.
They call this collection
Power Toys and they are available for personal use, without guarantee from Microsoft.
One of them is an
Image Resizer for Windows XP. It is a handy little tool for those folks who want to take pictures from their digital camera and send them via e-mail or post them on a website...but don't have a Photo Editing program...or can't figure theirs out.
Most images today from digital cameras are far too big for web use.
The Image Resizer, when installed, enables you to resize one or many image files with a right-click.
First, download the file from this URL, and save on your desktop.
http://download.microsoft.com/downlo...ertoySetup.exe
When you have downloaded the file, close all programs and locate the file,
ImageResizerPowertoySetup.exe, on your desktop.
Double-click to launch the installer and follow the instructions, taking the default choice on each page.
When the installation completes, you are done. You can delete the file you downloaded from your desktop.
This little program modifies the right-click context menu such that, when you point to any standard image file, you will now see a choice in the menu called "Resize Pictures."
Try it...
Find an image file on your computer (.jpg or .bmp), point to the icon of the file and right-click.
Choose Resize picture, and you will see the following:
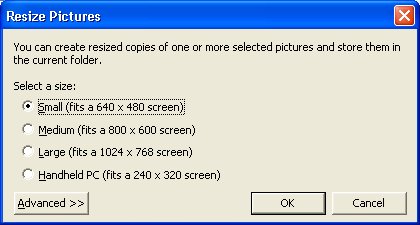
Choose a new picture size and click OK. The program will create
ANOTHER image file in the same location with the same name, but with the 'size' term added to its file name. (e.g., "small", "medium", etc.)
For posting on the forum... the
Small size is appropriate for Attachments, while the
Medium or
Large is correct for Gallery uploads.
You can customize the tool with the Advanced Button. When the Resize Picture window is displayed, hit Advanced and you will see:
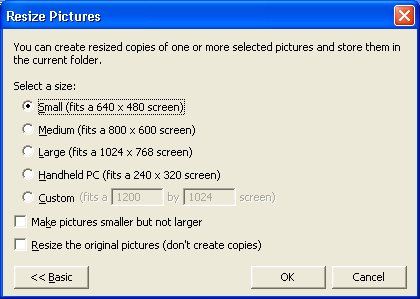
This lets you pick a custom size.
It also lets you configure the program to
MODIFY the original image, and not create a duplicate with the new size...NOT recommended unless you are sure you want to destroy the original image.
Have fun.... this should help new camera owners prep their pictures in a more standardized fashion.
Ron
ClubCobra Moderator