 
 Main Menu
|
|
Nevada Classics
|
|
Advertise at CC
|
| S |
M |
T |
W |
T |
F |
S |
| |
|
|
|
|
1 |
2 |
| 3 |
4 |
5 |
6 |
7 |
8 |
9 |
| 10 |
11 |
12 |
13 |
14 |
15 |
16 |
| 17 |
18 |
19 |
20 |
21 |
22 |
23 |
| 24 |
25 |
26 |
27 |
28 |
29 |
30 |
| 31 |
|
|
|
|
|
|
|
|
CC Advertisers
|
|

10-12-2012, 05:43 AM
|
 |
CC Member

|
|
|
Join Date: May 2011
Location: Orlando,
FL
Cobra Make, Engine: ERA154 427 HR
Posts: 206
|
|

 Not Ranked
 Dashboard Covering
I am getting ready to recover my dashboard in leather (2.6 oz, 1-1.2mm thick), and have a few questions for discussion:
1. Do I cover it in 2 steps, the flat parts first, let it dry, then work the curves (glovebox, steering opening, end curves)? Or do I try to do it all in 1 session?
2. What method works best for forming the leather to the curves? Heat? wetforming? I am a little lost here. Mainly for the glovebox lip.
3. I have searched a few threads for the best glue (contact), but are there any better options, or stick with a quality contact cement (and the impending high)?
Thanks,
Jim
|
10-12-2012, 06:10 AM
|
 |
CC Member
|
|
|
Join Date: Oct 2004
Cobra Make, Engine: CSX2321
Posts: 1,368
|
|
Not Ranked
Quote:
Originally Posted by flaflier

I am getting ready to recover my dashboard in leather (2.6 oz, 1-1.2mm thick), and have a few questions for discussion:
1. Do I cover it in 2 steps, the flat parts first, let it dry, then work the curves (glovebox, steering opening, end curves)? Or do I try to do it all in 1 session?
2. What method works best for forming the leather to the curves? Heat? wetforming? I am a little lost here. Mainly for the glovebox lip.
3. I have searched a few threads for the best glue (contact), but are there any better options, or stick with a quality contact cement (and the impending high)?
Thanks,
Jim
|
FWIW, The 289's used leather, the 427's used vinyl on the dash. Use a high quality spray contact cement. Spray both surfaces and let it dry a minute before putting the material in place. Work from the center out. When ready to work material around curved sections, you can then spray the back of the dash to hold the material on the 'back' of the curves. BTW you shouldn't need so much cement that it gives you a high :-)
Heat can be used on vinyl but NOT leather. Water can sometimes be used on leather, but you better know what you're doing. On a dash, there shouldn't be a need for water. Be careful with the relief cuts for the gauge holes.

|
10-12-2012, 06:18 AM
|
|
CC Member
|
|
|
Join Date: May 2003
Location: Carencro, La,
USA
Cobra Make, Engine: Midstates 427 / ERA 289 USRRC
Posts: 214
|
|
Not Ranked
I had an auto upholstery shop help me with mine. It took us about 20 minutes to do it. He used spray on weldwood contact cement. (Lowe's has it) After watching how he cut the material and folded it through the gauge and steering holes i knew that I would have screwed it up if I had done it myself. It came out perfect and for the $30.00 he charged me, it only cost me slightly more than if I had gone out and bought the glue and done it myself. Good luck on whatever you decide.
Mike
|
10-12-2012, 02:55 PM
|
|
CC Member
|
|
|
Join Date: Apr 2008
Location: Near Chichester, Sussex by the sea......,
UK
Cobra Make, Engine: Crendon 427 S/C 428 FE+toploader
Posts: 668
|
|
Not Ranked
Ive got PVC to conform to some tricky shapes. If you are set on leather, then ignore the following.....
I made some internal GRP/PVC door skins and trimmed the rear bulkhead in PVC instead of using carpet.
DSC00591 - Cobra Club Gallery
crendon door skin test fit - Cobra Club Gallery
- hopefully these pics are visible.
if you use PVC, first spray a flattish centre section and stick it in place.
Then 'borrow' your wife's hair dryer and gently apply heat front and back on the PVC - get it pretty warm but not uncomfortably hot to the touch of your palm. When you've got the heat into it, gently pull it round the curves you want it to conform to, WITHOUT adhesive. Of course it wont lie neatly because you can only pull in 1 direction at a time, and most likely you have some compound curves to deal with. Once you have pulled it (it can help a lot if a friend can help steady the centre section), spray the rear face and using a bundled up cloth or very small towel, gently push the vynil into where you want it, pulling the edge gently, as needed. You will need to work around the curve, pushing with the cloth, and pulling with your hand, as you go. Dont wait for the adhesive to go off fully, as you may want to pull it off and reposition it to make it sit neatly.
If its a concave curve, push it into the crevices. I use a flexi-curve from my old technical drawing class in school thats bent round to push the vynil into the curved surface.
If its a convex curve, you will need to work it round - this is where your friend's hands comes in handy making sure the centre section doesnt get wrinkled or tugged.
Have some shears handy (I use aero snips) to cut slits near the boundary - this helps eliminate wrinkles and overlaps. But it also helps if you can minimise the amount of excessive material: about an inch overlap is good idea, but go for more than this initially as its too easy to get your estimates of coverage wrong. You can always cut more, you cant put it back when its gone. When happy, the slits can be made into triangular cuts that can then be wrapped around the edge. I haveto have a couple of goes at this part to make it sit neat around areas of high curvature - Im not a professional trimmer.
When happy, clamp up in position as much as possible and leave over night to dry. Use telephone directories and wood to apply clamping force across a larger area. Dont over-tighten g-clamps, only gently pressure is needed - otherwise these will leave an impression in the vynil that wont shift.
Finally: PVC is cheap. If you get it wrong, walk away, have a beer, come back next day and try again. On one of the above door skins I had to have 3 goes at it before i was happy.
Hope that helps.
Last edited by KevinW; 10-12-2012 at 03:15 PM..
|
10-12-2012, 03:50 PM
|
 |
Senior Club Cobra Member
|
|
|
Join Date: Sep 2000
Location: Holderness, NH, US of A,
NH
Cobra Make, Engine: CSX 4772 old iron FE
Posts: 5,499
|
|
Not Ranked
Hey Jim, I lay the dash covering out on a bench cut close to the shape and size. I use the sharpie to locate a couple of guage holes for alignment. Once the dash is laid out flat on the bench I duct tape all the edges down to hold them flat. Then I put the Weldwood to both the dash and the cover with a chip brush and let it dry. I brush the cover first as the dash drys faster being sheet metal. Then I lower the dash against the cover using the gauge holes to align it. Having done the biggest part of the dash I make sure I have about 3/4" all around and trim if necessary and Weldwood all the edges of cover and dash and go around them a piece at a time pulling and folding once they're dry. Check gauge hole clearance. Some are cut with an exacto from the front, others need a pie cut on all the holes and all the little triangles gluing back depending on the gauge/hole clearance.
Last edited by mickmate; 10-12-2012 at 03:52 PM..
|
10-12-2012, 04:36 PM
|
|
CC Member
|
|
|
Join Date: Oct 2004
Cobra Make, Engine: CSX2321
Posts: 1,368
|
|
Not Ranked
Quote:
Originally Posted by mickmate
Hey Jim, I lay the dash covering out on a bench cut close to the shape and size. I use the sharpie to locate a couple of guage holes for alignment. Once the dash is laid out flat on the bench I duct tape all the edges down to hold them flat. Then I put the Weldwood to both the dash and the cover with a chip brush and let it dry. I brush the cover first as the dash drys faster being sheet metal. Then I lower the dash against the cover using the gauge holes to align it. Having done the biggest part of the dash I make sure I have about 3/4" all around and trim if necessary and Weldwood all the edges of cover and dash and go around them a piece at a time pulling and folding once they're dry. Check gauge hole clearance. Some are cut with an exacto from the front, others need a pie cut on all the holes and all the little triangles gluing back depending on the gauge/hole clearance.
|
Yep, that works. I would suggest, if it's your first time, leave more than 3/4", you can trim while and after you have the material wrapped. ( I have never figured out how to cut it longer if needed  )
I use a spray gun with the adhesive and, as long as you don't overdo it, it drys quickly.
|
10-12-2012, 04:56 PM
|
 |
CC Member
|
|
|
Join Date: Sep 2002
Cobra Make, Engine: SPF#0760
Posts: 3,409
|
|
Not Ranked
Be sure to use a new can of spray adhesive. There should be no lumps in the coatings on the dash or the material. If there are lumps, the dash will have lumps in the finished covering. You only get one shot at laying the two glues surfaces together so be sure its straight and wide enough - you can trim the excess material off later.
__________________
Wiring Diagrams: SPF MKII, MKIII, GT40, CSX7000, CSX8000, Corvette Grand Sport, and Shelby Sebring, Bondurant & Cinema Tribute Cars.
Owners Manuals: SPF MKII, CSX7000, CSX8000, Sebring, Bondurant, Cinema Tribute Cars $ GT40s..
Large, easy to read and trace schematics with part numbers, wire colors, wire gauge, fuses, and electrical upgrade information. Trouble-shooting and replacement part numbers for those roadside repair adventures.
SPFWiringDiagrams@Comcast.net
|
10-12-2012, 04:58 PM
|
 |
Senior Club Cobra Member
|
|
|
Join Date: Mar 2005
Location: Manchester,
NH
Cobra Make, Engine: AK1085 (302 Street), HTM111 (427 Comp), CSX2375R (289 Comp) and COB5999 (427 S/C)
Posts: 19,111
|
|
Not Ranked
427's were not vinyl...... They were naugahyde.  |
10-12-2012, 06:30 PM
|
 |
Senior Club Cobra Member
|
|
|
Join Date: May 2001
Location: Florence,
AL
Cobra Make, Engine: RCR GT 40 & 1966 Fairlane 390 5 speed
Posts: 4,511
|
|
Not Ranked
 glue dash vinyl
I spray only the dash or vinyl but not both. This way I can move or work the air bubbles out.
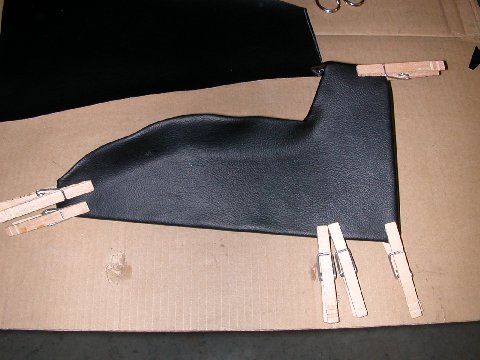
I use wood clothes pin to clamp the vinyl in place till it dry. I bought a bag of 100 clothes pins and use all of them on a dash.
If you have an air bubble you can puncture it with a pin and let the air out. If it will not stick to the dash you can use a hypodermic needle to insert a small amount of glue.
Dwight
__________________
''Life's tough.....it's even tougher if you're stupid.'' ~ John Wayne
"Happiness Is A Belt-Fed Weapon"
life's goal should be; "to be smarter than inanimate objects"
|
10-12-2012, 06:48 PM
|
|
Senior Club Cobra Member
|
|
|
Join Date: May 2001
Location: Florence,
AL
Cobra Make, Engine: RCR GT 40 & 1966 Fairlane 390 5 speed
Posts: 4,511
|
|
Not Ranked
out of the thousands of pictures I have this is the only one I could find of a dash piece glued up.
Dwight
__________________
''Life's tough.....it's even tougher if you're stupid.'' ~ John Wayne
"Happiness Is A Belt-Fed Weapon"
life's goal should be; "to be smarter than inanimate objects"
|
 Posting Rules
|
You may not post new threads
You may not post replies
You may not post attachments
You may not edit your posts
HTML code is Off
|
|
|
All times are GMT -7. The time now is 02:46 PM.
Links monetized by VigLink
|


 Linear Mode


