 
 Main Menu
|
|
Nevada Classics
|
|
Advertise at CC
|
| S |
M |
T |
W |
T |
F |
S |
| 1 |
2 |
3 |
4 |
5 |
6 |
7 |
| 8 |
9 |
10 |
11 |
12 |
13 |
14 |
| 15 |
16 |
17 |
18 |
19 |
20 |
21 |
| 22 |
23 |
24 |
25 |
26 |
27 |
28 |
| 29 |
30 |
31 |
|
|
|
|
|
|
CC Advertisers
|
|

08-17-2009, 05:09 PM
|
 |
CC Member

|
|
|
Join Date: Oct 2003
Location: Golden Isles,
GA
Cobra Make, Engine: Butler Cobra. 350 Chevy Engine, blueprinted, heads cc'd, ported, polished, manifolds matched, big valves, 1.6 roller rockers, TB Injected, mild cam, MSD crank trigger electronic ignition. TKO-600 transmission. XKE Jaguar rear. IFS by Fast Cars
Posts: 558
|
|

 Not Ranked
 Side Curtains for Butler Cobra with Hard-Top
I'm in the process of installing the Hard-Top that I got from Ron Butler on my Butler Cobra. I'm interested in knowing if anyone out there has had custom Sliding-Window/Slide-Curtains made to fit this combination.
I've spent my weekend figuring out how I would make the curtains and what jigs and tooling I need to produce to make this possible. But before I embark on this journey, It would be great to know if anyone has taken the trip.
I look forward to the usual insightful responses.
Thanks,
Arthur
Last edited by lal Naja; 08-27-2009 at 09:47 PM..
|
08-17-2009, 05:58 PM
|
 |
Senior Club Cobra Member
|
|
|
Join Date: Jan 2008
Location: McAllen,
TX
Cobra Make, Engine: Butler...488" hi-rise, dry-sump FE s/o w/stacks
Posts: 543
|
|
Not Ranked
Arthur,
I have a set of side curtains that were part of the original Butler soft top...which I do not have. No one knows what happened to the soft top.
I don't know if these can help in your work, but if so, let me know what you need to know....pics or whatever. I asked Ron if the shape was the same on the soft and hard top and he wasn't sure.
I bought a hard top from Ron....don't have it yet, but will be following your project for building side curtains.
Good Luck
Russ
__________________
Russ 
|
08-17-2009, 08:20 PM
|
|
CC Member
|
|
|
Join Date: Oct 2003
Location: Golden Isles,
GA
Cobra Make, Engine: Butler Cobra. 350 Chevy Engine, blueprinted, heads cc'd, ported, polished, manifolds matched, big valves, 1.6 roller rockers, TB Injected, mild cam, MSD crank trigger electronic ignition. TKO-600 transmission. XKE Jaguar rear. IFS by Fast Cars
Posts: 558
|
|
Not Ranked
Russ, some photos would be great! A couple of shots inside and outside and as much detail of the workings, corners, etc. that you would be willing to take.
Email to me at: Mitchy.usa@att.net
Much thanks,
Arthur |
08-18-2009, 09:29 PM
|
|
CC Member
|
|
|
Join Date: Oct 2003
Location: Golden Isles,
GA
Cobra Make, Engine: Butler Cobra. 350 Chevy Engine, blueprinted, heads cc'd, ported, polished, manifolds matched, big valves, 1.6 roller rockers, TB Injected, mild cam, MSD crank trigger electronic ignition. TKO-600 transmission. XKE Jaguar rear. IFS by Fast Cars
Posts: 558
|
|
Not Ranked
Alan the message below was my response to you, but it was returned undelivered, so I'm posting here. I'll paste the picture to my 'Pictures & Albums' on this forum.
__________________________________________________ ______________
Thanks Alan, I had talked with Jerrod about six months or so ago, I got his name from Ron Butler, Ron used him too. Jerrord would be happy to make the side-curtains and that may be one option. I'm also considering designing and building side-curtains that may not be not necessarily resemble the original style. I'm tossing around an idea that may be all aluminum & lexan, or a combination of aluminum, lexan & fiberglass.
Not much alteration can be done to the hardtop, see attached photo. The formed edge of the opening is perfect for a full length bulb seal between the curtail and hardtop. I've also never been thrilled with what I've seen with the fit between the curtain and the windshield post.
My post was a hope to perhaps uncover anything that may have been tried by others.
If I talk to Jerord I will mention your referral.
Regards,
Arthur

|
08-19-2009, 08:43 AM
|
|
CC Member
|
|
|
Join Date: Nov 2003
Location: northern calif.,
Posts: 50
|
|
Not Ranked
side curtains
Arthur,
I have an extra set of new original slide type side curtains for a Arntz hard top.
If interested, e-mail me at "telekwik@comcast.net".
Dan
|
08-19-2009, 10:37 PM
|
|
CC Member
|
|
|
Join Date: Oct 2003
Location: Golden Isles,
GA
Cobra Make, Engine: Butler Cobra. 350 Chevy Engine, blueprinted, heads cc'd, ported, polished, manifolds matched, big valves, 1.6 roller rockers, TB Injected, mild cam, MSD crank trigger electronic ignition. TKO-600 transmission. XKE Jaguar rear. IFS by Fast Cars
Posts: 558
|
|
Not Ranked
Thanks Dan, Thanks for the offer on the side-curtains, Do the ones you own have have sliding windows?
But first: Is the Arntz hard-top like mine, see photo in my Profile Album.
And if it's like mine, are your side-curtains made differently to traditional Cobra siding window side curtains?
Seems to me that the way my hardtop is made, a modified version of the side curtain could improve sealing out water and wind.
Arthur
Last edited by lal Naja; 09-18-2010 at 07:34 PM..
|
09-12-2009, 01:12 PM
|
|
CC Member
|
|
|
Join Date: Oct 2003
Location: Golden Isles,
GA
Cobra Make, Engine: Butler Cobra. 350 Chevy Engine, blueprinted, heads cc'd, ported, polished, manifolds matched, big valves, 1.6 roller rockers, TB Injected, mild cam, MSD crank trigger electronic ignition. TKO-600 transmission. XKE Jaguar rear. IFS by Fast Cars
Posts: 558
|
|
Not Ranked
Quote:
Originally Posted by lal Naja

Russ, some photos would be great! A couple of shots inside and outside and as much detail of the workings, corners, etc. that you would be willing to take.
Email to me at: Mitchy.usa@att.net
Much thanks,
Arthur |
Russ, Don't worry about taking photos of the windows. I'm beyond that need. So far it looks like my direction for windows will work out, but I'm still in R & D and mock-up. Have some issues to resolve.
Arthur |
09-02-2009, 08:30 AM
|
|
CC Member
|
|
|
Join Date: Oct 2003
Location: Golden Isles,
GA
Cobra Make, Engine: Butler Cobra. 350 Chevy Engine, blueprinted, heads cc'd, ported, polished, manifolds matched, big valves, 1.6 roller rockers, TB Injected, mild cam, MSD crank trigger electronic ignition. TKO-600 transmission. XKE Jaguar rear. IFS by Fast Cars
Posts: 558
|
|
Not Ranked
Russ, I don't think I'm going to bother with adding anything to the paint. The top has a vinyl texture in the gelcoat and Rat-Rod black would be perfect for it. In the past, way past you had to add additives to paint to bring down the gloss if you wanted flat or satin, but the paint I'm going to use is designed to have the look and is durable against moisture, UV etc. IMHO, additives like D.E. may have detrimental effects on the paint.
If you are planning anything other than black for the top you may have to add flattening agents to get the sheen you want.
I will add photos of my top and a detailed description of how I did it, but it may not happen till Sunday. I have family visiting and I'm not going to my studio till then.
Yes the glass has a crack. The crack is in the outer layer of glass. I can still use it as it holds it's shape just fine. At first I was devastated when I cracked it, but now I'm living with it until the car is finished. With my recent health record I'm pulling out all stops to finish the car before I'm dead LOL. I did make a mold of the glass before I started work, so forming one out of plexiglass shouldn't be too big a hassle. I just have to make a temporary oven to cook the plexi. So it goes!
Arthur
|
09-02-2009, 11:56 AM
|
|
Senior Club Cobra Member
|
|
|
Join Date: Jan 2008
Location: McAllen,
TX
Cobra Make, Engine: Butler...488" hi-rise, dry-sump FE s/o w/stacks
Posts: 543
|
|
Not Ranked
Arthur, good information. Mine will be black. You will share info on the paint, right? I am anxious to see how yours turns out.
Good Luck....and yes, get that car finished.
__________________
Russ
|
09-02-2009, 10:36 PM
|
|
CC Member
|
|
|
Join Date: Oct 2003
Location: Golden Isles,
GA
Cobra Make, Engine: Butler Cobra. 350 Chevy Engine, blueprinted, heads cc'd, ported, polished, manifolds matched, big valves, 1.6 roller rockers, TB Injected, mild cam, MSD crank trigger electronic ignition. TKO-600 transmission. XKE Jaguar rear. IFS by Fast Cars
Posts: 558
|
|
Not Ranked
Steps to fit my Butler hard top.
If the car is painted you will probably want to install a couple of layers of tough strong paint protection. My car is unpainted.
Fit the back glass. I did this about five or six months ago. (DO NOT PRESS TOO HARD ON THE LAMINATED GLASS. Each layer of glass is less than 1/8" thick. I pressed and it cracked real easy.) This will give the fiberglass a chance to conform to the glass window as there is a slight variance.
Make a wood and foam cradle for the fiberglass top. It will make your life easy when you work on it. I also used it to put about 20 lbs of extra weight on the top while the top was resting on the car.
Make a sanding file with 80 grit belt sander paper. I used a 1" wide x 12 " flexible steel engineers rule & #77 spray glue to attach a 1" x 12 " strip of sand paper to it. Use coarser paper if you think it will help.
Apply 1/16" thick X 1/2" wide hard rubber tape along the top front edge of the windshield frame. This strip of tape will give you enough space later when you go to install a strip of soft compressible 1/8" closed-cell foam tape to create a first barrier weather strip between the top & windshield. I'm looking for an extruded foam rubber profile that may do this. If I find something I'll place it in the photos and provide a link to it.
Place the top on the car and align the rear as best you can for fit, you will have gaps between the body and top. Fit the windshield and front of the top as best you can.
Shape the aluminum straps to fit the windshield frame top and position them. A little bending and twisting will do the trick. I did not have to adjust the angle on my windshield. Then use a large alligator/spring clamp to hold the front edge of the top to the left and right edges of the windshield frame. This will be your rough fit.
Start sanding the top by sliding the steel rule sander you made between the top and body. Carefully remove high spots a little at a time to bring the top down to about 1/16" from the body. This 1/16" gap that will be occupied by closed-cell foam tape when the top is finally done after painting & trim work. Use some standard grade laminate/Formica (roughly 1/16" thick x 1" x 2") as shims as you do the sanding. Stop for now, but you will be doing more sanding.
Apply a strip of 1/16" thick x 3/4" rubber to the rear lip/flange of the top. This is the area you just sanded. I used EPDM rubber as I had some and a little 3M #77. Let the top sit directly on the body and wiggle it a couple of times for a good fit. I got this far and four months went by and I could not work on it due to illness.
Install the steel pins into the furrels. I had installed the furrels for a soft top some time ago and the position of these was fixed. I had machined two aluminum bushes 1 1/4" in OD x 1/2" ID a 1 1/2" long and glassed these into the body to receive the furrels. These are strong & firm! (I think I will have to do the doors in a similar manner) Only 1/2" of the pins will enter the furrels. This depth is derived from the way the Butler made latches fit. I used 3/8" shaft collars as depth stops on the pins, this little trick will help make the fit easier as it holds the pins at the correct depth within the furrels. Make sure the setscrews (face screws inboard) of the collars are in a position that you can get an Allen/hex key to remove the collars later.
Once you are happy with fit of everything.; body, top windshield, rear latches. Epoxy the pins to the top with some epoxy dough. Only use enough to hold it in place. I used three 1/2" diameter balls of dough to do each pin. They sell the epoxy for fixing water leaks in pipes at the H-Depo and industrial centers like McMaster Carr. MAKE SURE THE REAR LATCHES ARE IN THE CORRECT LOCATION. Then do not touch it for 24 hours. More to come.....
Last edited by lal Naja; 09-13-2009 at 07:41 PM..
|
09-03-2009, 01:38 AM
|
|
Senior Club Cobra Member
|
|
|
Join Date: Jan 2008
Location: McAllen,
TX
Cobra Make, Engine: Butler...488" hi-rise, dry-sump FE s/o w/stacks
Posts: 543
|
|
Not Ranked
Arthur, great info....you should be writing "How To For Dummies (like me) Books".
Mine is painted, so I will have to be careful. Looking forward to seeing pics of your top installed.
__________________
Russ
|
09-12-2009, 12:54 PM
|
|
CC Member
|
|
|
Join Date: Oct 2003
Location: Golden Isles,
GA
Cobra Make, Engine: Butler Cobra. 350 Chevy Engine, blueprinted, heads cc'd, ported, polished, manifolds matched, big valves, 1.6 roller rockers, TB Injected, mild cam, MSD crank trigger electronic ignition. TKO-600 transmission. XKE Jaguar rear. IFS by Fast Cars
Posts: 558
|
|
Not Ranked

Now that the Epoxy is set and the position of the pins to furrel is correct, remove the top and take off the shaft collars, you won't need the collars again. Careful not to crack the epoxy patches on the pins.
Place the top back onto the car. Don't forget to check front fit and use the Alligator clamps on the windshield. Now it's time to fit the fiberglass pin/latch shrouds to the top. The shrouds as supplied with much depth & height surplus that needs to be trimmed. I should have made my shrouds 1/2" to 3/4" shorter in height, use your judgment for yours. The depth for fitting the shrouds is critical so place them in position and push with your thumb to try to make contact with the pin plate. You will find that at-least 1/4" to 3/8" will need to be trimmed off the back of the shroud. Use a suitable marker/pen/pencil and scribe a mark on the shroud to conform to the top. Sand this surplus off using a disk or belt sander. Try/scribe again and again till the shroud fits against the top and there is no gap between it and the pin plate. Gap between body & bottom of shroud on mine is about 3/16". Accurately transfer the holes from the pin plate to the shroud and screw the shroud to the pin plate with two 10x 32 screws. Repeat this process to fit the shroud to the other side. Then glass shroud to the top using 1 1/2" wide strips of glass cloth around the perimeter. Apply three layers around the perimeter and than two full pieces of glass cloth over the entire shroud. Don't glass in the two 10 x 32 screws. When I was done glassing in the perimeter I removed the 10 x 32 screws and placed 1" long 10 x 32 studs into the plates. These studs were ground to a point so that the next two layers of glass cloth would punch over them. Wax the studs so you can remove them when done glassing and as soon as resin sets up. Let the fiberglass setup for 24 hours.
Sand your glass work flat in the area of the mating latch plate and smooth sand the rest of the glass work depending on what you plan with your trim/head liner. Attach the latches to the pin plate/shroud and install the corresponding latch hooks to the body. Mark hooks on body and drill holes 1/16" lower that marked to provide the tension. Install nut-serts and complete the latch installation. If all prior care was taken in doing the fitting and measuring the result will be perfect and latch will clear body bull nose. If not you are in trouble!!
Now install the front latches to the windshield sides/straps. I did not use the Butler latches here, I used locking adjustable latches. Two reasons: Locking safety and ease of installation the tension adjustment provides. It's a no-brainer.
I'm thinking of installing a third brake light to the hardtop in the area above the back window. I may glass in copper foil tape between the light and the latch pins for the 12 volt supply. Will have to make spring loaded contacts in furrels to transfer power to the latch pins. This way all you have to do is drop the top onto the car and brake lights will be connected. Seamess and hidden.
But now I'm working on the sliding windows. Have made a mock-up and am now reviewing how to adjust/resolve/seal the misfit between the sculpted form of the top of the doors and the straight flat bottom of new sliding windows.
More to come if anyone is interested.
Last edited by lal Naja; 09-13-2009 at 07:34 PM..
|
03-18-2013, 01:41 PM
|
|
CC Member
|
|
|
Join Date: Aug 2010
Cobra Make, Engine:
Posts: 17
|
|
Not Ranked
anyone know if these hardtops are out there? Love the look...
|
03-18-2013, 02:23 PM
|
|
CC Member
|
|
|
Join Date: Nov 2003
Location: northern calif.,
Posts: 50
|
|
Not Ranked
Have a set of new Arntz / Butler side curtains. Mine are for a Type 4 car that Arntz only built 16 of. Not sure how much different, if at all, they are from the earlier Arntz / Butler cars.
Contact me directly @ "telekwik@comcast.net".
Also have a hardtop for the same car.
Dan
|
03-26-2013, 10:03 PM
|
|
CC Member
|
|
|
Join Date: Oct 2003
Location: Golden Isles,
GA
Cobra Make, Engine: Butler Cobra. 350 Chevy Engine, blueprinted, heads cc'd, ported, polished, manifolds matched, big valves, 1.6 roller rockers, TB Injected, mild cam, MSD crank trigger electronic ignition. TKO-600 transmission. XKE Jaguar rear. IFS by Fast Cars
Posts: 558
|
|
Not Ranked
I thought I'd post the information below on this thread too to see if we can find more interested individuals that may need a back glass for their Butler Hard Top.
I have confirmation that Russ (SoTxButler on this forum) is indeed looking into having glass made. He has a rough price of $1,200.00 for the first one.
If the count goes up the price goes down. So far it looks like the order may be as many as five. And here are the players that are interested.
Russ, Greg My427cobra, Ron Butler wants 2, and although my crack is minor I'd consider one as a spare.
To save on crating fees I'd be willing to use the crate I have to ship each glass, then the crate will have to be returned for packing and forwarding on the next person.
Post here if you are interested and we'll see how this shapes up. I'll also copy this in the other Arntz/Butler topic to see if the count can go up.
Arthur
|
03-27-2013, 03:22 PM
|
|
Club Cobra Member
|
|
|
Join Date: Mar 2002
Location: arroyo grande, ca,
ca
Cobra Make, Engine: NAF 427
Posts: 1,775
|
|
Not Ranked
Good stuff Arthur. Did you take any pics of the Butler hardtop fit/installation process. Would be great to add pics to your narrative.
Cheers
Greg
|
03-27-2013, 03:48 PM
|
|
CC Member
|
|
|
Join Date: Oct 2003
Location: Golden Isles,
GA
Cobra Make, Engine: Butler Cobra. 350 Chevy Engine, blueprinted, heads cc'd, ported, polished, manifolds matched, big valves, 1.6 roller rockers, TB Injected, mild cam, MSD crank trigger electronic ignition. TKO-600 transmission. XKE Jaguar rear. IFS by Fast Cars
Posts: 558
|
|
Not Ranked
Greg, I have some photos here on the forum in my profile/album and a bunch more on my face book page. The link is below.
https://www.facebook.com/media/set/?...1&l=4a4838b30a
Arthur
Last edited by lal Naja; 03-27-2013 at 07:10 PM..
|
03-27-2013, 04:01 PM
|
|
Club Cobra Member
|
|
|
Join Date: Mar 2002
Location: arroyo grande, ca,
ca
Cobra Make, Engine: NAF 427
Posts: 1,775
|
|
Not Ranked
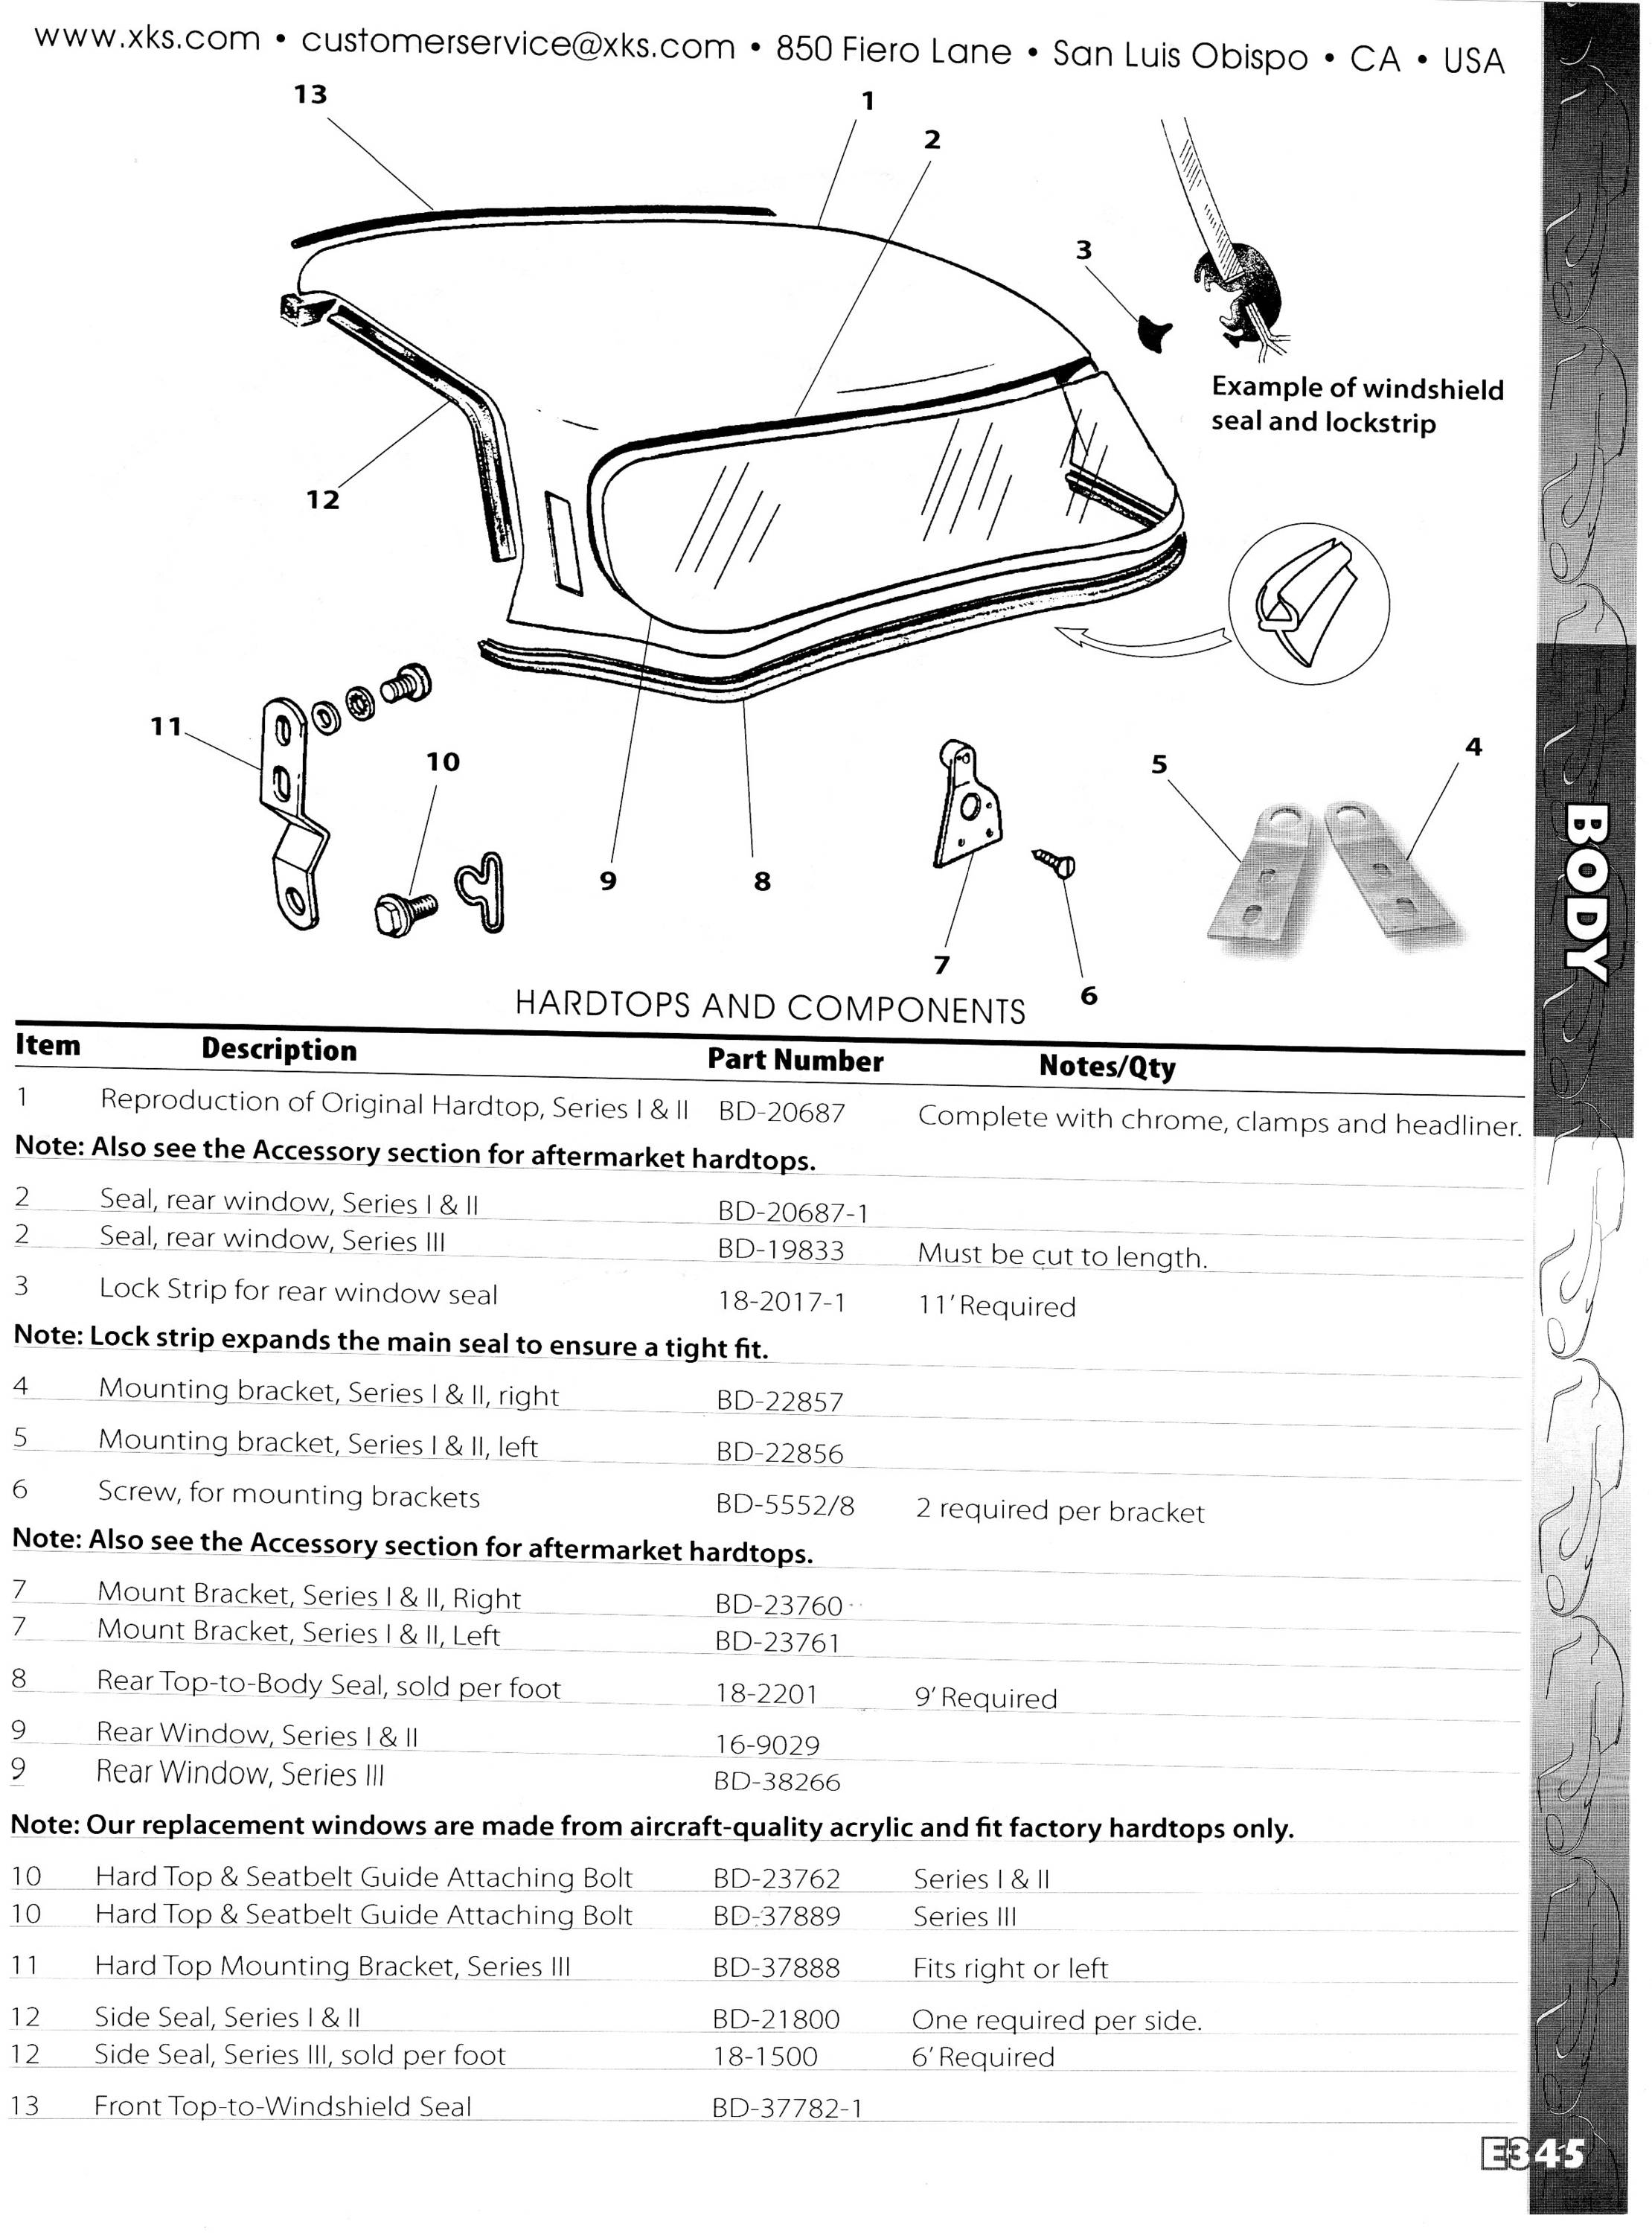
Here's a page from XK's Unlimited catalogue showing the XKE hardtop seals.

I'll check them out tommorrow.
Cheers
Greg |
03-27-2013, 07:20 PM
|
|
CC Member
|
|
|
Join Date: Oct 2003
Location: Golden Isles,
GA
Cobra Make, Engine: Butler Cobra. 350 Chevy Engine, blueprinted, heads cc'd, ported, polished, manifolds matched, big valves, 1.6 roller rockers, TB Injected, mild cam, MSD crank trigger electronic ignition. TKO-600 transmission. XKE Jaguar rear. IFS by Fast Cars
Posts: 558
|
|
Not Ranked
Quote:
Originally Posted by my427cobra
Here's a page from XK's Unlimited catalogue showing the XKE hardtop seals.
I'll check them out tommorrow.
Cheers
Greg |
The rubber extrusion shown here is very similar to what Butler supplied with my glass and hard-top.
For the seam between the hard-top and body I'm planning on using two strips of 'D' profile hollow rubber bulb seals. 1/4" x 1/8" section. The strips will be spaced about 1/2" apart and held in place with pressure sensitive adhesive.
The bottom lip seal shown in the image above will not function too well on my top.
Cheers back, Arthur |
 Posting Rules
|
You may not post new threads
You may not post replies
You may not post attachments
You may not edit your posts
HTML code is Off
|
|
|
All times are GMT -7. The time now is 07:59 PM.
Links monetized by VigLink
|


 Hybrid Mode

