Welcome to Club Cobra! The World's largest
non biased Shelby Cobra related site!
- » Representation from nearly all
Cobra/Daytona/GT40 manufacturers
- » Help from all over the world for your
questions
- » Build logs for you and all members
- » Blogs
- » Image Gallery
- » Many thousands of members and nearly 1
million posts!
YES! I want to register an account for free right now!
p.s.: For registered members this ad will NOT show
 
 Main Menu
|
|
Nevada Classics
|
|
Advertise at CC
|
|
June 2026
|
| S |
M |
T |
W |
T |
F |
S |
| |
1 |
2 |
3 |
4 |
5 |
6 |
| 7 |
8 |
9 |
10 |
11 |
12 |
13 |
| 14 |
15 |
16 |
17 |
18 |
19 |
20 |
| 21 |
22 |
23 |
24 |
25 |
26 |
27 |
| 28 |
29 |
30 |
|
|
|
|
|
|
CC Advertisers
|
|
 13Likes 13Likes

01-20-2013, 08:36 PM
|
 |
CC Member

|
|
|
Join Date: Jan 2001
Location: Sunbury,
VIC
Cobra Make, Engine: Rat Rod Racer, LS1 & T56
Posts: 5,391
|
|

 Not Ranked
 Power Steering
Hi All,
the next project I'm trying to knock over while to body is off is a power steering conversion.
Why? you ask. Well it's not to make the steering effort easier although that is a bonus when parking. The big advantage is the increase in speed of the rack. The CR uses a VL Commodore donor rack. The Manual version is more than 4 turns lock to lock. The power rack is only 2.7 turns. I figure a quick rack is an advantage in such a short wheelbase car.
Several folks have already done the conversion and after driving one of them I'm sold.
So far I've found pretty much all the bits to set it up. As usual I haven't got the easy off the shelf parts, I've got items I picked up here and there.
I picked up a new power steering pump I liked the look of at a swap meet. Lightweight aluminum construction. Later investigation revealing it was a BA Ford Falcon item. It was just the bare pump, no mounting or pulley but the price was right.
Before you say "Why didn't you just buy the GM one for the LS1 motor?" My response is "Where's the fun in that?"
So the job on the weekend was to adapt the pump to my LS motor. I started with a block of aluminum about 150x100x25 and a spare cylinder head. I took a bunch of measurements of the accessory mount holes on the front of the spare head and then turned that into a layout on the block and then drilled it to suit.
Here's the rough mount bolted up to the motor. I've also milled it down to about 16mm thick.

With the mount fitting OK now I just needed to trim away all the excess material. First up was marking out what needed to be removed.

Then mount it in the mill and start carving away. I like using the rotary table for this sort of stuff because the part has a lot of odd angles and can be quite hard to grip in the vice. It's also quicker to change position than directly bolting it to the table.

A bit more finessing and the mount is finished. The mount also acts as part of my belt tensioner setup for the Altenator which would have been something I would have had to mess with if I used the stock GM setup.
You can also see I've welded an AN-10 fitting onto the inlet of the pump. It originally had just a socket that probably connected to an integrated plastic reservoir.

Mounted on the motor and it's turned out pretty good.


The next job is making the pulley to suit. I machined up the serpentine pulleys for the water pump annd alternator so already have the technique for cutting the belt grooves sorted.
It starts with a big lump of aluminium sitting in the jaws of the Lathe. This is 150mm x 50mm and most of it will turn into swarf in the tray under the lathe.

To be continued...
__________________
Mike Murphy
Melbourne Australia
Last edited by Aussie Mike; 01-20-2013 at 08:43 PM..
|
01-20-2013, 10:30 PM
|
 |
CC Member
|
|
|
Join Date: Feb 2002
Location: Alice Springs, central Australia,
NT
Cobra Make, Engine: Classic revival kit (CR3181), gen III engine, T56 6 speed box, AU XR8 lsd diff
Posts: 5,699
|
|
Not Ranked
Mike, Your engine has spider webs on it.
Bloody spider webs.
You know spider webs only appear on things that dont move?
Spider bloody webs.
__________________
Cruising in 5th

---------------------------------------------
Never be afraid to do something new, Remember, Amateurs built the Ark: Professionals built the Titanic.
|
01-20-2013, 10:35 PM
|
|
CC Member
|
|
|
Join Date: Jan 2001
Location: Sunbury,
VIC
Cobra Make, Engine: Rat Rod Racer, LS1 & T56
Posts: 5,391
|
|
Not Ranked
Quote:
Originally Posted by boxhead

Mike, Your engine has spider webs on it.
|
And a fair coating of dust too.
Working on getting rid of all that.
Cheers
Michael
__________________
Mike Murphy
Melbourne Australia
|
01-21-2013, 12:39 AM
|
 |
CC Member
|
|
|
Join Date: Feb 2006
Location: Paradise Point,
Qld
Cobra Make, Engine: Absolute Pace
Posts: 1,205
|
|
Not Ranked
Superb Mike.
How do you do all the radius on the mill?
Phil
__________________
Not all driveways reach the street!
|
01-21-2013, 01:49 AM
|
|
CC Member
|
|
|
Join Date: Jan 2001
Location: Sunbury,
VIC
Cobra Make, Engine: Rat Rod Racer, LS1 & T56
Posts: 5,391
|
|
Not Ranked
Quote:
Originally Posted by Philm
Superb Mike.
How do you do all the radius on the mill?
Phil
|
The rotary table is the trick for cutting radius. I would usually just clamp the piece to the rotary table with the center of the diameter I want to cut (ie the center of the bolt hole) at the center of the table. For the large inside radius I cut that with the boring head and only cut an arc of the circle. I can change the radius by changing the diameter of the boring head.
On this piece I cheated for the small radius around the bolt holes and did them on the belt linisher.
Cheers
__________________
Mike Murphy
Melbourne Australia
|
01-21-2013, 04:15 PM
|
 |
CC Member
|
|
|
Join Date: Jan 2009
Location: Jonesboro,
AR
Cobra Make, Engine: Backdraft 874 solid red Roush 427 small block 515 hp
Posts: 572
|
|
Not Ranked
Rotary table
Quote:
Originally Posted by Aussie Mike
The rotary table is the trick for cutting radius. I would usually just clamp the piece to the rotary table with the center of the diameter I want to cut (ie the center of the bolt hole) at the center of the table. For the large inside radius I cut that with the boring head and only cut an arc of the circle. I can change the radius by changing the diameter of the boring head.
On this piece I cheated for the small radius around the bolt holes and did them on the belt finisher.
Cheers
|
My Rotary table is where I have lunch every Tuesday at Rotary Club of Jonesboro, Arkansas. District 6150 and Club 2520 (jonesbororotary.org)
I have 27+ years perfect attendance. If anybody drives their Cobra to our meeting, I will buy your lunch.
I know that is not you used and you do great work! I am impressed.
__________________
There were no atheists in the foxholes.
|
01-21-2013, 01:05 AM
|
 |
CC Member
|
|
|
Join Date: Apr 2006
Location: Mildura,
vic
Cobra Make, Engine: FFR Coupe, 416ci of LS goodness
Posts: 2,349
|
|
Not Ranked
Fantastic work as per usual Mikey 
__________________
Powered by Cu
|
01-21-2013, 01:26 AM
|
 |
CC Member
|
|
|
Join Date: Mar 2006
Location: Melbourne,
Vic
Cobra Make, Engine: Classic Revival LS1 6spd
Posts: 91
|
|
Not Ranked
Mike,
Fantastic work as we have all come to expect.
It is great reading you build threads because I know there is yet another CR that was once complete and is now in bits on the shed floor, however I am planing on having my back together for Winton. March 2011 was we I pulled my apart to be painted. I have just be informed I will have it back from the painters in about 2 weeks, we will wait and see.
Have you installed your steering rack yet?
When I installed mind, I lowered the rack by about 30mm to get it positioned correctly and strengthened all the gussets as well. I think Leigh lowered his by about 25mm.
I have the exact size I lowered it by some were if you want it.
Rod
|
01-21-2013, 02:06 AM
|
|
CC Member
|
|
|
Join Date: Jan 2001
Location: Sunbury,
VIC
Cobra Make, Engine: Rat Rod Racer, LS1 & T56
Posts: 5,391
|
|
Not Ranked
Quote:
Originally Posted by RODA
Mike,
Fantastic work as we have all come to expect.
It is great reading you build threads because I know there is yet another CR that was once complete and is now in bits on the shed floor, however I am planing on having my back together for Winton. March 2011 was we I pulled my apart to be painted. I have just be informed I will have it back from the painters in about 2 weeks, we will wait and see.
Have you installed your steering rack yet?
When I installed mind, I lowered the rack by about 30mm to get it positioned correctly and strengthened all the gussets as well. I think Leigh lowered his by about 25mm.
I have the exact size I lowered it by some were if you want it.
Rod
|
That's good news on the paint Rod. I'm looking forward to getting mine in paint.
The VL, VN and VP Commodore racks are all the same length with the same mountings. I've got a couple of different power racks. One from a VL and one from a VN and they bolt straight in. The VP rack differs from the others as some of them have a double D input shaft and some are splined the same as the VN and VL. The VL Manual rack has a different spline again.
The VP rack also has thicker rack ends with a 16mm fine thread but the rack ends are interchangable. I used the VP rack ends on my VL rack and they are now on this power rack.
I didn't lower my rack, I raised the tie rod position to fix the bump steer. It's not perfect but it's better than it was. I deleted the tie rod ends and changed them to rod ends. It went through engineering like this.
Clearance to the iside of the wheel rim was tight with the stock tie rod so that was part of the thinking for switching it round ths way. This will let me put a 9" wide rim on the front in future.

Cheers
__________________
Mike Murphy
Melbourne Australia
|
01-21-2013, 05:57 PM
|
|
CC Member
|
|
|
Join Date: Jan 2001
Location: Sunbury,
VIC
Cobra Make, Engine: Rat Rod Racer, LS1 & T56
Posts: 5,391
|
|
Not Ranked
Just a small update,
You may have noticed in the pics that I'm using AN fittings and braided hose for the lines. These pumps and steering racks use what they call a bump tube fitting to connect the hoses. It's a threaded ferrule that retains the end of a metal tube in the socket and this is sealed with an O ring. It's not a common fitting outside of power steering.
Sticking with these would mean having to get custom hoses made up. Fortunately there are a few companies that make bump tube to AN adaptors.

I've got a couple of old hoses mocked up to work out the routing. It's handy to have a few spare fittings lying around to do this especially when you consider the cost of the hose and fittings if you get it wrong.
You also need to consider the pressure rating of the hose for the application. This braided hose is only good for about 1000PSI but the pump is capable of much more. I've got some teflon braided hose that will be run in for the final fitup and this is rated at 3000PSI
Cheers
__________________
Mike Murphy
Melbourne Australia
|
01-22-2013, 01:08 AM
|
 |
CC Member
|
|
|
Join Date: Jan 2007
Location: Melbourne,
VIC
Cobra Make, Engine: Harrison, 6.0L Chev
Posts: 2,513
|
|
Not Ranked
Quote:
Originally Posted by Aussie Mike
You also need to consider the pressure rating of the hose for the application. This braided hose is only good for about 1000PSI but the pump is capable of much more. I've got some teflon braided hose that will be run in for the final fitup and this is rated at 3000PSI
|
Hey Mike, I've fitted a VK power rack with the teflon braided hose as well, seems to work well. The fittings on my rack look much the same as your picture above with the black male-to-male connectors - not sure what you mean by bump tube fittings?
__________________
"A spectacularly fast car in a grand if dated tradition."
|
01-22-2013, 03:41 PM
|
|
CC Member
|
|
|
Join Date: Jan 2001
Location: Sunbury,
VIC
Cobra Make, Engine: Rat Rod Racer, LS1 & T56
Posts: 5,391
|
|
Not Ranked
Quote:
Originally Posted by sambo
Hey Mike, I've fitted a VK power rack with the teflon braided hose as well, seems to work well. The fittings on my rack look much the same as your picture above with the black male-to-male connectors - not sure what you mean by bump tube fittings?
|
Hi Paul,
Bump tube is sometimes called beaded tube. The end of the tube has been pressed in a die to form a ridge around it. This is what the O ring sits up against to make the seal. The bump or ridge also gives something for the retaining nut to run up against to keep the fitting in place.
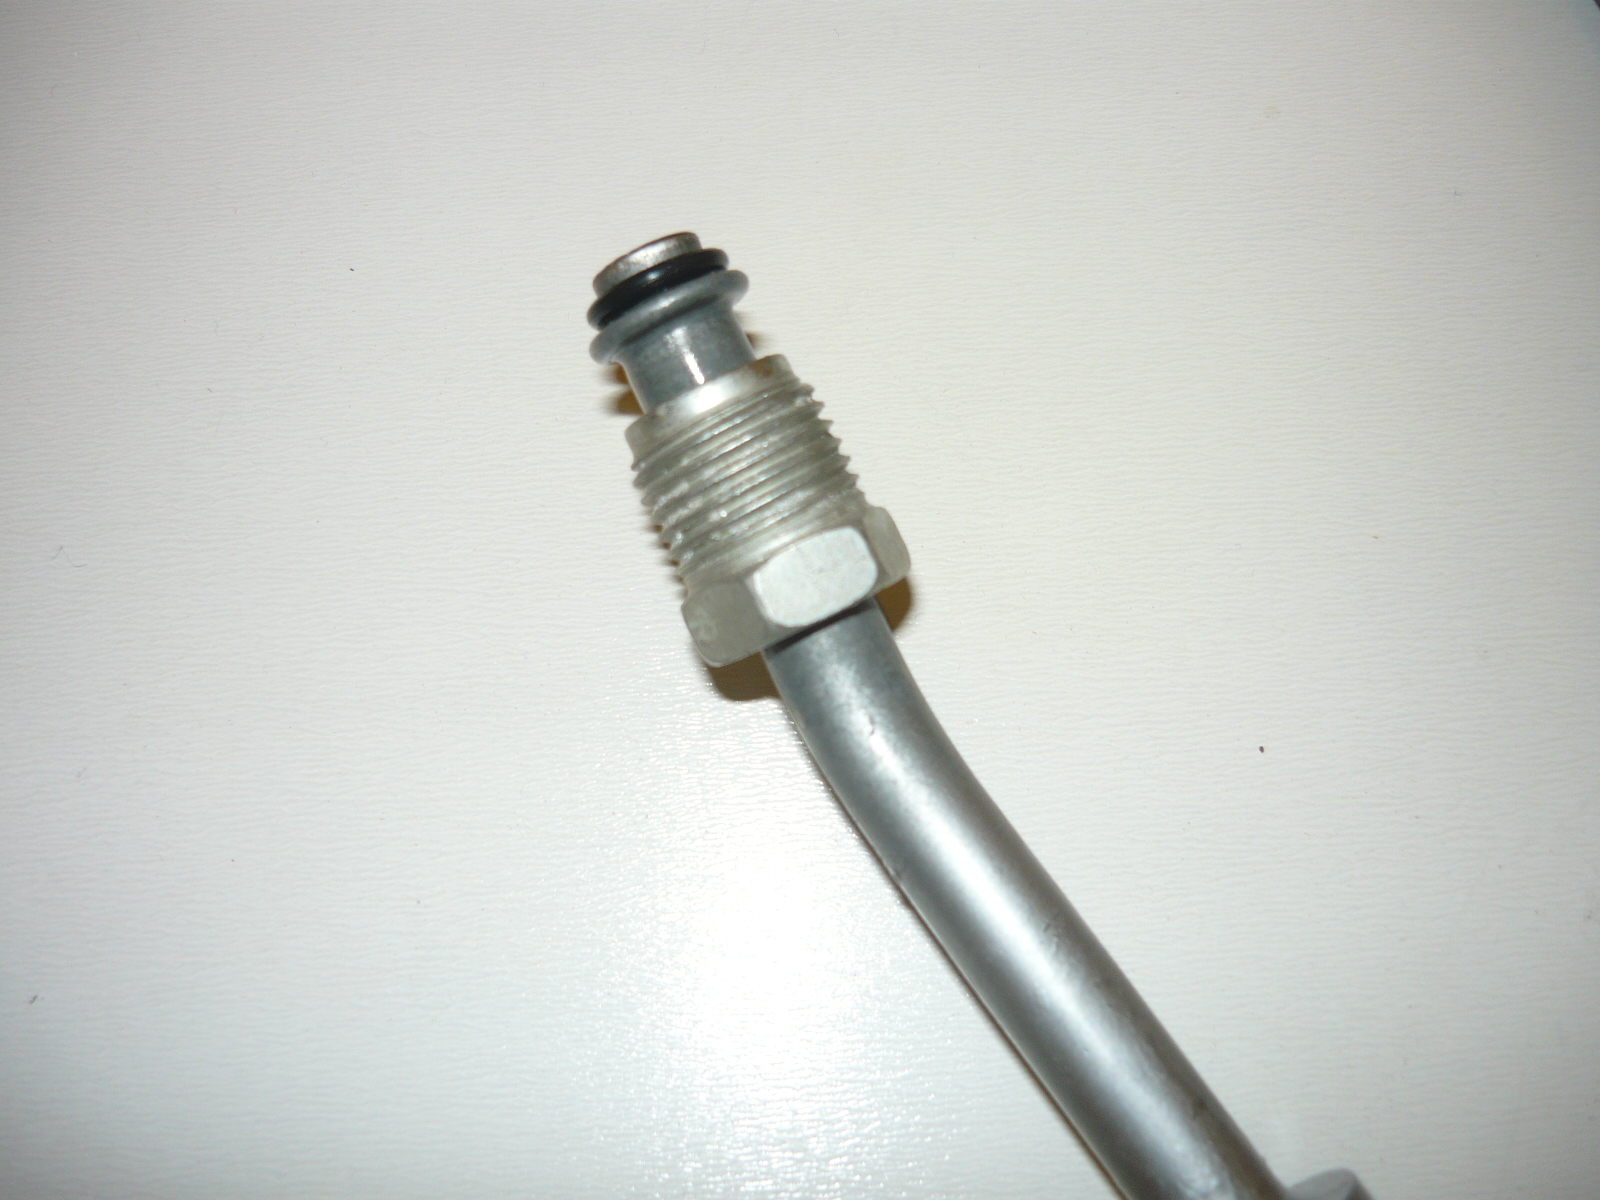
Cheers
__________________
Mike Murphy
Melbourne Australia
|
01-21-2013, 11:17 PM
|
 |
CC Member
|
|
|
Join Date: Apr 2008
Location: Melbourne,
VIC
Cobra Make, Engine: Classic Revival CR 3505, LS1, T56 6 Speed, VE 3.45 LSD Rear, 6 Spot AP Fronts, 4 Spot Wilwood Rears
Posts: 1,121
|
|
Not Ranked
Hey Mike, when I got my Power Steering High Pressure hose done by the Enzed man he showed me a "restricter" that went inside the hose to restrict the flow. (It looked like a steel spring I think)
He said this was needed so that the power steering wasnt too soft.
Is this something you've considered or decided you dont need. I am quite happy with my PS feel BTW.
Just thought I add something that I was told and know nothing about.
Cheers
Gregg
|
01-22-2013, 03:29 PM
|
|
CC Member
|
|
|
Join Date: Jan 2001
Location: Sunbury,
VIC
Cobra Make, Engine: Rat Rod Racer, LS1 & T56
Posts: 5,391
|
|
Not Ranked
Quote:
Originally Posted by gjkrv8
Hey Mike, when I got my Power Steering High Pressure hose done by the Enzed man he showed me a "restricter" that went inside the hose to restrict the flow. (It looked like a steel spring I think)
He said this was needed so that the power steering wasnt too soft.
Is this something you've considered or decided you dont need. I am quite happy with my PS feel BTW.
Just thought I add something that I was told and know nothing about.
Cheers
Gregg
|
I reckon he was probably right with the flow restricter in the system.
On my pump there is a fitting that screws into the pump body and retains the pressure reliefe valve assembly. This is what the high pressure line then screws into. There is a very small hole in this fitting that the fluid has to pass through and I believe this is the flow restricter. I'll try it with the regular line and see. It's easy enogh to add one later.
Cheers
__________________
Mike Murphy
Melbourne Australia
|
01-21-2013, 11:29 PM
|
|
CC Member
|
|
|
Join Date: Aug 2012
Posts: 108
|
|
Not Ranked
Nice work
I'm sooo jealous of your workshop and machinery... very nice |
01-22-2013, 01:49 AM
|
 |
CC Member
|
|
|
Join Date: Nov 2009
Location: Cheltenham,
Vic
Cobra Make, Engine: Classic Revival CR3516, LS3, Aussie Mike'd T-56, 3.70 LSD, AP brakes, Penske shocks
Posts: 1,616
|
|
Not Ranked
Mike will those AN style fittings hold that pressure? Just asking, as I really don't know!
__________________
BUILD-BLOG: http://cobrablog.holnet.net
Ben in AU
|
01-22-2013, 03:58 PM
|
|
CC Member
|
|
|
Join Date: Jan 2001
Location: Sunbury,
VIC
Cobra Make, Engine: Rat Rod Racer, LS1 & T56
Posts: 5,391
|
|
Not Ranked
Quote:
Originally Posted by Modena
Mike will those AN style fittings hold that pressure? Just asking, as I really don't know!
|
It's a good question Ben.
There's an interesting history behind AN fittings and the race car industry. AN stands for Aueonautical and Navy and they were a military standard used in WW2 on aircraft. They were a very robust fitting that could be quickly undone and serviced. You can imagine what they would have to go through on a war plane.
After WW2 there were a lot of mechanics returned from the war that then got involved in racing. There was a lot of military surplus materials out there including a heap of AN fittings. They found that these were great for racing for the same reasons they were good on fighter planes. Super reliable and easy to service.
As for the tapered seat holding pressure... Pretty much the same design is used in industrial hydraulics. They call them a JIC fitting (Joint Industry Council) They are dimensionally the same as AN fittings (and you can interconnect them) but JIC are usually made from steel. They are used on huge industrial machines like excavators with much higher hydraulic pressures.
Cheers
__________________
Mike Murphy
Melbourne Australia
|
01-22-2013, 05:21 PM
|
|
CC Member
|
|
|
Join Date: Jan 2001
Location: Sunbury,
VIC
Cobra Make, Engine: Rat Rod Racer, LS1 & T56
Posts: 5,391
|
|
Not Ranked
Got slightly distracted last night. On my last trip to the US I picked up an underdrive SFI spec damper. I figured swap it now since I'm working out belt arrangements for the power steering.

Also picked up a dedicated LS1 balancer puller. I'd looked at trying to use my regular gear puller but the LS1 ballancer has no bolt holes to grip it.

I'm super impressed with how this thing worked. I only needed a 3/8" ratchet to wind the ballancer off. Really easy to use. If anyone needs to use it, let me know.

While I've got it apart....
May as well change the cam.

Texas Speed MS4 Cam. Should wake the motor up a bit.

A new timing chain and a hi flow oil pump are going in as well.

These motors are very enjoyable to work on. No gaskets to worry about and everything is dead easy.
Cheers
__________________
Mike Murphy
Melbourne Australia
Last edited by Aussie Mike; 01-22-2013 at 08:17 PM..
Reason: spelling
|
02-03-2013, 02:55 AM
|
|
CC Member
|
|
|
Join Date: Jan 2001
Location: Sunbury,
VIC
Cobra Make, Engine: Rat Rod Racer, LS1 & T56
Posts: 5,391
|
|
Not Ranked
Got a bit more done on the power steering setup.
Before attacking a $40 lump of aluminum I thought It's be a good idea to make sure my serpentine pulley machining was up to snuff. I had to make a new alternator pulley as I'm going to drive it with a 4PK belt of it's own. I grabbed a piece of 60mm diameter billet and started machining. As you can see I've had a couple of goes to get it right.

The tool steel is ground at a 40 degree angle and I've cut the grooves at a 3.56mm pitch. Numbers I got from the belt specs on the Gates web page.
Here I'm trial fitting the pulley to check the alignment with a neat tool I picked at a swap meet years ago. It's a lazer alignment tool for V belts and multi rib belts. It aligns from the grooves in one pulley and shoots a beam at the other that you can line against. It's one of those tool that you don't use very often but when you do it makes the job so much easier.

Happy with the alignment. now I can clean it up and make it look nice.

With the serpentine machining set up working I could get back to the big lump of aluminum. There's a huge pile of swarf on the lathe now because like any complex shape you machine you have to start with a big piece of material and remove an awful lot of it. I reckon more than 2/3 of the original material has been machined off to reveal this pulley. A heap more material came out after this pic.

The back of the pulley is the important stuff. It has to run true and it also sets up the belt alignment. The shaft on the pump is 3/4" diameter but I've machine the hole .002" undersize for a press fit.
The front side is all about making it look nice. I've machined a center cap to cover the retaining bolt and then turned the whole thing as one piece.

Trial fitting and checking the alignment and how true it runs.

Pulleys all finished. Just measuring up to order some belts. Might have to machine up a new water pump pulley too as it's looking a bit scruffy next to it's fancy new friends.

Cheers
__________________
Mike Murphy
Melbourne Australia
Last edited by Aussie Mike; 02-03-2013 at 03:00 AM..
|
02-03-2013, 01:30 PM
|
|
CC Member
|
|
|
Join Date: May 2004
Location: Melbourne,
Vic
Cobra Make, Engine: Cobra RMC 377ci Windsor, Harrison Daytona Coupe, Ford XC Coupe.
Posts: 1,588
|
|
Not Ranked
Tools
So Mike,
To be able to do all great stuff you do all I need is better tools 
IF ONLY....... 
STIFFY |
 Posting Rules
|
You may not post new threads
You may not post replies
You may not post attachments
You may not edit your posts
HTML code is Off
|
|
|
All times are GMT -7. The time now is 01:06 PM.
|
|


 Hybrid Mode

