Absolute Pace

Go Back   Club Cobra > Club Forums > Australian Cobra Club

Welcome to Club Cobra!  The World's largest non biased Shelby Cobra related site!

  •  » Representation from nearly all Cobra/Daytona/GT40 manufacturers
  •  » Help from all over the world for your questions
  •  » Build logs for you and all members
  •  » Blogs
  •  » Image Gallery
  •  » Many thousands of members and nearly 1 million posts! 

YES! I want to register an account for free right now!  p.s.: For registered members this ad will NOT show

Keith Craft Racing
Nevada Classics
Keith Craft Racing
Main Menu
Nevada Classics
Nevada Classics
Keith Craft Racing
MMG Superformance
Advertise at CC
Banner Ad Rates
Keith Craft Racing
Keith Craft Racing
MMG Superformance
MMG Superformance
April 2024
S M T W T F S
  1 2 3 4 5 6
7 8 9 10 11 12 13
14 15 16 17 18 19 20
21 22 23 24 25 26 27
28 29 30        

Kirkham Motorsports

Like Tree6Likes
  • 1 Post By gjkrv8
  • 1 Post By sambo
  • 2 Post By gjkrv8
  • 2 Post By Tenrocca

Reply
 
LinkBack Thread Tools Rate Thread Display Modes
  #1 (permalink)  
Old 07-18-2014, 05:43 PM
gjkrv8's Avatar
CC Member
Visit my Photo Gallery

 
Join Date: Apr 2008
Location: Melbourne, VIC
Cobra Make, Engine: Classic Revival CR 3505, LS1, T56 6 Speed, VE 3.45 LSD Rear, 6 Spot AP Fronts, 4 Spot Wilwood Rears
Posts: 1,121
Not Ranked     
Default Wheel Alignment Jig

Its been a slow few days on the forum so I thought I'd put up something I did recently. Also Melb weather hasn't been conducive to Cobra driving too :-(

My Wheel alignment/camber had been concerning me lately as the rear drivers side "looked" very toe=in and excessive neg camber

Rather than take it to a shop and explain the peculiarities of a my Cobra and its suspension etc I decided to have a crack at making my own Wheel Alignment jig.

Also I got a welder for XMAS and was looking for something to try my hand at - (note I haven't welded before so please don't look too hard at the welds).

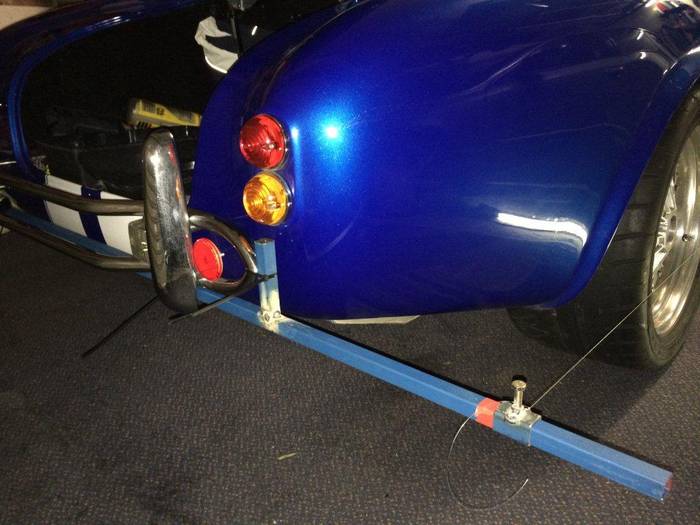
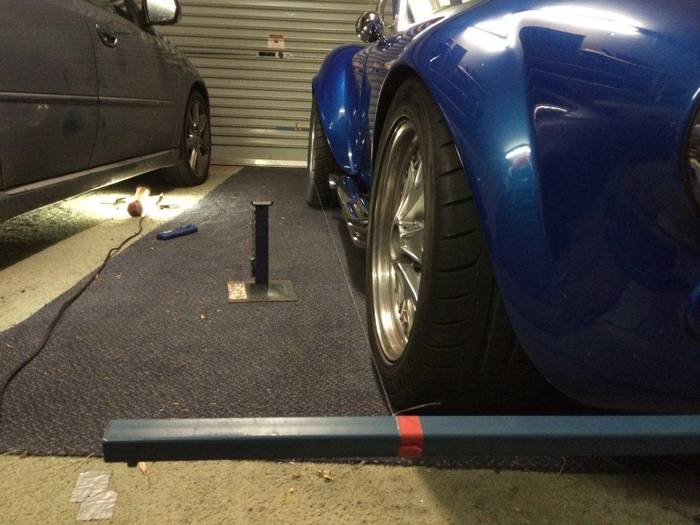
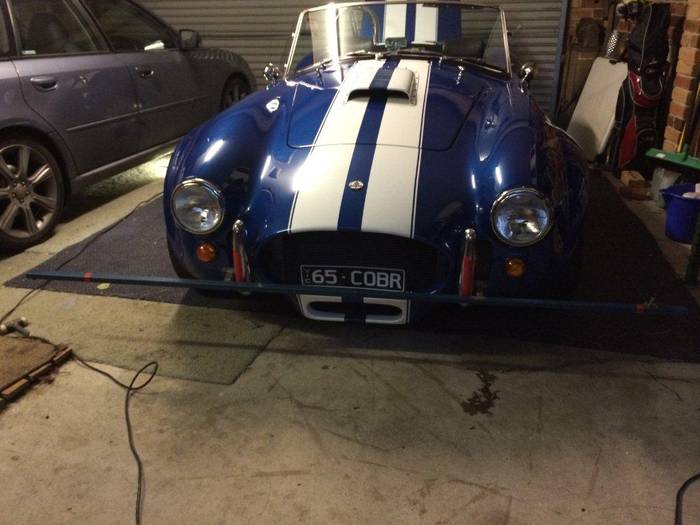
So I searched for some ideas on the inter web and made up a jig that attaches to the front and rear overrider/bumpers. I liked this idea as you need to jack the car up, adjust the alignment and then put it down and move it back and forth to "Settle" the suspension multiple times to get it right. Having the alignment tool attached to the car makes this easier.

Anyway here it is.

BTW: I found my suspicions were true for the rear drivers wheel - the camber adjustment was loose and the bottom of the wheel and moved out causing the toe in - all fixed now. Also used it to reset my front toe after I pulled the steering rack out to change tie rod ends etc.

I reckon its pretty handy - saves a bit of time and money take it to the alignment shops etc.

Once you have squared it up on the car, I then marked it with some red insulation tape. I can take the jig off and on again very quickly and a quick square check and ready to take measurements.

I made some little adjusters to set the square - did do it on the front bars yet. Also I only attached and lock it in with cable ties at the rear at the moment - am working on a better approach to that. It does "locate" sideways correctly in the same place each time though.

Its probably not uber accurate but does the job for me.

Cheers Gregg


LoBelly likes this.
Reply With Quote
  #2 (permalink)  
Old 07-18-2014, 10:45 PM
Krait's Avatar
CC Member
Visit my Photo Gallery

 
Join Date: Mar 2008
Location: Gold Coast, QLD
Cobra Make, Engine: Harrison #69, HSV LS2, T56, Custom rear suspension
Posts: 604
Not Ranked     
Default

Hi Gregg,

Nice job. Even top race teams use the string method. The string height should be level with the hub centre though.
__________________
Geoff
Cobra Car Club of Qld - UAE Chapter
Reply With Quote
  #3 (permalink)  
Old 07-19-2014, 12:05 AM
gjkrv8's Avatar
CC Member
Visit my Photo Gallery

 
Join Date: Apr 2008
Location: Melbourne, VIC
Cobra Make, Engine: Classic Revival CR 3505, LS1, T56 6 Speed, VE 3.45 LSD Rear, 6 Spot AP Fronts, 4 Spot Wilwood Rears
Posts: 1,121
Not Ranked     
Default

Quote:
Originally Posted by Krait View Post
Hi Gregg,

Nice job. Even top race teams use the string method. The string height should be level with the hub centre though.
Thanks Geoff.

Its probably the angle of the photo but the string is pretty close to the centre of the hubs.

cheers Gregg
Reply With Quote
  #4 (permalink)  
Old 07-19-2014, 02:56 AM
*13*'s Avatar
CC Member
Visit my Photo Gallery

 
Join Date: May 2006
Location: Portland, OR
Cobra Make, Engine: ERA FIA, 1964 289->Webers
Posts: 3,689
Not Ranked     
Default

Flat floor & a square, works also. Pencil mark on floor for front of tire & rear of tire. Measure distance, from left & right tires.
__________________
ERA FIA 2088
Reply With Quote
  #5 (permalink)  
Old 07-19-2014, 06:51 AM
CC Member
Visit my Photo Gallery

 
Join Date: Jun 2001
Location: munno para west, sa
Cobra Make, Engine: absolute pace chassis #50 L98 & 6 speed auto
Posts: 1,141
Not Ranked     
Default

I always string our race cars have done so for years also having a caster /camber gauge that mounts off the hub helps . I paid to get the race car scaled and wheel aligned and it handled like a pig in mud after a practice round and one race I set it back up with the string method and the car handled like it should .. good on ya for having a go I bet you learned heaps as well .
cheers dean
Reply With Quote
  #6 (permalink)  
Old 07-19-2014, 05:38 PM
gjkrv8's Avatar
CC Member
Visit my Photo Gallery

 
Join Date: Apr 2008
Location: Melbourne, VIC
Cobra Make, Engine: Classic Revival CR 3505, LS1, T56 6 Speed, VE 3.45 LSD Rear, 6 Spot AP Fronts, 4 Spot Wilwood Rears
Posts: 1,121
Not Ranked     
Default

sure learned heaps - I reckon it would be even easier to make for a car with quick jacks too.
cheers Gregg
Reply With Quote
  #7 (permalink)  
Old 07-20-2014, 02:14 AM
CC Member
Visit my Photo Gallery

 
Join Date: Mar 2014
Location: Melbourne, VIC
Cobra Make, Engine: RMC
Posts: 31
Not Ranked     
Default

Looks great. Might have to have a crack at that myself to get mine in the ball park. Thanks for sharing.
__________________
"It's better to burn out, than to fade away"
Reply With Quote
  #8 (permalink)  
Old 07-20-2014, 04:01 AM
CC Member
Visit my Photo Gallery

 
Join Date: Feb 2006
Location: The Hills, NSW
Cobra Make, Engine: Absolute Pace
Posts: 1,354
Not Ranked     
Default

Great idea.

I think Tenrocca has perfected doing alignments with his iPhone, perhaps he will chip in with comments.
Reply With Quote
  #9 (permalink)  
Old 07-20-2014, 04:21 PM
sambo's Avatar
CC Member
Visit my Photo Gallery

 
Join Date: Jan 2007
Location: Melbourne, VIC
Cobra Make, Engine: Harrison, 6.0L Chev
Posts: 2,513
Not Ranked     
Default

Nice work Gregg. I had a go at something similar with my initial alignment but the car didn't feel completely "right" until I took it for a proper laser alignment. Plus I had other problems with geometry that I won't go into here - all fixed now though.

How did you check for squareness with those two bars? They could be parallel but not square... just wondering. Also how would you measure camber and caster? I have a camber/caster gauge and some home made turn plates if you'd like to borrow them.
deano59 likes this.
__________________
"A spectacularly fast car in a grand if dated tradition."
Reply With Quote
  #10 (permalink)  
Old 07-20-2014, 06:23 PM
Gav's Avatar
Gav Gav is offline
CC Member
Visit my Photo Gallery

 
Join Date: Apr 2006
Location: Mildura, vic
Cobra Make, Engine: FFR Coupe, 416ci of LS goodness
Posts: 2,349
Not Ranked     
Default

I bought one of these a while back

QuickTrick Alignment Pro System Wheel Alignment Tools 90004 - Free Shipping on Orders Over $99 at Summit Racing

Pretty handy for changing street settings to track settings.
__________________
Powered by Cu
Reply With Quote
  #11 (permalink)  
Old 07-20-2014, 08:08 PM
gjkrv8's Avatar
CC Member
Visit my Photo Gallery

 
Join Date: Apr 2008
Location: Melbourne, VIC
Cobra Make, Engine: Classic Revival CR 3505, LS1, T56 6 Speed, VE 3.45 LSD Rear, 6 Spot AP Fronts, 4 Spot Wilwood Rears
Posts: 1,121
Not Ranked     
Default

Ooooo I like that QuickTrick tool - you know I googled my little heart out for something around that price and came up zero. Looks pretty neat.

Regarding Squaring up - essentially you make sure each end where the string connects to the bars is the same width - i.e. you pick a width that is great than the car.

Then to square it you need to ensure the strings are the same distance either side from the front and rear hubs.

Its a little bit of initial fiddling because the front and rear tracks are different (thats why I made the slide adjusters). But once you get it square I then just put insulation tape marks on the front and rear square alignment bars.

I have had it on and off the car multiple times and all I do is double check the square and hub distances and it comes up the same each time.

For Camber I have a very crude method - I have a square bar attached to a spirit level and I put it against the wheel rim edges and measure how far out the top edge is from the rim for a vertical spirit level etc. I then use a little spreadsheet with a TAN formula in it and I enter the value and it gives me the angle. Its probably not uber accurate but does the job.

Caster - I havent done that. Too hard for my small brain to figure out :-)

My car tracks pretty well at the front and the feel is right with the power steering and all so I am assuming caster is ok.

Its been too cold and wet here to test my new adjustments though. So I might have stuffed it up.

Attached is what I ended up with.


The camber is a bit much for street but I left it for Nationals in Oct. The rear camber is adjusted all the way in so thats the best I can do.

cheers gregg
Tenrocca and Gav like this.

Last edited by gjkrv8; 07-20-2014 at 08:09 PM.. Reason: spelling
Reply With Quote
  #12 (permalink)  
Old 07-20-2014, 09:06 PM
sambo's Avatar
CC Member
Visit my Photo Gallery

 
Join Date: Jan 2007
Location: Melbourne, VIC
Cobra Make, Engine: Harrison, 6.0L Chev
Posts: 2,513
Not Ranked     
Default

That's an interesting approach. With my car I just couldn't assume the wheels were square in the first place (don't go there). Two other methods:

1. Scribe a centre line on the underneath of the car, then run string lines parallel to that

OR

2. Lay a large builder's square over each corner where your alignment bar intersections the string lines and check for 90 degrees at each corner.

If your car is stable at high speeds and doesn't pull left or right then I'd suggest not messing with caster. I found it really hard to maintain a fixed camber setting while fiddling with caster. Gave up in the end!
__________________
"A spectacularly fast car in a grand if dated tradition."

Last edited by sambo; 07-20-2014 at 09:09 PM..
Reply With Quote
  #13 (permalink)  
Old 07-20-2014, 09:32 PM
gjkrv8's Avatar
CC Member
Visit my Photo Gallery

 
Join Date: Apr 2008
Location: Melbourne, VIC
Cobra Make, Engine: Classic Revival CR 3505, LS1, T56 6 Speed, VE 3.45 LSD Rear, 6 Spot AP Fronts, 4 Spot Wilwood Rears
Posts: 1,121
Not Ranked     
Default

Quote:
Originally Posted by sambo View Post
That's an interesting approach. With my car I just couldn't assume the wheels were square in the first place (don't go there). Two other methods:

1. Scribe a centre line on the underneath of the car, then run string lines parallel to that

OR

2. Lay a large builder's square over each corner where your alignment bar intersections the string lines and check for 90 degrees at each corner.

If your car is stable at high speeds and doesn't pull left or right then I'd suggest not messing with caster. I found it really hard to maintain a fixed camber setting while fiddling with caster. Gave up in the end!
I thought about the car/suspension being square so I measured that the two chassis round tubes were parallel and then measured from each rail to the hubs to check they were the same for the two fronts and two rears (within the measuring accuracy of my method).

It actually handled pretty well prior to this but the excessive camber on the rear (I found out was due to loose camber bolt) was buggering the rear toe.

Also I had to change my steering arms and tie rod ends so I needed a way to set it up again.

All good stuff - I like this as it helps me understand things better.


Totally different topic - Has anyone seen the "remote wireless QA1 Shocker adjustment system". I saw it in a mustang forum. You can modify your shocker settings via a wireless remote. Apparently you can retrofit it onto you existing twist knob click etc systems.

cheers

gregg

Last edited by gjkrv8; 07-20-2014 at 09:33 PM.. Reason: spelling
Reply With Quote
  #14 (permalink)  
Old 07-20-2014, 10:34 PM
Gav's Avatar
Gav Gav is offline
CC Member
Visit my Photo Gallery

 
Join Date: Apr 2006
Location: Mildura, vic
Cobra Make, Engine: FFR Coupe, 416ci of LS goodness
Posts: 2,349
Not Ranked     
Default

Quote:
Originally Posted by gjkrv8 View Post
Ooooo I like that QuickTrick tool - you know I googled my little heart out for something around that price and came up zero. Looks pretty neat.

Regarding Squaring up - essentially you make sure each end where the string connects to the bars is the same width - i.e. you pick a width that is great than the car.

Then to square it you need to ensure the strings are the same distance either side from the front and rear hubs.

Its a little bit of initial fiddling because the front and rear tracks are different (thats why I made the slide adjusters). But once you get it square I then just put insulation tape marks on the front and rear square alignment bars.

I have had it on and off the car multiple times and all I do is double check the square and hub distances and it comes up the same each time.

For Camber I have a very crude method - I have a square bar attached to a spirit level and I put it against the wheel rim edges and measure how far out the top edge is from the rim for a vertical spirit level etc. I then use a little spreadsheet with a TAN formula in it and I enter the value and it gives me the angle. Its probably not uber accurate but does the job.

Caster - I havent done that. Too hard for my small brain to figure out :-)

My car tracks pretty well at the front and the feel is right with the power steering and all so I am assuming caster is ok.

Its been too cold and wet here to test my new adjustments though. So I might have stuffed it up.

Attached is what I ended up with.


The camber is a bit much for street but I left it for Nationals in Oct. The rear camber is adjusted all the way in so thats the best I can do.

cheers gregg
A couple of mm toe out is the go for on the track.
I usually leave the rear square.
__________________
Powered by Cu
Reply With Quote
  #15 (permalink)  
Old 07-20-2014, 11:13 PM
Tenrocca's Avatar
CC Member
Visit my Photo Gallery

 
Join Date: Nov 2004
Location: Sydney, NSW
Cobra Make, Engine: Classic Revival #3199. 366ci L76, T56 6 speed, Blue circle custom paint, Australias most original cobra 2009-2010
Posts: 2,396
Not Ranked     
Default

Quote:
Originally Posted by gjkrv8 View Post
For Camber I have a very crude method - I have a square bar attached to a spirit level and I put it against the wheel rim edges and measure how far out the top edge is from the rim for a vertical spirit level etc. I then use a little spreadsheet with a TAN formula in it and I enter the value and it gives me the angle. Its probably not uber accurate but does the job.
As Ben said I made a simple mount to put my phone into and used a level app to measure camber. Have to have a level floor and make sure you have your phone square to the other 2 axis.

Saw the string setup being used at the V8 supercars at homebush a couple of years ago - was virtually identical to what your doing.

Cheers
Gav and gjkrv8 like this.
__________________
Proudly registered since 2013.
Reply With Quote
Reply


Posting Rules
You may not post new threads
You may not post replies
You may not post attachments
You may not edit your posts

BB code is On
Smilies are On
[IMG] code is On
HTML code is Off
Trackbacks are On
Pingbacks are On
Refbacks are On


All times are GMT -7. The time now is 10:57 AM.


Powered by vBulletin® Version 3.8.0
Copyright ©2000 - 2024, Jelsoft Enterprises Ltd.
Search Engine Friendly URLs by vBSEO 3.6.0
The representations expressed are the representations and opinions of the clubcobra.com forum members and do not necessarily reflect the opinions and viewpoints of the site owners, moderators, Shelby American, any other replica manufacturer, Ford Motor Company. This website has been planned and developed by clubcobra.com and its forum members and should not be construed as being endorsed by Ford Motor Company, or Shelby American or any other manufacturer unless expressly noted by that entity. "Cobra" and the Cobra logo are registered trademarks for Ford Motor Co., Inc. clubcobra.com forum members agree not to post any copyrighted material unless the copyrighted material is owned by you. Although we do not and cannot review the messages posted and are not responsible for the content of any of these messages, we reserve the right to delete any message for any reason whatsoever. You remain solely responsible for the content of your messages, and you agree to indemnify and hold us harmless with respect to any claim based upon transmission of your message(s). Thank you for visiting clubcobra.com. For full policy documentation refer to the following link: CC Policy