Welcome to Club Cobra! The World's largest
non biased Shelby Cobra related site!
- » Representation from nearly all
Cobra/Daytona/GT40 manufacturers
- » Help from all over the world for your
questions
- » Build logs for you and all members
- » Blogs
- » Image Gallery
- » Many thousands of members and nearly 1
million posts!
YES! I want to register an account for free right now!
p.s.: For registered members this ad will NOT show
 
 Main Menu
|
|
Nevada Classics
|
|
Advertise at CC
|
|
April 2026
|
| S |
M |
T |
W |
T |
F |
S |
| |
|
|
1 |
2 |
3 |
4 |
| 5 |
6 |
7 |
8 |
9 |
10 |
11 |
| 12 |
13 |
14 |
15 |
16 |
17 |
18 |
| 19 |
20 |
21 |
22 |
23 |
24 |
25 |
| 26 |
27 |
28 |
29 |
30 |
|
|
|
|
CC Advertisers
|
|

02-04-2007, 03:44 AM
|
 |
CC Member

|
|
|
Join Date: Jan 2001
Location: Sunbury,
VIC
Cobra Make, Engine: Rat Rod Racer, LS1 & T56
Posts: 5,391
|
|

 Not Ranked
 CR Seat mountngs
Hi All,
I'm currently working on the seats in my Cobra. This has been a fun exercise trying to work out the ideal seating position for me.
I'm a bit of a funny shape with a long torso. In most Cobras I seem to be looking at the top of the windscreen frame from the drivers seat. The plan was to get myself as far down as possible in the car. There are a couple of factors working against me and the main one being the ADR requirement for adjustable seat rails.
I couldn't find any seats for the Cobra that I really liked. Price or style or shape/support put me off most of them. What I wanted out of the seats for my car was the lateral support given by a fiberglass race seat but with the clean looks of a low back with a seperate head rest. I didn't want to spend a fortune so it looks like I'll have to make or modify something.
I picked up a pair of new fiberglass race seats on ebay complete with the adjustable mounting rails. I got them for a bargain price of about $160 each shipped which I thought was cheap enough that if I bollox up modifying them it won't break the bank.
First thing to do was sort out mounting the rails. Back when I had the body off I made a couple of modds to the chassis to make life easier for someone working by them selves on the car. One of the mods was to drill out the threaded mounting for the inner front seat mounts and drill right through the chassis cross member. I then welded in a crush tube so I could bolt right through the rail. This might not make sense at first but it will later.
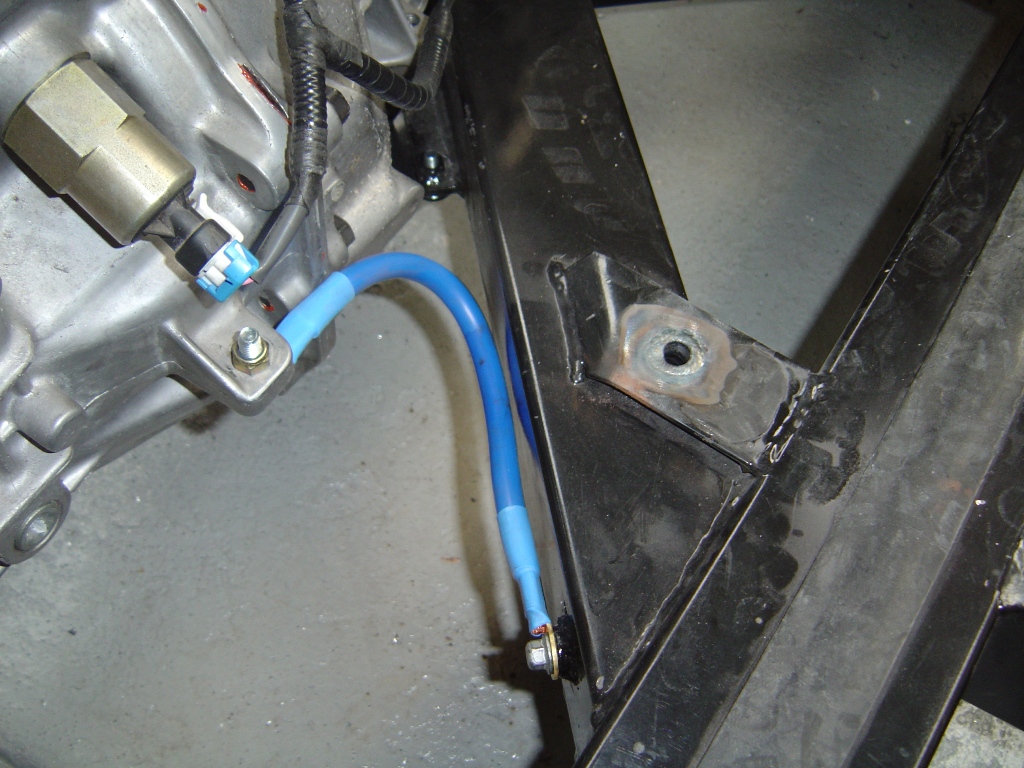
Here's a pic of the welded in crush tube. You will also notice the boss welded on for the battery strap to bolt to.
Later with the body on and bolted down you can see the core mat in the floor that gives it it's strength without adding too much weight. Normally the seat rails are just bolted down straight through the floor and onto the chassis. The floor with it's core mat is very strong and resists bending but it can be easily crushed by bolting through it. I decided to drill the holes through the floor out to 22mm with an arbour I made tha uses the hole in the chassis as a guide. I then machined up some bushes that limit how far the bolt can be tightened down. They clamp the floor to the chassis but not so tightly that the core mat gets crushed.
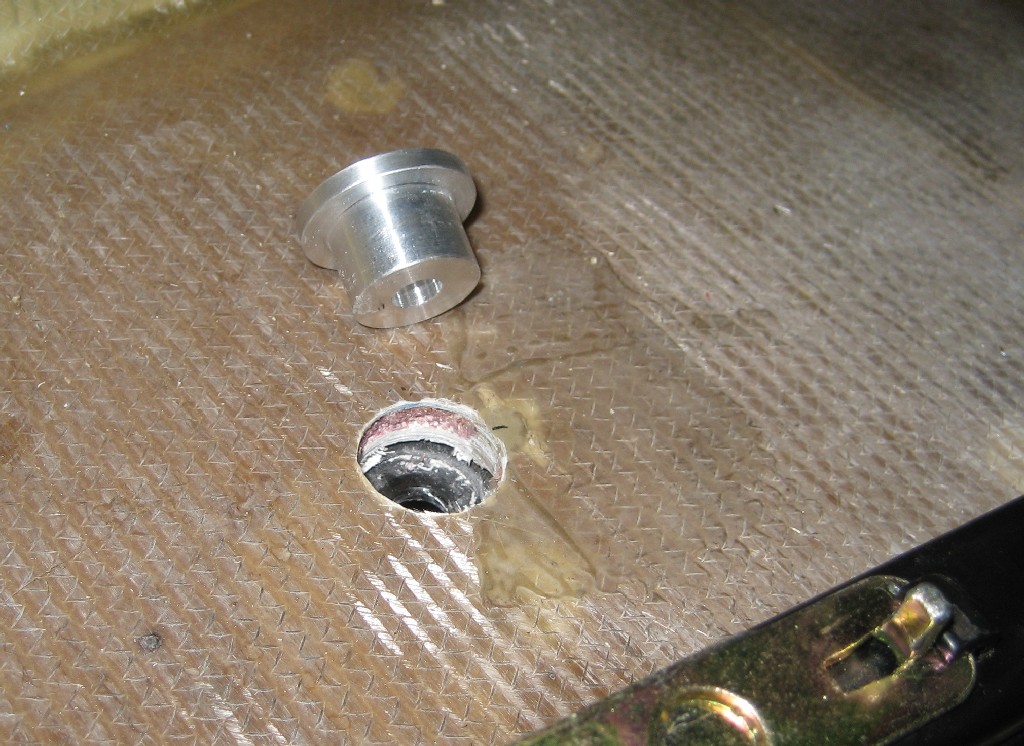
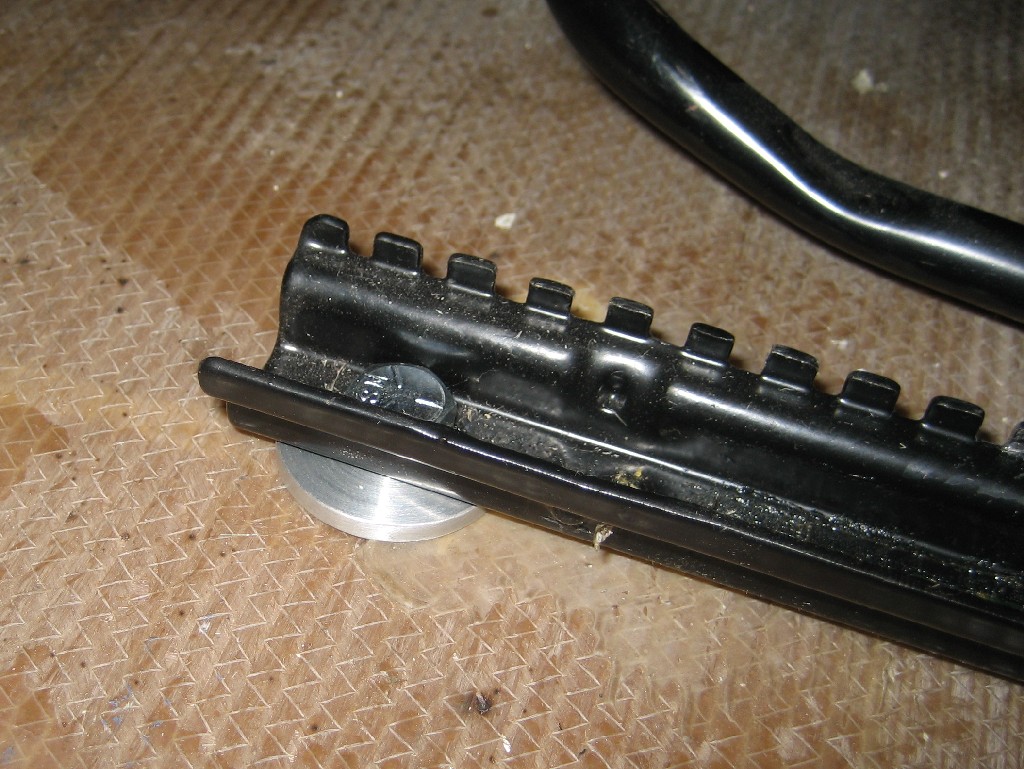
I also machined them with a 3mm lip that raises the rail slightly off the floor. This is to help keep the rail clear of the carpet (when it's finally fitted) and also to clear the edge of the door lock post there it's bonded to the floor. The rail was hitting on the edge of it and not running all the way back.
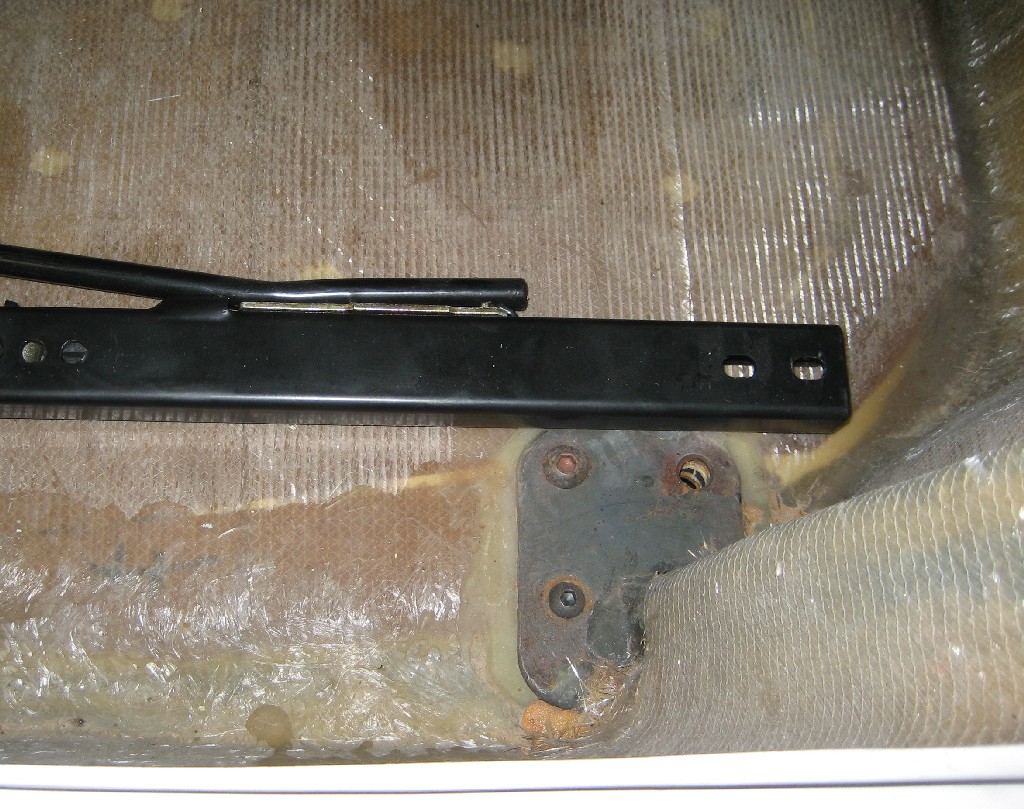
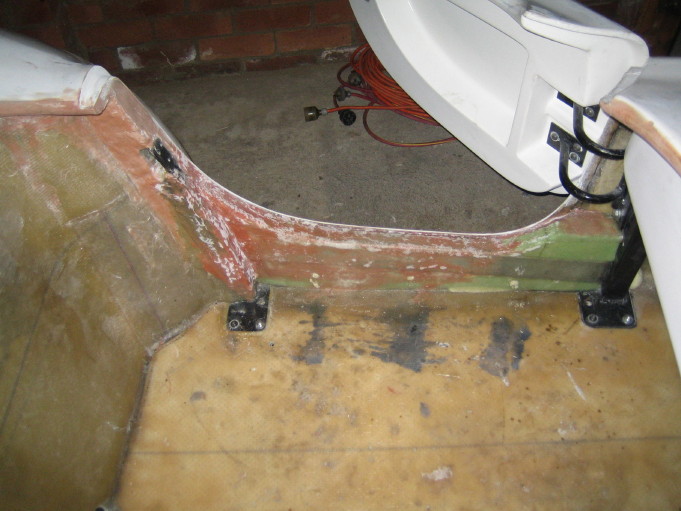
Here are two of the bushes fitted and the rail ready to bolt down. The long bolt at the front is the one that goes right through the cross member.

Now the reason for putting the crush tube in will be clearer after looking at this pic. I used hex bolts and their heads are locked in and can't rotate because of the channel in the rail where they run through. This lets me spin the nut on from underneath without needing anyone to hold the head of the bolt from inside the car. It also lets me unbolt the whole seat and remove it by just undoing 4 nuts from under the car and without dismantling the seat. Having the seat as low as possible means no clearance to get your hand underneath it.
One of the things I like about the fiberglass seats is that there is only 25mm of foam and 5mm of fiberglass keeping your bum off the floor. This is about as low down as I can sit with the adjustable rails in place.
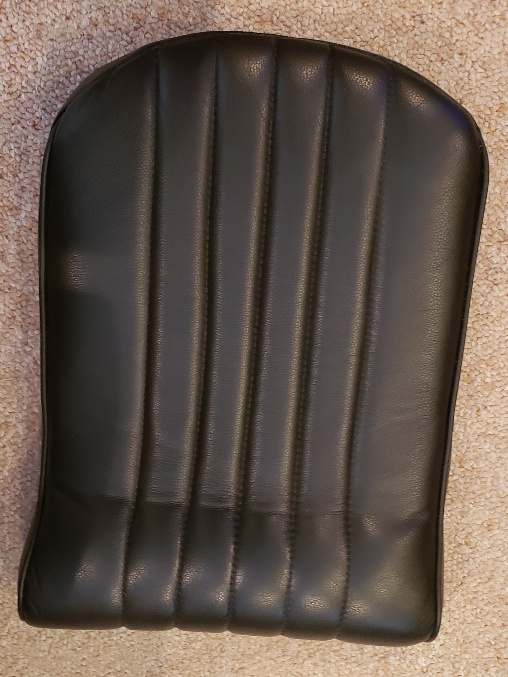
The fiberglass seat stripped of it's covering got some attention from the jigsaw and was rapidly turned into a low back seat. All that remains to do now is bend up a tubuar top rail to add some strenght in the back and support the head rest mounting. This will get fiberglassed in and the whole thing will probably get another couple of layers of mat inside it to stiffen it up. Then they are off to the trimmer to get some red leather wrapped around them.
The seating position is good with plenty of leg room. The seats really support you but are surprisingly comfortable even with just the foam squabs dropped in. They should provide heaps of support for track days. I reckon the only way you would feel more secure and supported is if you lined them with velcro and wore fury pants. Those of a more hairy persuasion could probably wear no pants.
Cheers
__________________
Mike Murphy
Melbourne Australia
Last edited by Aussie Mike; 02-04-2007 at 03:46 AM..
|
-
Advertising

02-04-2007, 04:03 AM
|
 |
CC Member
|
|
|
Join Date: Feb 2006
Location: Paradise Point,
Qld
Cobra Make, Engine: Absolute Pace
Posts: 1,205
|
|
Not Ranked
No Pants for me.
Excellent work Mike.
Phil
|
02-04-2007, 03:17 PM
|
|
CC Member
|
|
|
Join Date: Jun 2006
Location: Newcastle, Warners Bay,
NSW
Cobra Make, Engine: RMC . 393 Dart alloy block Stroked 351 alloy heads ..all the goodies plus a pre oiler. al
Posts: 1,495
|
|
Not Ranked
Nice Job ! I tack welded the nuts inside the tracks then screwed in pointed ended studs to help locate the holes when fitting the seats. I then removed the studs one at a time and replaced them with button head allen screws. The amount of bolt hanging under the floor is only the round head leaving no chance of damaging or fouling exposed threads.
Smithy,
|
02-04-2007, 03:59 PM
|
|
CC Member
|
|
|
Join Date: Jan 2001
Location: Sunbury,
VIC
Cobra Make, Engine: Rat Rod Racer, LS1 & T56
Posts: 5,391
|
|
Not Ranked
Good idea using bolts up through the floor Rob. It's pretty hard to round off a cap screw so you cant undo it. I'm a fan of button head cap screws as they have a nice rounded edge that doesn't catch on things.
On my chassis all of the seat mounting holes are well away from the ground. The body tub sits on top of the chassis and The seats bolt through to the C section chassis cross members.
Cheers
__________________
Mike Murphy
Melbourne Australia
|
02-04-2007, 06:38 PM
|
|
CC Member
|
|
|
Join Date: May 2002
Location: Brisbane Australia,
QLD
Cobra Make, Engine: RMC under re-construction, GenIV with tremec 600, Jag 3.31 L/S diff
Posts: 3,318
|
|
Not Ranked
Great stuff mike. You can move up here anytime you want. 
Without trying to hijack Mikes thread has any-one seen or sat in the VELO cobra seat thats advertised in snaketales?
Cheers
__________________
It's impossible to soar like an eagle when you're surrounded by turkeys.
|
02-04-2007, 11:28 PM
|
 |
CC Member
|
|
|
Join Date: Jul 2004
Cobra Make, Engine: 347 Stroker Morrison Injection. Registered.
Posts: 1,440
|
|
Not Ranked
Great work Mike, the crush tubes are a fantastic idea. Ill be using those on my seats.
Regards Mando.
__________________
Mando
|
02-05-2007, 01:18 AM
|
 |
CC Member
|
|
|
Join Date: Apr 2006
Location: Mildura,
vic
Cobra Make, Engine: FFR Coupe, 416ci of LS goodness
Posts: 2,349
|
|
Not Ranked
Smooth work as always Mikey.
Are you doing anything with the sills while you are at it?
__________________
Powered by Cu
|
02-05-2007, 01:58 AM
|
|
CC Member
|
|
|
Join Date: Jan 2001
Location: Sunbury,
VIC
Cobra Make, Engine: Rat Rod Racer, LS1 & T56
Posts: 5,391
|
|
Not Ranked
Thanks guys,
I'm thinking about later on tying the main dash hoop to the door lock post. I'll run a 100x50mm RHS section running along under the door. This would be welded to the door lock post and the dash hoop and then glassed into the body along with the dash hoop. It looks like Mando has bonded his dash hoop in and I reckon this is a good idea.
Linking the dash hoop and the lock pillar together will increase the side impact protection and stiffen the chassis. The RHS section will also be a good base to build a full door sill on with just a bit of foam and glass for shape.
Cheers.
__________________
Mike Murphy
Melbourne Australia
|
02-05-2007, 02:10 AM
|
|
CC Member
|
|
|
Join Date: Feb 2006
Location: Perth,
WA
Cobra Make, Engine: G-Force kit, LS1, 4L60, 4.09 LSD... Gone to Queensland!!!
Posts: 588
|
|
Not Ranked
Looking good Mike, I reckon they'll look great when they're covered too... I see the seat belts are in as well!!
Are you counting the sleeps till rego or is that still a little way off???
|
02-05-2007, 04:46 AM
|
|
CC Member
|
|
|
Join Date: Jan 2001
Location: Sunbury,
VIC
Cobra Make, Engine: Rat Rod Racer, LS1 & T56
Posts: 5,391
|
|
Not Ranked
Not quite counting the sleeps but I'm getting things crossed off the to-do list. Depending on my work load I hope to have it in front of the engineer in March.
Cheers
__________________
Mike Murphy
Melbourne Australia
|
02-06-2007, 01:59 AM
|
 |
CC Member
|
|
|
Join Date: Nov 2004
Location: Sydney,
NSW
Cobra Make, Engine: Classic Revival #3199. 366ci L76, T56 6 speed, Blue circle custom paint, Australias most original cobra 2009-2010
Posts: 2,396
|
|
Not Ranked
Quote:
|
Originally Posted by Aussie Mike
Thanks guys,
I'm thinking about later on tying the main dash hoop to the door lock post. I'll run a 100x50mm RHS section running along under the door. This would be welded to the door lock post and the dash hoop and then glassed into the body along with the dash hoop. It looks like Mando has bonded his dash hoop in and I reckon this is a good idea.
Linking the dash hoop and the lock pillar together will increase the side impact protection and stiffen the chassis. The RHS section will also be a good base to build a full door sill on with just a bit of foam and glass for shape.
Cheers.
|
Ummmmmm ....A little like this ?  :
OK - another idea Ive stolen off you  Sorry Mike, but you come up with all the good stuff
I couldnt fit a 2 x 4 in there though, I though the sill looked a bit to thick (and I think it was too tall but I could be wrong), so I just used a 3 x 1.5 RHS. I also filled in behind with that expanding foam and it feels nice and solid now. Still a lot of fibreglassing to go. 
Mizzi reckons its going to put me over 1200kgs, but Im not planning to put in those woofers that make every compass in a 12 mile radius point towards HIS car!
__________________
Proudly registered since 2013.
Last edited by Tenrocca; 02-06-2007 at 02:02 AM..
|
02-06-2007, 02:10 AM
|
|
CC Member
|
|
|
Join Date: Jan 2001
Location: Sunbury,
VIC
Cobra Make, Engine: Rat Rod Racer, LS1 & T56
Posts: 5,391
|
|
Not Ranked
That's exactly what I was thinking. Great work Andrew, you've certainly got some skills. I think we all talked about this at one of the B-Club BBQs so I can't take credit for the idea.
Is that one of Ian's new doors with the extra side impact bar?
Cheers
__________________
Mike Murphy
Melbourne Australia
|
02-06-2007, 02:39 AM
|
|
CC Member
|
|
|
Join Date: Nov 2004
Location: Sydney,
NSW
Cobra Make, Engine: Classic Revival #3199. 366ci L76, T56 6 speed, Blue circle custom paint, Australias most original cobra 2009-2010
Posts: 2,396
|
|
Not Ranked
Thanks Mike - I really should do stuff thats going to get my car on the road though - its all good fun.
Not sure about the doors - mine has 2 bars running above and below the large door pocket indent on the inside. They both tie into the lock mounting plate and I assume into the front hinge plate as well. I didnt realise the doors have changed from eariler ones.
Cheers.
__________________
Proudly registered since 2013.
|
02-06-2007, 06:20 AM
|
 |
Senior Club Cobra Member
|
|
|
Join Date: Feb 2006
Location: Melbourne,
VIC
Cobra Make, Engine: RMC, carb 347 TopLoader and Jag running gear ~ so old school I time it with an hour-glass :D
Posts: 1,293
|
|
Not Ranked
Looks like you CR guys get lots of nice flat floor.
Really like your seat set up Mike - you can borrow my ADR tags off my seats if you like
LoBelly |
02-06-2007, 07:45 PM
|
|
CC Member
|
|
|
Join Date: Apr 2006
Location: Mildura,
vic
Cobra Make, Engine: FFR Coupe, 416ci of LS goodness
Posts: 2,349
|
|
Not Ranked
Andrew can you give a bit of a run down on what you have done with the dash edge and the sills?
Surely you took loads of progress pics to help out dummies like me?
__________________
Powered by Cu
|
02-06-2007, 09:15 PM
|
|
CC Member
|
|
|
Join Date: Nov 2004
Location: Sydney,
NSW
Cobra Make, Engine: Classic Revival #3199. 366ci L76, T56 6 speed, Blue circle custom paint, Australias most original cobra 2009-2010
Posts: 2,396
|
|
Not Ranked
Quote:
|
Originally Posted by Gav
Andrew can you give a bit of a run down on what you have done with the dash edge and the sills?
Surely you took loads of progress pics to help out dummies like me? |
Ummm.....well that would have made a lot of sence wouldnt it  . I described it a bit in this thread:
Progress update - rounded cockpit edges
but Ill take some better pics of how it looks now and draw something up and scan it to explain it a bit better.
Cheers.
__________________
Proudly registered since 2013.
|
 Posting Rules
|
You may not post new threads
You may not post replies
You may not post attachments
You may not edit your posts
HTML code is Off
|
|
|
All times are GMT -7. The time now is 06:24 PM.
|
|


 Linear Mode


