Welcome to Club Cobra! The World's largest
non biased Shelby Cobra related site!
- » Representation from nearly all
Cobra/Daytona/GT40 manufacturers
- » Help from all over the world for your
questions
- » Build logs for you and all members
- » Blogs
- » Image Gallery
- » Many thousands of members and nearly 1
million posts!
YES! I want to register an account for free right now!
p.s.: For registered members this ad will NOT show
 
 Main Menu
|
|
Nevada Classics
|
|
Advertise at CC
|
|
February 2026
|
| S |
M |
T |
W |
T |
F |
S |
| 1 |
2 |
3 |
4 |
5 |
6 |
7 |
| 8 |
9 |
10 |
11 |
12 |
13 |
14 |
| 15 |
16 |
17 |
18 |
19 |
20 |
21 |
| 22 |
23 |
24 |
25 |
26 |
27 |
28 |
|
|
CC Advertisers
|
|

12-14-2008, 02:15 AM
|
 |
CC Member

|
|
|
Join Date: Nov 2004
Location: Sydney,
NSW
Cobra Make, Engine: Classic Revival #3199. 366ci L76, T56 6 speed, Blue circle custom paint, Australias most original cobra 2009-2010
Posts: 2,396
|
|

 Not Ranked
 A bit of build update
I havent posted any updated pics of my car in ages as I really havent been doing much except filling and sanding and gapping etc etc. , but I did fit the windscreen and wipers today.
Here she is looking mighty pretty (not) in gel coat and multi coloured bog. Looking to prime in the next 2-3 weeks and painted soon after. If all goes to plan engineering around March\April.


__________________
Proudly registered since 2013.
|
-
Advertising

12-14-2008, 03:07 AM
|
|
CC Member
|
|
|
Join Date: Jun 2006
Location: Newcastle, Warners Bay,
NSW
Cobra Make, Engine: RMC . 393 Dart alloy block Stroked 351 alloy heads ..all the goodies plus a pre oiler. al
Posts: 1,495
|
|
Not Ranked
Let that bog and primer dry for a spell. It will pay off in the future. Shrinkage happens !
Smithy
|
12-14-2008, 03:19 AM
|
|
CC Member
|
|
|
Join Date: Nov 2004
Location: Sydney,
NSW
Cobra Make, Engine: Classic Revival #3199. 366ci L76, T56 6 speed, Blue circle custom paint, Australias most original cobra 2009-2010
Posts: 2,396
|
|
Not Ranked
__________________
Proudly registered since 2013.
|
12-14-2008, 04:16 AM
|
 |
CC Member
|
|
|
Join Date: Feb 2006
Location: Paradise Point,
Qld
Cobra Make, Engine: Absolute Pace
Posts: 1,205
|
|
Not Ranked
Wipers
Andrew,
You Are Supposed To Have The Wipers Going the OTHER Way, They Are To Pivot On The Left Side.
Phil
__________________
Not all driveways reach the street!
|
12-14-2008, 05:07 AM
|
 |
CC Member
|
|
|
Join Date: Jul 2004
Cobra Make, Engine: 347 Stroker Morrison Injection. Registered.
Posts: 1,440
|
|
Not Ranked
Hi Andrew, its good to see someone else decided to go with only 2 wipers. Might be worth checking with your engineer if its OK for the wipers to rest on the left or if they should rest on the right like production cars do in Australia.
Regards.
__________________
Mando
|
12-14-2008, 01:19 PM
|
|
CC Member
|
|
|
Join Date: Nov 2004
Location: Sydney,
NSW
Cobra Make, Engine: Classic Revival #3199. 366ci L76, T56 6 speed, Blue circle custom paint, Australias most original cobra 2009-2010
Posts: 2,396
|
|
Not Ranked
I prefer 2 wipers to 3 and got the OK from my engineer. Apparantly the ADR has been changed from a percenatge area wipe to "vehicle must have an effective wiper system".
Mizz - I feel you Maybe Are being a Smart Arse There, but every car I have ever owned had the wipers parking on the passenger side. They are Period Correct symetrical and you just flip the wheel boxes over to make em park on the other side if I need.
__________________
Proudly registered since 2013.
|
12-14-2008, 02:34 PM
|
|
CC Member
|
|
|
Join Date: Feb 2006
Location: Paradise Point,
Qld
Cobra Make, Engine: Absolute Pace
Posts: 1,205
|
|
Not Ranked
Yep,
Couldn't resist 
Phil
__________________
Not all driveways reach the street!
|
12-14-2008, 03:09 PM
|
|
CC Member
|
|
|
Join Date: Nov 2004
Location: Sydney,
NSW
Cobra Make, Engine: Classic Revival #3199. 366ci L76, T56 6 speed, Blue circle custom paint, Australias most original cobra 2009-2010
Posts: 2,396
|
|
Not Ranked
Quote:
Originally Posted by Philm

Yep,
Couldn't resist
Phil |
I did run out and double check the cars in the driveway...... 
The way they are I dont think it would matter too much which way they parked - I just thought it better that the first wipe wipes away from the centre of the screen on the drivers side - probably not much difference either way though
I do need a 130 deg wiper gear I think- the one in there is 115 which I dont think is quite enough.
__________________
Proudly registered since 2013.
Last edited by Tenrocca; 12-14-2008 at 03:38 PM..
|
12-14-2008, 03:32 PM
|
 |
CC Member
|
|
|
Join Date: Feb 2002
Location: Alice Springs, central Australia,
NT
Cobra Make, Engine: Classic revival kit (CR3181), gen III engine, T56 6 speed box, AU XR8 lsd diff
Posts: 5,699
|
|
Not Ranked
Holy hell, that thing looks heavy.
__________________
Cruising in 5th

---------------------------------------------
Never be afraid to do something new, Remember, Amateurs built the Ark: Professionals built the Titanic.
|
12-14-2008, 04:23 PM
|
|
CC Member
|
|
|
Join Date: Feb 2006
Location: Sydney,
NSW
Cobra Make, Engine:
Posts: 554
|
|
Not Ranked
Quote:
Originally Posted by boxhead
Holy hell, that thing looks heavy.
|
Yes, Dave, but imagine how heavy it would be with 3 wipers ")
Richard |
12-15-2008, 04:53 AM
|
 |
CC Member
|
|
|
Join Date: Jun 2003
Location: Australia,
Zzz
Cobra Make, Engine: Shelby alum 468 block
Posts: 14,974
|
|
Not Ranked
Looking good - you are getting there quickly now.
__________________
Bernie Knight
KMS 427 #662 Shelby 468 CSX 1026
|
12-15-2008, 02:07 PM
|
 |
CC Member
|
|
|
Join Date: Apr 2008
Location: Melbourne,
VIC
Cobra Make, Engine: Classic Revival CR 3505, LS1, T56 6 Speed, VE 3.45 LSD Rear, 6 Spot AP Fronts, 4 Spot Wilwood Rears
Posts: 1,121
|
|
Not Ranked
Bog
Hi Andrew,
I am at the stage of thinking about bog/primer and painter etc.
I had to get my engineering done just recently due to my engine not being complaint after this year, so I am registering as unpainted etc.
Having not finished a fiberglass body before I was wondering what filler, sanding / tools etc you have been using on the CR body?
Rgds
Gregg
|
12-15-2008, 02:50 PM
|
|
CC Member
|
|
|
Join Date: Nov 2004
Location: Sydney,
NSW
Cobra Make, Engine: Classic Revival #3199. 366ci L76, T56 6 speed, Blue circle custom paint, Australias most original cobra 2009-2010
Posts: 2,396
|
|
Not Ranked
Gregg,
The best souce of bodywork information is the factory five forum site. The "ask streetrod painter" section - The guy there will answer any questions you may have but they have probably been asked and answered a thougsand times before.
A couple of tips that Ive picked up:
1) wash down whole car with ajax or similar then prepsol.
2) sand or grind flat the seams and go over with body filler - the back of a hacksaw blade or good for getting the curve on the top of the gaurds.
3) Whack the areas prone to voids under the gel coat with a stiff wire brush to break through the gel coat - then fill with body filler. Bad areas on mine were around the vent openings, the edges of the door\boot\bonnet, bottom of the sills.
4) Areas of the body that need a fair bit of filling and sanding tend to be in front of the doors, in front of the bonnet where the seam runs across the gaurds, the bonnet itself was pretty crook on mine, and a few ripples in the doors and boot.
5) I used Rage gold as my primary body filler - K&H make a nice only called gold fine filler (more a finishing filler) something that I used recently and goes on and sands very nicely.
6) Gap the panels about 4-5mm. Dont try and go to close.
6) By a set of these: Best money I spent for the body work phase: http://www.adjustflexsand.com/prokit1.html
Im no expert but hope that helps.
Cheers 
__________________
Proudly registered since 2013.
|
12-15-2008, 05:53 PM
|
|
CC Member
|
|
|
Join Date: Apr 2008
Location: Melbourne,
VIC
Cobra Make, Engine: Classic Revival CR 3505, LS1, T56 6 Speed, VE 3.45 LSD Rear, 6 Spot AP Fronts, 4 Spot Wilwood Rears
Posts: 1,121
|
|
Not Ranked
Thanks Andrew (I hope I've got your name right from other posts) for the information. Very valuable tips.
Are you going to paint it yourself or have you arranged with a painter?
There are a couple of the VIC club members who I am told do good paint work. I am going to have a chat to them to see what they normally recommend. My understanding is that the paint job finished product is largely dependant on the prep work.
I am thinking of waiting til my VIN # comes through and then driving my Cobra to them for a good chat about what they think etc.
Also, the eternal big problem - what colour and stripes.
I have my heart set on black with white stripes but the other members of my family are trying to talk me in to black with silver stripes.
I am planning on trying to see some examples "in the flesh" to get a good feel for how the finished product will look like.
What colour are you thinking?
Rgds
Gregg
|
12-15-2008, 06:19 PM
|
 |
CC Member
|
|
|
Join Date: Jan 2007
Location: Melbourne,
VIC
Cobra Make, Engine: Harrison, 6.0L Chev
Posts: 2,513
|
|
Not Ranked
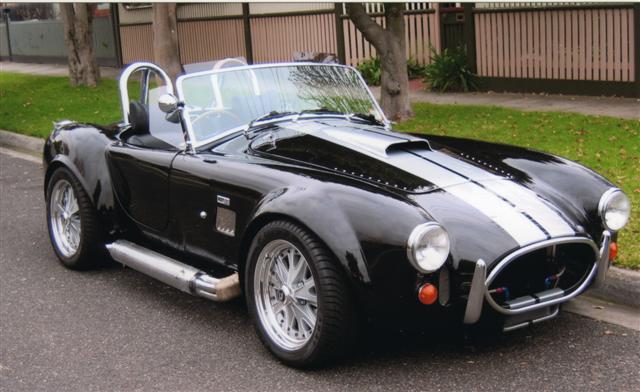
Gregg, regarding the black with silver stripes, have you seen Kanga's CR in the same colour (pic below)? He drops in here occasionally and he's in Melbourne too. He gave me my first ride in a Cobra and has been very helpful with advice - perhaps drop him a message?
Andrew - I'm thinking of doing some of the prep work myself so it's nice to get some practical advice. Thanks.
Last edited by sambo; 12-15-2008 at 06:21 PM..
Reason: added pic
|
12-15-2008, 06:28 PM
|
|
CC Member
|
|
|
Join Date: Nov 2004
Location: Sydney,
NSW
Cobra Make, Engine: Classic Revival #3199. 366ci L76, T56 6 speed, Blue circle custom paint, Australias most original cobra 2009-2010
Posts: 2,396
|
|
Not Ranked
I will definately be doing the primer surfacer - it is basicaly a spray on filler that gets block sanded anyway so room for error on that one.
I have a mystery temporary option on the paint Im working on - otherwise I have an aquaintance who can shoot the colour for me, which will be "mini" pepper white with a black stripe.
__________________
Proudly registered since 2013.
|
12-15-2008, 07:56 PM
|
|
CC Member
|
|
|
Join Date: Feb 2002
Location: Alice Springs, central Australia,
NT
Cobra Make, Engine: Classic revival kit (CR3181), gen III engine, T56 6 speed box, AU XR8 lsd diff
Posts: 5,699
|
|
Not Ranked
[quote=sambo;905293] practical advice. Thanks.
QUOTE]
You really dont know Andrew that well do you?

But on the serious side, it is all good advice Andrew, I did not know about the wire brush trick to break through possable air bubbles.
Gregg, My CR body had alot of pin holes over the r/h front fender, also the r/h sill was wavy, to straighten this out, I applied heat with a heat gun, then clamped long lengths of timber to inner and outer sill, I did this each day for approx 1 week, alowing to cool overnight, and it has straightened mine out really well.
__________________
Cruising in 5th
---------------------------------------------
Never be afraid to do something new, Remember, Amateurs built the Ark: Professionals built the Titanic.
Last edited by boxhead; 12-15-2008 at 07:59 PM..
|
12-15-2008, 08:30 PM
|
|
CC Member
|
|
|
Join Date: Nov 2004
Location: Sydney,
NSW
Cobra Make, Engine: Classic Revival #3199. 366ci L76, T56 6 speed, Blue circle custom paint, Australias most original cobra 2009-2010
Posts: 2,396
|
|
Not Ranked
Quote:
Originally Posted by boxhead
You really dont know Andrew that well do you?
|
Ooooh nasty. 
I followed boxheads instructions on the sills as well and it worked a treat. The heatgun is also very good for finding pockets under the gelcoat - when I heated the sills found a lot that way.
Also I would recommend using a heatgun around the sidepipe cutout - I think kanga had some probs with the glass rippling around his sidepies. When you heat it up sometimes the gelcoat seems to "settle" into the underlying firbreglass. better to do this before paint - just my theory based on very limited experience and may be complete BS.
__________________
Proudly registered since 2013.
|
12-15-2008, 11:04 PM
|
|
CC Member
|
|
|
Join Date: May 2002
Location: Brisbane Australia,
QLD
Cobra Make, Engine: RMC under re-construction, GenIV with tremec 600, Jag 3.31 L/S diff
Posts: 3,318
|
|
Not Ranked
All very good advice from both Tenrocca and Boxhead but missing one very important step.
As Tenrocca said, wash the whole body...thats inside and underside if you have an inner tub and all the outside surfaces. It is important to completely remove all waxes and parting agents used in the molding process.
Then the missing suggestion.....season the body by covering with black plastic and leave it outside for at least a month if possible. Preferably left on the chassis to maintain shape.
The reason for this is the same as Tenrocca mentioned heating around cutouts. It settles (post cures) the body. in other words you are accellerating any shrinkage and relieving stresses within the body laminate and also encouraging airbubbles (even very fine ones you would not normally identify) to erupt to the surface.
This is very important for cars being painted a dark color. We have all seen cars looking fantastic just after painting but then looking quite average after 6 - 12 months. This is because of the post curing of the glass laminate after the paining process.. By "cooking" under black plastic in the sun you will minimise this happening. It also ensures complete evacuation of any styrene trapped in the laminate from the chemical reaction of the resin.
Then do your filling and fairing using quality fillers as Tenrocca has then again let it sit for as long as possible before priming. Reason being is that the fillers use the same resin as the glass and also need time to shrink, minimise stresses, and evacuate the styrene. In fact you may find after spending hours getting the body perfectly fair that you will have to more filling before priming.
However, make sure after filling that the car is not exposed to rain as all polyester fillers are porous and will absorb moisture. A good idea is to spot prime filled areas because these can be refilled prior to full primer coats
__________________
It's impossible to soar like an eagle when you're surrounded by turkeys.
Last edited by Rebel1; 12-15-2008 at 11:12 PM..
|
12-15-2008, 11:30 PM
|
 |
CC Member
|
|
|
Join Date: Jan 2001
Location: Sunbury,
VIC
Cobra Make, Engine: Rat Rod Racer, LS1 & T56
Posts: 5,391
|
|
Not Ranked
Andrew,
Those sanding boards look great. Where did you get them from? What sort of $$$
I'm in the process of filling and rubbing back at the moment too. I bought some vinyl ester resin and some micro spheres a little while back and I've just tried them out on the seams on the rear guards and a mod to the top of the drivers door.
Cheers
__________________
Mike Murphy
Melbourne Australia
|
 Posting Rules
|
You may not post new threads
You may not post replies
You may not post attachments
You may not edit your posts
HTML code is Off
|
|
|
All times are GMT -7. The time now is 08:28 AM.
|
|


 Linear Mode


