Welcome to Club Cobra! The World's largest
non biased Shelby Cobra related site!
- » Representation from nearly all
Cobra/Daytona/GT40 manufacturers
- » Help from all over the world for your
questions
- » Build logs for you and all members
- » Blogs
- » Image Gallery
- » Many thousands of members and nearly 1
million posts!
YES! I want to register an account for free right now!
p.s.: For registered members this ad will NOT show
 
 Main Menu
|
|
Nevada Classics
|
|
Advertise at CC
|
|
April 2026
|
| S |
M |
T |
W |
T |
F |
S |
| |
|
|
1 |
2 |
3 |
4 |
| 5 |
6 |
7 |
8 |
9 |
10 |
11 |
| 12 |
13 |
14 |
15 |
16 |
17 |
18 |
| 19 |
20 |
21 |
22 |
23 |
24 |
25 |
| 26 |
27 |
28 |
29 |
30 |
|
|
|
|
CC Advertisers
|
|

05-12-2009, 02:23 AM
|
 |
CC Member

|
|
|
Join Date: Jan 2001
Location: Sunbury,
VIC
Cobra Make, Engine: Rat Rod Racer, LS1 & T56
Posts: 5,391
|
|

 Not Ranked
 Sanding, Sanding, Sanding
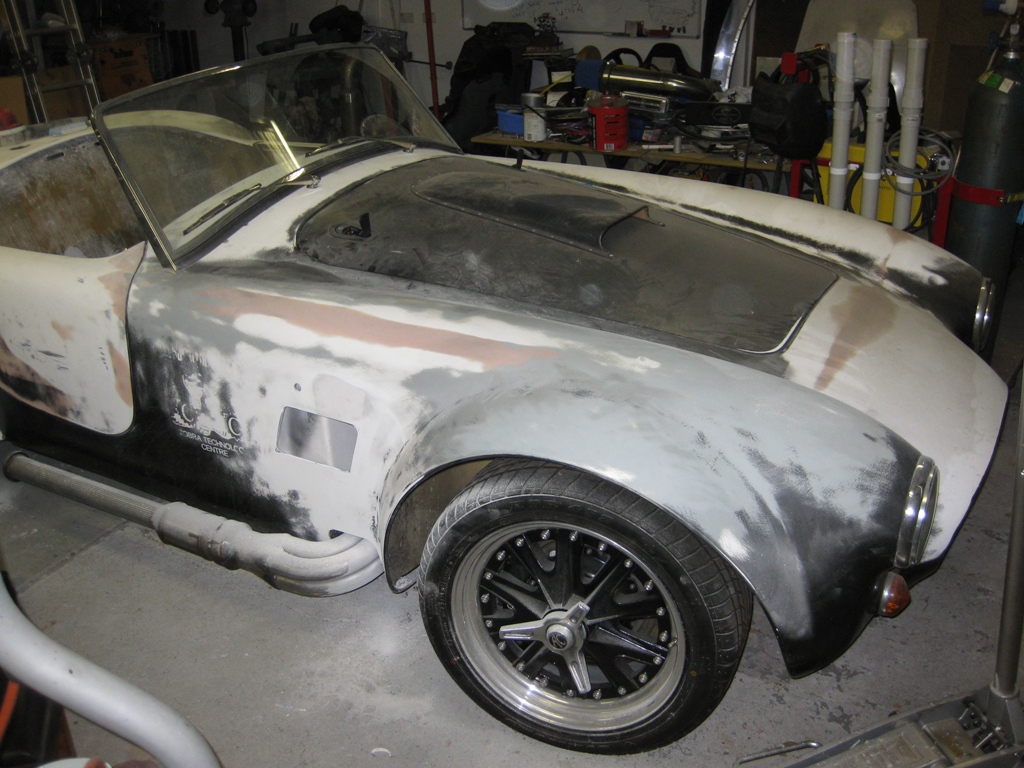
I Haven't posted an update for a while. I'm almost ashamed to post these pics after Andrew and Dale unveiled their fantastic paintwork efforts.
I'm prepping for paint at the moment. I got tired of looking at it with nasty flat black paint peeled in places where the sponsorship stickers were.
I've spent a bit of time talking to the experts and reseaching paint prep. I think I've learned a lot about getting the car straightened out and prepped for paint. I'm certainly a lot mor confident of the steps involved now.
At the moment I'm filling the seams and going back over and fixing my previous efforts as they were dubios at best.
This time I've filled the bulk of the seams with vinyl ester resin and micro spheres. It's the same resin the body is layed up in so should have similar characteristics. It's harder sanding than regular body filler but this is just getting it roughly the right shape.
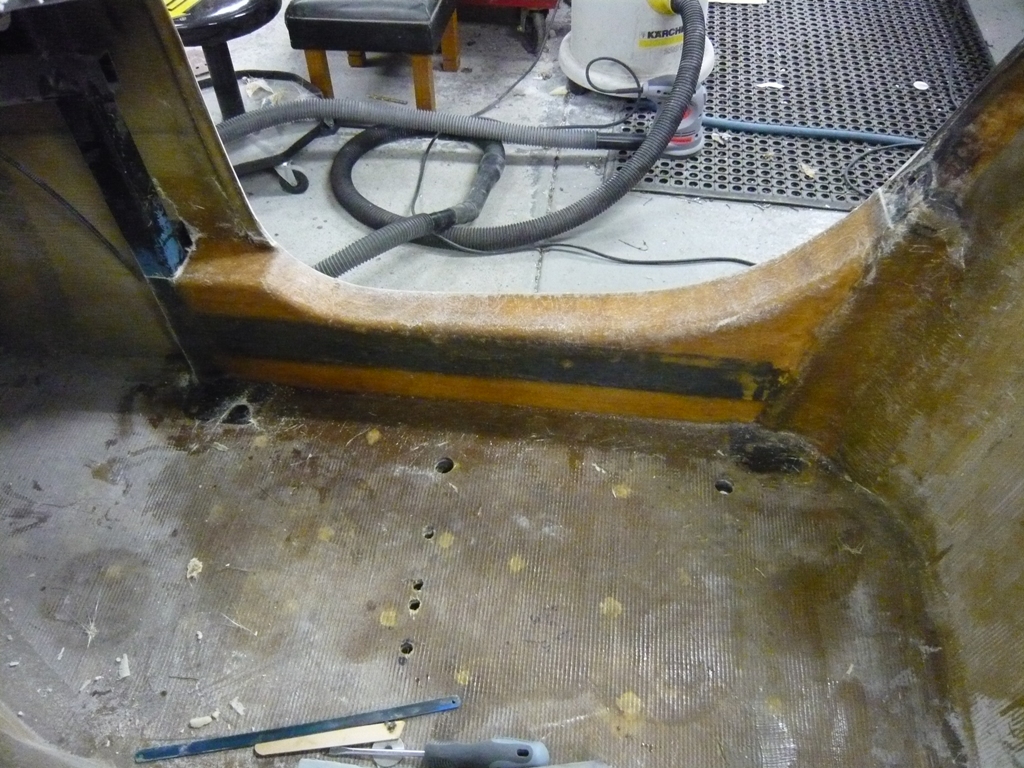
Here's the rear guard taking shape.
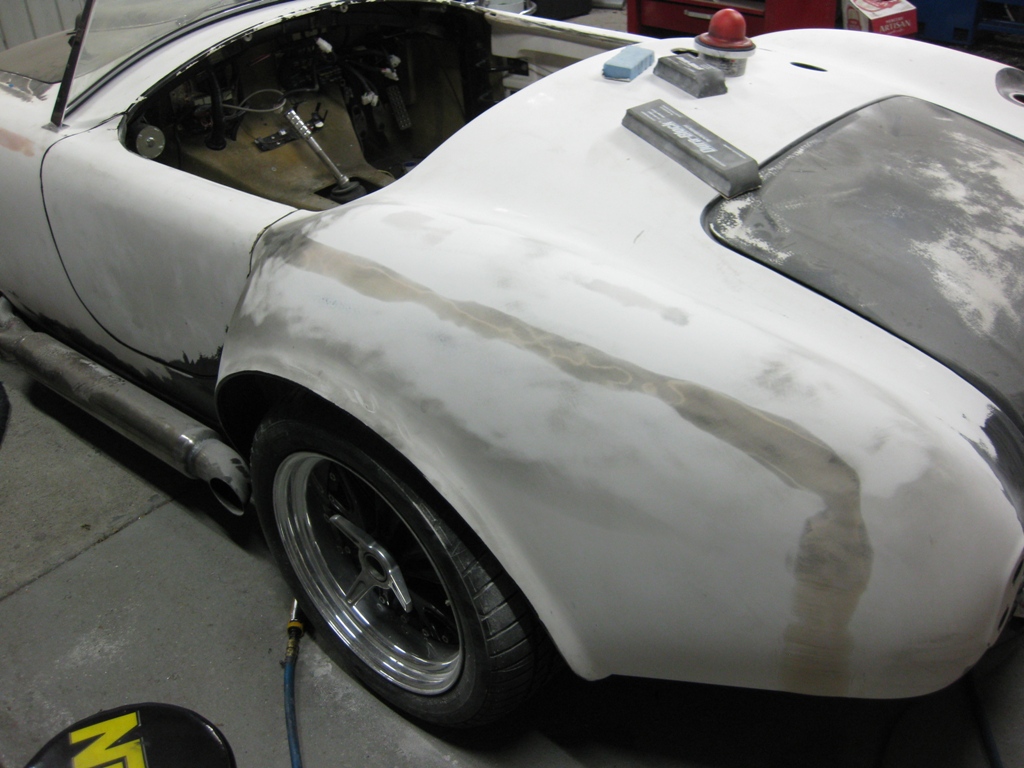
I bought some eurethane rubber sanding blocks and self adhesive backed paper. They are a lot easier to use and control on curved panels than the old speed file especially for a novice like me.
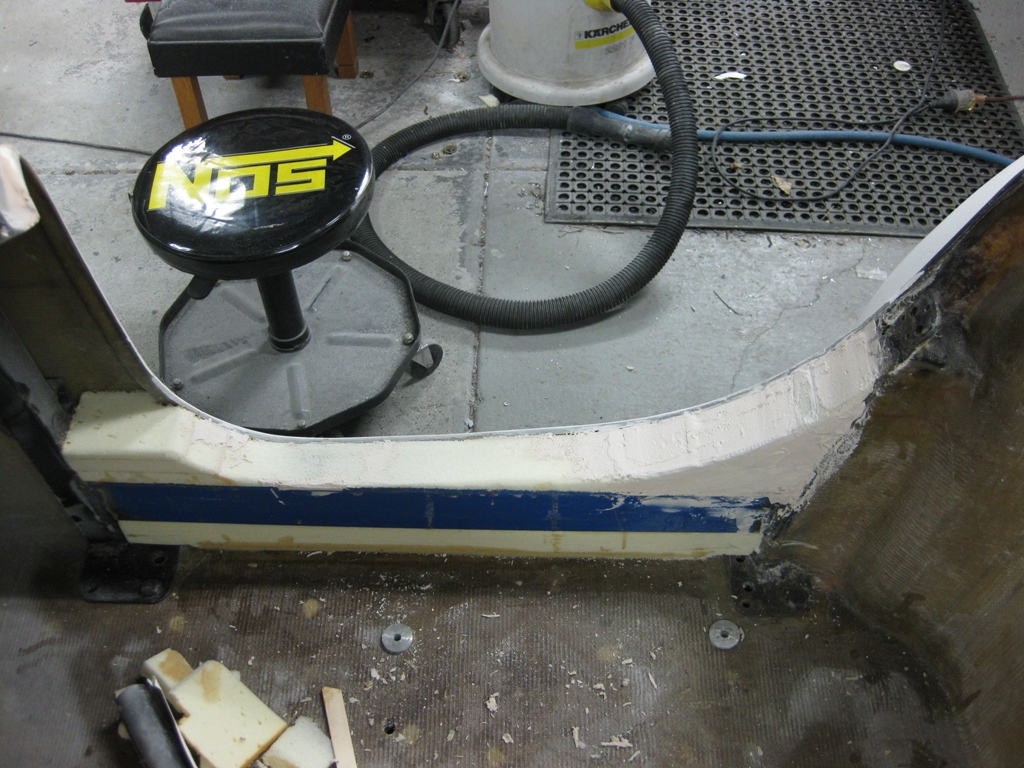
Something I've been thinking about for a long time and a few have already done is sills for the CR body. This is the beginings of a door sill. I've welded some 40mmx75mm RHS between the dash hoop and the door lock post. This will give me something to build the sill up from and also adds some extra rigidity and side impact protection. I've noticed it's much more solid already when realigning the door hinge and lock.
Another area of the body I wasn't happy with was the edges of the cockpit. They are pretty much just trimmed off where they roll down and looked unfinished. Dale and Andrew have both done a great job of putting a nice rounded edge on there.
After some thought I picked up some good glass fiber reinforced filler and applied it under the edge of the where it rolls down. I built this section up to a reasonable thickness and then sanded the edge to round it off nicely. A bit more filling and sanding and it should look tidy. I plan to do the same to edge around the dash.
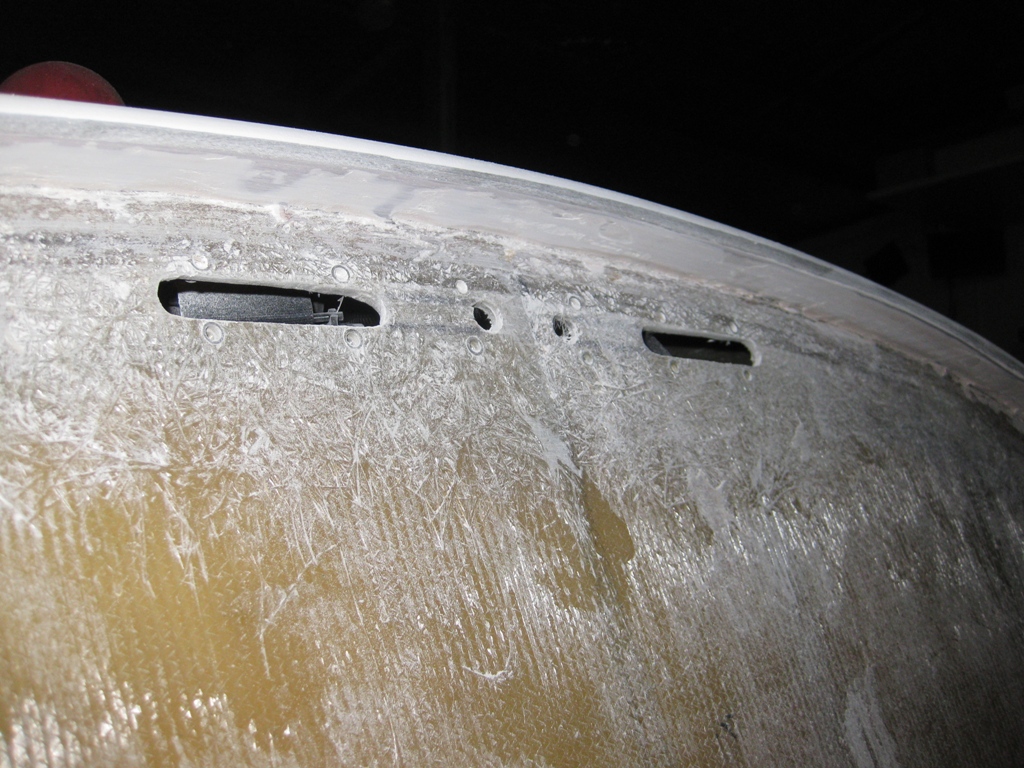

I'm stripping back a lot of my earlier work and redoing it. I wasn't confident that it was done right and figured I would be very unhappy if it ruined my paint job down the track.
I've also got the windscreen and wipers fitted. Hooray!
Cheers
__________________
Mike Murphy
Melbourne Australia
Last edited by Aussie Mike; 05-12-2009 at 02:27 AM..
|
-
Advertising

05-12-2009, 02:45 AM
|
 |
CC Member
|
|
|
Join Date: Jan 2007
Location: Melbourne,
VIC
Cobra Make, Engine: Harrison, 6.0L Chev
Posts: 2,513
|
|
Not Ranked
Mike, good progress and hats off for taking the plunge on the body work yourself. We'll have to arrange a visit down there one Sunday in the Disco and swap a few hours' sanding for some help with that fuel reg job - still haven't done it yet!
|
05-12-2009, 02:48 AM
|
|
CC Member
|
|
|
Join Date: Jan 2001
Location: Sunbury,
VIC
Cobra Make, Engine: Rat Rod Racer, LS1 & T56
Posts: 5,391
|
|
Not Ranked
No Problems Paul,
Having done the cursed TD5 fuel reg on mine It'll be easy 2nd time round. Probably just as painfull though, it's a tight squeeze to get a spanner behind the inlet manifold.
Cheers
__________________
Mike Murphy
Melbourne Australia
|
05-12-2009, 03:47 AM
|
 |
CC Member
|
|
|
Join Date: Jul 2008
Location: Melbourne,
Vic
Cobra Make, Engine: Harrison, VE L98 + T56
Posts: 164
|
|
Not Ranked
Making Progress Mike, excuse my ignorance, but what is "3M Dry Guide Coat" and what is it used for? ( the big red knob looks suspicious!). Cya Peter.  http://www.clubcobra.com/forums/albu...&pictureid=904
__________________
Life is what happens to you while you're busy making other plans...JWL
|
05-12-2009, 05:19 AM
|
 |
CC Member
|
|
|
Join Date: Aug 2004
Location: Geelong,
Vic
Cobra Make, Engine: Classic Revival.
Posts: 215
|
|
Not Ranked
Enjoy the sanding Mike, you end up with arms like Pop eye.
If you need any foam to glass over, I still have half a sheet left your welcome to have.
Cheers. Dale.
|
05-12-2009, 05:22 AM
|
|
CC Member
|
|
|
Join Date: Jan 2001
Location: Sunbury,
VIC
Cobra Make, Engine: Rat Rod Racer, LS1 & T56
Posts: 5,391
|
|
Not Ranked
It's pretty neat stuff. Rather than using a spray can to dust a panel to check for highs and lows this stuff just rubs on. It's basically some black carbon like dust in a pot with a sponge applicator. you just load the sponge up with dust by tipping it over a few times and then rub it on the panel.
No waiting for it to dry, just sand straight away. Its supposed to not react with any paint put over it as well.
I figure since I'm still learning to read the highs and lows so I'd use this stuff to more regularly coat the panel as I sand. So I dust the panel and sand a bit find my highs and lows, dust again and just keep working my way over the panels. Having the pot just sitting there means it's dead easy to keep checking.
Cheers
__________________
Mike Murphy
Melbourne Australia
|
05-12-2009, 05:30 AM
|
|
CC Member
|
|
|
Join Date: Jan 2001
Location: Sunbury,
VIC
Cobra Make, Engine: Rat Rod Racer, LS1 & T56
Posts: 5,391
|
|
Not Ranked
Thanks Dale,
Did you use that green foam to get the shape right? I think I've still got some in the back of the shed from an old project.
I was thinking I'd use a mix of that and expanding foam filler where I can't get to. I think there are also some 2 pack expanding foams available that are compatible with resin.
Cheers
__________________
Mike Murphy
Melbourne Australia
|
05-12-2009, 06:23 AM
|
|
CC Member
|
|
|
Join Date: Aug 2004
Location: Geelong,
Vic
Cobra Make, Engine: Classic Revival.
Posts: 215
|
|
Not Ranked
Its cream coloured and the sheet is about 25mm thick, easy to sand and cuts with a knife. Got it from and plastics supply shop here.
I think its the similar stuff used on surf boards which can handle the resin without melting.
Cheers.
|
05-21-2009, 11:39 PM
|
|
CC Member
|
|
|
Join Date: Jan 2001
Location: Sunbury,
VIC
Cobra Make, Engine: Rat Rod Racer, LS1 & T56
Posts: 5,391
|
|
Not Ranked

A small progress update. Sanding is pretty tedious but I'm slowly getting there.
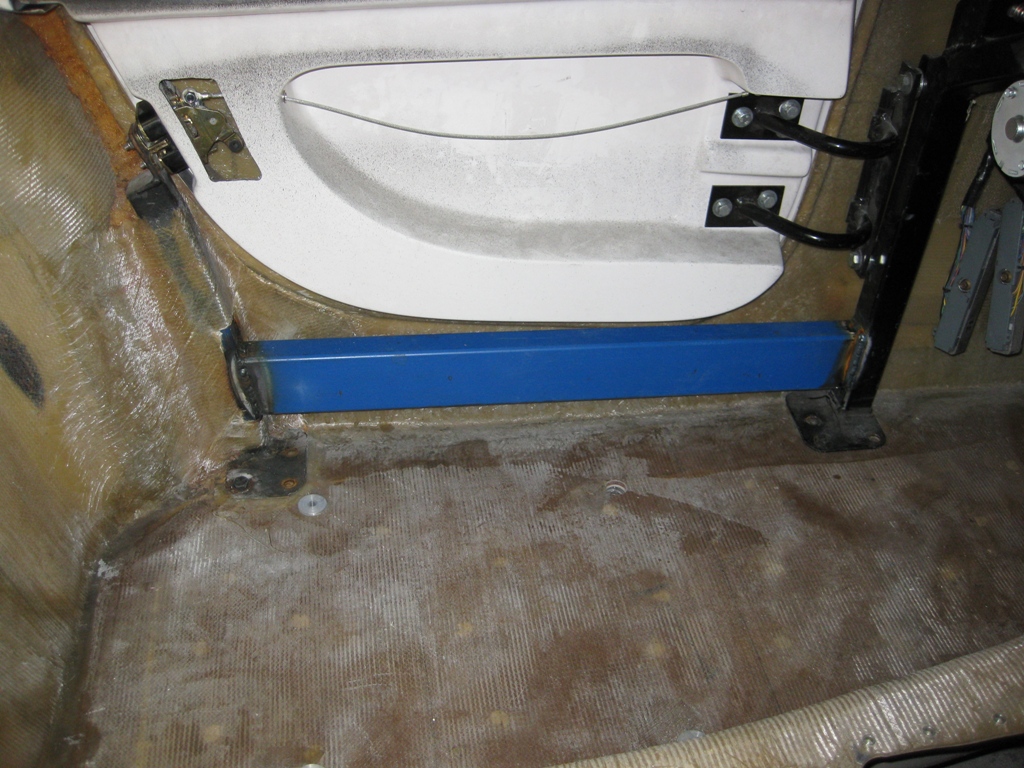
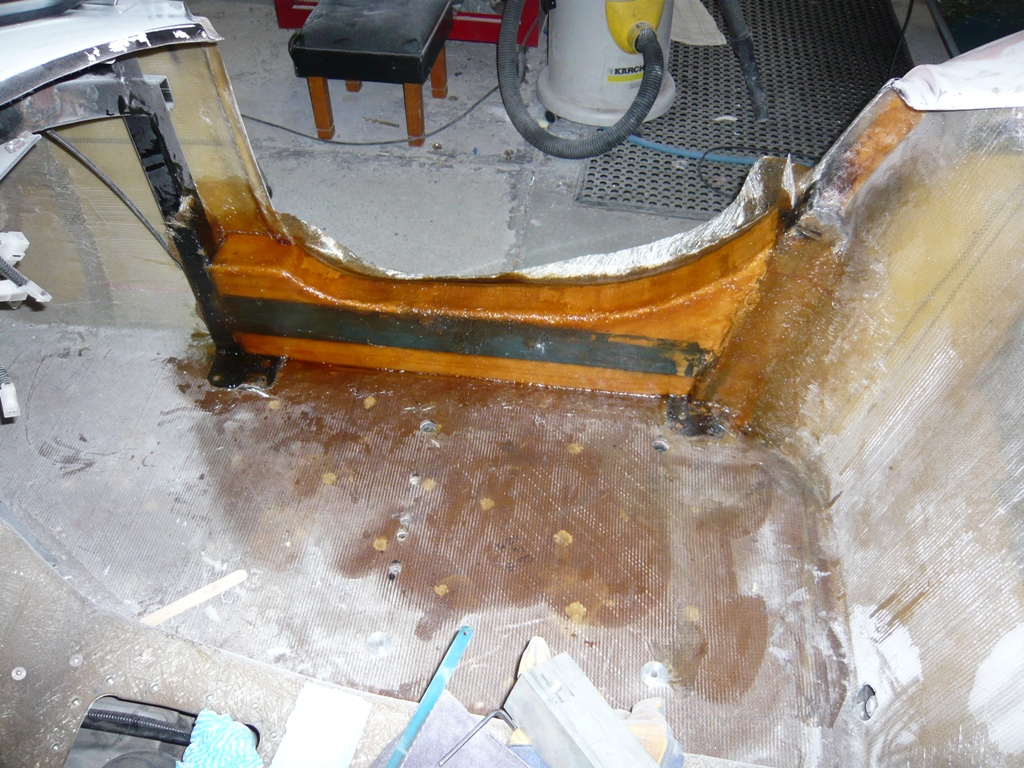
I've been working on fiberglass repairs and a few body mods. As noted previously the CR body's lack of a decent door sill is a bit annoying. A few guys have successfully built their own sills with great results. I thought I'd doccument my go at it.
Fingers crossed it works or I'm going to liik like a bit of an idiot (More than usual anyway).
The first step was welding in the support beam between the dash hoop and the door pillar.
Next step is to build a skeleton to lay the fiberglass on. I've used a foam I bought from the fiberglass supply. This stuff is resistent to the chemicals in the resin and doesn't break down. I reckon it's the same stuff Dale has used. A $13 sheet will be more than enough to do both sills and have spare for mistakes.
Here's the foam cut to shape and glued in place. I just used some of the same vinyl ester resin as used in the layup mixed with some microspheres to bulk it up a little bit.

Next once the resin has gone off you can shape it. It cuts really easy with a hacksaw blade and you can sand it to shape. There were a few gaps left so a thin wipe of body filler smothed them out.
I've also ground off the gellcoat along the edge of the body to expose the glass underneath and roughened it up. This will give a good surface for the resin to bond to when I lay the fiberglass. The last thin I want is the new glass delaminating from the body after I've painted it.
It was too cold in the shed last night to start laying fiberglass. Hopefully it'll be a bit warmer this weekend.
Cheers
__________________
Mike Murphy
Melbourne Australia
|
05-22-2009, 02:43 AM
|
 |
CC Member
|
|
|
Join Date: Jun 2007
Location: Sunshine Coast Qld,
QLD
Cobra Make, Engine: Harrison # 80; Ford 5.0L HO Trickflow heads, cam and rockers and MassFlow EFI
Posts: 3,482
|
|
Not Ranked
Are most replica bodies devoid of door sills? This seems a lot of work and could not a mould be made for others to use on CRs?
Merv
__________________
Merv
Ford Cobra
Harrison #80.
Peregian Beach
Sunshine Coast Qld.
|
05-22-2009, 02:49 AM
|
|
CC Member
|
|
|
Join Date: Jan 2001
Location: Sunbury,
VIC
Cobra Make, Engine: Rat Rod Racer, LS1 & T56
Posts: 5,391
|
|
Not Ranked
Most of the Aussie kits seem to have sills in the mold. CR is one of the few that doesn't seem to have them. Most who have built CRs don't seem to have bothered with sills because they are a lot of work.
You can make a tidy looking CR interior with trim panels and carpet that go inside the body around the edge of the door opening.
Cheers
__________________
Mike Murphy
Melbourne Australia
|
05-22-2009, 04:28 AM
|
|
CC Member
|
|
|
Join Date: Jun 2006
Location: Newcastle, Warners Bay,
NSW
Cobra Make, Engine: RMC . 393 Dart alloy block Stroked 351 alloy heads ..all the goodies plus a pre oiler. al
Posts: 1,495
|
|
Not Ranked
Aussie Mike,
What's the 3M dry guide coat like ? easy to use ? makes a mess ? I watched the 3M sales video and it looks easy. Particularly in a nice flat bonnet that they used in the video. What's it like on tight spots ?
Smithy
|
05-22-2009, 06:57 AM
|
|
CC Member
|
|
|
Join Date: Jan 2001
Location: Sunbury,
VIC
Cobra Make, Engine: Rat Rod Racer, LS1 & T56
Posts: 5,391
|
|
Not Ranked
The guide coat is very easy to use. It's pretty much just a tub of what looks like carbon black and a sponge applicator. You rub it on the panel and brush the excess off and away you go. You can get in everywhere with it. Doesn't make a huge mess, just a little extra dust.
I liked the idea that you just leave it sitting next to you and keep giving the panel a dust as you go. If I was using a regular rattle can for guide coat I probably wouldn't be checking as often. Highs and lows show up quite well with it.
It was a bit pricey at about $40 though but it'll probably last me forever.
I guess we'll see how good it worked when I get some paint on the panels. 
Cheers
__________________
Mike Murphy
Melbourne Australia
|
05-25-2009, 08:42 PM
|
|
CC Member
|
|
|
Join Date: Jan 2001
Location: Sunbury,
VIC
Cobra Make, Engine: Rat Rod Racer, LS1 & T56
Posts: 5,391
|
|
Not Ranked
Made some more progress on the door sill over the weekend.
Here it is layed up in fiberglass. The resin is still wet. I've used vinyl ester resin and some light weight chop strand mat. The thinner mat folds around the corners easier and is better for complex shapes. There are 3 layers on the side and 5 on the top.
I've ground back the gell coat on the edge of the door opening so the new glass has a good surface to bond too.
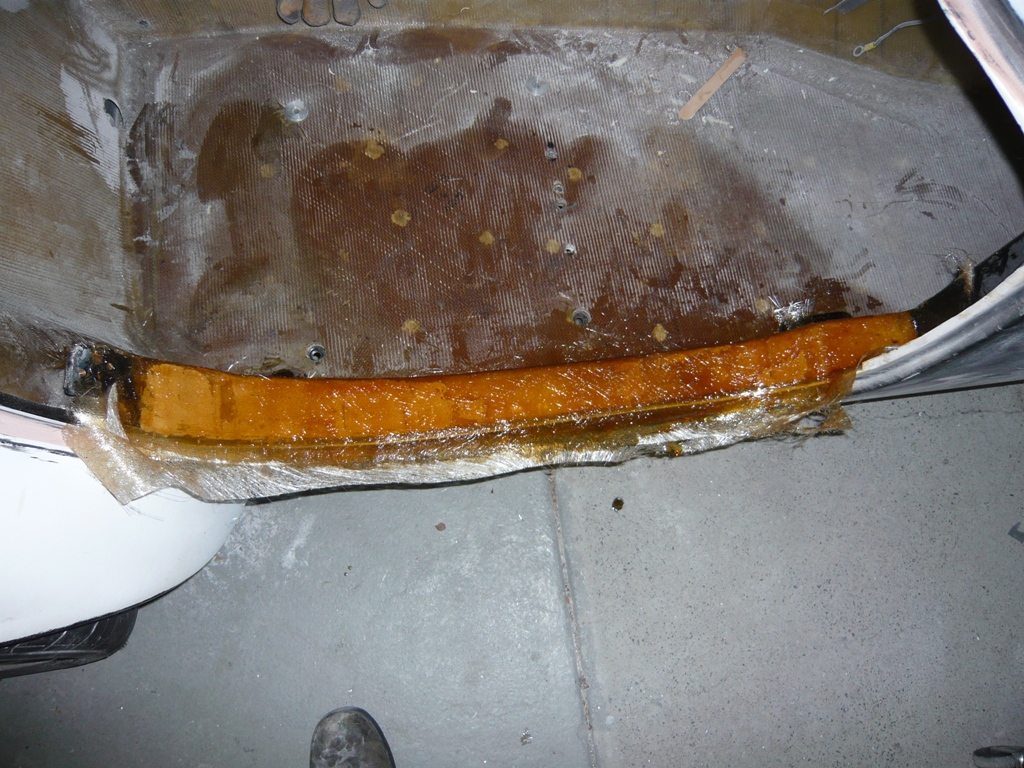
Once the resin had gone off I trimmed the overhang. This is easer to do when the resin is still a bit green and hasn't fully hardenend. You can just use a hand held hacksaw blade, easy.
The Vinyl Ester resin is quite dark when it's wet and lightens up as it goes off.
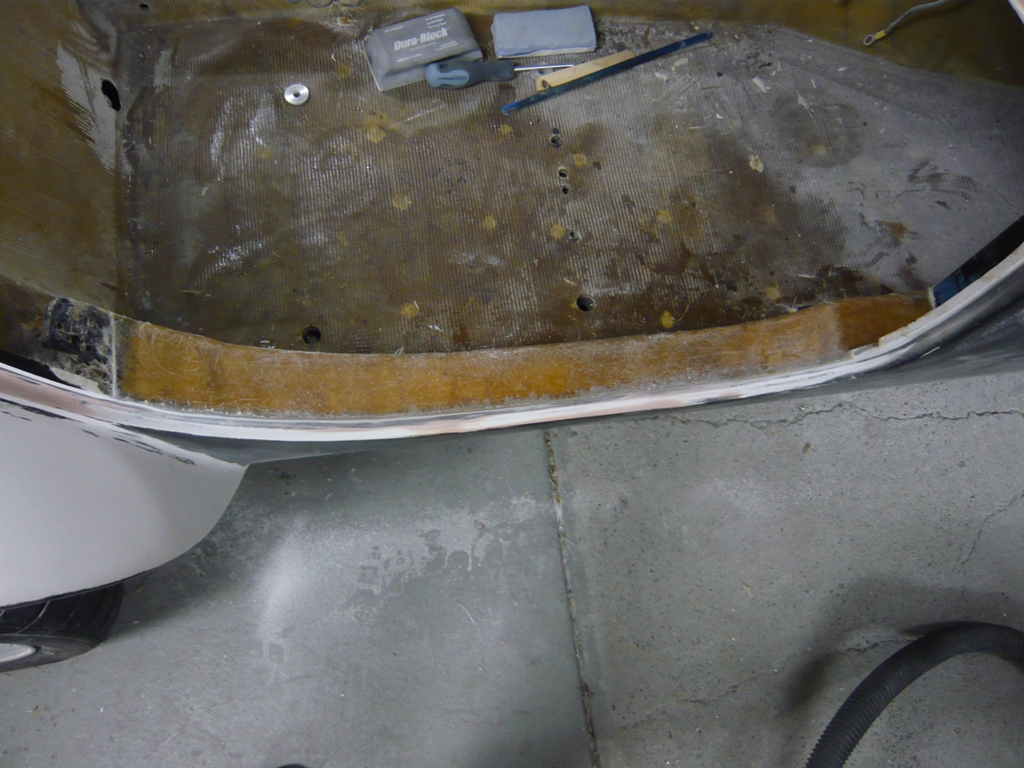
Now the filling and sanding to smooth it all out. I started with a coat of glass reinforced filler to square up the edges. It's stronger than the regular filler so should hold up to impacts better. I also worked on filling and smoothing out the door jam area. Hopefully when painted and trimmed it'll look tidy.
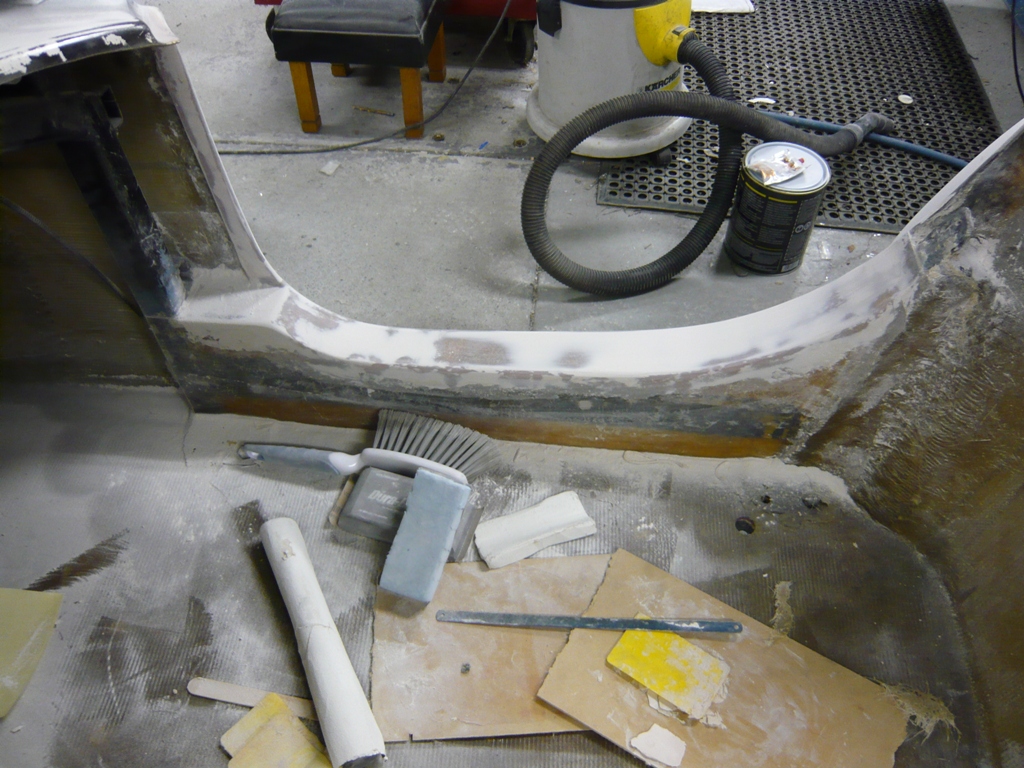
It's dusty work so keep the vaccum cleaner and a small sweeping brush near by and clean up as you go.
All smoothed out and ready for a coat of spray polyester.

Cheers
__________________
Mike Murphy
Melbourne Australia
Last edited by Aussie Mike; 05-25-2009 at 08:45 PM..
|
05-25-2009, 08:58 PM
|
 |
Senior Club Cobra Member
|
|
|
Join Date: Feb 2006
Location: Melbourne,
VIC
Cobra Make, Engine: RMC, carb 347 TopLoader and Jag running gear ~ so old school I time it with an hour-glass :D
Posts: 1,293
|
|
Not Ranked
Personally I dont think that I'd go to the effort (particularly as I could use the extra room  )
But I have to say that I'm impressed with the results.
Thankyou (again) for documenting the process for those of us who might need some reference point in the future.
Are you still able to remove the body or do you anticipate that if its ever required there'll be cutting involved
LoBelly |
05-25-2009, 09:10 PM
|
|
CC Member
|
|
|
Join Date: Jan 2001
Location: Sunbury,
VIC
Cobra Make, Engine: Rat Rod Racer, LS1 & T56
Posts: 5,391
|
|
Not Ranked
Hi Michael,
I always find how-to threads interesting so figured I'd post this one. Hopefully it'll encourage others to have a go and doccument their efforts.
There is no real loss of interior room as the sill is about the same thickness as the body of the door. When the door closes there is only about the thickness of the door trim in difference.
The body is still easily removable with just a couple of dozen bolts to undo. The CR has the tub and footwells all molded in one piece and bonded into the body. There is some steelwork inside the tub, the dash hoop, door lock pillar, bonnet and boot hinges etc. The tub is sandwiched to the chassis via bolts through the base of the dash hoop and door lock pillar. The dash hoop was removable before but it's all bonded into the tub now.
Cheers
__________________
Mike Murphy
Melbourne Australia
Last edited by Aussie Mike; 05-25-2009 at 10:36 PM..
|
05-26-2009, 04:01 AM
|
|
CC Member
|
|
|
Join Date: May 2002
Location: Brisbane Australia,
QLD
Cobra Make, Engine: RMC under re-construction, GenIV with tremec 600, Jag 3.31 L/S diff
Posts: 3,318
|
|
Not Ranked
You know what I don't like about your pics Mike?. 
.
.
.
.
.
.
.
That bluddy sanding dust .... give me the horrors ....... Gets everywhere. 
Great Job by the way  .
__________________
It's impossible to soar like an eagle when you're surrounded by turkeys.
|
05-26-2009, 05:08 AM
|
 |
CC Member
|
|
|
Join Date: Jul 2004
Cobra Make, Engine: 347 Stroker Morrison Injection. Registered.
Posts: 1,440
|
|
Not Ranked
Great work Mike, love the pics.
Regards.
__________________
Mando
|
06-11-2009, 07:30 PM
|
|
CC Member
|
|
|
Join Date: Jan 2001
Location: Sunbury,
VIC
Cobra Make, Engine: Rat Rod Racer, LS1 & T56
Posts: 5,391
|
|
Not Ranked
Still working on straightening everything out.
It's funny, you look at the fiberglass body when you first get it home. It's sitting there in shiny gel coat and you think... "I'll just grind those seams back and throw in a bit of filler, a quick sand and some paint..." It's not untill you start looking closer that you realise there are highs and lows all over that need work.
I've been working on the panel gaps. I wasn't so concerned with them at first until I saw Andrews efforts. That bugger has made a whole lot of extra work for me.
Here's the drivers door just about all ready for spray polyester. It now has an even 1/8" gap all round and looks much better.

The panel gaps out of the mold were fairly big and varied a bit. To get a nice even gap I first smoothed out the edge of the door. I didn't want to add to much filler to the edge of the door. Filler or adding fiberglass to the edge of the door wouldn't be as strong as the original galss fiberglass. Knocking the edge of the door aganst something when you open it might take a chunk out of it rather than just a small paint chip.
I roughened up the gel coat on the door opening and added a coat of filler in there. With the door located in it's best alignment I went round the edge of the door with a sharp blade and trimmed back the new filler to near the right gap.

It needed more filler in some spots as you can see.
To finish the gaps off evenly I used a piece of self adhesive backed sand paper and stuck it to one side of a plastic filler applicator card. I then ran this back and forth along the gap with the plastic side of the card running against the edge of the door. It worked well and produced an even 1/8" gap. The card was rigid enough to easily push back and forth along the edge but flexable enough to go round the corners.

The sanding continues this weekend. I'll hopefully finish the drivers front guard and start working on the drivers side rear guard.
Cheers
__________________
Mike Murphy
Melbourne Australia
|
06-12-2009, 12:26 AM
|
|
CC Member
|
|
|
Join Date: Jul 2004
Cobra Make, Engine: 347 Stroker Morrison Injection. Registered.
Posts: 1,440
|
|
Not Ranked
Beautiful work, looking forward to seeing more updates.
Regards.
__________________
Mando
|
 Posting Rules
|
You may not post new threads
You may not post replies
You may not post attachments
You may not edit your posts
HTML code is Off
|
|
|
All times are GMT -7. The time now is 03:18 PM.
|
|


 Linear Mode


