 
 Main Menu
|
|
Nevada Classics
|
|
Advertise at CC
|
| S |
M |
T |
W |
T |
F |
S |
| |
|
|
1 |
2 |
3 |
4 |
| 5 |
6 |
7 |
8 |
9 |
10 |
11 |
| 12 |
13 |
14 |
15 |
16 |
17 |
18 |
| 19 |
20 |
21 |
22 |
23 |
24 |
25 |
| 26 |
27 |
28 |
29 |
30 |
|
|
|
|
CC Advertisers
|
|
 2Likes 2Likes
-
 2
Post By C5GTO
2
Post By C5GTO

09-14-2016, 08:45 AM
|
 |
CC Member

|
|
|
Join Date: Jan 2016
Location: Ft Myers,
FL
Cobra Make, Engine: Classic Roadsters
Posts: 155
|
|

 Not Ranked
 CR Firewall Heat Damage from 351W Headers
CR Forum members,
I've been meaning to post this as a public service announcement for a few weeks since I got the body of the car and completely dismantled suspension, brakes, etc. Due to working like crazy on the suspension, I haven't had the time to post this, my apologies.
If you are currently operating your CR without any kind of heat shield on the headers or firewall (Header Tube Tape wrap, heat shields, etc), you may want to take a very close look at your footwell areas on your firewall.
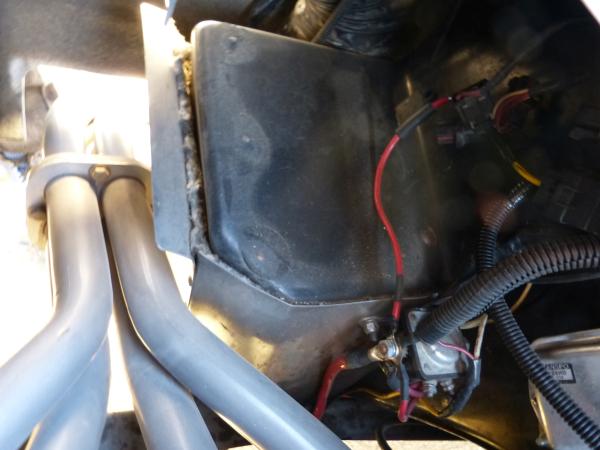
This is what I found when I removed the body:

As you can see from the photo, there is some substantial heat damage to the passenger side of the footwell area on the fiberglass firewall. The driver side also has some similar heat damage, just not as drastic.
The best way to see this on an assembled car would be to raise the front of the car and then look up from below just behind where the sidepipes exit the lower fenders.
When I rebuild my sidepipes, I'm going with Jet Hot ceramic coating and this should help with lowering temps somewhat. My rebuild plan is also to make and install stainless steel heat shields with 1/2" standoff from the fiberglass itself.
The other concern is the driver's side lower firewall area where the brake lines run. I'll do the same on this side but extend the heat shielding to cover the brake lines as well to prevent the brake fluid from boiling.
22 or 24 guage stainless sheet stock is fairly easy to work with and should solve this issue without wrapping the headers in heat tape.
Just thought I'd provide a warning to those of you that haven't looked closely at your firewalls where the headers get close. It's not easy to see from the top of the engine bay.

|
09-14-2016, 10:50 AM
|
|
CC Member
|
|
|
Join Date: Sep 2002
Location: Milwaukee,
Wi
Cobra Make, Engine: Classic Roadsters, 95 EFI 5.0
Posts: 297
|
|
Not Ranked
Ah yup... That doesn't surprise me.. I was planning the same thing (heat shields on the firewall)..
Looking at my brake lines, they are a ~inch from the headers and that was scarying me right there. (BTW I'm still building mine.)
|
09-14-2016, 11:33 AM
|
|
CC Member
|
|
|
Join Date: Jan 2016
Location: Ft Myers,
FL
Cobra Make, Engine: Classic Roadsters
Posts: 155
|
|
Not Ranked
Quote:
Originally Posted by Wisconsin_Snake

Ah yup... That doesn't surprise me.. I was planning the same thing (heat shields on the firewall)..
Looking at my brake lines, they are a ~inch from the headers and that was scarying me right there. (BTW I'm still building mine.)
|
Wisc Snake,
Good luck with the build and let me know what you do for the shields. More ideas are better than fewer.
I am planning on making the Stainless Sheet with a 1/2" offset bend on the top and bottom of the shield, kind of in the shape of a U. This would allow to drill 1/4 inch holes evenly spaced along the top and bottom of the shield, maybe 4 in all on each side.
This u-shape bend would protect the bolt head from the heat. If you don't shield the bolt head, they will transfer heat in a very small area and potentially create a fire.
Then with the bolts in the shield, place spacers(about 1/4 to 3/8") on the bolts and mount to the firewall with small 1/4 nuts on the inside of the firewall footwell. The spacers will keep the shield away from the firewall and allow an airgap for cooling, and minimal to no heat transfer to the fiberglass firewall.
A good friend of mine has built several Experimental Aircraft and this is the same way the FAA requires protection of fiberglass or flammable cowling components from hot engine components to obtain airworthiness certification.
Send me a pic of what you do. I probably wont get to this until next spring as my car building time is limited to the next 2.5 weeks. Unfortunately for my car, my wife and I stay in our Florida home during the fall and winter and my car is in our Cleveland area home.
|
09-14-2016, 04:35 PM
|
|
CC Member
|
|
|
Join Date: Apr 2015
Location: Prescott,
AZ
Cobra Make, Engine: Classic Roadsters
Posts: 209
|
|
Not Ranked
I built some simple heat shields from SS sheet and attached via sheet metal screws to the frame back when I first built my CRL. Between the SS shield and fiberglass I put some high heat insulation material. My brake lines run behind the drivers side shield so they don't get cooked. My CRL has been on the road for 20 plus years and 40K miles and the fiberglass footboxes are still good as new 
I'll try to take some pictures and post when I get a chance. Building the shields was fairly quick, easy, and materials were not expensive.
__________________
Thanks,
Joel Heinke (early 90's CRL Cobra)
|
09-14-2016, 05:32 PM
|
|
CC Member
|
|
|
Join Date: Jan 2016
Location: Ft Myers,
FL
Cobra Make, Engine: Classic Roadsters
Posts: 155
|
|
Not Ranked
Thanks, I look forward to seeing the pics
|
09-14-2016, 07:01 PM
|
 |
Senior Club Cobra Member
|
|
|
Join Date: Sep 2002
Location: Montgomery,
TX
Cobra Make, Engine: CR 427 S/C, 351W, 5 Sp & KMP142 - 427 SO, 4 Spd
Posts: 2,212
|
|
Not Ranked
I built mine in 2000 and wrapped the headers. Later I got Don's side pipes
that eliminated the restriction issue and had them ceramic coated, along
with the headers. No damage from heat anywhere, so either way worked for
me. I have heard stories about rust from wrapping but when I pulled the
wrapped pipes to change for the new ones there was no rust or damage that
I could see, this was after about 8 years or so.
__________________
Flip
|
09-15-2016, 06:12 AM
|
|
CC Member
|
|
|
Join Date: Jan 2016
Location: Ft Myers,
FL
Cobra Make, Engine: Classic Roadsters
Posts: 155
|
|
Not Ranked
Quote:
Originally Posted by HI Cobra
I built mine in 2000 and wrapped the headers. Later I got Don's side pipes
that eliminated the restriction issue and had them ceramic coated, along
with the headers. No damage from heat anywhere, so either way worked for
me. I have heard stories about rust from wrapping but when I pulled the
wrapped pipes to change for the new ones there was no rust or damage that
I could see, this was after about 8 years or so.
|
HI cobra,
Thanks for the info, I'm also changing out my 1990 factory mufflers to classic chambered 30" mufflers and turnouts. The elimination of backpressure and ceramic coating should help dramatically with lower upper header tube temps.
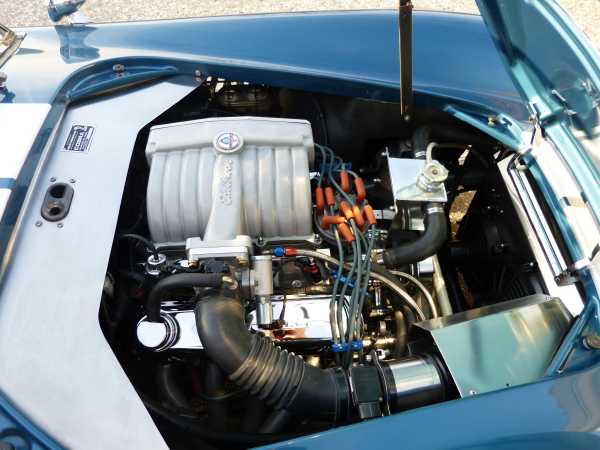
I looked at you gallery and have to say that I really like the aluminum plate you installed across the top of the firewall and hood latch area, looks great! and also hides some of the wiring, etc. |
09-16-2016, 08:54 PM
|
|
CC Member
|
|
|
Join Date: Apr 2015
Location: Prescott,
AZ
Cobra Make, Engine: Classic Roadsters
Posts: 209
|
|
Not Ranked
Footbox heat shield pics
I got a chance to jack up the car and take some pics. I thought I could get some decent pictures but clearances are so tight here (exactly why heat shields are needed), that they show parts of the heat shield but not all.
I highly recommend using heat shields like these as even though headers are Jet-Hot ceramic coated, they still radiate a lot of heat. I don't think the coating actually holds much heat in.
Drivers side:
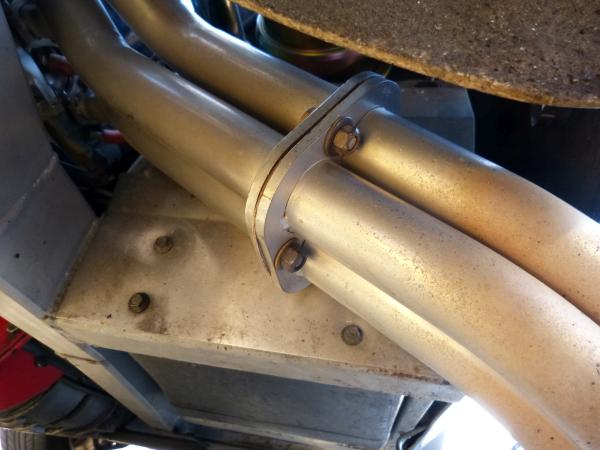

Passenger side:
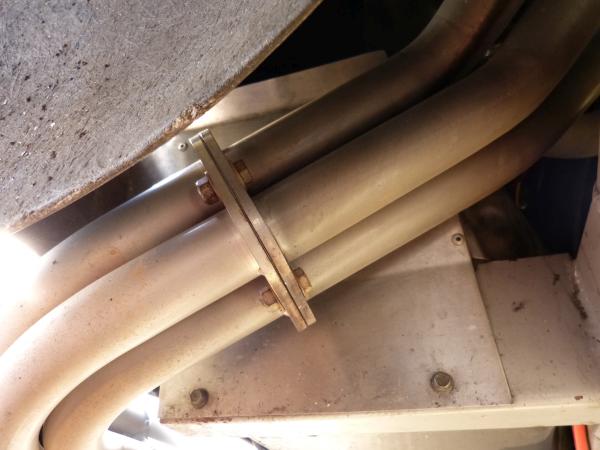

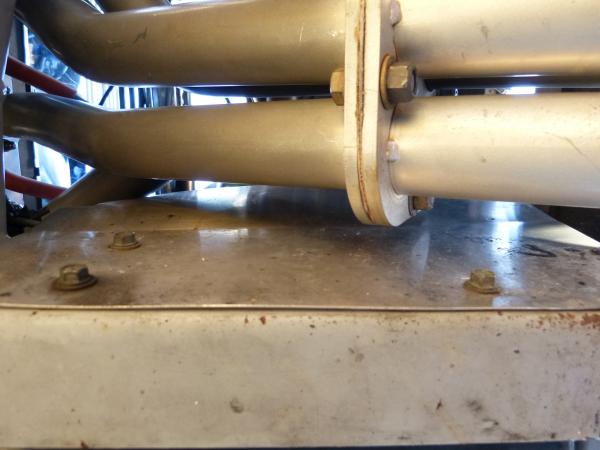
The shields are 304 SS in .050 thickness. They basically wrap the foot box with about 1/2 to 3/4" of space for insulation between the shield and footbox. I used ceramic wool type insulation (like used for ovens) held in place using a strip of metal pop riveted to sandwich the insulation at the top of the heat shield and preventing it from sagging down over time. The shields are made from 2 pieces, one for front of footbox, other for side and pop riveted down the seam in the middle. The folds on the shields are nothing fancy and can be made holding the sheet in a large vice or with a couple of 2X4s and C clamps and some muscle combined with a rubber hammer. The shields attach on the frame at the front of footbox on the big flat space and just lay on the top of the frame on the sides of the footbox.
On the passenger side, I would make the bend at the top so it goes backward toward the footbox if I were to make it again. The battery was mounted there when I first made the shield so the forward bend made sense for battery box clearance. I later moved the battery to trunk. A backward bend at the top now would hide the insulation and clean things up a bit.
The header on passenger side comes to within about 3/8" of the heat shield in one spot. On the drivers side it's about 1/4" at the closest. There's no evidence of the headers ever touching them even with this very little clearance.
Oh and here's a bonus pic for another good use of SS sheet in the engine compartment:
Yeah, cover up all the ugly wiring, hood latch, firewall, etc. with a nice smooth sheet behind the engine. This one is a bit harder to make and does require a sheet metal break for folds.
I hope these pics give you guys some help.
__________________
Thanks,
Joel Heinke (early 90's CRL Cobra)
|
09-18-2016, 04:08 PM
|
|
CC Member
|
|
|
Join Date: Jan 2016
Location: Ft Myers,
FL
Cobra Make, Engine: Classic Roadsters
Posts: 155
|
|
Not Ranked
C5gto,
Thanks for the detailed write up and the pics. Your car looks great and I really like the cowl aluminum plate on the top of the engine compartment.
Thanks again
|
09-24-2016, 05:09 AM
|
 |
CC Member
|
|
|
Join Date: Nov 1999
Location: Pentwater,
Mi
Cobra Make, Engine: Professional Cobra & Streetrod Builder
Posts: 5,352
|
|
Not Ranked
Finest Firewall I have ever seen on an EFI CR's!
DV
|
09-28-2016, 09:37 AM
|
|
CC Member
|
|
|
Join Date: Jan 2016
Location: Ft Myers,
FL
Cobra Make, Engine: Classic Roadsters
Posts: 155
|
|
Not Ranked
C5GTO,
Can you tell me what companies radiator expansion tank that is? I've been looking around for what I'm going to do when I put the engine back in next spring. Several options but most interfere with my serpentine belt system on my 351W.
|
09-29-2016, 10:16 AM
|
|
CC Member
|
|
|
Join Date: Apr 2015
Location: Prescott,
AZ
Cobra Make, Engine: Classic Roadsters
Posts: 209
|
|
Not Ranked
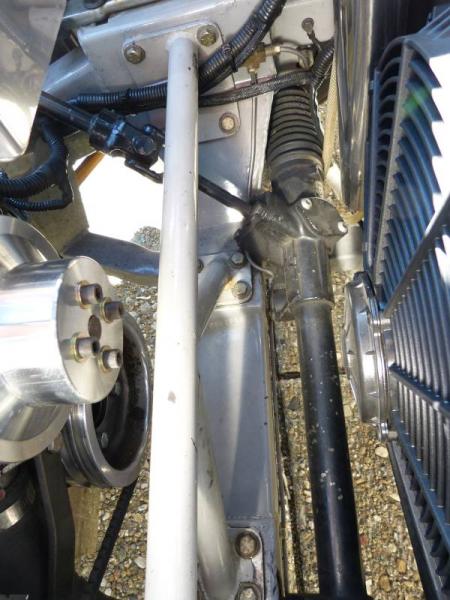
Radiator fill/surge tank
I believe it's this one: De gas tank straight
This tank was made to mount on the side of engine bay for FFR Cobras, not on the engine. My mount is a bit of a hack but it still looks good and has stood test of time. The mount is a 304 SS sheet that goes down to 3 or 4 water pump bolts and has one brace welded to it that goes back to an intake manifold bolt. Mount is light weight but sturdy as tank doesn't flop around at all.
__________________
Thanks,
Joel Heinke (early 90's CRL Cobra)
|
09-29-2016, 11:49 AM
|
|
CC Member
|
|
|
Join Date: Jan 2016
Location: Ft Myers,
FL
Cobra Make, Engine: Classic Roadsters
Posts: 155
|
|
Not Ranked
Quote:
Originally Posted by C5GTO
I believe it's this one: De gas tank straight
This tank was made to mount on the side of engine bay for FFR Cobras, not on the engine. My mount is a bit of a hack but it still looks good and has stood test of time. The mount is a 304 SS sheet that goes down to 3 or 4 water pump bolts and has one brace welded to it that goes back to an intake manifold bolt. Mount is light weight but sturdy as tank doesn't flop around at all. |
Thanks very much.
Probably what I'll go with. Do you have any estimate how much volume it holds? I've heard that you want somewhere around 2.5 qts to limit how much coolant you lose during expansion. Also, do you just fill this halfway when adding coolant after all the air has been burped out of the cooling system, or do you run an additional overflow tank?
The other item I'm going to add as I'm welded up the front end is a cross bar in the front from the spring towers side to side. I will angle this up slightly on each side and then horizontal in the center where it crosses in front of the engine. I thought this would be a perfect place to mount the expansion tank and also remote Oil Filter assy. I have 1.25" square tube 1/8 thick that I was planning on using. I will weld this to a plate and it will bolt in to each spring perch tower on each side so it can be removed for engine service etc. This bar will also stiffen the front suspension as it will not allow inward/outward movement or deflection of the upper/lower A-Arms during hard cornering.
I've seen on the forum where a few other members have added this to their cars and it not only stiffens the front end, but also provides a rock solid mounting point for engine accessories like expansion tank and remote Oil filters.
|
09-29-2016, 12:28 PM
|
|
CC Member
|
|
|
Join Date: Apr 2015
Location: Prescott,
AZ
Cobra Make, Engine: Classic Roadsters
Posts: 209
|
|
Not Ranked
I've never measured it but think that tank holds about 1.5 to 2 quarts. I use another tank for overflow ( 9973 - 13 - The Fan Man ) mounted to fan shroud (sort of visible in 3rd pic below). You'll need that if you use this tank as it isn't designed to run less than full. Both of the hose fittings are near the top of the tank so you wouldn't get full coolant flow if you run it low.
Here are pictures for the cross bar I added between the front spring perches:
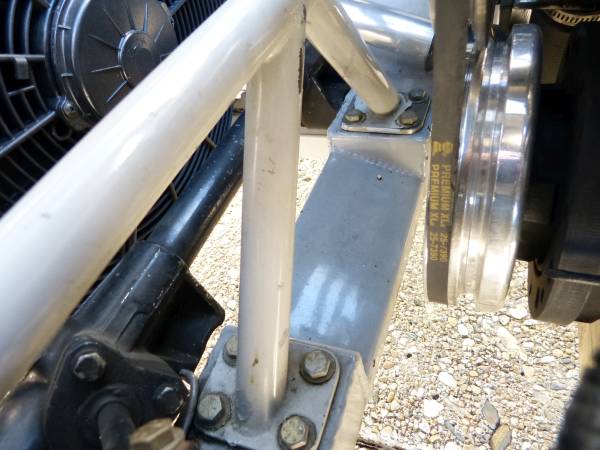
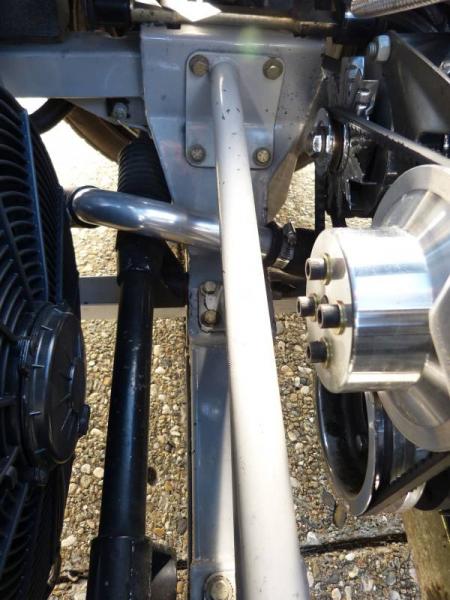
Simple and well triangulated. This in addition to a Panhard bar on the rear suspension makes for very sure footed cornering.
You could mount a tank on the cross bar but I think an engine mount works better in my opinion. I like to have some room for air flow behind the radiator fan. Mounting stuff on the cross bar starts to add vertical surfaces closer to the fan. Plus the further forward you go, the lower the tank will need to be to clear the hood. The tank needs to be the highest thing in the cooling system so no air gets trapped.
__________________
Thanks,
Joel Heinke (early 90's CRL Cobra)
|
09-29-2016, 12:55 PM
|
|
CC Member
|
|
|
Join Date: Jan 2016
Location: Ft Myers,
FL
Cobra Make, Engine: Classic Roadsters
Posts: 155
|
|
Not Ranked
Very cool and well done, gives me a few ideas.
|
09-30-2016, 12:15 PM
|
|
CC Member
|
|
|
Join Date: Apr 2015
Location: Prescott,
AZ
Cobra Make, Engine: Classic Roadsters
Posts: 209
|
|
Not Ranked
One other thing you should consider that might not be obvious in your car's current state of dis-assembly, the area above where a cross-bar will go is likely the area your hood hinge occupies. At least that's the situation on my CR1. I'm guessing you have the same single hood hinge arrangement that I have.
__________________
Thanks,
Joel Heinke (early 90's CRL Cobra)
|
09-30-2016, 06:04 PM
|
|
CC Member
|
|
|
Join Date: Jan 2016
Location: Ft Myers,
FL
Cobra Make, Engine: Classic Roadsters
Posts: 155
|
|
Not Ranked
C5GTO,
Thanks for the heads up....I took so many measurements of the front of the car from the frame and water pump center it makes my head spin. Since I'm in the automotive business and go to SEMA each year, I'm looking forward to Nov at sema to do some shopping.
Your right, I need to be careful about interfering with the hood hinges, but I think I'm ok.
You know how these things go, 2 steps forward and 1 step back.......crack another beer and find a solution.
|
 Posting Rules
|
You may not post new threads
You may not post replies
You may not post attachments
You may not edit your posts
HTML code is Off
|
|
|
All times are GMT -7. The time now is 11:07 PM.
Links monetized by VigLink
|


 Linear Mode


