 
 Main Menu
|
|
Nevada Classics
|
|
Advertise at CC
|
| S |
M |
T |
W |
T |
F |
S |
| |
|
|
1 |
2 |
3 |
4 |
| 5 |
6 |
7 |
8 |
9 |
10 |
11 |
| 12 |
13 |
14 |
15 |
16 |
17 |
18 |
| 19 |
20 |
21 |
22 |
23 |
24 |
25 |
| 26 |
27 |
28 |
29 |
30 |
|
|
|
|
CC Advertisers
|
|
 23Likes 23Likes

05-10-2013, 07:17 PM
|
 |
Half-Ass Member

|
|
|
Join Date: Jun 2005
Cobra Make, Engine: ERA #732, 428FE (447 CID), TKO600, Solid Flat Tappet Cam, Tons of Aluminum
Posts: 22,025
|
|

 Not Ranked
Quote:
Originally Posted by lippy

They delivered the suspension uninstalled. It's really heavy. Not sure how I will jack it into position but I'll cross that bridge when I come to it, or just get four guys to help.
|
Floor jacks with wood braces/supports -- it's doable. |
05-10-2013, 08:50 PM
|
|
Senior Club Cobra Member
|
|
|
Join Date: Dec 2007
Cobra Make, Engine: ERA FIA 'Street' Build
Posts: 2,129
|
|
Not Ranked
lippy,
797 is home
Congrats !!!
I see the heater pipes poking through the firewall, a rear brake line and the instruments are in. Is any of it wired or will you do it all?
Paint & body work look great, I bet the color is a rich deep blue in the sun.
Have fun and keep them pictures coming  |
05-11-2013, 04:27 AM
|
 |
CC Member
|
|
|
Join Date: Apr 2009
Location: Little Rock area,
AR
Cobra Make, Engine: ERA Street Roadster #782 with 459 cu in FE KC engine, toploader, 3.31
Posts: 4,533
|
|
Not Ranked
Quote:
Originally Posted by lippy
Not black, dark blue but shows scratches just as much.
They delivered the suspension uninstalled. It's really heavy. Not sure how I will jack it into position but I'll cross that bridge when I come to it, or just get four guys to help.
|
Sorry - color on my old laptop is a little off. Looked back at the photos from the paint shop and can see that it's dark blue now. My rear suspension was installed at ERA but from what I understand from ERAChase, it will go right in after pulling the gas tank. I suspect the biggest chore is working out how to support or balance it on a jack to roll under the rear. |
05-11-2013, 04:58 AM
|
 |
CC Member
|
|
|
Join Date: Oct 2012
Location: Burbs,
IL
Cobra Make, Engine: ERA #472, Previous owner of ERA #677 427, ERA 289 FIA-USRRC Street
Posts: 221
|
|
Not Ranked
Good for you! That is great...I am really enjoying your thread.
For some reason I thought you were doing a a Street car.
__________________
"Some things get meaner as they get older."
|
05-11-2013, 06:49 AM
|
 |
Senior Club Cobra Member
|
|
|
Join Date: Jun 2003
Location: West Linn,
OR
Cobra Make, Engine: ERA #684, 428 FE, TKO600
Posts: 1,378
|
|
Not Ranked
Some time back I had the rear suspension out of my car to have the drain plug repaired. I used a transmission jack to support it when it came out and went back in. A floor jack will work as well but just not as stable. I think I paid about $50 for the trans jack at Harbor Freight but, again, it was quite a while ago.
On the plus side ERA does a super job on engineering and fitment so you won't have to worry about things lining up. Put the part in place and drop the bolt in. If it needs a stover nut it's already welded in. Doesn't need any shimming or adjustment of the mounting points. They're just where they need to be. No surprises.
You might want to pick up a tapered punch to use as an alignment aid when putting the components in. I find one long and one short help a lot.
DonC
|
05-11-2013, 07:39 AM
|
|
CC Member
|
|
|
Join Date: Oct 2003
Posts: 4,078
|
|
Not Ranked
It's cake.Use a regular 2 or 3 ton floor jack. Cut a 3/4" thick board about a foot square and place on the jack's pad. With the car on jack stands and the gas tank out, roll the jack with rear under the car and elevate carefully.
Use the drift or awl as suggested to align the two top bolts and tighten them to 100 lb/ft. Connect the trailing arms to the chassis then remove the jack.
Here's a snap of the rear when I changed ratios, sitting on the board. Just size the board to support the cage and dif and no bigger.

__________________
Chas.
|
05-11-2013, 07:56 AM
|
|
Half-Ass Member
|
|
|
Join Date: Jun 2005
Cobra Make, Engine: ERA #732, 428FE (447 CID), TKO600, Solid Flat Tappet Cam, Tons of Aluminum
Posts: 22,025
|
|
Not Ranked
Quote:
Originally Posted by ERA Chas
It's cake.Use a regular 2 or 3 ton floor jack. Cut a 3/4" thick board about a foot square and place on the jack's pad.
|
Uhhh, isn't that what I just posted?  BTW, the Xtreme Filter top came. I'm going to try and turn it into aluminum this weekend. The bottom base of the Xtreme top does not fit with the existing filter, and the new filter will not fit with the existing base that fits my 4160 carb. But I think my existing base is easily modified to be flat, so I'll do that after I take some measurements. I got thrown off my schedule fetching one of the kids home from college and the three tons of crap that needed to be moved.  |
05-11-2013, 08:02 AM
|
|
CC Member
|
|
|
Join Date: Oct 2003
Posts: 4,078
|
|
Not Ranked
Quote:
Originally Posted by patrickt
Uhhh, isn't that what I just posted? |
Yes but as you recently informed me, I provided a more detailed response so OP is better informed and included a visual aid.
... and Lippy doesn't care about your air cleaner fiasco.
__________________
Chas.
|
05-12-2013, 06:42 PM
|
|
CC Member
|
|
|
Join Date: Apr 2012
Location: Bay Area (Peninsula),
CA
Cobra Make, Engine: ERA 427, 427/487 side-oiler
Posts: 1,248
|
|
Not Ranked
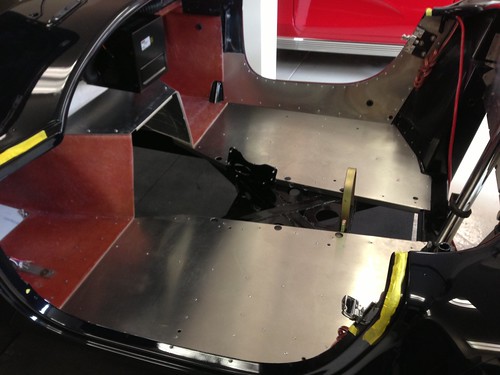
We accomplished quite a bit this first weekend with the car. I pulled the seats, dash, steering column, and radiator. After Mother's Day brunch, my wife wanted to lounge around so I spent the afternoon in the garage with the kids. They were great. I had prepped and drilled the rivet holes for the wheelwell and radiator panels, and we bonded and riveted them. The kids really liked using the pneumatic riveter. I also ditched virtually all of the sheet metal screws and speed nuts and replaced them with stainless hex screws with Pemnuts. Things went together easily and I'm happy with our progress.
 Untitled
 by Lippy111, on Flickr
 Untitled
 by Lippy111, on Flickr
 Untitled
 by Lippy111, on Flickr
 Untitled
 by Lippy111, on Flickr |
05-12-2013, 09:11 PM
|
 |
CC Member
|
|
|
Join Date: Aug 2009
Location: Adelaide,
SA
Cobra Make, Engine: AP 289FIA 'English' spec.
Posts: 13,152
|
|
Not Ranked
Looks nice Lippy; I'm envious!
I don't think I've commented on the colour before....that dark blue is going to look great.
Cheers,
Glen
|
05-27-2013, 11:47 AM
|
|
CC Member
|
|
|
Join Date: Apr 2012
Location: Bay Area (Peninsula),
CA
Cobra Make, Engine: ERA 427, 427/487 side-oiler
Posts: 1,248
|
|
Not Ranked

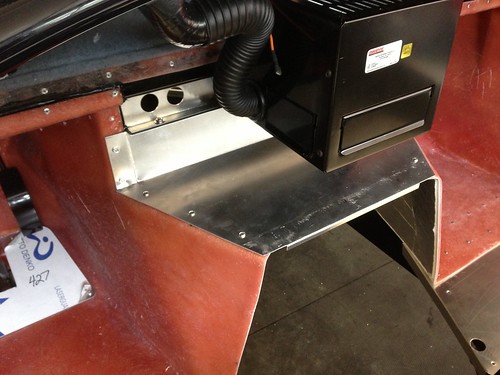
We've been making steady progress over the past couple of weeks, and the kids have helped me with almost everything. Since my last post, we've pulled the foot boxes (required removing the pedals and windshield) and floors, and then bonded and riveted them in permanently and reinstalled the pedals. We also installed some AWG-10 speaker wire on each side, and AWG-4 power wire on one side in case I want a stereo with an amp in the trunk and speakers in the foot boxes at a later point. I tied the wires up on the side of each foot box, and then riveted and bonded the aluminum panels under the doors. Last, we removed the firewall and bonded and riveted it back in. As you can see in some of the photos, I used Pemnuts wherever possible (floorboards, where the center tunnel will attach, and the center panel under the dash that connects the foot boxes).
I know a lot of people say you don't need Dynamat on the floors, etc. But after installing these panels they are like drums and will vibrate, even with carpet. It seems like a safe bet to install Dynamat on the floors, footboxes, and panels ahead of the rear wheels.
Next we will remove and install the panels in the rear footwells and trunk, which will require removing the roll bar. For anyone that has done this step before, did you drop the gas tank before drilling the panels in the trunk? The panels are fairly close and I think I could drill the holes without damaging the gas tank, but I may drop it just to be safe.
Also, should I leave the windshield off until I install the engine, or is it all right to reinstall it at this point?
 Untitled
 by Lippy111, on Flickr
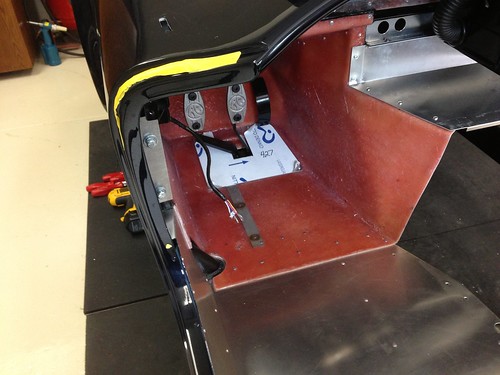 Untitled
 by Lippy111, on Flickr
 Untitled
 by Lippy111, on Flickr
 Untitled
 by Lippy111, on Flickr

|
05-27-2013, 12:26 PM
|
|
Half-Ass Member
|
|
|
Join Date: Jun 2005
Cobra Make, Engine: ERA #732, 428FE (447 CID), TKO600, Solid Flat Tappet Cam, Tons of Aluminum
Posts: 22,025
|
|
Not Ranked
Quote:
Originally Posted by lippy
Also, should I leave the windshield off until I install the engine, or is it all right to reinstall it at this point?
|
It will be slightly easier to drop the transmission in with the windshield off the car. Unless any of those kids are power lifters, you'll be using a lift to help you drop it in and having the windshield out of the way is a help. |
05-27-2013, 12:59 PM
|
|
CC Member
|
|
|
Join Date: Oct 2003
Posts: 4,078
|
|
Not Ranked
Keep the windshield out. Everything is easier and safer to the parts with it out. It should be one of the last assemblies to go on.
__________________
Chas.
|
05-27-2013, 01:03 PM
|
|
Half-Ass Member
|
|
|
Join Date: Jun 2005
Cobra Make, Engine: ERA #732, 428FE (447 CID), TKO600, Solid Flat Tappet Cam, Tons of Aluminum
Posts: 22,025
|
|
Not Ranked
Quote:
Originally Posted by ERA Chas
Keep the windshield out. Everything is easier and safer to the parts with it out. It should be one of the last assemblies to go on.
|
I think, instead, next time you should just write "listen to Patrickt." |
05-27-2013, 01:13 PM
|
|
CC Member
|
|
|
Join Date: Oct 2003
Posts: 4,078
|
|
Not Ranked
Quote:
Originally Posted by patrickt
I think, instead, next time you should just write "listen to Patrickt." |
For a guy that never assembled or disassembled one of these (or maybe anything) I'd never give that advice.
Is your name 'ERA Patrick'??
__________________
Chas.
|
05-27-2013, 01:17 PM
|
|
Half-Ass Member
|
|
|
Join Date: Jun 2005
Cobra Make, Engine: ERA #732, 428FE (447 CID), TKO600, Solid Flat Tappet Cam, Tons of Aluminum
Posts: 22,025
|
|
Not Ranked
Quote:
Originally Posted by ERA Chas
For a guy that never assembled or disassembled one of these (or maybe anything) I'd never give that advice.
|
But I have done something even better. I have disassembled and reassembled every part of my ERA multiple times just for the fun of it. And since it was originally put together by the elves at New Britain, there's no question that it was done properly to begin with. 
Quote:
Originally Posted by ERA Chas
Is your name 'ERA Patrick'??
|
If I could turn back time....  |
05-27-2013, 02:40 PM
|
|
CC Member
|
|
|
Join Date: Oct 2003
Posts: 4,078
|
|
Not Ranked
Quote:
Originally Posted by patrickt
But I have done something even better. I have disassembled and reassembled every part of my ERA multiple times just for the fun of it.
|
That so? Pulled engine? trans? changed clutch? intake? changed valve seals? changed heads? dropped the pan? dash out? installed MSD? prepped body for paint? installed Wilwoods? changed the rear? rebuilt carbs?
Have you done those things?
Near I can tell you put foam on the roll bars, painted your wheels, squirt Gumout in your air bleeds and took Brillo to your K&N lid. Oh and maybe adjust your lifters for the noise they make.
I just get on you because the newbs actually think you've done the things you advise about-Sheldon.
Those guys in New Britain are not elves-they're immensely skilled and experienced craftsmen.
__________________
Chas.
|
05-27-2013, 03:02 PM
|
|
Half-Ass Member
|
|
|
Join Date: Jun 2005
Cobra Make, Engine: ERA #732, 428FE (447 CID), TKO600, Solid Flat Tappet Cam, Tons of Aluminum
Posts: 22,025
|
|
Not Ranked
Quote:
Originally Posted by ERA Chas
Have you done those things?
|
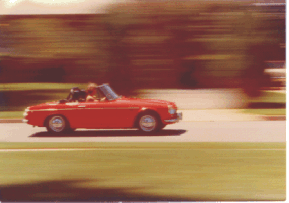
Most, and all on one of my cars or another. You forget, I've had this affliction all my life. Here's me almost 40 years ago in my pre-cursor to the Cobra.... Now, with a straight line like that, surely you can come up with a clever one.
Last edited by patrickt; 10-26-2016 at 09:03 AM..
|
05-27-2013, 04:33 PM
|
|
CC Member
|
|
|
Join Date: Oct 2003
Posts: 4,078
|
|
Not Ranked
NO roll bars???
So my point is basically correct-you're advising guys building Cobras based on MG 'experience'. I was not clever enough to specify those questions in relation to your Cobra-but that's what I questioned. Anything you did to the ERA was documented in 5000 posts and photos-and it was none of what I asked you about.
The affliction you suffer from my friend is called 'abundant BS'. With apologies to Jamo-you're a lawyer after all.... 
__________________
Chas.
|
05-27-2013, 04:38 PM
|
|
Half-Ass Member
|
|
|
Join Date: Jun 2005
Cobra Make, Engine: ERA #732, 428FE (447 CID), TKO600, Solid Flat Tappet Cam, Tons of Aluminum
Posts: 22,025
|
|
Not Ranked
Quote:
Originally Posted by ERA Chas
NO roll bars???
So my point is basically correct-you're advising guys building Cobras based on MG 'experience'. I was not clever enough to specify those questions in relation to your Cobra-but that's what I questioned. Anything you did to the ERA was documented in 5000 posts and photos-and it was none of what I asked you about.
The affliction you suffer from my friend is called 'abundant BS'. With apologies to Jamo-you're a lawyer after all....
|
That's not an MG, that's a Datsun 2000 Roadster, and it has a full roll bar, which I padded even back then. You don't happen to have an audio file of your Cobra, do you? |
 Posting Rules
|
You may not post new threads
You may not post replies
You may not post attachments
You may not edit your posts
HTML code is Off
|
|
|
All times are GMT -7. The time now is 06:25 PM.
Links monetized by VigLink
|


 Linear Mode


