 
 Main Menu
|
|
Nevada Classics
|
|
Advertise at CC
|
| S |
M |
T |
W |
T |
F |
S |
| |
|
|
|
|
|
1 |
| 2 |
3 |
4 |
5 |
6 |
7 |
8 |
| 9 |
10 |
11 |
12 |
13 |
14 |
15 |
| 16 |
17 |
18 |
19 |
20 |
21 |
22 |
| 23 |
24 |
25 |
26 |
27 |
28 |
29 |
| 30 |
|
|
|
|
|
|
|
|
CC Advertisers
|
|

07-14-2008, 03:14 AM
|
 |
CC Member

|
|
|
Join Date: Jul 1999
Location: istanbul,
TR
Cobra Make, Engine: scratch built 289 eclectic mix of fia/ussrc/early comp
Posts: 820
|
|

 Not Ranked
G'day Berg,
it's great work. You may take a look to my 3d work below
Regards
Ozgur
i used autodesk mechanical desktop for modelling and 3dmax for rendering @ year 1999

here it is, my work in progress for cobra 289 fia 3d model, wings3d and rhino3d @ year 2007
Last edited by Ozgur_Tan; 07-14-2008 at 03:35 AM..
|
07-14-2008, 09:47 AM
|
 |
CC Member
|
|
|
Join Date: Jul 2008
Location: Portland,
OR
Cobra Make, Engine:
Posts: 24
|
|
Not Ranked
Hey Ozgur,
thanks! great work yourself. Love the birdcage frame. Not sure if I'm going to go into that much detail yet....
Rhino, now that's a serious application, makes perfect curves. I know a few car modelers who swear by it. Good luck on the fia, would love to see progress as you continue.
|
07-14-2008, 06:06 PM
|
|
CC Member
|
|
|
Join Date: Jul 2008
Location: Portland,
OR
Cobra Make, Engine:
Posts: 24
|
|
Not Ranked
I couldn't leave the front end knowing how off the front panel was. Not sure if anyone would have caught it, but it was defiantly bugging me. Also as expected, cleaning that created a bunch of cascading issues. Getting it all hammered out and, in the end it will be a bit truer to form.

Here is the old front clip on the left, and the new piece that I am still working on, on the right. I will punch the hole out for the front brake vent when I'm sure I have this where I want it. After I put that in, adjustments are close to impossible without making a mess.

Here it is with higher tessellation. Getting there, but still needs a little more work to get the transitions solid. Attimes like these I wish I could slap on some bondo and break out the sand paper  (though throwing bondo on a cobra would probably get me struck by lighting!) |
07-15-2008, 08:00 PM
|
|
CC Member
|
|
|
Join Date: Jul 2008
Location: Portland,
OR
Cobra Make, Engine:
Posts: 24
|
|
Not Ranked
got most of the smoothing issues sorted on the body, though as I stand back and look at it, the "mouth" is looking too wide, almost austin healy-ish. The jack hooks are looking a bit small as are the brake vents, but these adjustments hopefully won't take too much time. Anyone have some actual blueprints they want to share? 

(The hood and trunk are not sitting correctly atm, didn't notice till after the render, though that's just getting all the parts back to the correct points in space.)
Will plan on getting the proportions further adjusted before I start working on the cockpit.
As always, comments and feedback very welcome.
Cheers
-Will
Last edited by Berg; 07-15-2008 at 08:03 PM..
|
07-15-2008, 11:20 PM
|
|
CC Member
|
|
|
Join Date: Jul 1999
Location: istanbul,
TR
Cobra Make, Engine: scratch built 289 eclectic mix of fia/ussrc/early comp
Posts: 820
|
|
Not Ranked
G'day Berg,
i'm newcomer for sub-polygon modelling. frankly, it's completely different thing then hybrid parametric CAD and NURBS based applications that i've been using for long time.
quick 3d model of 289fia is part of my pet project, you may take a look at
http://picasaweb.google.com/ozgur.ta...ey=2t9bgNur68Y
Regards,
Ozgur
Quote:
Originally Posted by Berg

Hey Ozgur,
thanks! great work yourself. Love the birdcage frame. Not sure if I'm going to go into that much detail yet....
Rhino, now that's a serious application, makes perfect curves. I know a few car modelers who swear by it. Good luck on the fia, would love to see progress as you continue.
|
|
07-16-2008, 12:49 AM
|
|
CC Member
|
|
|
Join Date: Jul 2008
Location: Portland,
OR
Cobra Make, Engine:
Posts: 24
|
|
Not Ranked
wow Ozgur, quite the set up, that's definitely the way to make sure your nailing the body. Mine is all based on eyeballing the model from photo reference and getting as many base measurements as I could to get in the ballpark.
Coming from an art background, I will keep plugging away and see how close I can get, I think if I had actual cad files or scan files at this point it would be depressing
how far are you taking your project? |
07-16-2008, 01:03 AM
|
|
CC Member
|
|
|
Join Date: Jul 1999
Location: istanbul,
TR
Cobra Make, Engine: scratch built 289 eclectic mix of fia/ussrc/early comp
Posts: 820
|
|
Not Ranked
because of some relocation, i could not setup my workplace.
but, i'll start soon.
Quote:
Originally Posted by Berg
wow Ozgur, quite the set up, that's definitely the way to make sure your nailing the body. Mine is all based on eyeballing the model from photo reference and getting as many base measurements as I could to get in the ballpark.
Coming from an art background, I will keep plugging away and see how close I can get, I think if I had actual cad files or scan files at this point it would be depressing
how far are you taking your project? |
|
07-16-2008, 10:25 PM
|
|
CC Member
|
|
|
Join Date: Jul 2008
Location: Portland,
OR
Cobra Make, Engine:
Posts: 24
|
|
Not Ranked

Had some solid progress. I'm feeling pretty solid with the proportions at this point, spent a while making sure all the body panels are nice and smooth. At this point things start getting fun as I get to work on the details.

forgive the spinners on the wheels off to the left, I forgot to remove them

will get to the radiator and oil cooler next

just realized in my earlier shot I had the vents facing the wrong way... doh

I love the rivets on the hood scoop. I see shots of cobras with and without rivets attaching the hood skin to the frame. I'm on the fence on this one... thoughts?

the tail end is coming along nicely. You can see the starting of the interior. The seat will be a bit of a challenge, should be fun.

better view of the interior. I went a little crazy on the gum-balls at the rear end and had to tub out the rear wheel wells to accommodate the monster tires. (definately not period, so I will most likely get these back to what they would have been stock.)
Will work on getting the windshield, roll bar, dash and more detail in the front end tonight. Should have another solid update soon.
cheers,
Will

|
07-17-2008, 05:40 PM
|
|
CC Member
|
|
|
Join Date: Jul 2008
Location: Portland,
OR
Cobra Make, Engine:
Posts: 24
|
|
Not Ranked
a little progress, got the windshield and the roll bar mounted. The roll bar diameter is a bit thin I think, looking through ref may need to get this to be a bit more substantial.
 |
07-22-2008, 01:23 AM
|
|
CC Member
|
|
|
Join Date: Jul 2008
Location: Portland,
OR
Cobra Make, Engine:
Posts: 24
|
|
Not Ranked
I have a little bit of progress, but frankly, the weather was too nice to bask in the glow of an LCD screen
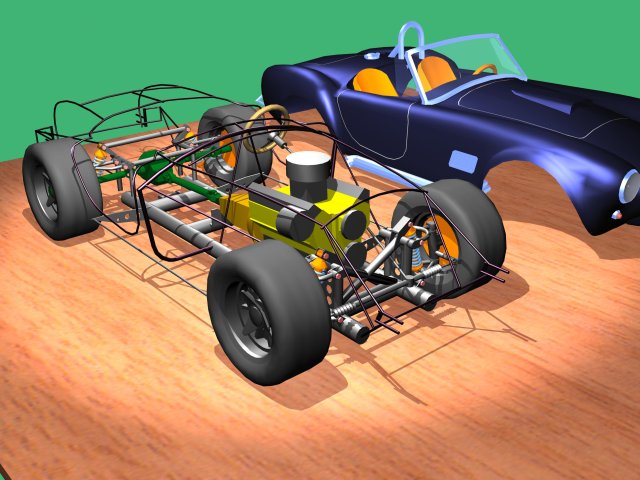
The side pipes are quick and dirty, but got the radiator, oil cooler, housing and braided lines done. A little more detail in the headlights, the hood latches, roll bar has been updated and am starting to work on the interior.

Here are the wires in maya. When smoothed I'm pushing close to a million polygons. So far my laptop is doing surprisingly well, but I do expect to have to start working in sections very soon.

I will handle alot of the detail work like the braiding on the lines and the radiator itself when I do the materials.

hood latches. tough to judge scale and placement from the pics, but I think I have these pretty solid

side pipes are pretty rough at the moment. Roll bar is a bit larger in diameter and feels more substantial
As always, comments and feedback appreciatted.
Cheers!
-Will |
| Thread Tools |
|
|
| Display Modes |
Rate This Thread |
 Hybrid Mode Hybrid Mode
|
|
 Posting Rules
|
You may not post new threads
You may not post replies
You may not post attachments
You may not edit your posts
HTML code is Off
|
|
|
All times are GMT -7. The time now is 09:42 PM.
Links monetized by VigLink
|


