Keith Craft Inc.- We service what we sell!!! Check out our Cobra engines!!! We build high performance racing engines and components for the fast pace strip racing industry as well as daily drivers who want to be FIRST!!!

FE Forums sponsored by Keith Craft Inc.


Go Back   Club Cobra > Engine Building, Tuning, and Induction > FE TALK

Welcome to Club Cobra!  The World's largest non biased Shelby Cobra related site!

  •  » Representation from nearly all Cobra/Daytona/GT40 manufacturers
  •  » Help from all over the world for your questions
  •  » Build logs for you and all members
  •  » Blogs
  •  » Image Gallery
  •  » Many thousands of members and nearly 1 million posts! 

YES! I want to register an account for free right now!  p.s.: For registered members this ad will NOT show

Nevada Classics
MMG Superformance
Main Menu
Nevada Classics
Nevada Classics
Keith Craft Racing
Advertise at CC
Banner Ad Rates
MMG Superformance
MMG Superformance
Keith Craft Racing
April 2024
S M T W T F S
  1 2 3 4 5 6
7 8 9 10 11 12 13
14 15 16 17 18 19 20
21 22 23 24 25 26 27
28 29 30        

Kirkham Motorsports

Reply
 
LinkBack Thread Tools Rate Thread Display Modes
  #1 (permalink)  
Old 09-19-2010, 12:24 PM
dcdoug's Avatar
CC Member
Visit my Photo Gallery

 
Join Date: Apr 2009
Location: Bethesda, MD
Cobra Make, Engine: CSX 6022, navy blue, period correct 427 SO
Posts: 2,154
Not Ranked     
Default C5AF distributor question

My C5AF-E distributor stopped advancing and it appears its likely due to surface rust on the mechanism (and maybe a bit of other crap too). I have removed the top half of the advance mechanism, but the bottom half seems stuck (although I haven't really pried much - don't want to until I get a response to this question). Will it come out on its own, or does the distributor shaft half to come out first?

Here's a pic of the piece I'm talking about that I need to remove for proper cleaning:


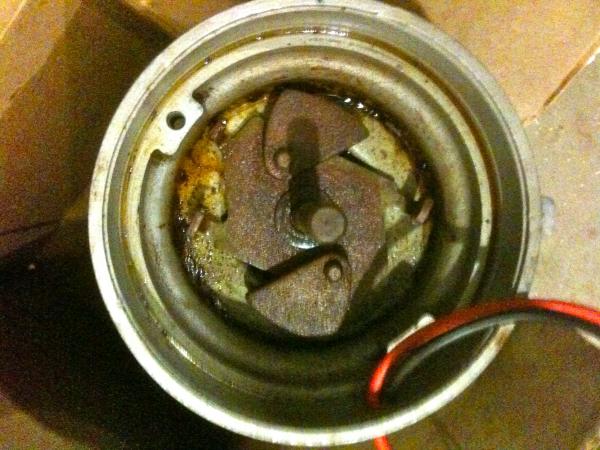
Oh, right now the top half of the advance mech is soaking in PB Blaster before I wire brush them. I wire brushed it a bit after spraying it and letting it sit overnight and it didn't come off easily, so I put it back into soak. Any other techniques for removing surface rust?

Thanks!
__________________
“There are only three sports: bullfighting, motor racing, and mountaineering; all the rest are merely games.”

www.partskeeper.com
(Less time searching, more time wrenching & driving)
Reply With Quote
  #2 (permalink)  
Old 09-19-2010, 01:28 PM
Rick Parker's Avatar
CC Member
Visit my Photo Gallery

 
Join Date: May 2001
Location: California, Ca
Cobra Make, Engine: NAF 289 Slabside Early Comp Car with 289 Webers and all the goodies. Cancelling the efforts of several Priuses
Posts: 6,592
Not Ranked     
Default

Remove the gear and shaft, bead blast advance mechanism parts, consider replacing the bushings as needed (real easy) and reassemble. You'll never be satisfied with the finished product unless you disassemble it before attempting to clean it.
__________________
Rick

As you slide down the Banister of Life, may the splinters never be pointing the wrong way
Reply With Quote
  #3 (permalink)  
Old 09-19-2010, 03:23 PM
dcdoug's Avatar
CC Member
Visit my Photo Gallery

 
Join Date: Apr 2009
Location: Bethesda, MD
Cobra Make, Engine: CSX 6022, navy blue, period correct 427 SO
Posts: 2,154
Not Ranked     
Default

Quote:
Originally Posted by Rick Parker View Post
Remove the gear and shaft, bead blast advance mechanism parts, consider replacing the bushings as needed (real easy) and reassemble. You'll never be satisfied with the finished product unless you disassemble it before attempting to clean it.
So the weights and bottom half of the advance mech aren't going to come out unless I remove the shaft? Also, given that I don't have a bead blaster, any other suggestions to remove the surface rust (other than soaking them and using a wire brush, which I is what I'm doing).

Do you know the exact bushings and where I can buy them?

Lastly, do I need any special hi-temp grease when I reassemble, or will garden variety automotive grease work fine?
__________________
“There are only three sports: bullfighting, motor racing, and mountaineering; all the rest are merely games.”

www.partskeeper.com
(Less time searching, more time wrenching & driving)
Reply With Quote
  #4 (permalink)  
Old 09-19-2010, 04:02 PM
Rick Parker's Avatar
CC Member
Visit my Photo Gallery

 
Join Date: May 2001
Location: California, Ca
Cobra Make, Engine: NAF 289 Slabside Early Comp Car with 289 Webers and all the goodies. Cancelling the efforts of several Priuses
Posts: 6,592
Not Ranked     
Default

What you are looking at are the two fly weights and the base plate which iw welded to the shaft. The oil lite bushings can easily be driven out from the top. The ready made bushings may be obsolete (?) through Ford but can be provided easily by a competant machine shop. The OD & ID are standard sizes the length is a unique size. 2 readily available ones can be "stacked" to arrive at the necessary length. This is not a difficult job but has good benefits. Se of the shafts had a spiral groove that pulled oil to provide necessary lubrication.
__________________
Rick

As you slide down the Banister of Life, may the splinters never be pointing the wrong way
Reply With Quote
  #5 (permalink)  
Old 09-20-2010, 11:28 AM
dcdoug's Avatar
CC Member
Visit my Photo Gallery

 
Join Date: Apr 2009
Location: Bethesda, MD
Cobra Make, Engine: CSX 6022, navy blue, period correct 427 SO
Posts: 2,154
Not Ranked     
Default

Any idea what the OD & ID size and length is for the distributor bushing?

I guess they need to be oil-impregnated bronze bushings from my reading. I assume that I can get them from McMaster-Carr if someone knows the exact size.
__________________
“There are only three sports: bullfighting, motor racing, and mountaineering; all the rest are merely games.”

www.partskeeper.com
(Less time searching, more time wrenching & driving)
Reply With Quote
  #6 (permalink)  
Old 09-20-2010, 08:28 PM
Rick Parker's Avatar
CC Member
Visit my Photo Gallery

 
Join Date: May 2001
Location: California, Ca
Cobra Make, Engine: NAF 289 Slabside Early Comp Car with 289 Webers and all the goodies. Cancelling the efforts of several Priuses
Posts: 6,592
Not Ranked     
Default

Dc. Check your PM's
__________________
Rick

As you slide down the Banister of Life, may the splinters never be pointing the wrong way
Reply With Quote
  #7 (permalink)  
Old 09-20-2010, 09:39 PM
Rick Parker's Avatar
CC Member
Visit my Photo Gallery

 
Join Date: May 2001
Location: California, Ca
Cobra Make, Engine: NAF 289 Slabside Early Comp Car with 289 Webers and all the goodies. Cancelling the efforts of several Priuses
Posts: 6,592
Not Ranked     
Default

looks like 11/16 OD/ 1.75 long/ 15/32 ID. May have been reamed to size??

I remember having to use 2 1" long ones once when I did this repair, shortened 1 of them to achieve the finished length.

The used distributor shaft I measured was .466 OD
__________________
Rick

As you slide down the Banister of Life, may the splinters never be pointing the wrong way

Last edited by Rick Parker; 09-20-2010 at 09:47 PM..
Reply With Quote
  #8 (permalink)  
Old 09-21-2010, 03:16 AM
Senile Club Cobra Member
Visit my Photo Gallery

 
Join Date: Feb 2001
Location: Buffalo, NY USA, NY
Cobra Make, Engine: Time Machines Motorsports LLC- Superformance Dealer
Posts: 4,489
Not Ranked     
Default

If you bead blast the shaft, I suggest you run it on a wire wheel to knock down the peaks and valleys that the blasting will create. There are several unique parts in a Ford dizzy, like the wave washers that go under the weights on the stud they pivot on and the felt that holds oil at the top of the shaft.

I'll look and see if I still have a box of N.O.S. oddball distributor parts lying around.
__________________
"I'm high all right, but on the real thing....powerful gasoline and a clean windshield..."

http://www.timemachinesauto.com/
Reply With Quote
  #9 (permalink)  
Old 09-21-2010, 08:03 AM
dcdoug's Avatar
CC Member
Visit my Photo Gallery

 
Join Date: Apr 2009
Location: Bethesda, MD
Cobra Make, Engine: CSX 6022, navy blue, period correct 427 SO
Posts: 2,154
Not Ranked     
Default

Other than the one flange bushing, I don't have any other bushings. The flange bushing is in decent shape, but I might replace it if I can find one anyway.


Are the wave washers below the weights, the c-clips that secure the weights and the thrust washer on top of the assemble specific to these distributors, or can they be found anywhere?
__________________
“There are only three sports: bullfighting, motor racing, and mountaineering; all the rest are merely games.”

www.partskeeper.com
(Less time searching, more time wrenching & driving)
Reply With Quote
  #10 (permalink)  
Old 09-21-2010, 08:28 AM
Senile Club Cobra Member
Visit my Photo Gallery

 
Join Date: Feb 2001
Location: Buffalo, NY USA, NY
Cobra Make, Engine: Time Machines Motorsports LLC- Superformance Dealer
Posts: 4,489
Not Ranked     
Default

Quote:
Originally Posted by dcdoug View Post
Are the wave washers below the weights, the c-clips that secure the weights and the thrust washer on top of the assemble specific to these distributors, or can they be found anywhere?
Standard to most all 1960 Ford V8 distributors. There should be a bushing pressed into the distributor housing as well, you won't find it until you dis-assemble the unit.
__________________
"I'm high all right, but on the real thing....powerful gasoline and a clean windshield..."

http://www.timemachinesauto.com/
Reply With Quote
  #11 (permalink)  
Old 09-21-2010, 08:33 AM
dcdoug's Avatar
CC Member
Visit my Photo Gallery

 
Join Date: Apr 2009
Location: Bethesda, MD
Cobra Make, Engine: CSX 6022, navy blue, period correct 427 SO
Posts: 2,154
Not Ranked     
Default

Quote:
Originally Posted by Mark IV View Post
Standard to most all 1960 Ford V8 distributors. There should be a bushing pressed into the distributor housing as well, you won't find it until you dis-assemble the unit.
Ah, didn't realize that. I will look tonight.
__________________
“There are only three sports: bullfighting, motor racing, and mountaineering; all the rest are merely games.”

www.partskeeper.com
(Less time searching, more time wrenching & driving)
Reply With Quote
  #12 (permalink)  
Old 09-21-2010, 03:14 PM
dcdoug's Avatar
CC Member
Visit my Photo Gallery

 
Join Date: Apr 2009
Location: Bethesda, MD
Cobra Make, Engine: CSX 6022, navy blue, period correct 427 SO
Posts: 2,154
Not Ranked     
Default

I spoke to lots of people today about 1960 Ford distributors and got a number of small little parts being sent my way to get this thing back together in good shape.

The only items I didn't find was the upper and lower shaft bushings. Hopefully mine are in OK shape. I will look tonight. They are almost impossible to find. I got a lot of help from Tim O'Connor at Tim O'Connor's Ford Distributor repair (http://428cobrajetcars.com/home), who has been rebuilding these since 1966 and has forgotten more than I will ever know. He did tell me that you need a special tool to remove the upper bushing and told me where to look to see if it's in good shape. the lower bushing is smaller and easier to knock out and inspect.

There seems to be some demand for these bushings, surprising no one makes them.

Anyway, thanks for all your help and I'll report back what I find tonight.
__________________
“There are only three sports: bullfighting, motor racing, and mountaineering; all the rest are merely games.”

www.partskeeper.com
(Less time searching, more time wrenching & driving)
Reply With Quote
  #13 (permalink)  
Old 09-21-2010, 08:06 PM
dcdoug's Avatar
CC Member
Visit my Photo Gallery

 
Join Date: Apr 2009
Location: Bethesda, MD
Cobra Make, Engine: CSX 6022, navy blue, period correct 427 SO
Posts: 2,154
Not Ranked     
Default

The upper bushing looks OK, so I will leave it as is. The lower bushing is OK, but I would probably replace it if I had the option. I measured the ID as 7/8 and the OD as 21/32, although since I wasn't using a caliper, it might not be exact. However, nothing that McMaster-Carr sells in oil-impregnated bronze was even close, so unless someone has one laying around, I will just use the one I have. It should still be OK.

All surface rust has been removed using a fine wire wheel, so ready to go back together when I get the parts. Hopefully by Friday so I can make cars and coffee on Sat AM.
__________________
“There are only three sports: bullfighting, motor racing, and mountaineering; all the rest are merely games.”

www.partskeeper.com
(Less time searching, more time wrenching & driving)
Reply With Quote
  #14 (permalink)  
Old 09-21-2010, 08:12 PM
Woodz428's Avatar
CC Member
Visit my Photo Gallery

 
Join Date: Jun 2003
Location: Freedomia,, Il
Cobra Make, Engine: Coupe,Blue w/white stripes SB; Roadster, Blue w/white stripes BB w/2-4s; SPF installer/Hot Rod-Custom Car builder
Posts: 1,376
Not Ranked     
Default

Look in the services section of Hemmings. There are several distributor rebuilders listed and they would surely have the bushings in stock or be able to tell you where to get them.
__________________
WDZ
Reply With Quote
  #15 (permalink)  
Old 09-22-2010, 06:25 AM
dcdoug's Avatar
CC Member
Visit my Photo Gallery

 
Join Date: Apr 2009
Location: Bethesda, MD
Cobra Make, Engine: CSX 6022, navy blue, period correct 427 SO
Posts: 2,154
Not Ranked     
Default

Quote:
Originally Posted by Woodz428 View Post
Look in the services section of Hemmings. There are several distributor rebuilders listed and they would surely have the bushings in stock or be able to tell you where to get them.
I'll take a look. I spoke with several yesterday and the few that said they had them, said they only used them for complete rebuilds. Several said they often have to buy used distributors just to get the bushings (which would lead me to question their condition).

If you really wanted to, I'm sure you could take a new fitting (most have much thicker walls) and machine it to fit, but I think mine is in OK condition and will probably just go with that unless I find something different today.

EDIT: Maybe I mis-measured, hard to know, but I did find an oil-impregnated bronze bushing at McMaster that had an OD of 11/16" (I had measured 21/31") and an exact match for ID of 1/2" (I remeasured and this seems right). The length is 1/2" instead of 3/8". For $1.19, I'll see if it works....if it doesn't I'm OK with the one I have.

On the length - does anyone know if it matters if the lower bushing is 1/8 longer? I could always cut it to size, but am curious if it actually matters.
__________________
“There are only three sports: bullfighting, motor racing, and mountaineering; all the rest are merely games.”

www.partskeeper.com
(Less time searching, more time wrenching & driving)

Last edited by dcdoug; 09-22-2010 at 08:07 AM..
Reply With Quote
  #16 (permalink)  
Old 09-22-2010, 09:23 AM
Wbulk's Avatar
CC Member
Visit my Photo Gallery

 
Join Date: May 2009
Location: American Fork, Ut
Cobra Make, Engine: 66 Cobra
Posts: 930
Not Ranked     
Default

I was wondering what your shaft looks like. I went through the same thing, but even if I put in a new bushing my shaft had over .015 wear where the bushing was riding. So as you would rev the engine the dwell would change. I called a few rebuilders and was advised shafts in good condition were hard to come by. Most used cores were coming out of Mexico, but it was getting rare to find a shaft that was in good condition. I ended up buying a new aftermarket distributor. So, I guess I am saying mic your shaft for wear.

Last edited by Wbulk; 09-22-2010 at 09:42 AM.. Reason: Correction
Reply With Quote
  #17 (permalink)  
Old 09-22-2010, 10:19 AM
dcdoug's Avatar
CC Member
Visit my Photo Gallery

 
Join Date: Apr 2009
Location: Bethesda, MD
Cobra Make, Engine: CSX 6022, navy blue, period correct 427 SO
Posts: 2,154
Not Ranked     
Default

My shaft appears to be in good shape. I also have pertronix, so no issue with dwell changing. Maybe it's time to buy a proper measuring device.
__________________
“There are only three sports: bullfighting, motor racing, and mountaineering; all the rest are merely games.”

www.partskeeper.com
(Less time searching, more time wrenching & driving)
Reply With Quote
  #18 (permalink)  
Old 09-22-2010, 11:59 AM
dcdoug's Avatar
CC Member
Visit my Photo Gallery

 
Join Date: Apr 2009
Location: Bethesda, MD
Cobra Make, Engine: CSX 6022, navy blue, period correct 427 SO
Posts: 2,154
Not Ranked     
Default

OK, here's a question on the mechanical advance cam adjustment. My cam has two options, 15L and 10L for 30 degrees and 20 degrees mech advance.

When I took it out, 15L was on the limit pin, but I don't know that it was ever advancing properly and knowing that these cars like 18-22 degrees of base timing (mine was set at 22), it seems that adding another 30 degrees on top of that for a total of 52 would be WAY too much.

Thoughts? Should I go ahead and switch it to the 10L/20 degrees advance? And if I do this, as long as I rotate the assembly so that the rotor is in the exact same position as it was when I took out the distributor, the timing should be similar to what I started with, correct?
__________________
“There are only three sports: bullfighting, motor racing, and mountaineering; all the rest are merely games.”

www.partskeeper.com
(Less time searching, more time wrenching & driving)
Reply With Quote
  #19 (permalink)  
Old 09-22-2010, 01:09 PM
Rick Parker's Avatar
CC Member
Visit my Photo Gallery

 
Join Date: May 2001
Location: California, Ca
Cobra Make, Engine: NAF 289 Slabside Early Comp Car with 289 Webers and all the goodies. Cancelling the efforts of several Priuses
Posts: 6,592
Not Ranked     
Default

If you have an Electric Motor repair shop in your vicinity, they may be able to help with the Bushings.
__________________
Rick

As you slide down the Banister of Life, may the splinters never be pointing the wrong way
Reply With Quote
  #20 (permalink)  
Old 09-22-2010, 01:23 PM
Wbulk's Avatar
CC Member
Visit my Photo Gallery

 
Join Date: May 2009
Location: American Fork, Ut
Cobra Make, Engine: 66 Cobra
Posts: 930
Not Ranked     
Default

Yes, I would go with the 10L to give you 20 deg. of mechanical advance. To check this if you have timing marks on your damper you can set initial at 0 deg and rev the engine up to about 4K and watch the timing marks with your timing light. If you have vacuum advance it needs to be disconnected. If everything is working right you should hit that 20 deg. mark. Then you can add additional initial timing to get it where you want, somewhere in the mid 30s.

Or if you just want to set it for total advance, with vacuum advance disconnected, rev it up to about the same 4k, set the timing to about 36 deg. This of course is if you do not have really heavy advance springs. This would be a good starting point as engines vary depending how they were built, altitude, CR, AF ratio, etc.

Last edited by Wbulk; 09-22-2010 at 01:26 PM..
Reply With Quote
Reply


Posting Rules
You may not post new threads
You may not post replies
You may not post attachments
You may not edit your posts

BB code is On
Smilies are On
[IMG] code is On
HTML code is Off
Trackbacks are On
Pingbacks are On
Refbacks are On


All times are GMT -7. The time now is 03:27 AM.


Powered by vBulletin® Version 3.8.0
Copyright ©2000 - 2024, Jelsoft Enterprises Ltd.
Search Engine Friendly URLs by vBSEO 3.6.0
The representations expressed are the representations and opinions of the clubcobra.com forum members and do not necessarily reflect the opinions and viewpoints of the site owners, moderators, Shelby American, any other replica manufacturer, Ford Motor Company. This website has been planned and developed by clubcobra.com and its forum members and should not be construed as being endorsed by Ford Motor Company, or Shelby American or any other manufacturer unless expressly noted by that entity. "Cobra" and the Cobra logo are registered trademarks for Ford Motor Co., Inc. clubcobra.com forum members agree not to post any copyrighted material unless the copyrighted material is owned by you. Although we do not and cannot review the messages posted and are not responsible for the content of any of these messages, we reserve the right to delete any message for any reason whatsoever. You remain solely responsible for the content of your messages, and you agree to indemnify and hold us harmless with respect to any claim based upon transmission of your message(s). Thank you for visiting clubcobra.com. For full policy documentation refer to the following link: CC Policy