Welcome to Club Cobra! The World's largest
non biased Shelby Cobra related site!
- » Representation from nearly all
Cobra/Daytona/GT40 manufacturers
- » Help from all over the world for your
questions
- » Build logs for you and all members
- » Blogs
- » Image Gallery
- » Many thousands of members and nearly 1
million posts!
YES! I want to register an account for free right now!
p.s.: For registered members this ad will NOT show
 
 Main Menu
|
|
Nevada Classics
|
|
Advertise at CC
|
|
March 2026
|
| S |
M |
T |
W |
T |
F |
S |
| 1 |
2 |
3 |
4 |
5 |
6 |
7 |
| 8 |
9 |
10 |
11 |
12 |
13 |
14 |
| 15 |
16 |
17 |
18 |
19 |
20 |
21 |
| 22 |
23 |
24 |
25 |
26 |
27 |
28 |
| 29 |
30 |
31 |
|
|
|
|
|
|
CC Advertisers
|
|
 7Likes 7Likes

02-15-2017, 04:12 PM
|
|
CC Member

|
|
|
Join Date: Aug 2014
Cobra Make, Engine: Kirkham
Posts: 71
|
|

 Not Ranked
 Suspension alignment
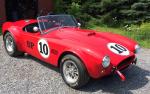
How I set up alignment on my new Kirkham 427, with an opportunity to showcase the really fantastic suspension of the Kirkham. Not just pretty to look at, but really well engineered and a pleasure to work with, compared to my previous work on panteras and mustangs and old corvettes.
This seemed to work for me. I give no guarantees to safety or validity of this technique. This is my experience as an amateur.
As a recreational mechanic, I do not have ready access to a fancy alignment machine. Years back I bought the Fastrax, which is powerful but probably not as precise as a laser. But with the right amount of effort and time, seems to give pretty good results.
This device basically has a level on it, so you can measure camber, which is just how many degrees off the wheel is from the vertical. By holding the device on the wheel and measuring camber at 15 degrees of turn-out and comparing to 15 degrees of wheel turned-in, you can also read caster with the same level.
It also has adapter arms to measure toe in, with some futzing. I have found a bungee cord will hold the device to the wheel while I measure with a tape measure to the opposite tire. I measure to the edge of the tread. This is probably accurate to a sixteenth of an inch if I am careful, judging by my own unofficial testing with repeated measurements. It actually is surprising how consistent the measurements can be.
Last edited by jkg2101; 02-15-2017 at 04:23 PM..
|
02-15-2017, 04:14 PM
|
|
CC Member
|
|
|
Join Date: Aug 2014
Cobra Make, Engine: Kirkham
Posts: 71
|
|
Not Ranked
First I set ride height on the front and rear. Just under 6 at the rear, and 5 at the front. Others may want theirs lower. This is easily done by adjusting the Penske coilover shocks. Of note, to get the rear below 6, the spring ends up loose at full droop (when jacked in the air). But when the weight of the car is on the suspension, the spring is under compression. Apparently this is common with some coilovers.
Although I have a spanner wrench for adjusting coil-overs, actually dont need one on the Kirkham. If I wanted to make the ride height much higher, then I would.
With a 4 wheel independent suspension, the next thing is to find the long axis of the car/frame. I am not entirely sure how to do this on a car with an irregular unibody, like a Pantera, but with an original-style framed Cobra, the main tubes are a good point of reference. The frame is really nice and square (parallel main tubes) on a kirkham. I used a level to measure a fixed distance (21 inches for me) perpendicular to the main tubes on each side, and put marks on the floor so I could draw a line that represented the long axis of the frame but alongside the body. Shown in this image by the green tape marks on the floor.
|
02-15-2017, 04:15 PM
|
|
CC Member
|
|
|
Join Date: Aug 2014
Cobra Make, Engine: Kirkham
Posts: 71
|
|
Not Ranked
Next I want to set the long axis of the rear tires to be parallel to this long axis of the frame. The tape marks on the ground show me the long axis of the frame. I need to determine the long axis of the tire. I came up with an idea to use string under tension, although others have apparently also used this from what I hear.
I put a heavy jackstand behind the car, towards the center, and a second in front of the car. I tied a string between those jack stands, so the string is coming from inside the back of the rear tire and running toward the front. The string should be under tension, not loose, so it is a straight line. Then I move the front jack stand so that the string is just barely touching the front of the rear tire, so I know the string is along the axis of the rear tire. So now the string is perfectly parallel to the long axis of the tire.
I then adjust the toe of the rear tire until I can get the string to be parallel to the frame axis, which is on the floor on the green tape marks. The rear toe-rod (probably the wrong name) is easy to turn to make this adjustment. My floor is vinyl tile, and if I put a thin piece of cardboard under the tires, the wheels slide easily, so I can move the tire and not have to rock the car to be sure the tire has moved. If I was on pavement or unfinished concrete, I would have to rock the car back and forth a bit to settle the tire to be sure the change in the suspension is in effect. Hope that makes sense.
At first, I set the rear toe to be zero. This helps align the front tires later. Even later on I will add toe in.

|
02-15-2017, 04:17 PM
|
|
CC Member
|
|
|
Join Date: Aug 2014
Cobra Make, Engine: Kirkham
Posts: 71
|
|
Not Ranked
Next I set the rear camber. On the Kirkham, this is easy. First measure with fastrax. I was positive 1 degree. At the rear suspension, when the car was delivered, the only loose rear suspension nuts were on the toe link and the upper heim joint/rod end at the rear carrier. (the rod end attaching the upper control arm to the rear hub carrier) All the others were tight, so I figured these shouldn’t be adjusted. To adjust the rear camber, (after jacking up car, placing jack stands, and removing rear tire) unbolt the rod end at the top of the rear upright and disconnect it from the upright. Then spin the rod end in or out to adjust camber, then re-attach to the upright. It takes longer to type these words than it takes to do it.
Then put the tire back on and lower the jack (after removing the jack stands). Remeasure camber with fastrax. It took me two times up and down to get a little more than 0.5 degree negative camber, which is what I wanted.
When it is where you want, you tighten the adjuster nut on the rod end.
As mentioned before, I put a piece of cardboard under the tire, and my floor is vinyl tile, so the tires will move with the weight of the car on them. So I can adjust toe while the car is on the ground. For camber, I have to jack up car, remove wheel, adjust camber, then put tire back on and lower car, each time. I also roll the car a little front to back to make sure nothing is binding from jacking up and down. So adjusting camber takes a few tries to get it just right. But not hard to do.
I found if I check camber when I first lower the car off the jack, and then check again after rolling car front and back a bit, there is a slight bit more negative camber after rolling. So I can’t trust the vinyl floor tile and cardboard to fully settle the suspension when coming off the jack.
Last edited by jkg2101; 02-15-2017 at 04:25 PM..
|
02-15-2017, 04:18 PM
|
|
CC Member
|
|
|
Join Date: Aug 2014
Cobra Make, Engine: Kirkham
Posts: 71
|
|
Not Ranked
Now that I am happy with camber, I double check the toe in with the fastrax. Strap the fastrax to the rear tire with a bungee cord, and use the legs to measure with a tape measure to the front and rear of the opposite tire. I picked a spot on the edge of the tread to measure to. This should be equal on the front and back of the tire, meaning the tires are parallel and toe in is set to zero. Which is what I want for now.
|
02-15-2017, 04:20 PM
|
|
CC Member
|
|
|
Join Date: Aug 2014
Cobra Make, Engine: Kirkham
Posts: 71
|
|
Not Ranked
Now to the front suspension
Front tire camber is really easy to set on a Kirkham. The lower control arm has these neat adjustments at the attachment to the frame. The rod ends can be pulled in or out of the control arm by turning the hex heads on the lower arm, as in the picture. In addition, by varying how much the forward or rear rod end is moved, can adjust caster (the forward rod end should be extended out further to decrease caster). At least I think that is how it works, and it worked well for me.
I could even make these adjustments with the car on the ground, as long as I had cardboard on my vinyl tile, so the tires slide really easily. I think if I jacked up the car, I might have to roll it to settle the suspension, but once on the ground, suspension changes dont seem to need the rolling back and forth since my floor is so slippery and the car is pretty light, even with engine in.
|
02-17-2017, 08:38 PM
|
 |
CC Member
|
|
|
Join Date: Apr 2016
Location: Phoenix,
AZ
Cobra Make, Engine: Ex owner of a polished Kirkham 427 S/C. Now Cobra-less and driving a mid-engine German hot rod.
Posts: 828
|
|
Not Ranked
Thanks for posting these. Very helpful. Is there a way to adjust the caster?
|
02-18-2017, 08:18 AM
|
|
CC Member
|
|
|
Join Date: Aug 2014
Cobra Make, Engine: Kirkham
Posts: 71
|
|
Not Ranked
The typical way to adjust caster is to use shims where the control arms mount to the frame. But I was able to make slight adjustments by turning out on one lower control arm rod end while turning the other one in. The suspension on a Kirkham is really well designed. I started with 7 degrees and brought it down to 6. That is too much for a street car from what I hear but really is fine I think on this lightweight car. If you have too much caster, then it may be hard to turn at lowest speeds. But light cars seem to do well with more caster. The pantera experts say to just put in as much caster as possible.
|
02-18-2017, 10:52 AM
|
|
CC Member
|
|
|
Join Date: Apr 2016
Location: Phoenix,
AZ
Cobra Make, Engine: Ex owner of a polished Kirkham 427 S/C. Now Cobra-less and driving a mid-engine German hot rod.
Posts: 828
|
|
Not Ranked
Thx - I would like more on mine. Haven't measured it but return to center coming out of a turn is not real strong and I think a bit more would help straight line stability at higher speeds too.
|
02-26-2017, 04:34 PM
|
|
CC Member
|
|
|
Join Date: Aug 2014
Cobra Make, Engine: Kirkham
Posts: 71
|
|
Not Ranked
here are some additional shots of front and rear suspension, for your viewing pleasure (as requested by a few interested folks)
Last edited by jkg2101; 02-26-2017 at 04:36 PM..
|
02-26-2017, 06:29 PM
|
|
CC Member
|
|
|
Join Date: Dec 2003
Location: Gurnee,
IL
Cobra Make, Engine: Kirkham #259
Posts: 1,396
|
|
Not Ranked
When you string a chassis.......you go off of the chassis....not the location of the wheels....
Set the strings parallel to the chassis rails.....then measure at the front of the wheel and the rear of the wheel to tell you what the wheel is doing.....and adjust from there..........
Camber is set based on the temperature of the heat across the tire.....
Caster is as much as you can get away with....5+*degrees is best....as you start getting grip...power steering maybe necessary......
__________________
Morris
|
02-26-2017, 06:33 PM
|
|
CC Member
|
|
|
Join Date: Dec 2003
Location: Gurnee,
IL
Cobra Make, Engine: Kirkham #259
Posts: 1,396
|
|
Not Ranked
BTW....in one of your photo's......is that the brake bleed screw I see at the bottom of the caliper....???
__________________
Morris
|
02-26-2017, 06:54 PM
|
 |
CC Member
|
|
|
Join Date: Aug 2013
Location: Canandaigua,
NY
Cobra Make, Engine: SPF MKII Riverside Racer FIA
Posts: 2,507
|
|
Not Ranked
Morris,
It does look like that in the first photo of a caliper that the bleeder is on top and in the last photo that includes a caliper the bleeder does appear to be on the bottom. Good catch, I have looked at these several times and did not pick up on that.
I agree with coming off of the frame (which hopefully should be straight) to establish straight lines from which to align the tires. Sage advice.
__________________

Last edited by 1795; 02-26-2017 at 06:56 PM..
|
11-05-2019, 09:40 AM
|
|
Club Cobra Member
|
|
|
Join Date: Mar 2002
Location: arroyo grande, ca,
ca
Cobra Make, Engine: NAF 427
Posts: 1,775
|
|
Not Ranked
Great post jkg2101.
What did you set the REAR SUSPENSION UPRIGHT CASTOR at ?
Thanks for your help.
Cheers
Greg
|
11-05-2019, 06:57 PM
|
|
CC Member
|
|
|
Join Date: Dec 2003
Location: Gurnee,
IL
Cobra Make, Engine: Kirkham #259
Posts: 1,396
|
|
Not Ranked
Quote:
Originally Posted by my427cobra

Great post jkg2101.
What did you set the REAR SUSPENSION UPRIGHT CASTOR at ?
Thanks for your help.
Cheers
Greg
|
What you really want to know .....is what is the bump steer on the rear.....
This has the biggest affect on the rear as power is put to the ground and the chassis squats down and the wheel steers in or out as it moves thru the bump and rebound travel.....
Only .015 thousands of a inch....is allowable per inch of travel in bump or droop....
__________________
Morris
|
11-06-2019, 07:56 AM
|
|
CC Member
|
|
|
Join Date: Nov 1999
Location: Rosemount,
Mn
Cobra Make, Engine: SPF 1233-396C.I. Windsor
Posts: 123
|
|
Not Ranked
Morris,I am guessing the caliper is universal left or right and has internal crossover tubes. We see this typically on rear calipers that are square bore.(not staggered).
__________________
Mike Beamish / Northern Racing Products Superformance service & installation.
|
11-05-2019, 03:55 PM
|
 |
CC Member
|
|
|
Join Date: May 2008
Location: Brisbane,
QLD
Cobra Make, Engine:
Posts: 2,797
|
|
Not Ranked
Greg,
Rear suspension geometry has no characteristic that is defined as caster. A caster angle applies where the wheel pivots around a steering axis - the rear wheels don't do this (except for the small amount of movement that's used to adjust toe).
Unless you have 4 wheel steering.
And the only way to measure caster is to sweep the "steering" 15 degrees to left and right first.
Gary
Last edited by Gaz64; 11-05-2019 at 03:58 PM..
|
02-21-2020, 03:15 AM
|
|
CC Member
|
|
|
Join Date: Jun 2006
Location: Newcastle, Warners Bay,
NSW
Cobra Make, Engine: RMC . 393 Dart alloy block Stroked 351 alloy heads ..all the goodies plus a pre oiler. al
Posts: 1,495
|
|
Not Ranked
Boy ..those shocks are at a steep angle... that will require a heavier spring. I did a lot of work on mine to make the shocks as close to vertical as possible... good luck with that set up.
|
02-21-2020, 09:10 PM
|
 |
CC Member
|
|
|
Join Date: Feb 2018
Location: Lodi,
CA
Cobra Make, Engine: 427 manowar forged crank roller rockers . BIG CAM.
Posts: 787
|
|
Not Ranked
When you lay down the shock it allows it to be longer witch helps with the action of the suspension I am no expert but the motorcycle world found this to be true back in the 70s I do not own a kirkham but personally I really like what I am seeing.
|
06-04-2020, 10:05 PM
|
|
CC Member
|
|
|
Join Date: Jan 2020
Location: La Costa/San Diego,
Ca
Cobra Make, Engine: Kirkham shelby cobra slabside
Posts: 4
|
|
Not Ranked
Tremendous post. Thanks for going to such depth and energy to help and educate. Time consuming. You are truly passionate about your car,
|
 Posting Rules
|
You may not post new threads
You may not post replies
You may not post attachments
You may not edit your posts
HTML code is Off
|
|
|
All times are GMT -7. The time now is 05:13 PM.
|
|


 Hybrid Mode

