Club Cobra Gas-N Exhaust  

Go Back   Club Cobra > Cobra Talk Areas > Scratch Builders Forum

MMG Superformance
Nevada Classics
MMG Superformance
Main Menu
Module Jump:
Nevada Classics
Nevada Classics
MMG Superformance
Advertise at CC
Banner Ad Rates
Keith Craft Racing
MMG Superformance
MMG Superformance
November 2025
S M T W T F S
            1
2 3 4 5 6 7 8
9 10 11 12 13 14 15
16 17 18 19 20 21 22
23 24 25 26 27 28 29
30            

Kirkham Motorsports

Like Tree3Likes

Reply
 
LinkBack Thread Tools Rating: Thread Rating: 63 votes, 2.76 average. Display Modes
  #1 (permalink)  
Old 05-16-2006, 08:52 PM
fasterpatrick's Avatar
CC Member
Visit my Photo Gallery

 
Join Date: Feb 2006
Location: IGH, MN, mn
Cobra Make, Engine: scratch build self design 4.6l DOHC
Posts: 769
Not Ranked     
Default Fasterpatricks Custom Cobra

Well, most of the stuff to get the build started is here. Now let the lunacy transpire. 
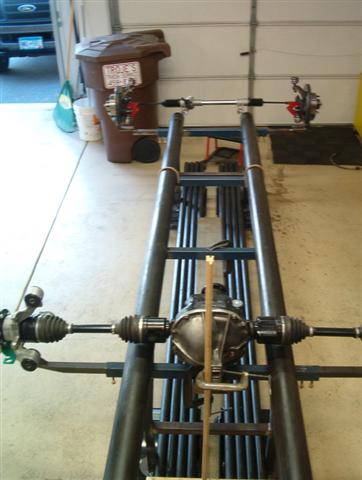
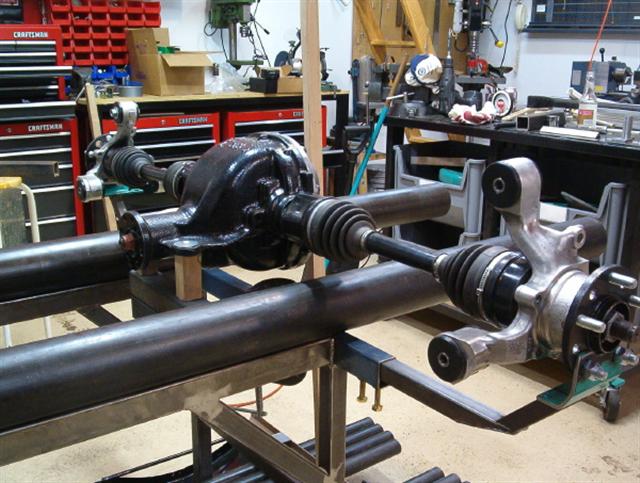
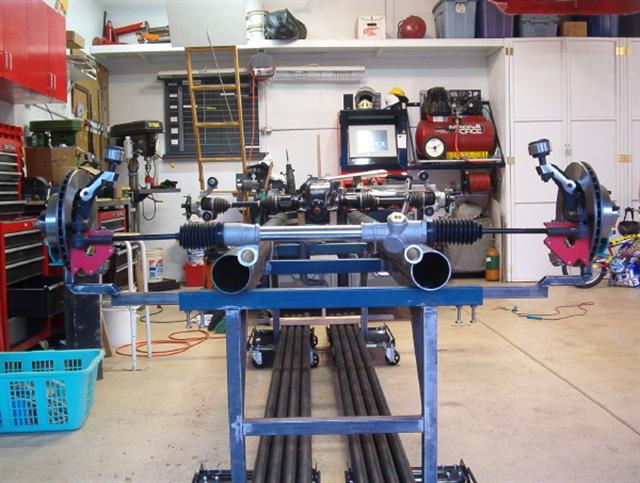
This frame promises not to be original style but more of a hybred of sorts. Read way to many chassis books and head still spinning for details now. Chassis jig photos will have to do, more pics in gallery


Last edited by fasterpatrick; 11-26-2007 at 09:14 PM..
Reply With Quote
  #2 (permalink)  
Old 05-17-2006, 11:40 AM
Jay Little's Avatar
CC Member
Visit my Photo Gallery

 
Join Date: Jun 1999
Location: Portsmouth, OH
Cobra Make, Engine: Undecided, 289
Posts: 200
Not Ranked     
Default

Very Nice! I'm wondering what spindles you are using up front? I have looked through some of your older post, but didn't see anything mentioned.

Jay Little
Reply With Quote
  #3 (permalink)  
Old 05-17-2006, 03:47 PM
CC Member
Visit my Photo Gallery

 
Join Date: Aug 2004
Location: Tarpon Springs, fl
Cobra Make, Engine: scratch building
Posts: 182
Not Ranked     
Cool Fasterpatricks Custom Cobra

And the fun begins...tank after tank of argon...and a lot of reading and figuring.....Keep us posted with your progress..
Al
Reply With Quote
  #4 (permalink)  
Old 05-17-2006, 04:26 PM
KarlCSX2498's Avatar
Senior Club Cobra Member
Visit my Photo Gallery

 
Join Date: Aug 2004
Location: Near Phila. (Collegeville), PA
Cobra Make, Engine: CSX2498 has been in our family garage since '68....Scratch built aluminum bodied 427SC Cobra, 427FE, CSX3000 chassis specs, 95% finished, only needs paint.
Posts: 642
Not Ranked     
Default have fun Pat.

keep posting photos & have fun, Karl
Reply With Quote
  #5 (permalink)  
Old 05-17-2006, 08:13 PM
fasterpatrick's Avatar
CC Member
Visit my Photo Gallery

 
Join Date: Feb 2006
Location: IGH, MN, mn
Cobra Make, Engine: scratch build self design 4.6l DOHC
Posts: 769
Not Ranked     
Default

Front end parts are mustang II repo units with 11" rotors and manual rack, All from speedway motors. Got the whole works spindels, rotors, brakes, ball joints, steering rack, tierod ends, and assorted hardware for just over $700. Not a bad deal. It's pretty much what they use for modified stock circle track cars. Pat
Reply With Quote
  #6 (permalink)  
Old 05-30-2006, 08:38 PM
fasterpatrick's Avatar
CC Member
Visit my Photo Gallery

 
Join Date: Feb 2006
Location: IGH, MN, mn
Cobra Make, Engine: scratch build self design 4.6l DOHC
Posts: 769
Not Ranked     
Default

I have a question, which would be better solid aluminum steering rack bushings or should I use delerin(Poly). I will be machining the myself and stock for both. Just a survey question. Pat
Reply With Quote
  #7 (permalink)  
Old 06-05-2006, 09:29 PM
fasterpatrick's Avatar
CC Member
Visit my Photo Gallery

 
Join Date: Feb 2006
Location: IGH, MN, mn
Cobra Make, Engine: scratch build self design 4.6l DOHC
Posts: 769
Not Ranked     
Default

Hey everyone,
Look what happened, while everyones out driving around I'm in the shop working. Just a few photos of what I've been up to Pat.


Last edited by fasterpatrick; 11-26-2007 at 09:14 PM..
Reply With Quote
  #8 (permalink)  
Old 06-05-2006, 11:21 PM
Banned
Visit my Photo Gallery

 
Join Date: Oct 2003
Location: Yorba Linda, CA
Cobra Make, Engine: SPF w/392CI stroker
Posts: 3,293
Not Ranked     
Default

You have skills.

-Dean
Reply With Quote
  #9 (permalink)  
Old 12-23-2009, 12:10 PM
CC Member
Visit my Photo Gallery

 
Join Date: Jan 2007
Cobra Make, Engine:
Posts: 27
Not Ranked     
Default

Quote:
Originally Posted by fasterpatrick View Post
Hey everyone,
Look what happened, while everyones out driving around I'm in the shop working. Just a few photos of what I've been up to Pat.
http://www.clubcobra.com/photopost/d...0/IM000709.JPG
http://www.clubcobra.com/photopost/d...0/IM000708.JPG
http://www.clubcobra.com/photopost/d...0/IM000707.JPG
New question, what make is your rear end parts from???
Reply With Quote
  #10 (permalink)  
Old 01-03-2010, 09:33 PM
fasterpatrick's Avatar
CC Member
Visit my Photo Gallery

 
Join Date: Feb 2006
Location: IGH, MN, mn
Cobra Make, Engine: scratch build self design 4.6l DOHC
Posts: 769
Not Ranked     
Default No more play time back to work

Well let's see, way to cold thank god for the heated shop. I've started back to work getting her ready for paint. The car is back on the chassis dolly, body is off the ceiling, and I have roughed in the fender wells on the front end of the car. These are times that I really do envy you guys that get to work with a kit. Having some of this metal work laid out for you must make this a little easier than trying to figure out, just how am I going to get this covered and how can I bend it this way. But I can get this stuff cleaned up and coated with the same stuff that the rest of the sheet metal is covered with.


Need to source the bulb-seal that I will need to go between the metal, frame, and body. With some luck I should be able to get the rest of the holes laid out that I need to cut into the body and start prepping it for undercoating. I can not believe how different this body is left to right. It's like they molded off of two different cars, guess that is what is meant by character.
Patrick
__________________
http://www.clubcobra.com/photopost/s...0&ppuser=23754

Well, it occurs to me that perhaps not all of the modifications I made are technically 'street legal'

Nothing good ever happened after this statement;
Hey Moe watch this!
Reply With Quote
  #11 (permalink)  
Old 01-03-2010, 09:48 PM
*13*'s Avatar
CC Member
Visit my Photo Gallery

 
Join Date: May 2006
Location: Portland, OR
Cobra Make, Engine: ERA FIA, 1964 289->Webers
Posts: 3,689
Not Ranked     
Default

Kit's are pretty easy, in comparison, but bragging rights are something to cherish! Nice work! Keep the pics comin'!
__________________
ERA FIA 2088
Reply With Quote
  #12 (permalink)  
Old 03-06-2010, 07:47 PM
fasterpatrick's Avatar
CC Member
Visit my Photo Gallery

 
Join Date: Feb 2006
Location: IGH, MN, mn
Cobra Make, Engine: scratch build self design 4.6l DOHC
Posts: 769
Not Ranked     
Default Wow two months with out an update

Okay guys, here it goes I have the rest of the missing sheet metal formed and coated. Now I cutout some of the holes in the body and found that it had been made very thin I believe this was because of all the extra glass work that would have needed to be done to bond the tub interior that the body kit came with. So I went back to the glass and resin store and picked up another 5gal and mat. So when the temps get back up so I can work with the shop open, I will make the body a bit thicker. For now I will continue to take care of small stuff. This unfortunate setback will delay the paint work which I was hoping to have done late spring.

More bad I came down with Shingles (Chicken Pox Revenge) three weeks ago, I would not wish this on anyone ( Okay maybe one or two people), so working out in the shop has been hit and miss.

I have made some small steps in the right direction. I have made myself a set of louvers for my car, before you all get testy about how they look they will be painted body color like "The Real Ones"


So everyone I'm not dead and I'm still plugging away until later,
Patrick
__________________
http://www.clubcobra.com/photopost/s...0&ppuser=23754

Well, it occurs to me that perhaps not all of the modifications I made are technically 'street legal'

Nothing good ever happened after this statement;
Hey Moe watch this!
Reply With Quote
  #13 (permalink)  
Old 06-09-2006, 07:09 AM
CC Member
Visit my Photo Gallery

 
Join Date: Apr 2004
Cobra Make, Engine: Scratch Build
Posts: 15
Not Ranked     
Default

Awesome, Patrick, now I really want to get moving. I love your table, and wish I saw it sooner. I am almost done with mine. It is made of 7 nine foot 6 inch I-beams. It is too much table for my single bay garage.

I will try to finish it this weekend and make my first cut on the 4 inch tubes.

Thanks for the inspiration.
Iggy
Duwey likes this.
Reply With Quote
  #14 (permalink)  
Old 06-09-2006, 09:23 AM
CC Member
Visit my Photo Gallery

 
Join Date: Apr 2004
Cobra Make, Engine: Scratch Build
Posts: 15
Not Ranked     
Default

Patrick, this may only add weight, but do you think that it would help to drill out a hole in the front pumkin cross piece where the bolts go and weld in a section of pipe. The pipe would be flush top and bottom, also it would be welded top and bottom. So the cross piece would hold it steady, but never see compression. The bolts would just fit in the pipe. Just thinking that now you could tighten the pumpkin untill the bolts break without any stress on the parts.

I do see that the cross piece is so thick that this might be overkill.

Iggy
Reply With Quote
  #15 (permalink)  
Old 06-09-2006, 08:47 PM
fasterpatrick's Avatar
CC Member
Visit my Photo Gallery

 
Join Date: Feb 2006
Location: IGH, MN, mn
Cobra Make, Engine: scratch build self design 4.6l DOHC
Posts: 769
Not Ranked     
Default

Iggy,
I have done that many times in the past but with lighter stock. this crosmember is 3/16ths thick so yes it would be overkill. Was thinking about making the bottom hole large enough to tuck the bolt up inside the crossmember. That would make for a much cleaner look. Pat
Reply With Quote
  #16 (permalink)  
Old 06-25-2006, 10:51 PM
fasterpatrick's Avatar
CC Member
Visit my Photo Gallery

 
Join Date: Feb 2006
Location: IGH, MN, mn
Cobra Make, Engine: scratch build self design 4.6l DOHC
Posts: 769
Not Ranked     
Default rear suspension drawings

Hey guys,
Well I'm back, took the family to see dead presidents carved in stone. Black hills camping vacation, long drive but worth it, good time. Been getting more parts together and lots of cad time.

PLease tell me what you think of this for rear suspension layout nothing is set in stone yet. Will work in shock mounts when the shocks arive so I can get them drawn in the computer. Pat
Reply With Quote
  #17 (permalink)  
Old 06-26-2006, 10:10 PM
hssss's Avatar
CC Member
Visit my Photo Gallery

 
Join Date: Jun 2006
Cobra Make, Engine:
Posts: 92
Not Ranked     
Default

Patrick
Since you are still in the design stage you might look at the rear cover from an 8.8 Explorer, I like the mounting much better. I can get them for anyone interested for about $35 to $40. I believe with a load your arms would bend at the curve. I'm going to adapt the Locost Roarty plans for the 8.8 IRS. I know it is a Lotus 7 type but the general Idea would be the same. http://locost7.info/files/suspension...RSAssembly.pdf
Reply With Quote
  #18 (permalink)  
Old 06-27-2006, 10:57 PM
CC Member
Visit my Photo Gallery

 
Join Date: May 2006
Cobra Make, Engine: scratch built aluminum chassis/bb
Posts: 6
Not Ranked     
Default

Hey Pat,just a quick observation on your great work. I usually wait untill last to permanently mount the rack, this saves lots of time when sorting out any bump-steer.
Reply With Quote
  #19 (permalink)  
Old 06-28-2006, 06:08 AM
CC Member
Visit my Photo Gallery

 
Join Date: Apr 2004
Cobra Make, Engine: Scratch Build
Posts: 15
Not Ranked     
Default

Pat it looks good. To Hesss'es point, you could diagonal the lower back arm (vs curve). The upper arm on many (Jag, FFR) is a single arm. The FFR uses an angled lower rear arm. The Heim joint hits at the same angle. Also the Lower rear mount is set 3 degrees lower than the front. I am told that both of these add anti-squat. I think that the angle binds the joints under power and tends to add anti-squat and toe-in (a desirable thing). I do not remember how the original was setup (I don't think it had the 3 degree down angle), but will look tonight. I also have a book somewhere that gives some guidance I’ll check this out. I also have seen where people use spherical bearings vs bushings as they may move more than the arms flexing.

Iggy
Reply With Quote
  #20 (permalink)  
Old 06-28-2006, 01:44 PM
hssss's Avatar
CC Member
Visit my Photo Gallery

 
Join Date: Jun 2006
Cobra Make, Engine:
Posts: 92
Not Ranked     
Default

FWIW I have been researching how to setup the IRS. I plan on using Rorty as general directions. I plan on using Stock Car Products links which are DOM and threaded for 3/4 rod ends. I like and will probably use Rock Krawler rod ends which have a 14 mm trunion bolt but they have a 10mm sleeve for them.


$30.00 Per Assembly for 3/4 Shank
+/- 20 degrees
60,000 Pound Radial Load Capacity
8,800 Pound Axial Load Capacity
Rebuild Kits $5.00 (New Poly Races)
Fits Clevis widths of 2.375"
14 mm Bore

I also believe I have found a cheap way to put spherical bearings in the spindle. Currie makes a johnnie joint which is a sleeve that looks like it would be a direct fit into the spindle.


2" Johnny Joint w/ Greaseable bolt
2 x 1.5 shell
2 trunion

CE-9112 Our Price: $37.95

Description: For fabricators and suspension system builders. Currie's Johnny Joints offer 30 degrees of unrestricted movement in any direction as compared to 22 degrees on a common heim joint. The bushings in the Johnny Joint rod ends are made with a high-density, "tough 88" urethane that encases the inner ball. It is a very durable material, and is impervious to weather. The special ball is heat-treated steel for extra strength, and is cross-drilled for thru-bolt lubrication. The outer shell is .180" DOM tubing, and the retaining washers are heat-treated steel. This 2" joint also includes a 7/16" greasable thru-bolt.
Unit of Measure: Each

http://www.currieenterprises.com/ces...nnyjoints.aspx

Last edited by hssss; 07-05-2006 at 12:58 AM..
Reply With Quote
Reply

Thread Tools
Display Modes Rate This Thread
Rate This Thread:

Posting Rules
You may not post new threads
You may not post replies
You may not post attachments
You may not edit your posts

BB code is On
Smilies are On
[IMG] code is On
HTML code is Off
Trackbacks are On
Pingbacks are On
Refbacks are On


All times are GMT -7. The time now is 09:10 AM.


Powered by vBulletin® Version 3.8.0
Copyright ©2000 - 2025, Jelsoft Enterprises Ltd.
Search Engine Friendly URLs by vBSEO 3.6.0
The representations expressed are the representations and opinions of the clubcobra.com forum members and do not necessarily reflect the opinions and viewpoints of the site owners, moderators, Shelby American, any other replica manufacturer, Ford Motor Company. This website has been planned and developed by clubcobra.com and its forum members and should not be construed as being endorsed by Ford Motor Company, or Shelby American or any other manufacturer unless expressly noted by that entity. "Cobra" and the Cobra logo are registered trademarks for Ford Motor Co., Inc. clubcobra.com forum members agree not to post any copyrighted material unless the copyrighted material is owned by you. Although we do not and cannot review the messages posted and are not responsible for the content of any of these messages, we reserve the right to delete any message for any reason whatsoever. You remain solely responsible for the content of your messages, and you agree to indemnify and hold us harmless with respect to any claim based upon transmission of your message(s). Thank you for visiting clubcobra.com. For full policy documentation refer to the following link: CC Policy
Links monetized by VigLink