
04-03-2013, 03:52 PM
|
|
CC Member

|
|
|
Join Date: Mar 2003
Location: PVE,
CA
Cobra Make, Engine: ERA 289 FIA #2027, 65' 289" PS wheels
Posts: 345
|
|

 Not Ranked
 TDC tool
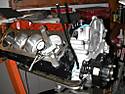 Gary,
Made this fixture from a aluminum tube...then I saw David Gagnard's idea...he used an open slot which is easier than trying to get the two bolts into the block centered.
The 5/16" pointer bolt is too big, and the #18 pitch thread too coarse. Fit is pretty sloppy. Would try a fine machine screw if I did it again...hard to use to repeat TDC.
The bar did work well to support the dial indicator solidly. My magnetic base was always creeping.
Using the dial indicator had a problem with the new rings causing a chatter as you rotated the crank...hit the bores with WD-40 and that smoothed out and made finding TDC repeatable.
The PAPER CLIP gauge is great idea for checking the rocker arm clearance, I will give that a try.
Thanks, Pete

__________________
ERA 289 #2027
|


 2Likes


 Threaded Mode

