 
 Main Menu
|
|
Nevada Classics
|
|
Advertise at CC
|
| S |
M |
T |
W |
T |
F |
S |
| |
|
|
1 |
2 |
3 |
4 |
| 5 |
6 |
7 |
8 |
9 |
10 |
11 |
| 12 |
13 |
14 |
15 |
16 |
17 |
18 |
| 19 |
20 |
21 |
22 |
23 |
24 |
25 |
| 26 |
27 |
28 |
29 |
30 |
|
|
|
|
CC Advertisers
|
|

02-21-2007, 01:12 PM
|
|
Banned

|
|
|
Join Date: Oct 2003
Location: Yorba Linda,
CA
Cobra Make, Engine: SPF w/392CI stroker
Posts: 3,293
|
|

 Not Ranked
 Replaced drive shaft safety hoop in my SPF
Is anyone here interested in seeing before/after photos of this simple mod?
I recently read some other threads on driveshaft universal joints that have let go, causing a lot more damage than one would imagine. In both cases (one of them an SPF), each car had a factory-installed safety hoop and the front universal joint (closest to the tranny) is the one that let go. And in both cases, the factory u-joint did not fully contain the driveshaft, causing damage to the surrounding fiberglass work/tranny tunnel. Although a rare event, I decided to improve what I have. I crawled under 'ol #747 and decided that the factory hoop wasn't going to do much.
There were a few creative alternatives that were posted, including a steel "tunnel" by Buckshot Fabrication. I decided to go a slightly easier route (I did not want to pull the trans tunnel out of the car at this time) and bought a universal safety hoop kit from Summit Racing ($25 + $10 handling). The steel is considerably thicker and wider than the factory SPF hoop, and the installation was fairly straight forward. You will require a cut-off wheel to shorten the outriggers on the new hoop (or plasma cutter, if you are so blessed). You may also require a Dremel tool with cut-off wheel to trim some of the glass on the floorpan (I had to do this to clear the bolt nuts on the driver's side). Otherwise, it was a "measure twice, cut once" job. It's not a 100% solution, but it's a ton better than what was there originally.
The pics are on my home PC and I can post late tonight. Let me know.
Regards,
-Dean #747

|
02-21-2007, 04:01 PM
|
 |
CC Member
|
|
|
Join Date: Jan 2007
Location: Greensboro NC,
NC
Cobra Make, Engine: SPF #2101 Diamond Ed.; 460
Posts: 61
|
|
Not Ranked
Yes please!
|
02-21-2007, 06:27 PM
|
|
CC Member
|
|
|
Join Date: Jan 2007
Location: Santa Maria,
Ca
Cobra Make, Engine: 2001 SPF, Sold =(
Posts: 300
|
|
Not Ranked
I would like to see those pics too! Thanks!
|
02-21-2007, 06:32 PM
|
|
Banned
|
|
|
Join Date: Oct 2003
Location: Yorba Linda,
CA
Cobra Make, Engine: SPF w/392CI stroker
Posts: 3,293
|
|
Not Ranked
I will post them LATE tonight.  |
02-21-2007, 08:25 PM
|
|
Club Cobra Member
|
|
|
Join Date: Feb 2003
Location: Sterling,
IL
Cobra Make, Engine: SPF #1507 427 Dart Block Windsor
Posts: 1,192
|
|
Not Ranked
Dean,
Initially, I was rather impressed with the SPF driveshaft hoop but the more I looked at it the more concerned I became that it would only catch the rear end of the driveshaft. If the front U-joint breaks, the hoop will be better than nothing, but not much. The Buckshot tunnel does enclose the entire driveshaft but evidently needs to be removed to grease the U-joints (if you use the greasable ones) which would be a big PIA. Furthermore, neither option would contain the driveshaft very closely, giving it quite a bit of room to flop around once one end comes loose.
I'm in the process of fabricating a double hoop arrangement which will use a 1/4 x 2" angle iron bracket mounted to the back of the crossmember for the front attachment, with two 1/4 x 1-1/2" bars extending back to the mounting tabs for the original hoop. The hoops will also be 1/4 x 1-1/2", with a piece of 1/4 x 3" welded on the top 180° of each hoop to deflect shrapnel from the U-joints. Each hoop will also have another piece bolted in to form a circle around the driveshaft. Nothing fancy; just a lot of 1/4" steel around the ends of the driveshaft, with room to get in and service the U-joints. From your description of the hoop you bought from Summit, it sounds as though you could easily duplicate the brackets I made and mount another Summit hoop over the front end of your driveshaft, working from under your car with the tunnel in place.
Removing the tunnel the first time is a real b!tch but it sure makes working on that stuff convenient every time thereafter. When you do decide to do it, there's a thread here where it's covered pretty thoroughly. Whatever you do, don't glue it back in!
Lowell
|
02-21-2007, 08:41 PM
|
|
Banned
|
|
|
Join Date: Oct 2003
Location: Yorba Linda,
CA
Cobra Make, Engine: SPF w/392CI stroker
Posts: 3,293
|
|
Not Ranked
Lowell, I would be interested to see pics of your final product/design! I just uploaded the pics of my install and will post them here later tonight (gotta run).
-Dean
|
02-21-2007, 10:06 PM
|
|
Banned
|
|
|
Join Date: Oct 2003
Location: Yorba Linda,
CA
Cobra Make, Engine: SPF w/392CI stroker
Posts: 3,293
|
|
Not Ranked
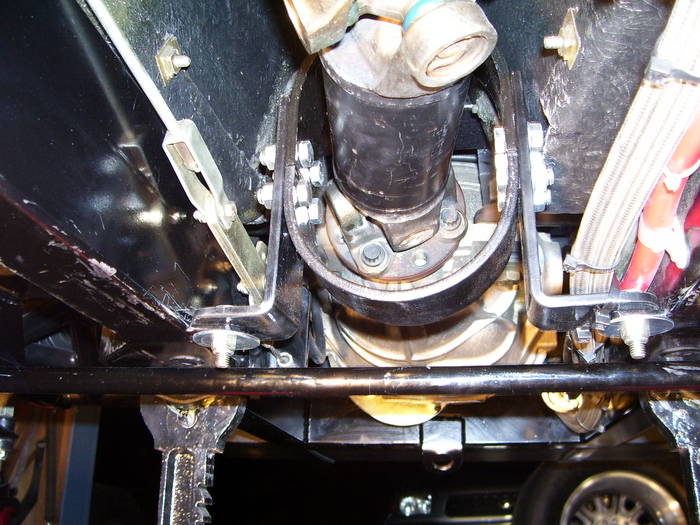
Oooookay...pics are in my gallery but here goes.
This first pic is of the factory set-up. Note that the hoop is more of an upside down "V", and though it essentially would perform the majority of its intended job, it's not really adequate (but still better than nothing at all)
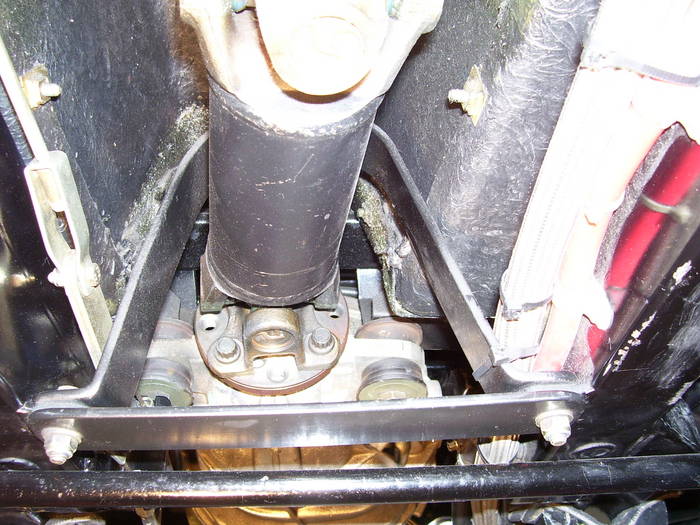
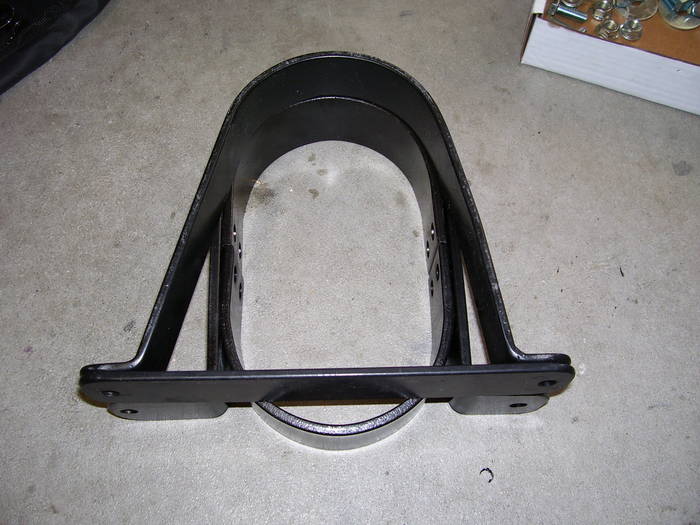
This next two pics give you a good idea of the relative increase in both thickness and width of the Summit Racing hoop. I layed the old hoop on top of the new one for size comparisons. You can also see that I had to trim the "out riggers" so that they would match-up to the mounting points of the original. This involved using a 10" carbide disc on a cut-off saw, but a plasma cutter would also work.  I also cut 45 degree notches on the corners and rounded them on a bench grinder, then touched them up with black paint to match. This eliminated the sharp edges and gave the final product a cleaner look.

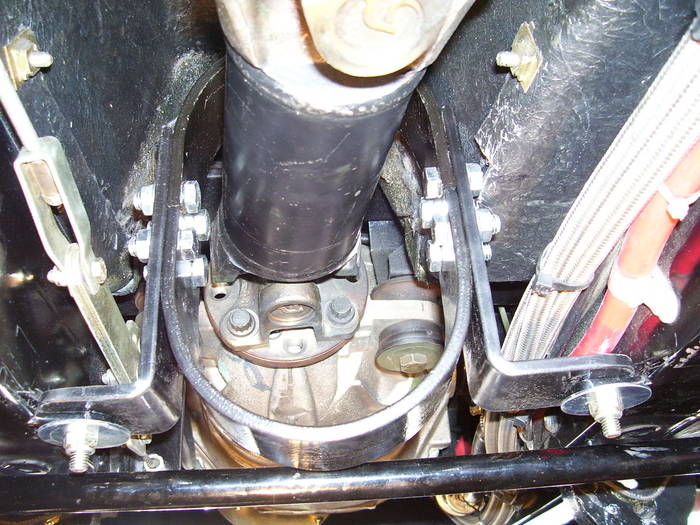
Here's a final pic showing the final installation. Fits like a glove and the lower portion of the hoop is still above the rear sway bar. So I didn't lose any ground clearance. You can also see in this pic where I had to remove a small strip of the floorboard to clear the upper bolts on the driver's side. And I had to do this even after shortening those bolts a 1/4" with a hack saw so that the nuts tightened even with the end of the shortened bolts! Still had a clearance issue, so I marked the area with a Sharpie and broke out my Dremel tool with a small cut-off wheel. That did the trick and did not create some gapping hole that would allow moisture or air to seep into the cockpit from below. Worst case is you can lop in some non-drying Permatex to seal it.
If Lowell's idea doesn't wow me, the next thing that I'm seriously considering is to add AN ADDITIONAL HOOP toward the front of the driveshaft. The mounting points would be the rear bolts that hold the seats in (they attached to a strong strap that is welded between the main frame and the outriggers). I would start with a thin piece of aluminum strap (one that I can bend with my hands), form it around the frame rails to my liking, then make sure it mates up with the secondary hoop correctly. Then send out the bent aluminum strap to a local fabricator (probably the same guy that did my side pipe muffler swap) and have him bend some 5/16" steel strap to mimic the Summit hoop material. Then, and only then, will I have achieved a true 100% solution.
I sure hope this little pictorial has helped some of you.
Regards,
-Dean
|
02-21-2007, 10:23 PM
|
|
CC Member
|
|
|
Join Date: Jan 2007
Location: Santa Maria,
Ca
Cobra Make, Engine: 2001 SPF, Sold =(
Posts: 300
|
|
Not Ranked
Great pics and explanation. Thanks! I'll be looking at mine soon.
|
02-22-2007, 07:24 AM
|
 |
CC Member
|
|
|
Join Date: Dec 2000
Location: Livermore,
CA
Cobra Make, Engine: ERA #629, BBM Side Oiler Block, 482ci, Richmond 5 speed
Posts: 853
|
|
Not Ranked
That is a definite improvment over what you initially had, but it is still a really big loop. Your driveline will still flop all over the place if a u-joint does let go. I think it would be better if you could significantly reduce the overall inside diameter. 1 or 2 inches of clearance between your driveline and the loop all the way around would be ideal.
Chris
|
02-22-2007, 09:29 AM
|
|
Banned
|
|
|
Join Date: Oct 2003
Location: Yorba Linda,
CA
Cobra Make, Engine: SPF w/392CI stroker
Posts: 3,293
|
|
Not Ranked
Quote:
|
Originally Posted by CJ428CJ
That is a definite improvment over what you initially had, but it is still a really big loop. Your driveline will still flop all over the place if a u-joint does let go. I think it would be better if you could significantly reduce the overall inside diameter. 1 or 2 inches of clearance between your driveline and the loop all the way around would be ideal.
Chris
|
I agree 100%, Chris. The trick is designing a solution whereby you don't have to go through the task of pulling the seats and the trans tunnel, and it remains a true bolt-on that doesn't require unbolting the driveshaft and threading it through some form of steel tube. Call me lazy! 
I believe that Lowell and I are onto the same solution...a bolt-in double hoop that protects against a front or rear universal joint failure. Now that I've had a chance to study my own pics, you could knock down some of the flats on the half loops, re-drill and essentially create more of a circle than an oval. If you did this on the lower portion, you would reduce that larger gap by approx. 1" and you wouldn't lose any structural integrity with the hoop. The upper half is already about 1-2" from the top of the shaft, so you really can't do much more there.
I think I'm going to do this.
-Dean
|
02-22-2007, 10:48 AM
|
 |
CC Member
|
|
|
Join Date: Sep 2002
Cobra Make, Engine: SPF#0760
Posts: 3,409
|
|
Not Ranked
The more I look at the photos, the more I think that one properly sized and placed ring would do the trick. Centered on the driveshaft, with a tighter ring to shaft clearance - say .75" maybe. The ring would catch the shaft regardless of which end of the shaft u-joint detonates....
|
02-22-2007, 10:59 AM
|
|
Banned
|
|
|
Join Date: Oct 2003
Location: Yorba Linda,
CA
Cobra Make, Engine: SPF w/392CI stroker
Posts: 3,293
|
|
Not Ranked
Quote:
|
Originally Posted by Blas
The more I look at the photos, the more I think that one properly sized and placed ring would do the trick. Centered on the driveshaft, with a tighter ring to shaft clearance - say .75" maybe. The ring would catch the shaft regardless of which end of the shaft u-joint detonates....
|
Blas, if I could get my fab guy to rework the outriggers to pull the hoop closer to the middle (would take some iron twisting, or some custom welds), along with my previous thought of cutting down the lower portion of the hoop so that it cinches up closer to the bottom of the driveshaft, then I might just achieve the same idea you just mentioned.
-Dean |
02-22-2007, 02:56 PM
|
 |
CC Member
|
|
|
Join Date: Sep 2003
Location: San Jose,
Ca
Cobra Make, Engine: SPF #1436 514
Posts: 1,489
|
|
Not Ranked
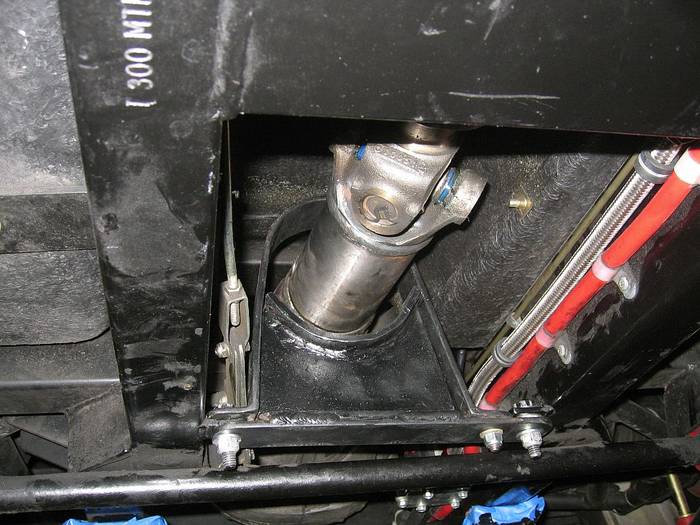
Here is what I did with mine this week. Since the drive line is off to the passenger side, I bent the hoop smaller and drilled a new hole in the bottom strap. Then I made the bottom part to keep the drive line from flopping around to much if it does cut loose. I also drilled out the holes and put bigger grade 8 bolts. I am thinking of making another one that is closer to the front Ujoint since the stock one is towards the back. You could use the bolts from the trans cross member so you wouldn't have to weld to the frame or drill holes.
Scott

 |
02-22-2007, 03:08 PM
|
|
Banned
|
|
|
Join Date: Oct 2003
Location: Yorba Linda,
CA
Cobra Make, Engine: SPF w/392CI stroker
Posts: 3,293
|
|
Not Ranked
Scott, that's a clever alternative solution...I like it!
But that's it! This keeping up with the Jones's is about to come to an end...I'm going to shorten the lower hoop and have THE WHOLE ASSEMBLY CHROME PLATED.
Seriously, that's what CC should be all about...sharing ideas and building better mouse traps.
-Dean |
02-22-2007, 04:24 PM
|
|
Club Cobra Member
|
|
|
Join Date: Feb 2003
Location: Sterling,
IL
Cobra Make, Engine: SPF #1507 427 Dart Block Windsor
Posts: 1,192
|
|
Not Ranked
Blas,
Yeah, a tube around the driveshaft would be the best way to contain it but I don't want the hassle of having to pull the driveshaft out to put the hoop in and vice versa, even though I'll be pulling the driveshaft out later. Then there's also the consideration of loose high velocity U-joint parts... Having a removable tunnel does make the job easier, but I wanted to be able to install this with the tunnel intact. I also wanted to try to do this with a minimum amout of welding-not for any reason other than laziness, I guess...
Dean,
Nice looking installation. I probably could have saved a lot of time and trouble by buying a couple of these, modifying them and and incorporating them into my design, rather than bending my own hoops. The only problems I see with your install, as mentioned above, is the fact that there's still a lot of "flop room" with this system; that you need one for each end, and there's no provision for containing a busted U-joint. Maybe an issue; maybe not. I think the Summit product is designed for a live axle, so there needs to be room for the driveshaft to move up and down. In our cars, that's not an issue.
My design, basically, is a rehash of the SPF factory hoop, except X2 for front and back, with an extra piece under the driveshaft to limit how much it can flop around, and a hood over the top 1/2 of the U-joint to contain shrapnel. The front hoop can be symmetrical, since the front U-joint is in the center of the tunnel; the rear hoop needs to be offset about 1", since the driveshaft angles towards the passenger side relative to the frame. I've used a bunch of acetylene gas so far, but haven't had to fire up the plasma cutter yet 
I'll email you a photo or post here when I'm done.
Scootter,
Now that's what I'M talkin about...put another one in the front and do something to contain the shrapnel from busted U-joints... How'd ja bend that sucker...hot or cold?
Think I'll go out to the garage for another Bombay Sapphire and tonic and a cigar and consider the situation further...although I don't want to get too far off track, since I have most of the parts made already.
BTW: How 'bout this one...With a satisfactory method of containing the driveshaft, do you see the battery cable and the fuel line running together as a problem?
Lowell
|
02-22-2007, 04:59 PM
|
|
Banned
|
|
|
Join Date: Oct 2003
Location: Yorba Linda,
CA
Cobra Make, Engine: SPF w/392CI stroker
Posts: 3,293
|
|
Not Ranked
Quote:
|
Originally Posted by Lowell W
BTW: How 'bout this one...With a satisfactory method of containing the driveshaft, do you see the battery cable and the fuel line running together as a problem?
Lowell
|
Gives new meaning to the term "hot seat", doesn't it?
Luckily for me, I have three braided steel lines (containing Halon) to slice through before anything gets to the battery cable and factory fuel hard line. Then there is the back-up Halon portable unit between the seats. After that, it's grabbing the cell phone on the spot and calling Allstate to buy me another.
-Dean |
02-22-2007, 06:38 PM
|
|
CC Member
|
|
|
Join Date: Sep 2003
Location: San Jose,
Ca
Cobra Make, Engine: SPF #1436 514
Posts: 1,489
|
|
Not Ranked
Dean,
What the heck are you feeding with that giant hose. Now I am jealous. I'm going to run out and get a bigger fuel line, but I just put mine in. Maybe I can sell it.
I had to bend it hot, but the original hoop I bent over by hand to the new hole.
Scott
|
02-22-2007, 06:02 PM
|
|
CC Member
|
|
|
Join Date: Apr 2005
Location: Near Chattanooga,
TN
Cobra Make, Engine: SPF, 418 Stroker
Posts: 220
|
|
Not Ranked
Dean - Most excellent thread. Thanks for starting it. Some comments on your mods:
1. From your pictures, it looks like your set up would constrain the shaft more from side to side, but it can move more top to bottom than with the original hoop. Am I seeing this correctly?
2. With regard to the clearance problem, how about turning the bolts around so the heads are on the outside? In the pics, it looks like there's enough clearance for that to work. That way, you don't risk reducing the strength of the fastener by cutting down on thread engagement length (by cutting off the ends of the bolts).
Again, very good show.
Jerry
|
02-23-2007, 08:19 AM
|
|
Banned
|
|
|
Join Date: Oct 2003
Location: Yorba Linda,
CA
Cobra Make, Engine: SPF w/392CI stroker
Posts: 3,293
|
|
Not Ranked
Quote:
|
Originally Posted by CWizard
Dean - Most excellent thread. Thanks for starting it. Some comments on your mods:
1. From your pictures, it looks like your set up would constrain the shaft more from side to side, but it can move more top to bottom than with the original hoop. Am I seeing this correctly?
|
Thanks for the kid words, Jerry. Yes, you are seeing it correctly and I'm going to modify the half hoops (cut them down on the flat portions) so that the verticle "slop" is mitigated considerably more than you see right now.
Quote:
2. With regard to the clearance problem, how about turning the bolts around so the heads are on the outside? In the pics, it looks like there's enough clearance for that to work. That way, you don't risk reducing the strength of the fastener by cutting down on thread engagement length (by cutting off the ends of the bolts).
Jerry
|
I really didn't want to chance any lateral drivetrain movements that may nick an inward facing bolt. The two bolts that I did shorten 1/4" still have 100% of the threads engaging the nut. And I also used Lock-tite on just those.
Quote:
|
Dean, What the heck are you feeding with that giant hose. Now I am jealous. I'm going to run out and get a bigger fuel line, but I just put mine in. Maybe I can sell it. -Scott
|
Scott, no giant hose there (though I do have -8AN from the mechanical fuel pump to the carb). The big red line is obviously the battery cable. The other three braided lines (looks like one big azz hose until you focus...too much flash when I took the picture) run from the trunk-mounted 5lb Halon fire suppression system. Two lines flow to the engine bay and the third to the footwells.
Yeah...those stroked small blocks require BIG fuel lines. I'm getting a nasty lean condition on the top end with a -10AN and my fuel tank is sucking inward...I think I'll jump up to a -12AN. 
-Dean
|
02-25-2007, 08:14 AM
|
|
Banned
|
|
|
Join Date: Oct 2003
Location: Yorba Linda,
CA
Cobra Make, Engine: SPF w/392CI stroker
Posts: 3,293
|
|
Not Ranked
Before and After with additional mods...
Here's a before and after pic after cutting down the lower portion of the hoop by a full inch.
BEFORE
AFTER
If you remove any more material from the flat portion of the bend, then you start encroaching on the curvature and then you can't bolt it together flush. At least I've minimized the verticle movement in the event of a driveline failure. Still not a 100% solution, but given we're dealing with a $25 bolt-in hoop, it's worlds better than what the factory installed.
I'm probably going to take it all out, remove 1/2" from the top hoop (just to tighten it up a little more), then send out all the pieces for a fresh gloss black powder coat. Will probably touch up my frame while I have it all out as well (geez, I'm such a waxer... )
-Dean
Last edited by RedBarchetta; 02-25-2007 at 08:16 AM..
|
 Posting Rules
|
You may not post new threads
You may not post replies
You may not post attachments
You may not edit your posts
HTML code is Off
|
|
|
All times are GMT -7. The time now is 12:19 AM.
Links monetized by VigLink
|


 Hybrid Mode

