 
 Main Menu
|
|
Nevada Classics
|
|
Advertise at CC
|
| S |
M |
T |
W |
T |
F |
S |
| |
|
|
|
1 |
2 |
3 |
| 4 |
5 |
6 |
7 |
8 |
9 |
10 |
| 11 |
12 |
13 |
14 |
15 |
16 |
17 |
| 18 |
19 |
20 |
21 |
22 |
23 |
24 |
| 25 |
26 |
27 |
28 |
29 |
30 |
31 |
|
|
CC Advertisers
|
|
 9Likes 9Likes

09-30-2016, 01:20 PM
|
 |
CC Member

|
|
|
Join Date: Apr 2015
Location: Prescott,
AZ
Cobra Make, Engine: Classic Roadsters
Posts: 209
|
|

 Not Ranked
Quote:
Originally Posted by rbgray1

Redhawk,
Thought you might like to see the result of the work on the rear suspension on the CR1.
Just need to re-install brake lines and new wilwood e-brake cables.
|
Rear suspension looks nice!
You should consider installing a Panhard bar on the rear end while you have the body off. That addition made quite a bit of difference on my car.
__________________
Thanks,
Joel Heinke (early 90's CRL Cobra)
|
11-25-2021, 06:13 PM
|
|
CC Member
|
|
|
Join Date: Jul 2021
Location: Denver,
NC
Cobra Make, Engine: Classic Roadsters, 347 stroker
Posts: 118
|
|
Not Ranked
Quote:
Originally Posted by rbgray1
Redhawk,
Thought you might like to see the result of the work on the rear suspension on the CR1.
Just need to re-install brake lines and new wilwood e-brake cables.
|
RBGray1, what model of QA1's and spring rates did you use for the rears? I purchased the DS602's with 250lb springs. Sound correct? Still building and have not installed and driven yet. That wont be for at least another 18 months, but doing the initial build and mock-up. Let me know what you used on your rear.  |
09-28-2016, 08:56 AM
|
 |
CC Member
|
|
|
Join Date: Jan 2016
Location: Ft Myers,
FL
Cobra Make, Engine: Classic Roadsters
Posts: 155
|
|
Not Ranked

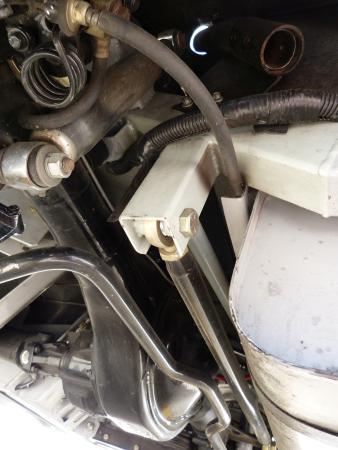
If anyone is interested, these are the brackets (see picture) that I had made for the rear coil over mounts. I took these templates to a local metal fab shop and had two of each made (one set for each side) from 3/16 CRS. The longer bracket is for the upper mount and the shorter is for welding onto the rear axle bracket. My local steel fab shop charged me 25 bucks for all 4 and they did it in 1 day. I would recommend to not bend these yourself using heat as heating CRS changes the molecular makeup of the steel and makes it harder/more brittle, not a good thing on a critical suspension component.
The reason for the upper and lower length differential is to provide for clearance of the coil over and to maintain factory shock angles.
I also welded each of these brackets completely to the upper frame and lower rear axle area making careful measurements for placement, this keeps the rear geometry the same as stock. As well as welding them in, I also gusseted each bracket on the top or bottom and the upper frame mount in two places with 3/16 CRS plate (side and top, see pictures) to provide additional strength. Bolts would probably work, I just feel better knowing these are welded in solidly and constructed from 3/16 CRS, and rock solid. You may not need to gusset the frame, I just think this adds a lot of strength and will make me more comfortable on hard launches or at 100mph.
|
09-28-2016, 09:29 AM
|
 |
CC Member/Contributor
|

|
|
Join Date: Sep 2016
Location: (Beautiful) Sequim,
WA
Cobra Make, Engine: Pacific Roadster, 347 cu.in. 5-speed
Posts: 2,018
|
|
Not Ranked
Thank's Rob, for posting these pictures, as per our conversation last night I believe this is the correct way to go with mine before the body is bolted down. As always thanks for your help buddy.
|
09-28-2016, 10:14 AM
|
|
CC Member
|
|
|
Join Date: Jan 2016
Location: Ft Myers,
FL
Cobra Make, Engine: Classic Roadsters
Posts: 155
|
|
Not Ranked
Quote:
Originally Posted by Alfa02
Thank's Rob, for posting these pictures, as per our conversation last night I believe this is the correct way to go with mine before the body is bolted down. As always thanks for your help buddy.
|
Thanks Tom.
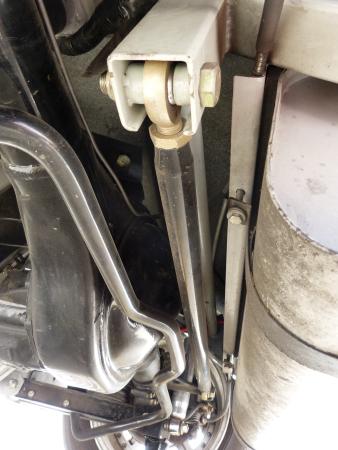
One thing I forgot to mention, when you weld on the strap or gusset on the lower shock mount, leave a small gap near the base (about 1/4"). This is due to the angle of the lower mount and the gap will allow water to drain out of the lower mount and not collect in the bracket causing premature corrosion. See the picture from the ground up of the lower mount, I know it's hard to see clearly. |
09-29-2016, 07:55 PM
|
 |
CC Member
|
|
|
Join Date: May 2016
Location: Southlake,
TX
Cobra Make, Engine: Classic Roadsters
Posts: 134
|
|
Not Ranked
Some pics
Here are some pics of new A-arms and tower fabrication.
|
09-29-2016, 08:24 PM
|
|
CC Member
|
|
|
Join Date: Jan 2016
Location: Ft Myers,
FL
Cobra Make, Engine: Classic Roadsters
Posts: 155
|
|
Not Ranked
Redhawk,
Can you take a close up photo of the front mount of the lower a arm and the rear of the lower a arm?
You also just confirmed the upper shock mount issue for me.
|
09-29-2016, 10:10 PM
|
|
CC Member
|
|
|
Join Date: May 2016
Location: Southlake,
TX
Cobra Make, Engine: Classic Roadsters
Posts: 134
|
|
Not Ranked
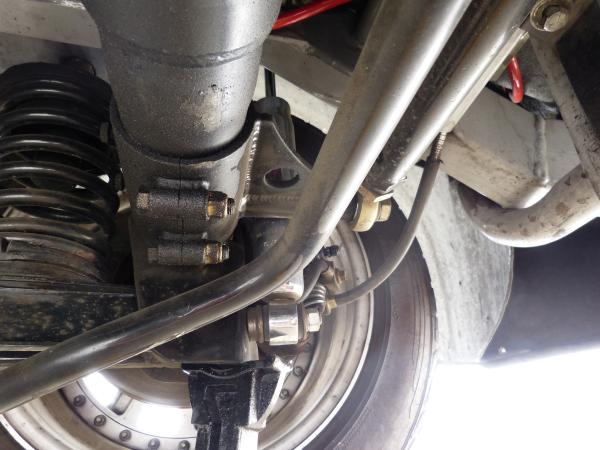
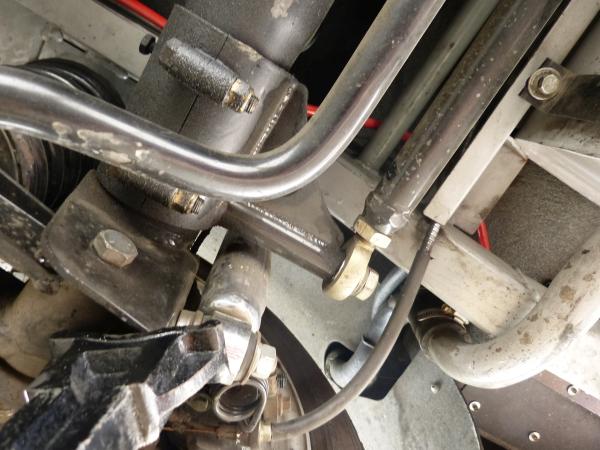
Lower control arm braket and rear brake setup
Rbgray1 also look at rear brake. Does this look right? I remember you mentioning all the different set ups for wilwood.
|
09-30-2016, 07:30 AM
|
|
CC Member
|
|
|
Join Date: Jan 2016
Location: Ft Myers,
FL
Cobra Make, Engine: Classic Roadsters
Posts: 155
|
|
Not Ranked
Redhawk,
The rear rotors are missing the center rotor indexing bushing. This is an aluminum bushing that slips on the axle before the rotor is slipped on. This bushing centers the rotor on the axle helping to reduce/eliminate runout while braking, otherwise only the threads of your lugnuts are controling runout. Runout during braking may create a chatter effect during hard braking. Take a look at your rear brake kit instructions, if you don't have the instructions I can forward you a scanned copy. You'll see these on the top of page 2 of the instructions. One size came with the kit for the most common Ford Axles. I had to order a set from Wilwood as my axles were not the most common size. They only take 2 mins to install and I would definitely order or install the correct ones. Take a close look at the picture I posted previously of the side shot of my Wilwood install. The silver ring around the center of the axle at the rotor is the aluminum rotor indexing bushing.
Also, not sure why your toe-in is wrong, but looking at your previous pics I can see you are way in on the tie rod threads. I have over 1.25 inches left on each side of mine.
Difficult to tell from the pictures, are there 2 sleeves welded on that the A-Arm 5/8 bolt runs through?
Make sure these support sleeves that came from heidts with the lower arms are there. The sleeves are installed to put the arms in lateral compression (squeezing in from side to side). The rear bracket they made and installed is great, however only limits the a-arm lateral spread, not compression.
Take a look at the center of the crossmember where the A-Arm bolt runs through, is there a sleeve (about 1" diameter) welded in between the crossmember?
The heidts arms come with 2 sleeves for each arm, a shorter one that gets welded between the crossmember mounting and a longer sleeve that is welded on between the rear of the crossmember and the rear mounting point. These are important as they provide for constant compression of the lower a-arm and keep the mounting points stable.
Without these sleeves the rear bracket they installed only limits outward travel of the A-Arm pivot points and does not limit or provide for inward compression of the bushings. Also, these sleeves place the bushings in compression making the A-arm more stable.
I'll send pictures later today.

|
09-30-2016, 08:07 AM
|
|
CC Member
|
|
|
Join Date: May 2016
Location: Southlake,
TX
Cobra Make, Engine: Classic Roadsters
Posts: 134
|
|
Not Ranked
Quote:
Originally Posted by rbgray1
Redhawk,
The rear rotors are missing the center rotor indexing bushing. This is an aluminum bushing that slips on the axle before the rotor is slipped on. This bushing centers the rotor on the axle helping to reduce/eliminate runout while braking, otherwise only the threads of your lugnuts are controling runout. Runout during braking may create a chatter effect during hard braking. Take a look at your rear brake kit instructions, if you don't have the instructions I can forward you a scanned copy. You'll see these on the top of page 2 of the instructions. One size came with the kit for the most common Ford Axles. I had to order a set from Wilwood as my axles were not the most common size. They only take 2 mins to install and I would definitely order or install the correct ones. Take a close look at the picture I posted previously of the side shot of my Wilwood install. The silver ring around the center of the axle at the rotor is the aluminum rotor indexing bushing.
Also, not sure why your toe-in is wrong, but looking at your previous pics I can see you are way in on the tie rod threads. I have over 1.25 inches left on each side of mine.
Difficult to tell from the pictures, are there 2 sleeves welded on that the A-Arm 5/8 bolt runs through?
Make sure these support sleeves that came from heidts with the lower arms are there. The sleeves are installed to put the arms in lateral compression (squeezing in from side to side). The rear bracket they made and installed is great, however only limits the a-arm lateral spread, not compression.
Take a look at the center of the crossmember where the A-Arm bolt runs through, is there a sleeve (about 1" diameter) welded in between the crossmember?
The heidts arms come with 2 sleeves for each arm, a shorter one that gets welded between the crossmember mounting and a longer sleeve that is welded on between the rear of the crossmember and the rear mounting point. These are important as they provide for constant compression of the lower a-arm and keep the mounting points stable.
Without these sleeves the rear bracket they installed only limits outward travel of the A-Arm pivot points and does not limit or provide for inward compression of the bushings. Also, these sleeves place the bushings in compression making the A-arm more stable.
I'll send pictures later today.
|
The picture of the rear rotor was at their shop so until I pull wheel off which I will do not entirely sure if they did it right. Something tells me they probably didnt.
Also I need to see pictures of the sleeves your talking about because although I think I understand what your saying Im not 100% clear.
Can you tell me more about negative effects of not having sleeves as you have mentioned. Safety etc...? Should I be driving this car?
Thanks! You have been a huge help. Love your garage too with vette hiding in the background.
Last edited by RedHawk; 09-30-2016 at 08:11 AM..
|
09-30-2016, 06:54 PM
|
|
CC Member
|
|
|
Join Date: Jan 2016
Location: Ft Myers,
FL
Cobra Make, Engine: Classic Roadsters
Posts: 155
|
|
Not Ranked
Joel,
Does a 4 trailing arm setup benefit from a panhard bar?
Can you send me a pic of your setup? Would be very easy at this point.....just not sure Panhards and 4 trailing links go together.
I do know you want the panhard as long as absolutely possible, to create the largest arc possible.
|
10-01-2016, 01:08 PM
|
 |
CC Member
|
|
|
Join Date: Feb 2014
Location: White City,
SK
Cobra Make, Engine: West Coast, 460 CID
Posts: 2,916
|
|
Not Ranked
Quote:
Originally Posted by rbgray1
Joel,
Does a 4 trailing arm setup benefit from a panhard bar?
Can you send me a pic of your setup? Would be very easy at this point.....just not sure Panhards and 4 trailing links go together.
I do know you want the panhard as long as absolutely possible, to create the largest arc possible.
|
The biggest problem with a Panhard bar is the axle will move in a slight arc - with the arc being reduced through as long a Panhard bar as possible. While there is certainly some compliance in the bushings of a 4-link rear suspension, this is not ideal.
You may want to look at a Watt's linkage ( https://en.wikipedia.org/wiki/Watt%27s_linkage ) - you get the lateral location benefits of a Panhard bar but the axle remains centred. While there is still some lateral motion, it is significantly less than a Panhard rod would produce.
A very thorough assessment of suspension including 4 link suspension and Watt's linkage. It touches briefly on Panhard rods but discards that design due to the issues of arc travel of the axle. https://eprints.usq.edu.au/3971/1/Parkin_2007.pdf
__________________
Brian
|
10-03-2016, 12:04 PM
|
 |
CC Member
|
|
|
Join Date: Aug 2015
Cobra Make, Engine: All original, with Chevy engine since 1964
Posts: 996
|
|
Not Ranked
Quote:
Originally Posted by rbgray1
Does a 4 trailing arm setup benefit from a panhard bar?
|
That all depends on how the upper control arms are positioned.
If the upper arms are positioned parallel (or near parallel) to the lower arms, then a panhard bar will definitely help with lateral positioning in a solid rear axle car.
But, if the upper control arms are angled in, so that they converge near the center point of the rear axle (forming a triangle), then the control arms themselves serve to keep the axle located laterally, and a panhard bar would be redundant.
__________________
- Robert
|
10-03-2016, 01:38 PM
|
|
CC Member
|
|
|
Join Date: Apr 2015
Location: Prescott,
AZ
Cobra Make, Engine: Classic Roadsters
Posts: 209
|
|
Not Ranked
Panhard bar
Given the angling of control arms on the CR1, the main lateral movement comes from control arm bushing displacement. If you have "solid" bushings, no or very little displacement. If you have rubber bushings, then there will be displacement under load. Under load is when you really don't want the displacement.
Is a Watts linkage better than a Panhard bar? Yes, but it's more complicated and thus likely more expensive.
Can a Panhard bar be setup to minimize the amount of arc? Yes, through length and setup. On mine, it's length it about that of the distance between the frame rails. For setup, it goes slightly downward from frame to rear end at normal ride height. So when the suspension compresses, the Panhard bar first goes to level and then to slightly upward. Given the amount of rear suspension travel on a CR1 (not a lot) and this setup, there's very little arc introduced by the Panhard bar. And besides, when you're cornering hard it's usually on a fairly flat surface, in other words not a surface with large undulations.
I didn't have a chance to jack up the car and take pictures over the weekend as I was busy welding new mufflers into the side pipes. Let me know if you really want some pictures and I'll try to find some time to take them.
__________________
Thanks,
Joel Heinke (early 90's CRL Cobra)
|
10-08-2016, 07:05 PM
|
|
CC Member
|
|
|
Join Date: Apr 2015
Location: Prescott,
AZ
Cobra Make, Engine: Classic Roadsters
Posts: 209
|
|
Not Ranked
Panhard bar pics
__________________
Thanks,
Joel Heinke (early 90's CRL Cobra)
|
10-12-2016, 07:49 AM
|
|
CC Member
|
|
|
Join Date: Jan 2016
Location: Ft Myers,
FL
Cobra Make, Engine: Classic Roadsters
Posts: 155
|
|
Not Ranked
C5GTO,
Thanks for the pics. Should give me something to consider before I finish the suspension and frame painting.
|
10-02-2016, 07:37 PM
|
|
CC Member
|
|
|
Join Date: May 2016
Location: Southlake,
TX
Cobra Make, Engine: Classic Roadsters
Posts: 134
|
|
Not Ranked
So it may be time to end this thread
Decided to take the car for some auto cross fun even though car isn't ideal yet. A lot of work has gone into getting car righted after getting back from the SHOP.
I wanted to test suspension and play around with dual adjustable shocks. First run was with everything at its stiffest setting. After crappy times and one high speed near corner washout I found a setting that got me times within 3 seconds of the fastest guys and gals out there running slicks.
On my last run I had throttle loss on take off but it came back on. I think it was my old vapor lock enemy, but not sure. Time to check fuel pressure among a whole bunch of other things.
It was a beautiful day in the rockies and car had no problems with hour trip to and back from road course.
Upward and Onward
RedHawk out
*poof*
|
10-04-2016, 07:40 PM
|
|
CC Member
|
|
|
Join Date: Oct 2016
Location: Bremerton,
wa
Cobra Make, Engine: Classic Roadsters
Posts: 205
|
|
Not Ranked
So just a two cents worth. The MII stock springs are 14" for correct geometry, most aftermarket springs for Mii's are only 12" total. Which can start the problem, and or course require the strut rods. But I'm sure you guys knew that. There is a great debate about if the tubulars actually are strong enough alone.Pinto was retrofitted with the Mii components, that why the angles are different. I see a lot of great work, thanks for the pics. They will helpful to me. But why were the lower control arms not upgraded, as the uppers were. Are they not using Mustang lowers, or are they Explorer ones.
|
10-13-2016, 09:35 PM
|
|
CC Member
|
|
|
Join Date: May 2016
Location: Southlake,
TX
Cobra Make, Engine: Classic Roadsters
Posts: 134
|
|
Not Ranked
Been doing research on how to dial in car after blasting through autocross race a couple weeks ago.
Replacing front steering gearbox with new flaming river unit. This way I can reduce slop and get proper adjustments with tie rods.
Replacing all the steering shafts and U joints. A lot of play in U joints. Either going with flaming river or original borgenson.
Vasilating on Flaming river steering colum or Ididit with push button start and fob.
But before I start chasing my tail and drop a couple grand I figured that I should take car to a reputable chassis shop to access geometry. These guys in my opion are way more qualified then a standard alignment shop.
|
10-14-2016, 04:44 PM
|
|
CC Member
|
|
|
Join Date: Jan 2016
Location: Ft Myers,
FL
Cobra Make, Engine: Classic Roadsters
Posts: 155
|
|
Not Ranked
Redhawk,
My Flaming river column is gorgeous, I ordered a polished, tilt, with no key...going to install an ignition switch with a key on the dash when I rebuild the dash. Probably also going to install a momentary "starter" rubber coated button for the start function.
My column was approx 800 bucks with the drop bracket and aluminum swivel bearing plate for the firewall protrusion. FR also offers in column start button with proximity fob and electronic box controller, I'm just not sure how much this adds to the cost. The reason I didn't go that way is that their controller can operate 6 to 8 functions, power windows, door locks, auto start, etc and I just didn't need all that. Also, keep in mind the polished column is probably twice the cost of a painted unit.
I also am replacing the sector shaft and both U joints in the sector shaft with an FR unit once I start reassembling the car. It was interesting that a car with only 26k on the odometer had a fair amount of play in the joints on the sector shaft. Let me know if you need the part numbers that I ordered from FR. This is a custom length for them but still only took 3 days for them to build. FR is only 10mins from my home in the Cleveland area.
|
 Posting Rules
|
You may not post new threads
You may not post replies
You may not post attachments
You may not edit your posts
HTML code is Off
|
|
|
All times are GMT -7. The time now is 04:39 AM.
Links monetized by VigLink
|


 Hybrid Mode

