 
 Main Menu
|
|
Nevada Classics
|
|
Advertise at CC
|
| S |
M |
T |
W |
T |
F |
S |
| |
1 |
2 |
3 |
4 |
5 |
6 |
| 7 |
8 |
9 |
10 |
11 |
12 |
13 |
| 14 |
15 |
16 |
17 |
18 |
19 |
20 |
| 21 |
22 |
23 |
24 |
25 |
26 |
27 |
| 28 |
29 |
30 |
|
|
|
|
|
|
CC Advertisers
|
|
 6Likes 6Likes
-
 1
Post By patrickt
1
Post By patrickt
-
 2
Post By kevins2
2
Post By kevins2
-
 1
Post By RodKnock
1
Post By RodKnock
-
 1
Post By ACHiPo
1
Post By ACHiPo
-
1
Post By kevins2

09-11-2010, 03:58 PM
|
|
Half-Ass Member

|
|
|
Join Date: Jun 2005
Cobra Make, Engine: ERA #732, 428FE (447 CID), TKO600, Solid Flat Tappet Cam, Tons of Aluminum
Posts: 22,025
|
|

 Not Ranked
 3rd Brake Light/Running Light - Detailed Instructions & Part Numbers ("Chas. Runner")
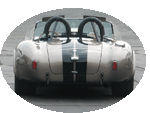
I've received more than a few requests for part numbers and instruction tips on how to install the 3rd brake/running light in the Cobra's license plate fixture. This third brake/running light matches the look of the Lucas rectangular lights and is quite bright when the brake is on. It also has a low level "running light" function that matches the tail lights and that looks awfully cool. I've affectionately named this modification the "Chas. Runner" after my good friend, ERAChas, who nagged me in to fabbing this light to the point that it looks absolutely gorgeous. This is the same light that is discussed towards the end of this thread: LED Upgrade to Rear Rectangular Lights and it looks like this:
Tools Needed:
Dremel or other small cutting wheel tool, along with a tiny grinding attachment.
Small File.
Soldering Iron.
Clear Silicone.
Black RTV Silicone.
Shrink Tubing.
Electrical Tape.
Wire.
Parts to Purchase:
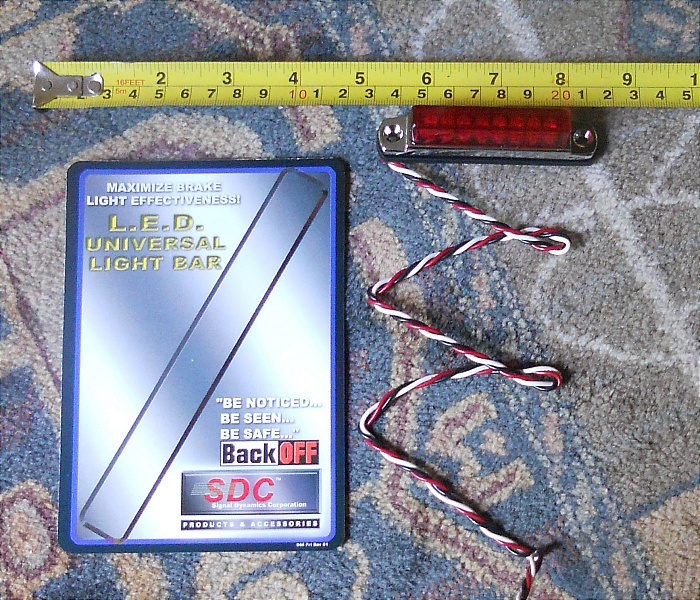
Signal Dynamics Part #2043 "3 Inch Red Universal LED Light" http://www.signaldynamics.com/ pictured here:
Radio Shack Part #7219 12v "Micro Lamps" (2 per package) or equivalent

Step One:
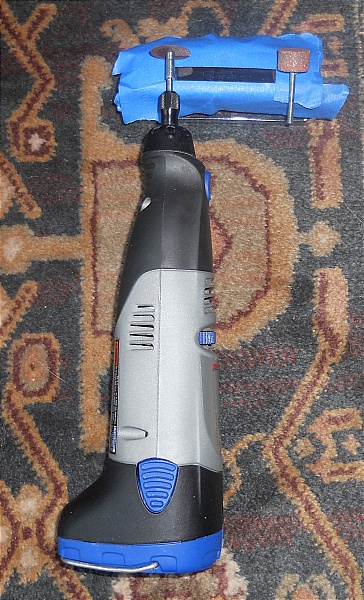
Remove your existing license plate fixture. Cut a cardboard template so that it has a rectangular hole that perfectly fits the red lens of the Signal Dymanics LED Light. Place the cardboard template over your license plate fixture and "tape off" the same rectangular hole so that when you place your perfect template over the fixture you can just barely see a border of the blue tape. The idea is that you will cut a rectangular hole that is slightly smaller than the red lens. You will then hand grind the hole to exactly the right size. The lens is slightly "wedge shaped," so you can adjust the distance the lens sticks out by how large the rectangular hole is. Take care in this step to get your rectangular taped box nicely centered and straight. Here's a pic of the taped off fixture along with the cutting/grinding tools:
Step Two:
Use the Dremel cutting wheel to cut your rectangular hole (it will be smaller than the red lens). You then file the edges to get a smooth straight finish that allows the red lens to fit through and then wedge itself tight after about a quarter inch or so. I found the grinding stone shown in the picture above worked well for the grinding.
Step Three:
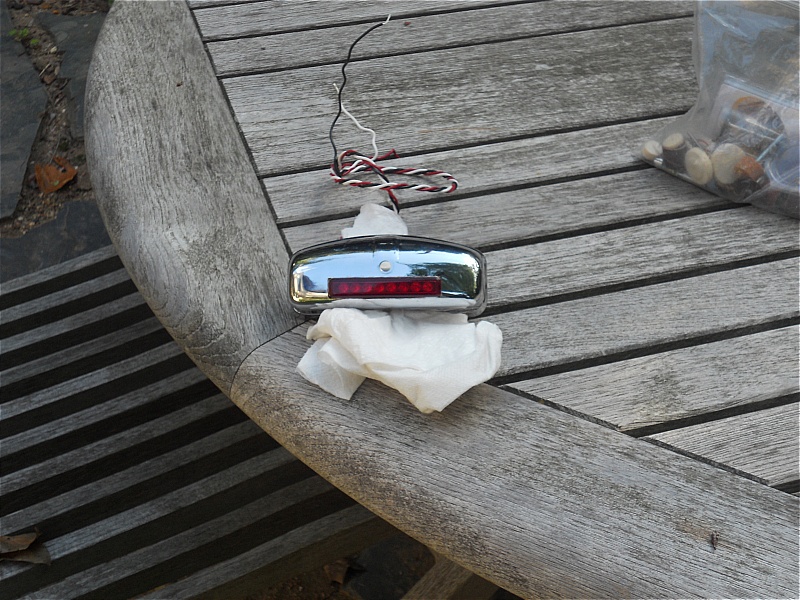
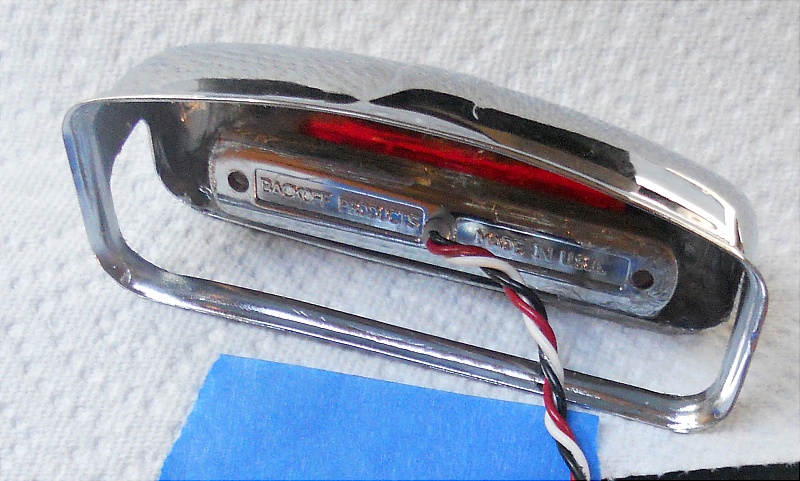
Insert the LED light through the rectangular hole and wedge it tight. Seal it off with clear silicone, from the back, and allow to dry for 24 hours. It will look like this:
Step Four:
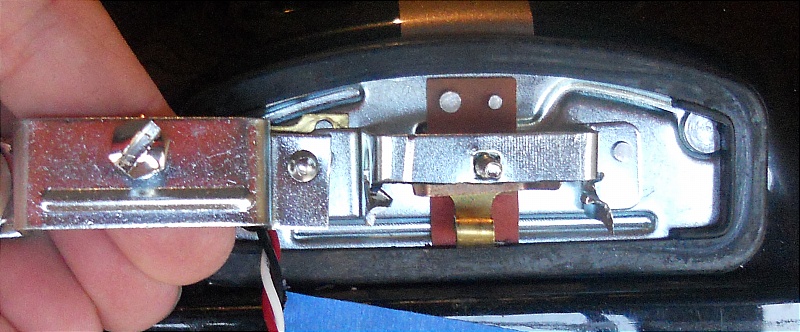
Cut and remove the wires, the two little light bulbs, and the associated hardware around it, from your existing fixture structure that is still on your car. You can use snips to cut some of the smaller pieces off. Pull the two wires that you cut back in to the trunk and let them dangle there. You can either dispense with the little clear plastic covering, or you can use your Dremel wheel to clearance it as well. You must then cut the bottom half of the bracket horizontally using your cutting wheel. Here is a picture showing a normal bracket next to the cut bracket.
Step Five:
Insert the cover with the new LED light on to your existing structure and feed the red, black, and white wires through the holes where the existing wires had run so that they are now dangling in the trunk. Make sure you have clearance in the fixture and can get the little screw on. Run a very light bead of black RTV along the line at the top and sides of the red lens where it meets with the fixture. It should now look perfect (even though it doesn't work and you don't have license plate lights yet). Do a quick test now to make sure the LED works. Connect the black wire to a good ground and 12v positive to the red wire. The light should come on nice and bright (this is the brake light function). Then disconnect the red wire and connect the white wire to 12v positive. The light should come on and at a low level, similar to your tail lights.
Step Six:
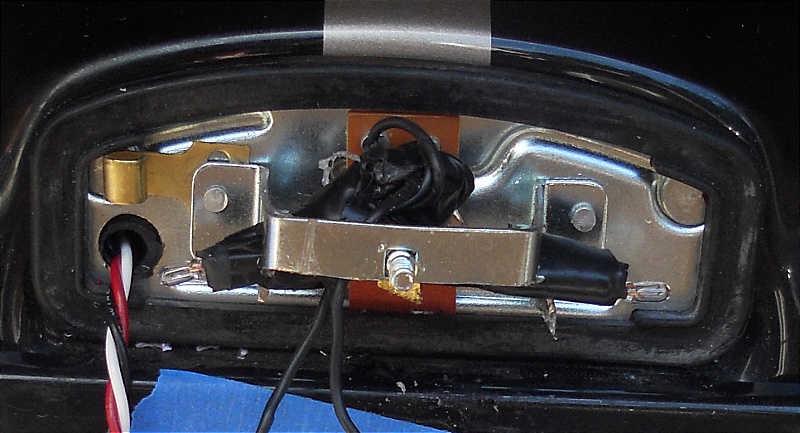
Wire the two Radio Shack 12v #7219 Micro Lamps together, and use electrical tape and shrink tubing, along with a hair dryer or heat gun, so that the diameter of the insulated base allows it to fit in where your old bulbs went. Solder the two leads from these small lamps in to the white wire and black wire of the LED feeds and insulate them. Run 12v positive to the white wire and ground the black wire; confirm that the little Radio Shack lights come on along with the low level running light function of the LED (the Radio Shack lights are not very bright, they're about the same as the original bulbs that you replaced). Note in this picture how the three red, white, and black wires from the LED are fished through the existing grommet in to the trunk. There are two black wires leading from the Radio Shack lights that are soldered in as per this step, but you can't see it. Here is a picture:
Step Seven:
Put the fixture together, make sure you have clearance, and then test the connections once more by running 12v to the red wire, then 12v to the white wire, while having the black wire grounded. Everything should work and it should look great.
Step Eight:
Wire it up permanently. The two wires that had originally run to your fixture (and that you cut and that are now hanging down in your trunk) need to be hooked up to the black and white wires that are running through the trunk lid from the new LED lights. Obviously, black is ground. The remaining red wire must be run to your 12v positive brake light feed. Each Cobra manufacturer handles it differently, but the one point you need to be aware of is that if you have a "shared" brake/turn bulb you want to tap in to the brake feed before the point where it is blinking.
That's it. You'll love it. I promise. 
Last edited by patrickt; 10-24-2016 at 12:39 PM..
Reason: Typos
|
09-14-2010, 08:48 PM
|
 |
CC Member
|
|
|
Join Date: Oct 2003
Location: Golden Isles,
GA
Cobra Make, Engine: Butler Cobra. 350 Chevy Engine, blueprinted, heads cc'd, ported, polished, manifolds matched, big valves, 1.6 roller rockers, TB Injected, mild cam, MSD crank trigger electronic ignition. TKO-600 transmission. XKE Jaguar rear. IFS by Fast Cars
Posts: 558
|
|
Not Ranked
Thanks for posting your design. I may consider this after I've finished my car. I already have a 3rd. brake light mounted on the trunk, you can see pictures in my profile albums.
This looks like a fun project.
Thanks,
Arthur
|
03-19-2019, 02:25 AM
|
 |
CC Member
|
|
|
Join Date: Jun 2015
Location: Bloemfontein,
FS
Cobra Make, Engine: Backdraft RT3
Posts: 163
|
|
Not Ranked
Reviving old thread. Why hasn't this solution been made commercially available as a plug-n-play replacement item yet? Anyone...?
|
03-19-2019, 07:14 AM
|
|
CC Member
|
|
|
Join Date: Oct 2016
Location: Pleasanton,
CA
Cobra Make, Engine: ERA 824 with 470 FE BBM street 427
Posts: 550
|
|
Not Ranked
Great post even if it is 9 years old. Thanks!
|
03-19-2019, 07:23 AM
|
|
CC Member
|
|
|
Join Date: Dec 2011
Location: West Chester,
PA
Cobra Make, Engine: ERA #795 427 S/C completed Jan. '14 - '68 FE 427 side oiler
Posts: 1,064
|
|
Not Ranked
The 3rd tail light is a good idea, but if you haven't upgraded to LED tail lights, that's a major safety improvement that I'd suggest first because it's so easy to do. I recommend the bulbs from Superbrightled.com. The cost of these bulbs has come down substantially so no reason not to use them. Be sure to get the red LEDs. They are bright even in direct sunlight and looking at mine makes me squint from the brightness in low light. I left the 1157 bulbs in the front so had no problem with the flasher working.
Kevin
__________________
"Anyone who drives faster than you is a maniac and anyone who drives slower than you is an idiot" - George Carlin
|
03-19-2019, 07:47 AM
|
|
Half-Ass Member
|
|
|
Join Date: Jun 2005
Cobra Make, Engine: ERA #732, 428FE (447 CID), TKO600, Solid Flat Tappet Cam, Tons of Aluminum
Posts: 22,025
|
|
Not Ranked
Quote:
Originally Posted by lomdel

Reviving old thread. Why hasn't this solution been made commercially available as a plug-n-play replacement item yet? Anyone...?
|
If RodKnock capitalizes it, I would be more than happy to just sit in front of the TV, watching RHOBH, and fab them for him at my normal hourly rate.  |
03-19-2019, 10:11 AM
|
|
Senior Club Cobra Member
|
|
|
Join Date: Feb 2007
Cobra Make, Engine: KMP 539, a Ton of Aluminum
Posts: 9,592
|
|
Not Ranked
I want to see Patrick (and his dog) pitch it to the Shark Tank and try to explain demand and market potential.
|
03-19-2019, 12:29 PM
|
|
CC Member
|
|
|
Join Date: Oct 2016
Location: Pleasanton,
CA
Cobra Make, Engine: ERA 824 with 470 FE BBM street 427
Posts: 550
|
|
Not Ranked
Quote:
Originally Posted by kevins2
The 3rd tail light is a good idea, but if you haven't upgraded to LED tail lights, that's a major safety improvement that I'd suggest first because it's so easy to do. I recommend the bulbs from Superbrightled.com. The cost of these bulbs has come down substantially so no reason not to use them. Be sure to get the red LEDs. They are bright even in direct sunlight and looking at mine makes me squint from the brightness in low light. I left the 1157 bulbs in the front so had no problem with the flasher working.
Kevin
|
Kevin,
Absolutely agree! I ordered the 1157 replacement bulbs (and ballast resistors just in case) this morning. I ordered 4 just to have spares as I'm I'm most concerned about the brake lights, not so much the front signal lights. If there are no issues I can always add the front (thus the ballast resistors).
Evan |
03-19-2019, 02:35 PM
|
|
CC Member
|
|
|
Join Date: Aug 2014
Location: Mill Valley,
CA
Cobra Make, Engine: ERA FIA #2064 BOSS 302 CSX2047 sold
Posts: 181
|
|
Not Ranked
Superbrightled.com has several choices for 1157 bulbs. Is the one you are
ordering the dual function 1157 with the stock cover @ $14.95 each ? The
other choices are uncovered cylinders...but much cheaper.
|
03-19-2019, 03:37 PM
|
|
CC Member
|
|
|
Join Date: Dec 2011
Location: West Chester,
PA
Cobra Make, Engine: ERA #795 427 S/C completed Jan. '14 - '68 FE 427 side oiler
Posts: 1,064
|
|
Not Ranked
The ones I have are discontinued but, yes, they are the dual function. I just checked their site and they still list them (as discontinued), along with the suggested replacement: https://www.superbrightleds.com/more...ulb/2625/5698/
As for cheaper, the prices have come down. When I bought these in 2015, they were $22.95 each and these replacements are $9.95. And I have double round tail lights, so bought 4...
Kevin
__________________
"Anyone who drives faster than you is a maniac and anyone who drives slower than you is an idiot" - George Carlin
|
03-19-2019, 11:35 PM
|
|
CC Member
|
|
|
Join Date: Oct 2016
Location: Pleasanton,
CA
Cobra Make, Engine: ERA 824 with 470 FE BBM street 427
Posts: 550
|
|
Not Ranked
I bought the suggested replacements for $20/ pr. |
03-20-2019, 09:53 AM
|
|
CC Member
|
|
|
Join Date: Aug 2014
Location: Mill Valley,
CA
Cobra Make, Engine: ERA FIA #2064 BOSS 302 CSX2047 sold
Posts: 181
|
|
Not Ranked
And I just did likewise. Thank you for the help. Superbrightled.com part#
1157-x27-T-car. 1157 LED dual function 27smd tower bay15d bulb RED
$9.95 each. I also have the additional ERA tail light reflectors installed so it
should really light me up!
|
03-20-2019, 10:04 AM
|
|
CC Member
|
|
|
Join Date: Dec 2011
Location: West Chester,
PA
Cobra Make, Engine: ERA #795 427 S/C completed Jan. '14 - '68 FE 427 side oiler
Posts: 1,064
|
|
Not Ranked
Quote:
Originally Posted by Kit Coyle
And I just did likewise. Thank you for the help. Superbrightled.com part#
1157-x27-T-car. 1157 LED dual function 27smd tower bay15d bulb RED
$9.95 each. I also have the additional ERA tail light reflectors installed so it
should really light me up!
|
So many choices now. I wonder what the real difference is between all these variations that are available now. If they're as bright as the originals, the drivers behind you will need sunglasses.
Kevin
__________________
"Anyone who drives faster than you is a maniac and anyone who drives slower than you is an idiot" - George Carlin
|
 Posting Rules
|
You may not post new threads
You may not post replies
You may not post attachments
You may not edit your posts
HTML code is Off
|
|
|
All times are GMT -7. The time now is 05:11 PM.
Links monetized by VigLink
|


 Linear Mode


