 
 Main Menu
|
|
Nevada Classics
|
|
Advertise at CC
|
| S |
M |
T |
W |
T |
F |
S |
| |
|
|
|
|
1 |
2 |
| 3 |
4 |
5 |
6 |
7 |
8 |
9 |
| 10 |
11 |
12 |
13 |
14 |
15 |
16 |
| 17 |
18 |
19 |
20 |
21 |
22 |
23 |
| 24 |
25 |
26 |
27 |
28 |
29 |
30 |
| 31 |
|
|
|
|
|
|
|
|
CC Advertisers
|
|

10-12-2012, 03:50 PM
|
 |
Senior Club Cobra Member

|
|
|
Join Date: Sep 2000
Location: Holderness, NH, US of A,
NH
Cobra Make, Engine: CSX 4772 old iron FE
Posts: 5,499
|
|

 Not Ranked
Hey Jim, I lay the dash covering out on a bench cut close to the shape and size. I use the sharpie to locate a couple of guage holes for alignment. Once the dash is laid out flat on the bench I duct tape all the edges down to hold them flat. Then I put the Weldwood to both the dash and the cover with a chip brush and let it dry. I brush the cover first as the dash drys faster being sheet metal. Then I lower the dash against the cover using the gauge holes to align it. Having done the biggest part of the dash I make sure I have about 3/4" all around and trim if necessary and Weldwood all the edges of cover and dash and go around them a piece at a time pulling and folding once they're dry. Check gauge hole clearance. Some are cut with an exacto from the front, others need a pie cut on all the holes and all the little triangles gluing back depending on the gauge/hole clearance.
Last edited by mickmate; 10-12-2012 at 03:52 PM..
|
10-12-2012, 04:36 PM
|
 |
CC Member
|
|
|
Join Date: Oct 2004
Cobra Make, Engine: CSX2321
Posts: 1,368
|
|
Not Ranked

Quote:
Originally Posted by mickmate

Hey Jim, I lay the dash covering out on a bench cut close to the shape and size. I use the sharpie to locate a couple of guage holes for alignment. Once the dash is laid out flat on the bench I duct tape all the edges down to hold them flat. Then I put the Weldwood to both the dash and the cover with a chip brush and let it dry. I brush the cover first as the dash drys faster being sheet metal. Then I lower the dash against the cover using the gauge holes to align it. Having done the biggest part of the dash I make sure I have about 3/4" all around and trim if necessary and Weldwood all the edges of cover and dash and go around them a piece at a time pulling and folding once they're dry. Check gauge hole clearance. Some are cut with an exacto from the front, others need a pie cut on all the holes and all the little triangles gluing back depending on the gauge/hole clearance.
|
Yep, that works. I would suggest, if it's your first time, leave more than 3/4", you can trim while and after you have the material wrapped. ( I have never figured out how to cut it longer if needed  )
I use a spray gun with the adhesive and, as long as you don't overdo it, it drys quickly.

|
10-12-2012, 04:56 PM
|
 |
CC Member
|
|
|
Join Date: Sep 2002
Cobra Make, Engine: SPF#0760
Posts: 3,409
|
|
Not Ranked
Be sure to use a new can of spray adhesive. There should be no lumps in the coatings on the dash or the material. If there are lumps, the dash will have lumps in the finished covering. You only get one shot at laying the two glues surfaces together so be sure its straight and wide enough - you can trim the excess material off later.
__________________
Wiring Diagrams: SPF MKII, MKIII, GT40, CSX7000, CSX8000, Corvette Grand Sport, and Shelby Sebring, Bondurant & Cinema Tribute Cars.
Owners Manuals: SPF MKII, CSX7000, CSX8000, Sebring, Bondurant, Cinema Tribute Cars $ GT40s..
Large, easy to read and trace schematics with part numbers, wire colors, wire gauge, fuses, and electrical upgrade information. Trouble-shooting and replacement part numbers for those roadside repair adventures.
SPFWiringDiagrams@Comcast.net
|
10-12-2012, 04:58 PM
|
 |
Senior Club Cobra Member
|
|
|
Join Date: Mar 2005
Location: Manchester,
NH
Cobra Make, Engine: AK1085 (302 Street), HTM111 (427 Comp), CSX2375R (289 Comp) and COB5999 (427 S/C)
Posts: 19,111
|
|
Not Ranked
427's were not vinyl...... They were naugahyde.  |
10-12-2012, 06:30 PM
|
 |
Senior Club Cobra Member
|
|
|
Join Date: May 2001
Location: Florence,
AL
Cobra Make, Engine: RCR GT 40 & 1966 Fairlane 390 5 speed
Posts: 4,511
|
|
Not Ranked
 glue dash vinyl
I spray only the dash or vinyl but not both. This way I can move or work the air bubbles out.
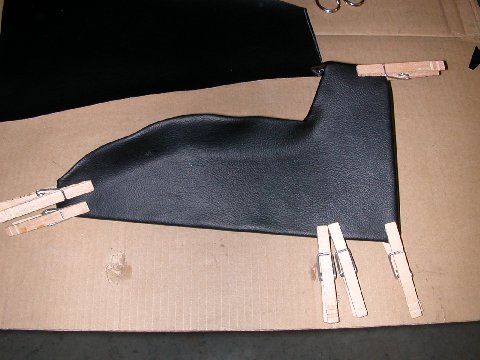
I use wood clothes pin to clamp the vinyl in place till it dry. I bought a bag of 100 clothes pins and use all of them on a dash.
If you have an air bubble you can puncture it with a pin and let the air out. If it will not stick to the dash you can use a hypodermic needle to insert a small amount of glue.
Dwight
__________________
''Life's tough.....it's even tougher if you're stupid.'' ~ John Wayne
"Happiness Is A Belt-Fed Weapon"
life's goal should be; "to be smarter than inanimate objects"
|
10-12-2012, 06:48 PM
|
|
Senior Club Cobra Member
|
|
|
Join Date: May 2001
Location: Florence,
AL
Cobra Make, Engine: RCR GT 40 & 1966 Fairlane 390 5 speed
Posts: 4,511
|
|
Not Ranked
out of the thousands of pictures I have this is the only one I could find of a dash piece glued up.
Dwight
__________________
''Life's tough.....it's even tougher if you're stupid.'' ~ John Wayne
"Happiness Is A Belt-Fed Weapon"
life's goal should be; "to be smarter than inanimate objects"
|
 Posting Rules
|
You may not post new threads
You may not post replies
You may not post attachments
You may not edit your posts
HTML code is Off
|
|
|
All times are GMT -7. The time now is 09:00 PM.
Links monetized by VigLink
|


 Hybrid Mode

