 
 Main Menu
|
|
Nevada Classics
|
|
Advertise at CC
|
| S |
M |
T |
W |
T |
F |
S |
| |
|
|
1 |
2 |
3 |
4 |
| 5 |
6 |
7 |
8 |
9 |
10 |
11 |
| 12 |
13 |
14 |
15 |
16 |
17 |
18 |
| 19 |
20 |
21 |
22 |
23 |
24 |
25 |
| 26 |
27 |
28 |
29 |
30 |
|
|
|
|
CC Advertisers
|
|
 1Likes 1Likes

02-20-2018, 10:17 PM
|
 |
CC Member

|
|
|
Join Date: Jun 2003
Location: Waco,
TX
Cobra Make, Engine: 1980 Arntz, 350 'Vette & Muncie, & Jag rear
Posts: 219
|
|

 Not Ranked
 Jag XKE Rear End Info Needed -- How To Pull The Calipers
I have a used Jag XKE rear end that appears to have stuck calipers
or something like that -- I can't get the rear end to turn.
I've looked all over the net for instructions on pulling the calipers,
and haven't found anything.
Can someone tell me how to do it, or get me to a link that shows how to pull the calipers and pads?
Thanks,
Jim
|
02-20-2018, 10:57 PM
|
 |
CC Member
|
|
|
Join Date: Jan 2002
Location: Northridge,
CA
Cobra Make, Engine: Arntz Cobra
Posts: 1,839
|
|
Not Ranked
Yes, I can. It is not easy. You have to pull the whole rear end out of the car.
If your rear end is in a Cobra and not a stock Jaguar, start by removing the coilovers. Then remove the 8 lock nuts that hold the halfshafts the the differential. Slide the long bolts out of the bottom of each hub carrier and pull the hubs and halfshafts out. Remove the long shafts that the swing arms pivot on (underneath the brakes) and you can pull the swing arms. Disconnect the brake lines running from the frame to the top of the calipers. Disconnect the drive shaft from the differential. Disconnect the handbrake cable from the arm at the top of the differential. Roll a floor jack under the differential and support the weight while you unscrew the 4 bolts from the top. Lower the differential (and brakes) to the floor. Remove the handbrake bellcrank from the top of the differential. Now, you can get wrenches the the bolts that hold the calipers to the differential and pull them out. Be very careful to note the arrangement of the small parts and springs inside the handbrake levers before you disassemble them. It's easy to get confused with this and waste a lot of time putting them back together if you don't. These may be the source of your problem because the ratchet mechanism gets frozen when the grease hardens up.
This is a big job and it is the time to rebuild the positraction disks as well as the brakes. It is also a good time to change the gears if you need to change the ratio. Check the bearings in the hubs. If they are loose, you will need to have them professionally rebuilt. I recommend Curt Hamilton in Van Nuys, Ca if you need help.
__________________
"It doesn't have anything on it that doesn't make it go faster."
|
02-20-2018, 11:02 PM
|
|
CC Member
|
|
|
Join Date: Jun 2003
Location: Waco,
TX
Cobra Make, Engine: 1980 Arntz, 350 'Vette & Muncie, & Jag rear
Posts: 219
|
|
Not Ranked
The rear end isn't mounted yet.
Looks like a pretty big job....
Thanks for your help, I'll get started on it and see what the problem is.
Jim
|
02-20-2018, 11:25 PM
|
|
CC Member
|
|
|
Join Date: Oct 2007
Location: Cape Town,
WC
Cobra Make, Engine: Shamrock
Posts: 428
|
|
Not Ranked
Is the rear end on the car or lying free? Sorry - too late
Last edited by Snake2998; 02-20-2018 at 11:26 PM..
Reason: Already answered
|
02-20-2018, 11:31 PM
|
|
CC Member
|
|
|
Join Date: Oct 2007
Location: Cape Town,
WC
Cobra Make, Engine: Shamrock
Posts: 428
|
|
Not Ranked
OK - as the rear end isn't on the car I would just split the calipers taking the precautions mentioned by RallySnake above. They warn you not to split calipers but just take care not to damage the faces and test well for leaks under pressure when finished.
|
02-21-2018, 01:12 AM
|
|
CC Member
|
|
|
Join Date: Jan 2002
Location: Northridge,
CA
Cobra Make, Engine: Arntz Cobra
Posts: 1,839
|
|
Not Ranked
Is the stock cage on the rear end? If it is, you will have to remove the long bolts to pull it off. Then, you can get an open end wrench to the 4 bolts down between the calipers and diff case to remove the calipers.
__________________
"It doesn't have anything on it that doesn't make it go faster."
|
02-21-2018, 01:51 AM
|
 |
CC Member
|
|
|
Join Date: Feb 2000
Location: St. Lucia, West Indies,
WI
Cobra Make, Engine: Unique 427SC 383 stroker
Posts: 3,786
|
|
Not Ranked
Jim, I recently went through the exact same scenario. The calipers on the assembly I picked up were locked solid and I was unable to get the pads to budge. What Snake2998 said. Once the unit is free from the cage, split the calipers by loosening the bolts on the calipers. You may not need to fully separate them, but keep going until the pads are no longer stuck to the rotor. You can remove the pads at this point. On mine, one side was worse than the other and I really had to hammer the pads out from the other side of the caliper while the others slid out easily once the caliper body was partially split. Accessing the bolts to remove them from the differential is easier on a Series 1 rear - the bolt heads face outward and they are accessed through holes in the rotors, once you get them to turn. If you have a later Series 2 unit, the bolt heads are towards the diff and can be accessed with a spanner. I found it easier to turn the whole assembly upside down to get at the lower bolts.
From JH Engineering website:
Quote:
There are 2 different types of stub axle flanges/caliper mounts. Series 1 & early II, pic "B", and later Series II with additional bolt tabs for the calipers, pic "A". The differences are due to bearing configurations - ball bearings vs tapered roller bearings.
Also, the Series I case has fins in the casting off the passenger side of the pinion area.
The Series II casting has a solid wide bar in that area.
|
This pic shows a Series 1 diff where the bolts go directly into threaded bosses on the diff case.

In this pic you see the tabs on a Series 2 diff that the calipers bolt to

__________________
Tropical Buzz
Grant me the serenity to accept the things I cannot change, the strength to change the things I can, and the wisdom to know the difference. -(wasn't me)
BEWARE OF THE DOGma!! Dogmatism bites...
Last edited by Buzz; 02-21-2018 at 01:56 AM..
|
02-21-2018, 04:52 AM
|
 |
CC Member
|
|
|
Join Date: Feb 2009
Posts: 1,696
|
|
Not Ranked
What style calipers do you have? Series 1 uses a 3 piece caliper where the piston cups bolt on to a metal cage. They are relatively easy to remove. Later version used a 2 piece caliper where the caliper has a seam down the center.
|
02-21-2018, 12:15 PM
|
|
CC Member
|
|
|
Join Date: Jun 2003
Location: Waco,
TX
Cobra Make, Engine: 1980 Arntz, 350 'Vette & Muncie, & Jag rear
Posts: 219
|
|
Not Ranked
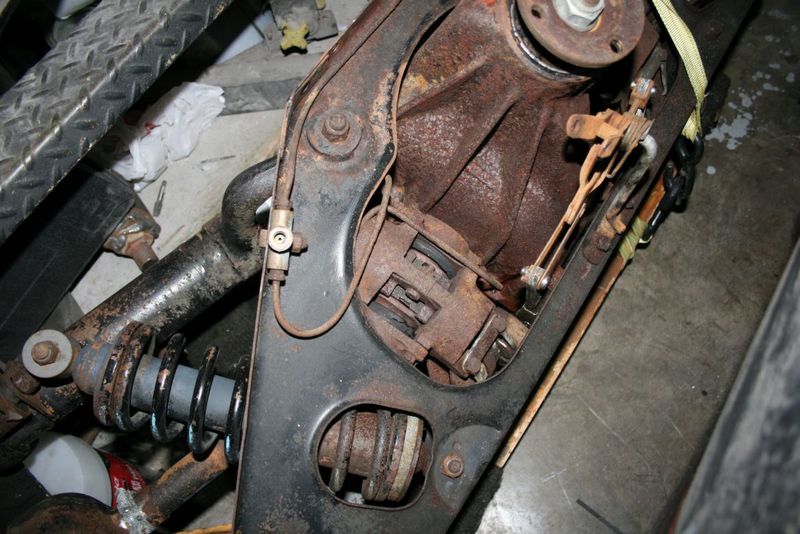
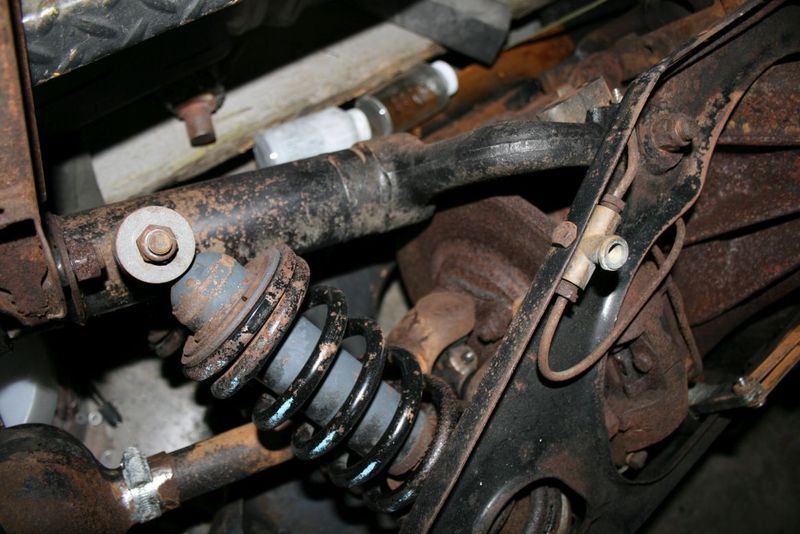
Here are some photos of the rear end.
 |
02-21-2018, 04:44 PM
|
|
CC Member
|
|
|
Join Date: Feb 2009
Posts: 1,696
|
|
Not Ranked
Those are Series 1 calipers and case. The pistons and housings unbolt from the frame with 4 bolts on each side. They would mount to a bracket and the bracket mounts to the bearing housing. You can usually unbolt the outer piston housing which will at least loosen the grip the pad has on the rotor. Then unbolt the frame from the mount, unhook the e-brake cables, then remove the caliper.
This style is getting a bit hard to find. They work well, but you have to have the calipers sleeved with stainless sleeves to make them durable. They came in a few sizes. If you loom on the outside of the housing it will tell you the piston size. Later version had larger pistons. Maybe 2-1/8” if I recall?
|
02-21-2018, 06:41 PM
|
|
CC Member
|
|
|
Join Date: Jun 2003
Location: Waco,
TX
Cobra Make, Engine: 1980 Arntz, 350 'Vette & Muncie, & Jag rear
Posts: 219
|
|
Not Ranked
Glad you could tell from the upside down photos!
If I read it correctly, I can remove the calipers without taking the rear end completely apart?
Thanks,
Jim
|
02-21-2018, 07:48 PM
|
 |
CC Member
|
|
|
Join Date: Jan 2018
Location: Lafayette,
IN
Cobra Make, Engine: Looking to buy
Posts: 1,295
|
|
Not Ranked
I'd try to get a screwdriver to push down between the pad and the rotor. I'd drive it down with a hammer and see if I could get the caliper to retract. Once the caliper has had its pistons pushed in a bit the caliper will come right off the rotor (on most cars). I have not done this with a jag rear end.
__________________
 Cobra loving, autocrossing Grandpa Architect.
|
02-21-2018, 08:24 PM
|
|
CC Member
|
|
|
Join Date: Jan 2002
Location: Northridge,
CA
Cobra Make, Engine: Arntz Cobra
Posts: 1,839
|
|
Not Ranked
The big question is, what do you intend to do with the rear end?
__________________
"It doesn't have anything on it that doesn't make it go faster."
|
02-21-2018, 09:50 PM
|
|
CC Member
|
|
|
Join Date: Jun 2003
Location: Waco,
TX
Cobra Make, Engine: 1980 Arntz, 350 'Vette & Muncie, & Jag rear
Posts: 219
|
|
Not Ranked
That's a fair question, RallySnake. BTW, thanks for the disassembly information.
I got the rear end with an Arntz body and frame, that's set up for a Jag.
Thanks,
Jim
Last edited by Jim Coleman; 02-21-2018 at 10:16 PM..
|
02-22-2018, 04:01 AM
|
|
CC Member
|
|
|
Join Date: Jan 2018
Location: Lafayette,
IN
Cobra Make, Engine: Looking to buy
Posts: 1,295
|
|
Not Ranked
Cool!
__________________
Cobra loving, autocrossing Grandpa Architect.
|
02-22-2018, 04:29 AM
|
|
CC Member
|
|
|
Join Date: Feb 2009
Posts: 1,696
|
|
Not Ranked
Is it the correct width? I would be tearing that whole thing apart as it has been sitting a while. The whole cage assembly is not needed to install it in the Arntz.
|
02-22-2018, 04:58 AM
|
|
CC Member
|
|
|
Join Date: Jun 2003
Location: Waco,
TX
Cobra Make, Engine: 1980 Arntz, 350 'Vette & Muncie, & Jag rear
Posts: 219
|
|
Not Ranked
Not sure it's the right width, was told that it was by seller.
It came with a set of flanges with lug nut studs to replace the ones with knock offs.
It probably needs to be uncaged and torn down.
I just wanted to make sure the thing didn't have other problems internally since it wouldn't spin.
Thanks
Jim
|
02-22-2018, 10:46 PM
|
|
CC Member
|
|
|
Join Date: Jan 2002
Location: Northridge,
CA
Cobra Make, Engine: Arntz Cobra
Posts: 1,839
|
|
Not Ranked
Jim,
I built Arntz kit #6, 30 years ago. Like you, I got a POS Jag rear end with it. I was on a tight budget and cleaned, painted and bolted it together. That very nearly killed me! Here's what you need to do to drive the car and live to tell about it:
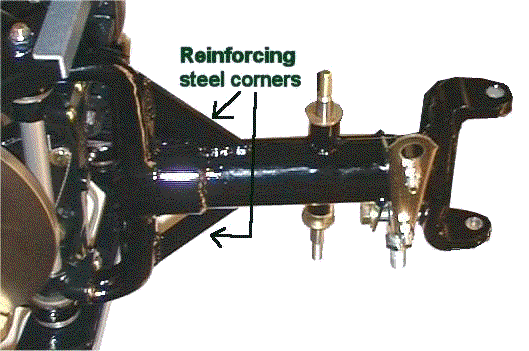
1. You need to reinforce the lower control arms. Mine broke at 100 mph and I got it down to 90 before it spun sideways, went up on two wheels then off the road and over a mountain. After dragging the wreck home, I used 1/4 " steel plate, cut it into triangles and welded them on. Here's what they need to look like:
2. You need to make sure you have 0 degree control arm brackets. Those are the brackets that bolt onto the differential below the brakes. There are 3 different angles. I originally put mine together with 6 degree brackets. It took me a while to figure out why I spun out so much on autocross courses.
3. The Jaguar uses a bellcrank on top of the differential to transfer force from the handbrake to the calipers. This looks like a "T". It does not work well and your car will roll down a hill when you park it if you don't modify it. The center arm goes to the handbrake lever. The other two are connected to the calipers. You need to weld a 2" steel strap onto the center arm and drill a new hole for the cable exactly twice as far from the pivot point as the original hole. Then your handbrake will actually hold your car in place.
4. After years of frustration with bad rear brakes, grinding bearings and terrible handling, I took my rear end out of the car and over to Curt Hamiliton at:
Address: 15824 Stagg St
Van Nuys, California 91406
Phone: (818) 787-9695
He installed ventilated rotors, rebuilt and widened the calipers, new brake pads, 3.73 gears, new positraction, new hub bearings, new universal joints and built a bottom plate that holds everything together.
After 7 years and over 100,000 rally miles, the hub bearings wore out and started grinding again. He rebuilt them again. Since then, I have used a modern wheel bearing grease and they are doing Ok after another 50,000 miles.
Ron Butler intended for you to use the XKE width rear end when he designed the car. You are supposed to use 12" wide by 15" Centerline wheels on the rear and 10" wide on the front. I used 10" wide Centerlines on the rear and 8.5" on the front. Ron sells plastic wheel inserts that look like original Cobra wheels and knockoff assemblies to hold them on. He may still have some. You can call him at 805-649-6000. He gave me HUGE support while I was building my car.
RS
__________________
"It doesn't have anything on it that doesn't make it go faster."
Last edited by RallySnake; 02-22-2018 at 10:57 PM..
|
02-22-2018, 11:52 PM
|
|
CC Member
|
|
|
Join Date: Jun 2003
Location: Waco,
TX
Cobra Make, Engine: 1980 Arntz, 350 'Vette & Muncie, & Jag rear
Posts: 219
|
|
Not Ranked
Thanks, RS
That's good information to know about the Jag rear end.
Jim
|
02-23-2018, 05:13 AM
|
|
CC Member
|
|
|
Join Date: Feb 2009
Posts: 1,696
|
|
Not Ranked
[quote=RallySnake;1439163]
2. You need to make sure you have 0 degree control arm brackets. Those are the brackets that bolt onto the differential below the brakes. There are 3 different angles. I originally put mine together with 6 degree brackets. It took me a while to figure out why I spun out so much on autocross courses.
/QUOTE]
I found the answer. You have brackets from a XJS versus an E-Type. Due to my training arms, I could not change them as it would shift the counting back slightly. Interesting info.
Thanks
Ron
Last edited by joyridin'; 02-24-2018 at 09:58 AM..
|
 Posting Rules
|
You may not post new threads
You may not post replies
You may not post attachments
You may not edit your posts
HTML code is Off
|
|
|
All times are GMT -7. The time now is 11:20 PM.
Links monetized by VigLink
|


 Linear Mode


