 
 Main Menu
|
|
Nevada Classics
|
|
Advertise at CC
|
| S |
M |
T |
W |
T |
F |
S |
| 1 |
2 |
3 |
4 |
5 |
6 |
7 |
| 8 |
9 |
10 |
11 |
12 |
13 |
14 |
| 15 |
16 |
17 |
18 |
19 |
20 |
21 |
| 22 |
23 |
24 |
25 |
26 |
27 |
28 |
| 29 |
30 |
31 |
|
|
|
|
|
|
CC Advertisers
|
|

05-28-2008, 04:34 PM
|
|
CC Member

|
|
|
Join Date: Aug 2006
Cobra Make, Engine: A&C
Posts: 379
|
|

 Not Ranked
 side pipe cut outs?
I take it from other post that the best way to line up the cut out is to put the body on?
Did you guys shorten the headers to get the side pipes to fit? It appears the headers are about 6" to long. Besides that I can't get the oversized adapters to slide up over the header pipes any farther then a few inch's.
|
05-28-2008, 05:58 PM
|
 |
CC Member
|
|
|
Join Date: Jul 2003
Location: Corinth,
NY
Cobra Make, Engine: Antique & Collectable 302, C-4,Ford 9 inch
Posts: 251
|
|
Not Ranked
I set my body on temporarily then marked my holes for the exhaust.
I believe I used Emery cloth very aggresively on the inside of the adapters to make them fit the headers.
I have a small block, the header length was not an issue, if you have headers that are too long, cutting them to fit should not be an issue. Just measure twice.
Hope your build continues smoothly,
__________________
Jerry
|
05-28-2008, 07:27 PM
|
 |
Club Cobra Member
|
|
|
Join Date: Nov 2000
Location: Macedonia,
OH
Cobra Make, Engine: A&C 427S/C, 351W, T5
Posts: 521
|
|
Not Ranked
rdc;
I have a 351 W. I mounted the headers on the motor, then tried to lower the body down. At first it would not go but we tipped one side up and the other side down and it went down to the frame.
You may want to put the body on first then mount the headers.
Which ever way you go, once the body is down on the frame and positioned the way you want it. Drill some pilot holes thru the body and the frame and put in some of the big pop rivets as guides only, do not use the pop rivet tool at this time. These holes are only to be used as pilot guide holes to reposition the body back on the frame, because you will want to remove the body to do a lot of the remaining work with the body off the frame.
Now that you have the body positioned on the frame with the pop rivets as guides and the headers mounted on the heads of the engines. You can determine with a straight edge where the side pipes are going to go thru the body. Once you determine where the opening will be, mask off the area and use an air operated little sawsall (best tool I ever bought) to cut out the opening. I tried to get at least a 1/2" clearance around the pipes at the exit area of the body.
When you are doing this be very careful on where the inside body panels are for the engine compartment. I was very close to this panel when I began to carve out the opening.
Once you have the opening cut out you can go back and make the final opening with nice blended generous radii with a sanding tool drum.
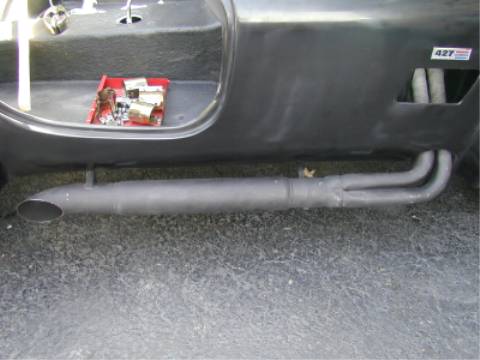
Make sure that when you position the side pipes on the headers you maintain at least 3/4" to an 1" of clearance along the body for the side pipe. Determine where you support mounting bracket is going to be at this time. I welded a small angle bracket on the side pipe and mounted a bracket off the frame that I bolted thru the angle bracket to the frame support with a rubber bushing for vibration.
What I learned and followed thru all of my build was I thought about how I was going to do something and then thought about what it would look like and then thought about it again, then made a sketch and thought about it again then went and did it.
I wished I found this site before I began.
Wait until you make your first cut into the body, it is a real "Sphincter" (sp)tightening moment.
Jim
|
05-29-2008, 04:13 AM
|
 |
CC Member
|
|
|
Join Date: Mar 2000
Location: Fairfield, NJ, USA,
NJ
Cobra Make, Engine: A & C, 351W, Tremec 3550. Exiled Member: Club Cranky
Posts: 5,900
|
|
Not Ranked
Ditto on the little sawzall. A must have tool. I cut mine similar to the way Jim did it.
Roscoe
__________________
Roscoe
"Crisis occurs when women and cattle get excited!"....James Thurber
|
05-29-2008, 09:15 AM
|
|
CC Member
|
|
|
Join Date: Aug 2006
Cobra Make, Engine: A&C
Posts: 379
|
|
Not Ranked
Thanks guys. This great advice.
Ron
|
05-30-2008, 05:51 PM
|
|
CC Member
|
|
|
Join Date: Jul 2003
Location: Corinth,
NY
Cobra Make, Engine: Antique & Collectable 302, C-4,Ford 9 inch
Posts: 251
|
|
Not Ranked
Hope I am not to late with this last piece of advice:
I found using a ceramic or glass cutting blade in my reciprocating saw worked the best. Remember you are cutting through resin and GLASS. It had the finest teeth and made a real smooth cut with out chipping out. Masking tape is a must, and I also finished the cut with a sanding drum on a dremel tool.
Good luck take your time on this.
__________________
Jerry
|
05-30-2008, 08:45 PM
|
|
CC Member
|
|
|
Join Date: Mar 2000
Location: Fairfield, NJ, USA,
NJ
Cobra Make, Engine: A & C, 351W, Tremec 3550. Exiled Member: Club Cranky
Posts: 5,900
|
|
Not Ranked
Ditto Jerry...I forgot to mention the tape and the finishing with the drum on the Dremel.
Roscoe
__________________
Roscoe
"Crisis occurs when women and cattle get excited!"....James Thurber
|
05-31-2008, 06:39 AM
|
|
CC Member
|
|
|
Join Date: Jul 2003
Location: Corinth,
NY
Cobra Make, Engine: Antique & Collectable 302, C-4,Ford 9 inch
Posts: 251
|
|
Not Ranked
You will have to cut out holes in the trunk area first before you can test fit your body. This is a great place to get the feel of how to cut and shape the fiberglass in an area that is not as critical as the side-pipe cut outs.
When I cut the holes in the trunk area to accomodate the bumper mounts on the frame I put a fine tooth metal cutting blade in my saw. Mistake! I could not finish one hole! The fiberglass dulled the blade in no time, the teeth that were originally sharp and pointed very quicklu were rounded off!
Hence the ceramic tile/glass cutting blade.
The dust is nasty, very fine, and made my skin itch, something else to consider, take precautions.
Regards,
__________________
Jerry
|
 Posting Rules
|
You may not post new threads
You may not post replies
You may not post attachments
You may not edit your posts
HTML code is Off
|
|
|
All times are GMT -7. The time now is 05:25 AM.
Links monetized by VigLink
|


 Hybrid Mode

