Welcome to Club Cobra! The World's largest
non biased Shelby Cobra related site!
- » Representation from nearly all
Cobra/Daytona/GT40 manufacturers
- » Help from all over the world for your
questions
- » Build logs for you and all members
- » Blogs
- » Image Gallery
- » Many thousands of members and nearly 1
million posts!
YES! I want to register an account for free right now!
p.s.: For registered members this ad will NOT show
 
 Main Menu
|
|
Nevada Classics
|
|
Advertise at CC
|
|
April 2026
|
| S |
M |
T |
W |
T |
F |
S |
| |
|
|
1 |
2 |
3 |
4 |
| 5 |
6 |
7 |
8 |
9 |
10 |
11 |
| 12 |
13 |
14 |
15 |
16 |
17 |
18 |
| 19 |
20 |
21 |
22 |
23 |
24 |
25 |
| 26 |
27 |
28 |
29 |
30 |
|
|
|
|
CC Advertisers
|
|
 134Likes 134Likes

04-20-2014, 03:37 PM
|
 |
CC Member

|
|
|
Join Date: Feb 2013
Posts: 150
|
|

 Not Ranked
 Kirkham 668 build
Though I would start a build thread even though progress is slower than the melting of the ice caps. (parts supply)
Had a few days to stuff around with a few odd and ends.
I invited a mate up for lunch and "while you are here" we bleed the brakes and the clutch, only had one leak! it is nice to have a couple of firm pedals for when I sit in the car pretending to drive through the hills.
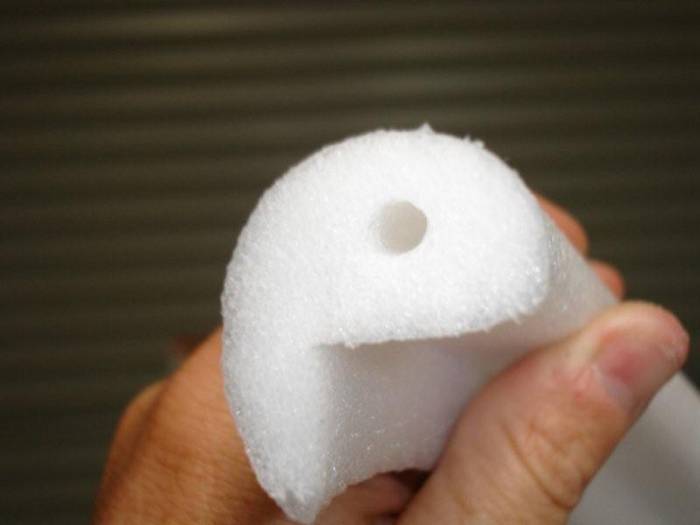
I made a mold for the dash crash pad,
end profile of mold
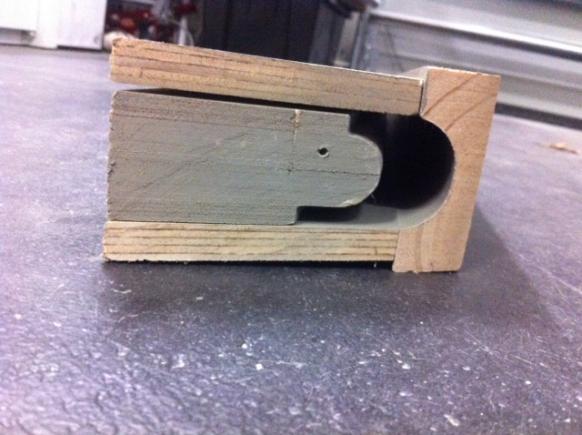
I poured it in ISF136 (Integral Skin Foam 136kg per cubic meter) mix and pour, you have to be quick it starts to expand at a very rapid rate after 25 sec of mixing. You can get it the right sure hardness by pouring more mixture in to the mold than is required and sealing the mold, the foam cant expand and becomes more dense, a bit of trial and error.
End product installed
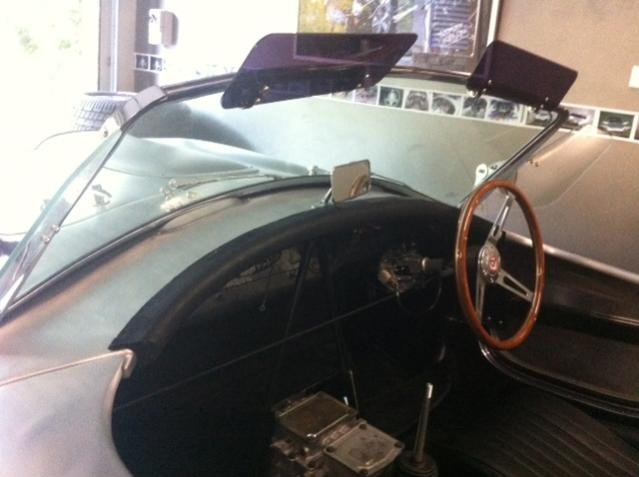
I had some trouble de-molding and damaged it, but I think it will be ok in the end and because it has a skin you don't have to cover it with anything. I will do some mods to the mold and pour another one next weekend
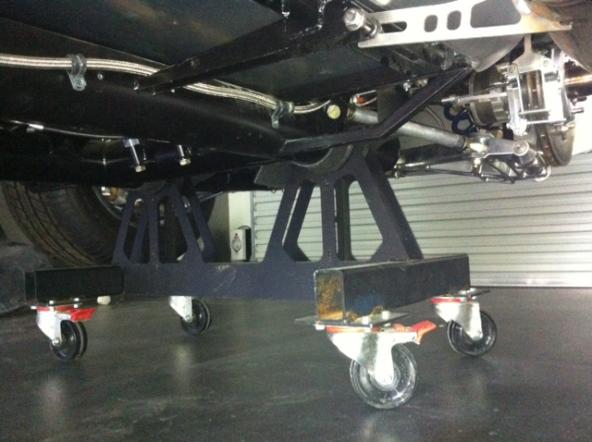
I moved my fuel lines in to a cable tray that I put in the tunnel
instead of this
fuel lines drooping between P-clips
and this
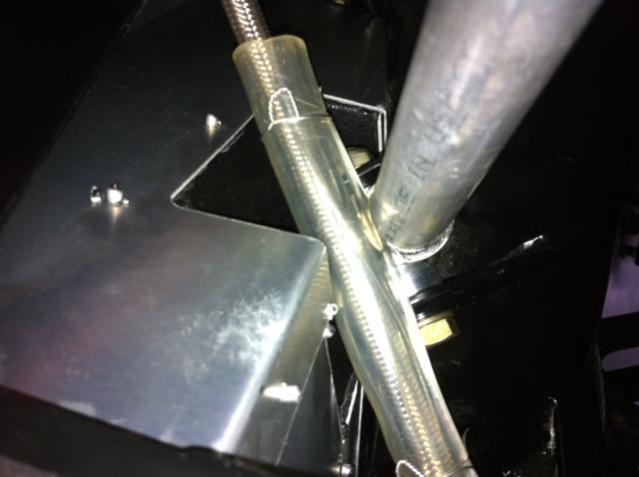
Fuel line squashed between body and moving suspension parts
It now looks like this
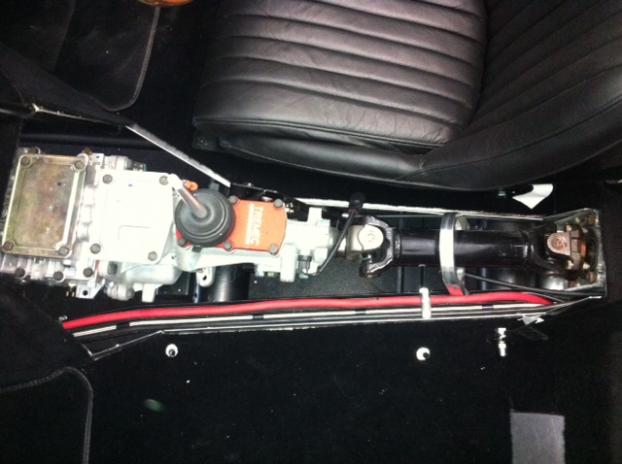
There was room to run the vacuum hose for the charcoal canister, the hose for the windscreen washer & the main power fed to the starter as well. It cleaned up the underside of the car nicely.
Cheers
|
-
Advertising

04-20-2014, 03:53 PM
|
 |
CC Member
|
|
|
Join Date: Jan 2002
Location: Melbourne, Australia,
VIC
Cobra Make, Engine: AP Pace427 (AP4033) GM L77 6.0L TR6060
Posts: 838
|
|
Not Ranked
Nice Lex. Cool - another build thread!
The fuel line certainly needed 'fixing' didn't it. That surprises me on a Kirkham, with their reputation for quality.
Is there any issue running fuel lines and power etc in the same cavity?
__________________
Guy
Cobra Progress guye-cobra.blogspot.com
|
04-20-2014, 04:10 PM
|
|
CC Member
|
|
|
Join Date: Feb 2013
Posts: 150
|
|
Not Ranked
Hi Guye
Not sure if the fuel line left Kirkhams like that.
Don't know about running fuel and power together I must admit I did have the same though..... after I had done it.
The cable tray is made up by two small U channels so they are kinda separated. I put the fuel and water in on and the power in the other.
Forgot to mention David Kirkham has kindly downloaded some photos of 668 on the Kirkham Facebook site for me if anyone is interested.
Cheers
|
04-20-2014, 06:27 PM
|
 |
CC Member
|
|
|
Join Date: Nov 1999
Location: Brisbane, Australia,
Q
Cobra Make, Engine: Contemporary CCX3117 427FE
Posts: 4,381
|
|
Not Ranked
Great to see another build thread!
It looks like the fuel line was loose in the Kirkham photo. It's blurry, but you can see it hanging at that stage of the build:

Just a little tip for including photos throughout your build thread; instead of attaching the little images that everyone clicks into, you can just insert an image which will show up as full size. Just click this
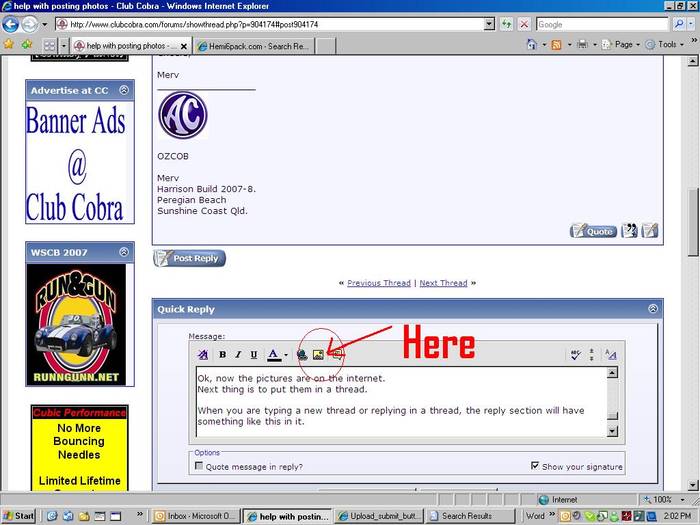
...and paste in the location of the image (ie: the bit that starts with http...and ends with...jpg)
I'm looking forward to seeing your car come together. It looked great sitting in the Kirkham workshop with another RHD car and others at various stages of completion!

__________________
Craig
|
04-20-2014, 08:23 PM
|
 |
CC Member
|
|
|
Join Date: Apr 2008
Location: Melbourne,
Vic
Cobra Make, Engine: Some polish thing... With some old engine
Posts: 2,286
|
|
Not Ranked
Way cool...
Hopefully with global warming those ice-caps melt a little quicker for you moving forwards. 
That is for sharing. |
04-21-2014, 01:25 AM
|
|
CC Member
|
|
|
Join Date: Jan 2002
Location: Melbourne, Australia,
VIC
Cobra Make, Engine: AP Pace427 (AP4033) GM L77 6.0L TR6060
Posts: 838
|
|
Not Ranked
Quote:
Originally Posted by 750hp

... It looks like the fuel line was loose in the Kirkham photo. It's blurry, but you can see it hanging at that stage of the build
...
|
Detective Craig!
__________________
Guy
Cobra Progress guye-cobra.blogspot.com
|
04-21-2014, 02:34 AM
|
|
CC Member
|
|
|
Join Date: Feb 2013
Posts: 150
|
|
Not Ranked
Thanks Craig for photo posting advise, I can't get my head around it I wish I had a 9 year old around the house they would figure it out in seconds. I will give it another go soon.
|
04-21-2014, 05:15 AM
|
 |
CC Member
|
|
|
Join Date: Aug 2013
Location: redcliffe,
qld
Cobra Make, Engine: Kirkham 427SC 482 Cammer
Posts: 700
|
|
Not Ranked
Yeh more Kirkham pics, about time mate.
On the fuel line mine was in a similar position. I put the suspension though it's full travel and saw that it wasn't going to be an issue so left it where it was figuring that Kirkham probably has a few out there like that.
I thought you had all your parts to finish your girl off.   |
04-21-2014, 01:41 PM
|
|
CC Member
|
|
|
Join Date: Feb 2013
Posts: 150
|
|
Not Ranked
Damage
OK ...so that is the correct position for the fuel line. I think the inspection team at the road traffic board would frown on it being squashed in there.
Cheers
|
04-21-2014, 07:39 PM
|
|
CC Member
|
|
|
Join Date: Aug 2013
Location: redcliffe,
qld
Cobra Make, Engine: Kirkham 427SC 482 Cammer
Posts: 700
|
|
Not Ranked
I don't necessarily think its correct but that's where they put them.
One thing that you may consider though with where you have now rerouted your fuel line is the heat soak that the fuel line may get from the transmission. Hot fuel = less ponies. with the fuel line in its position from Kirkham at least its away from most heat sources except the road of course.
|
04-22-2014, 12:51 AM
|
|
CC Member
|
|
|
Join Date: Feb 2013
Posts: 150
|
|
Not Ranked
I'll see how it goes, easy to put back I haven't cut anything, anyhow I will be looking where to fit a parcel shelf for the white bowling hat before I get this thing on the road |
04-22-2014, 01:21 AM
|
|
CC Member
|
|
|
Join Date: Nov 1999
Location: Brisbane, Australia,
Q
Cobra Make, Engine: Contemporary CCX3117 427FE
Posts: 4,381
|
|
Not Ranked
There's an ex-Bathurst racer in the Qld club who is in his 80s and has a 630ish horsepower Robnell Cobra, so you still have time!
In a previous Cobra, I ran the fuel lines down the trans tunnel without any heatsoak issues. It was EFI with a return line though.
__________________
Craig
|
04-22-2014, 02:10 AM
|
|
CC Member
|
|
|
Join Date: Feb 2013
Posts: 150
|
|
Not Ranked
Craig it will be EFI and the return fuel line is in that channel as well so hopefully all is well
I will probably end up with under car exhaust for compliance ( don't really mind I have come to like the street look very much) so all the wiring and fuel lines would have been right next to the hot exhaust anyway.
While I was modifying my mould for the crash pad I got to thinking, what does everyone else use for the dash padding?
|
04-22-2014, 03:05 AM
|
 |
CC Member
|
|
|
Join Date: Apr 2010
Location: Hobart,
TAS
Cobra Make, Engine: ?????
Posts: 494
|
|
Not Ranked
I am also curious to hear about the dash pad/edge roll for registration/compliance?
Is it critical for ADRs?
Cheers
Tony
|
04-22-2014, 03:08 AM
|
 |
CC Member
|
|
|
Join Date: Apr 2008
Location: Melbourne,
VIC
Cobra Make, Engine: Classic Revival CR 3505, LS1, T56 6 Speed, VE 3.45 LSD Rear, 6 Spot AP Fronts, 4 Spot Wilwood Rears
Posts: 1,121
|
|
Not Ranked
I used a foam profile from a furniture manufacturer as recommended by my Engineer. $5 all up. Still needed to be covered later on.
Definitely required for ADRs etc.
 |
04-22-2014, 07:57 PM
|
|
CC Member
|
|
|
Join Date: Aug 2013
Location: redcliffe,
qld
Cobra Make, Engine: Kirkham 427SC 482 Cammer
Posts: 700
|
|
Not Ranked
Lex,
I was just filling in lunch time boredom and looking at your pics and decided you need to put more up.
I'm interested to see how your door locks have ended up, I see you have your intrusion bars in. I'm not 100% happy with mine and still thinking of how I can finish them up a bit better so wondered what track you went.
Have you got any feed back on when the reindeer is turning up with the rest of your bits. I noticed you still don't have a wiring harness fitted have you got that or are making it one strand of wire at a time.
|
04-22-2014, 08:22 PM
|
|
CC Member
|
|
|
Join Date: Feb 2013
Posts: 150
|
|
Not Ranked
I believe the loom is in the final stages of being debugged.... Hopefully!!
I will give posting photos another go ....
|
04-22-2014, 09:34 PM
|
|
CC Member
|
|
|
Join Date: Aug 2013
Location: redcliffe,
qld
Cobra Make, Engine: Kirkham 427SC 482 Cammer
Posts: 700
|
|
Not Ranked
Debugged???
|
04-25-2014, 05:53 PM
|
|
CC Member
|
|
|
Join Date: Feb 2013
Posts: 150
|
|
Not Ranked
Door lock covers
After an early start with a walk down to the local dawn service, I had a bit of time to work on some stuff.
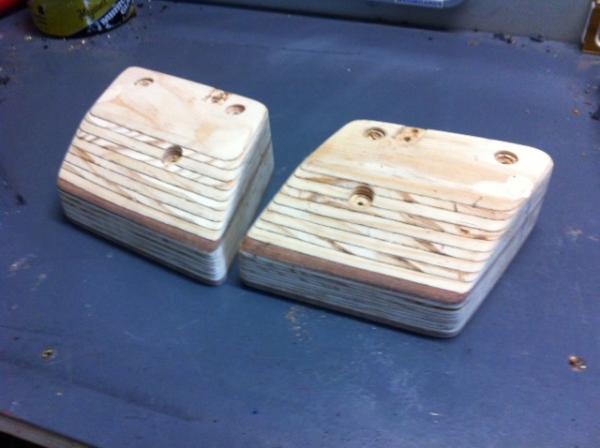
I wanted to cover the door lock
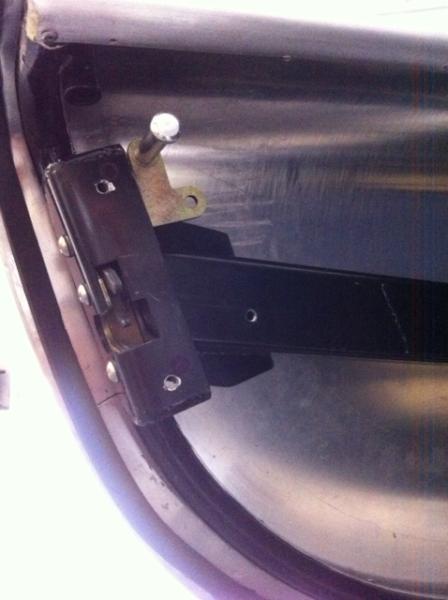
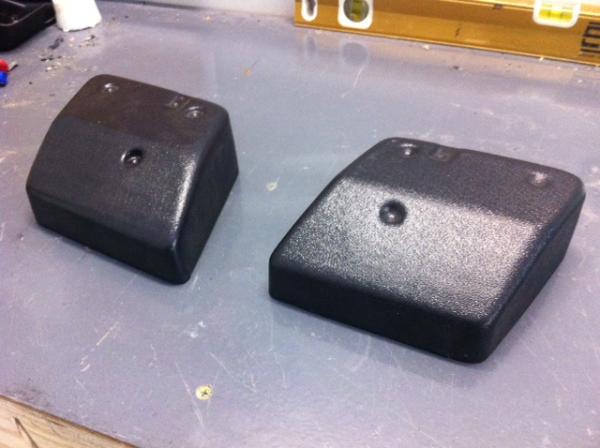
I made these dies at work earlier in the week.
The I vac formed these in 2mm thick ABS plastic sheet
A bit of drilling, score and snap, filing, cursing.. the die grinder became my best friend
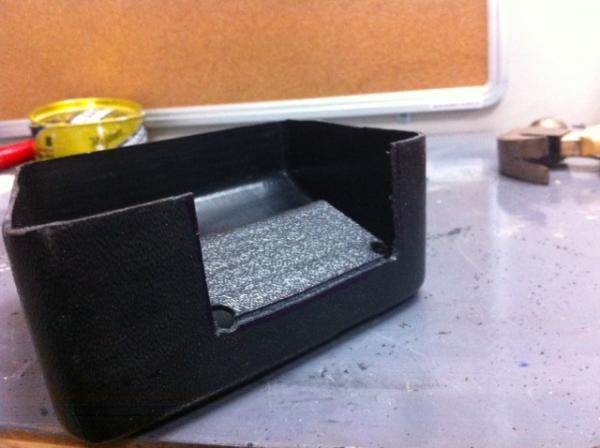
Finished!!
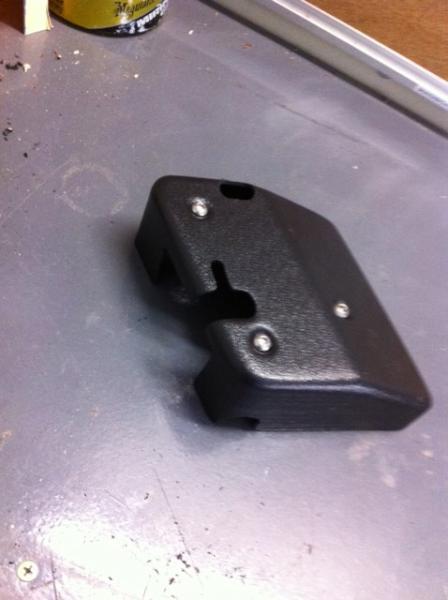
And fitted
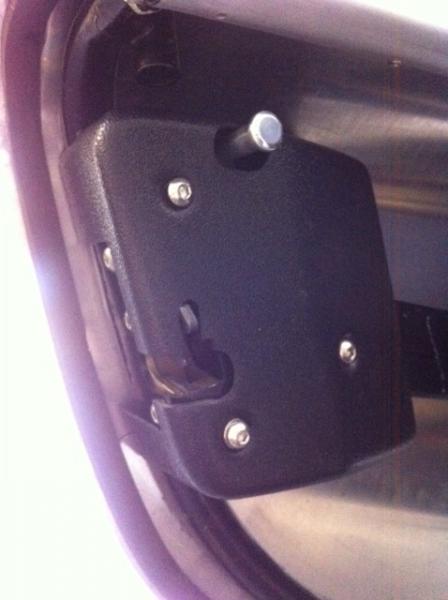
Now the other side.....
Cheers |
04-25-2014, 06:01 PM
|
|
CC Member
|
|
|
Join Date: Nov 1999
Location: Brisbane, Australia,
Q
Cobra Make, Engine: Contemporary CCX3117 427FE
Posts: 4,381
|
|
Not Ranked
My fabrication skills extend as far as hitting something with a hammer until it fits or it breaks. Seeing parts come together as well as your cover is really impressive.
__________________
Craig
|
 Posting Rules
|
You may not post new threads
You may not post replies
You may not post attachments
You may not edit your posts
HTML code is Off
|
|
|
All times are GMT -7. The time now is 03:25 PM.
|
|


 Linear Mode


