Welcome to Club Cobra! The World's largest
non biased Shelby Cobra related site!
- » Representation from nearly all
Cobra/Daytona/GT40 manufacturers
- » Help from all over the world for your
questions
- » Build logs for you and all members
- » Blogs
- » Image Gallery
- » Many thousands of members and nearly 1
million posts!
YES! I want to register an account for free right now!
p.s.: For registered members this ad will NOT show
 
 Main Menu
|
|
Nevada Classics
|
|
Advertise at CC
|
|
April 2026
|
| S |
M |
T |
W |
T |
F |
S |
| |
|
|
1 |
2 |
3 |
4 |
| 5 |
6 |
7 |
8 |
9 |
10 |
11 |
| 12 |
13 |
14 |
15 |
16 |
17 |
18 |
| 19 |
20 |
21 |
22 |
23 |
24 |
25 |
| 26 |
27 |
28 |
29 |
30 |
|
|
|
|
CC Advertisers
|
|
 250Likes 250Likes

06-27-2015, 03:59 PM
|
 |
CC Member

|
|
|
Join Date: Feb 2009
Posts: 1,696
|
|

 Not Ranked
I went through most of the same stuff you are going through 2 years ago. Here is a suggestion; Get rid of the goofy bearing and seal deal in the rear and get these:
Team CJ system bronze
I also used Wilwoods and made an e-brake set-up that mounts on the driveshaft. The disk came from Speedway and I made the adapters to mount it on the pinion. I used a Wilwood mechanical caliper and made a bracket to mount it. The original e-brake handle was used and a cable from a go-cart was found on Ebay. The disk was from their 9" e-brake kit. |
-
Advertising

06-27-2015, 04:33 PM
|
 |
CC Member
|
|
|
Join Date: Nov 1999
Location: Brisbane, Australia,
Q
Cobra Make, Engine: Contemporary CCX3117 427FE
Posts: 4,381
|
|
Not Ranked
I know how clean you keep your floor in that garage, so you must have been convulsing at the sight of all that crud and grime smeared into it...
Removing the original calipers and linkages looks like will give you a significant weight saving.
Great to see the before shots because it really highlights the effort you're putting in to get to the end result.
__________________
Craig
|
06-27-2015, 05:35 PM
|
 |
CC Member
|
|
|
Join Date: Mar 2005
Location: Perth,
wa
Cobra Make, Engine: Pace Alumina 427 #69
Posts: 1,615
|
|
Not Ranked
I'm loving this thread.....The no tears attitude, just get in, get it apart and make it mint. Keep up the great work.
|
06-28-2015, 02:13 AM
|
 |
CC Member
|
|
|
Join Date: Mar 2010
Location: Gold Coast,
QLD
Cobra Make, Engine: Arntz, TKO600, 460
Posts: 818
|
|
Not Ranked
Quote:
Originally Posted by EB847

double check your welds. my diff broke off the frame after installing billboards and giving the car a proper work out last week 
reinforcing everything suspension related that had the same crappy welds (including the rear arm area i sent you). i will post the after pix in a week or two. and then see what else my race tires can break  |
Whoa..... I can only imaging the noise and shock that must have been.
It's interesting to see the different shock and diff mounts. Mine has about an inch and a 1/2 drop mount for the diff and the shocks are bolt on plats with tabs.
Either way, I plan on a full strip down and checking welding and may look at braces for certain areas. Keep me posted on your progress. |
06-28-2015, 03:16 AM
|
|
CC Member
|
|
|
Join Date: Mar 2010
Location: Gold Coast,
QLD
Cobra Make, Engine: Arntz, TKO600, 460
Posts: 818
|
|
Not Ranked
Quote:
Originally Posted by joyridin'
I went through most of the same stuff you are going through 2 years ago. Here is a suggestion; Get rid of the goofy bearing and seal deal in the rear and get these:
Team CJ system bronze
I also used Wilwoods and made an e-brake set-up that mounts on the driveshaft. The disk came from Speedway and I made the adapters to mount it on the pinion. I used a Wilwood mechanical caliper and made a bracket to mount it. The original e-brake handle was used and a cable from a go-cart was found on Ebay. The disk was from their 9" e-brake kit. |
Thanks for the link, when I am pulling it apart I though that there must be a better option than the original set up.
I welcome pics on your e-brake set up, I was thinking the same as I saw one pic of a similar sounding arrangement and that's why I want to junk that current arrangement. |
06-28-2015, 03:19 AM
|
|
CC Member
|
|
|
Join Date: Mar 2010
Location: Gold Coast,
QLD
Cobra Make, Engine: Arntz, TKO600, 460
Posts: 818
|
|
Not Ranked
Quote:
Originally Posted by 750hp
I know how clean you keep your floor in that garage, so you must have been convulsing at the sight of all that crud and grime smeared into it.
|
I really am becoming one with degreaser, I have no shortage of cans racked up ready for use.
The mess got a little out of hand, once it started, I just kept going, clean up in the evening, degreaser and a pressure cleaner..... All clean again. |
06-28-2015, 05:43 AM
|
|
CC Member
|
|
|
Join Date: Jun 2003
Location: Oakham,
Ma
Cobra Make, Engine: Kirkham 592
Posts: 580
|
|
Not Ranked
I have a special socket I had made for the rear end. If you need it I could let you borrow it. You need it to rebuild that rear.
|
06-29-2015, 06:35 PM
|
 |
CC Member
|
|
|
Join Date: Sep 2010
Location: redcliffe,
qld
Cobra Make, Engine: venom motorsports /ls1 auto
Posts: 500
|
|
Not Ranked
Leroy if you need a exploded diagram of the rear end & all bushes & seal I have an original I can send you
it has all partno.
rob
__________________
not all your babies are your children
|
07-11-2015, 02:16 PM
|
|
CC Member
|
|
|
Join Date: Mar 2010
Location: Gold Coast,
QLD
Cobra Make, Engine: Arntz, TKO600, 460
Posts: 818
|
|
Not Ranked
Quote:
Originally Posted by renovationinnov
Leroy if you need a exploded diagram of the rear end & all bushes & seal I have an original I can send you
it has all partno.
rob
|
Thanks Rob, I got your message and this would be a great help. |
07-11-2015, 02:35 PM
|
|
CC Member
|
|
|
Join Date: Mar 2010
Location: Gold Coast,
QLD
Cobra Make, Engine: Arntz, TKO600, 460
Posts: 818
|
|
Not Ranked
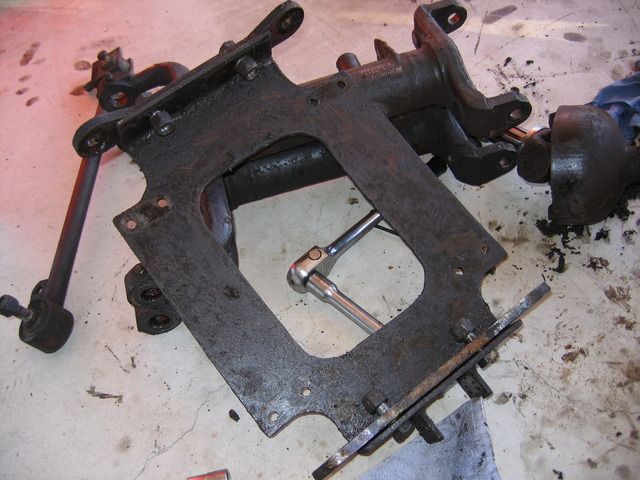
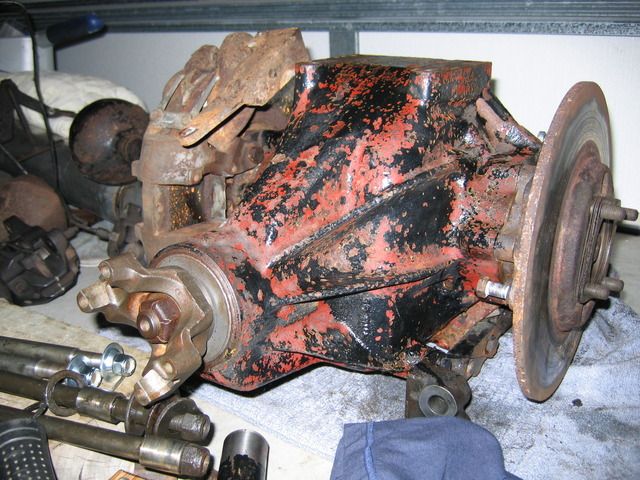
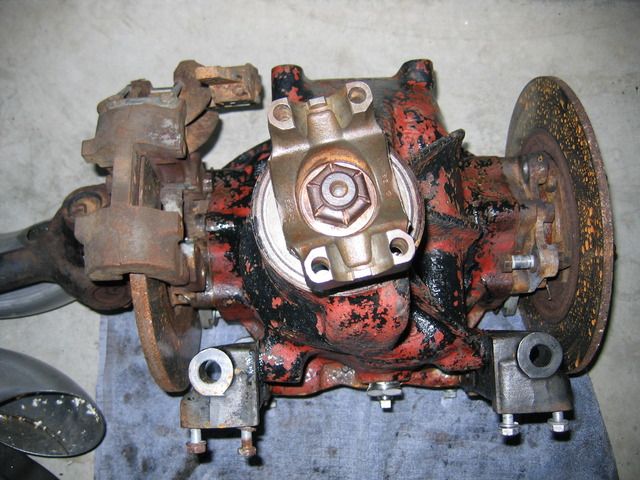
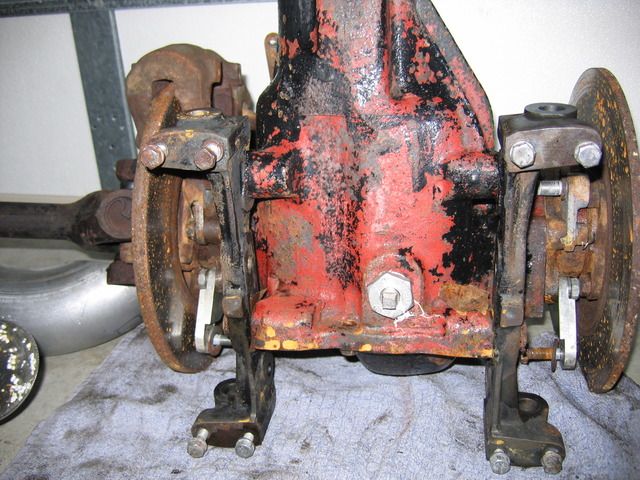
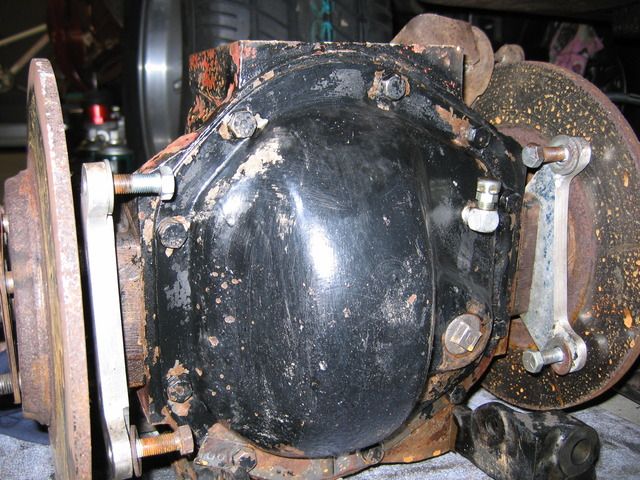
Well yesterday I officially reached the WTF am I doing part of this quick refurb.
Two weeks ago I thought the 'ugly' was the dirty diff with a few years of gunk buildup. After a few hours yesterday just to clean this off the real ugly was revealed.
I have seized bolts in a few places which just need a little more work, always take the optimistic approach here. The original jag caliper set up will be junked (rusted and seized and beyond repair anyway), I will have the Wilwoods rebuilt and also looking at the Wilwood mechanical handbrake (e brake) as well. New rotors will replace the two current different sized rotors (cant explain this).
Bronze bushing kit has been ordered and LCA are currently having gusset braces welded in.
Any tips for identification would be appreciated. To me it appears its a 64-67 XKE, but the input appear different.
Here is just a few before pics, more for reference to what I will get this to.
Last edited by leroy17; 07-11-2015 at 03:26 PM..
|
07-12-2015, 04:58 AM
|
|
CC Member
|
|
|
Join Date: Feb 2009
Posts: 1,696
|
|
Not Ranked
The brakes are a Series 1, and the carrier probably is also. It looks like somebody changed the flange to a yoke style set-up. Not necessarily a bad thing especially if you ever want to change the ring and pinion at a later date.
|
07-13-2015, 12:35 PM
|
|
CC Member
|
|
|
Join Date: Aug 2006
Cobra Make, Engine:
Posts: 42
|
|
Not Ranked
diff plate rewelded to frame. much stronger now.
|
07-25-2015, 01:35 PM
|
|
CC Member
|
|
|
Join Date: Mar 2010
Location: Gold Coast,
QLD
Cobra Make, Engine: Arntz, TKO600, 460
Posts: 818
|
|
Not Ranked
|
09-07-2015, 11:26 AM
|
|
CC Member
|
|
|
Join Date: Mar 2010
Location: Gold Coast,
QLD
Cobra Make, Engine: Arntz, TKO600, 460
Posts: 818
|
|
Not Ranked

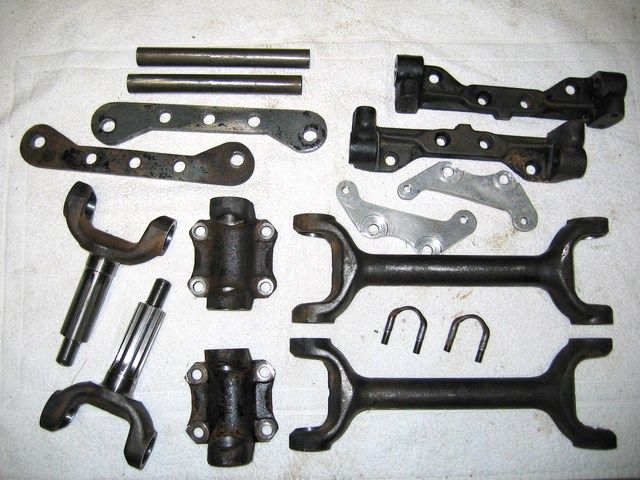
Another step forward with some parts back from blasting and powdercoat.
It never ceases to amaze me the results from the before and afters as the diff parts have a significant aging to their near 50 year old life.
I take this opportunity to promote Robertos Custom Powder (link below).
Roberto's Custom Powder
The attention to detail and understanding of finish required is just awesome. His work is not only paint, he can restore original style finish to a variety of parts with different techniques. The caliper brackets below are not painted, they are a wet blasted leaving a matt finish. The attention to detail for masking is far superior to other shops and the work is truly custom rather than commercial volume churn and burn. I urge you to take a look at his site and if there is anything you want painted, blasted, restored I am sure that you will not be disappointed.
Parts before paint.
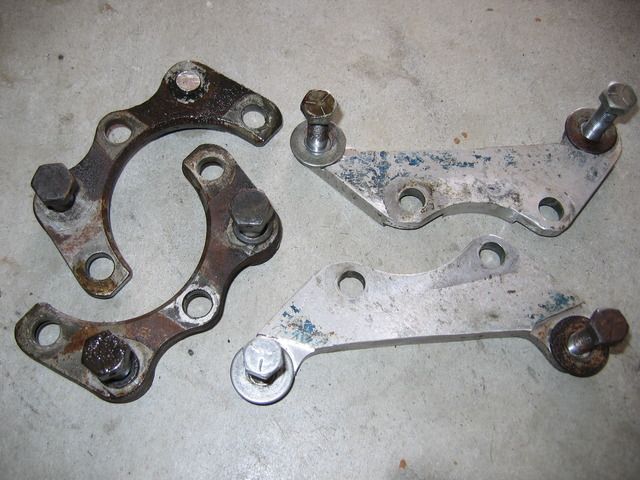
Caliper brackets before.
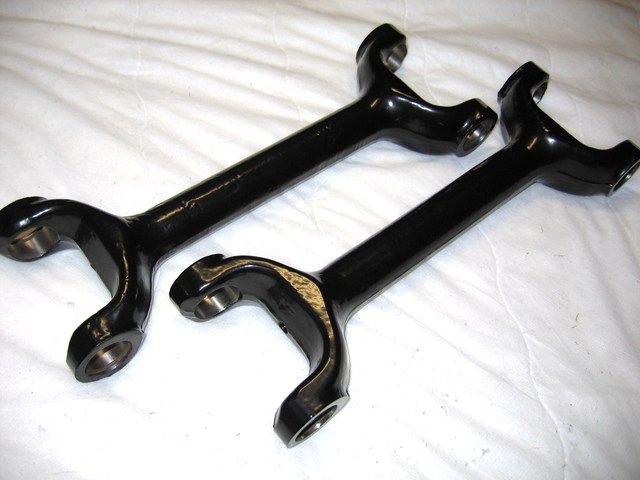
Driveshafts after paint.
Masking results.
Lower control arms after paint.
Stub axels.
Caliper brackets after wet blast.
LCA mount bracket.
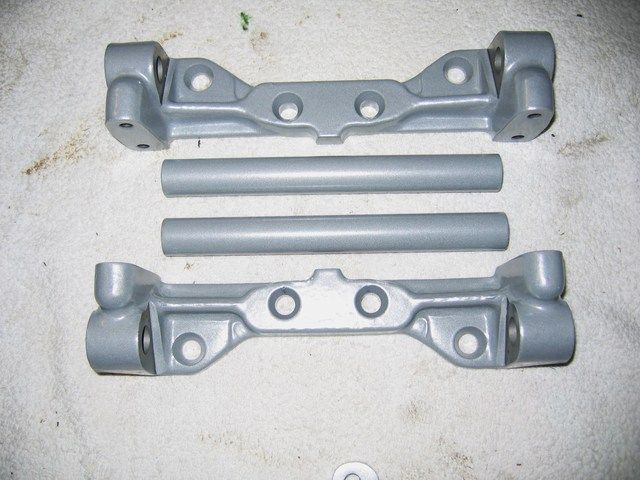
Tiebar after paint.
Last edited by leroy17; 09-07-2015 at 11:58 AM..
|
09-07-2015, 11:38 AM
|
|
CC Member
|
|
|
Join Date: Mar 2010
Location: Gold Coast,
QLD
Cobra Make, Engine: Arntz, TKO600, 460
Posts: 818
|
|
Not Ranked
With the diff assembly removed for restoration I took the back cover off to see what the inside was like. The oil came out really clean and there was no sludge or residue buildup anywhere. I suspected that this may have been attended to at some stage.
Since I had gone this far, I figured it would be foolish not to have the diff inspected and serviced. Bearings are being replaced as are the seals which were not just hardened, but more like mummified. Kedron Diffs are conducting the work as they are respected and know their way around Jag Rears. They returned the housing and external parts to me for restoration which will be finished later this week and returned for final assembly.
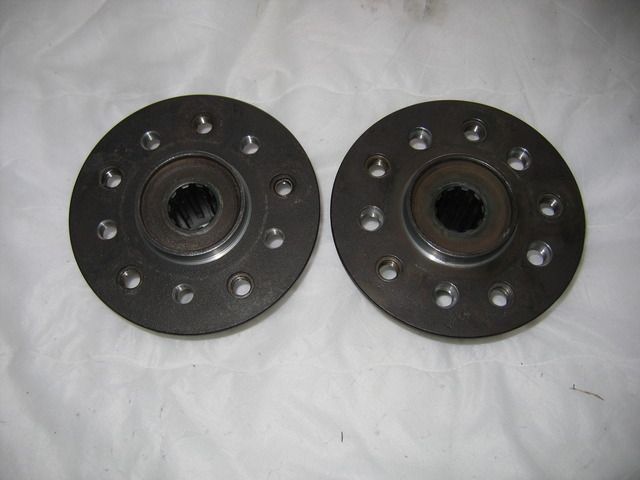
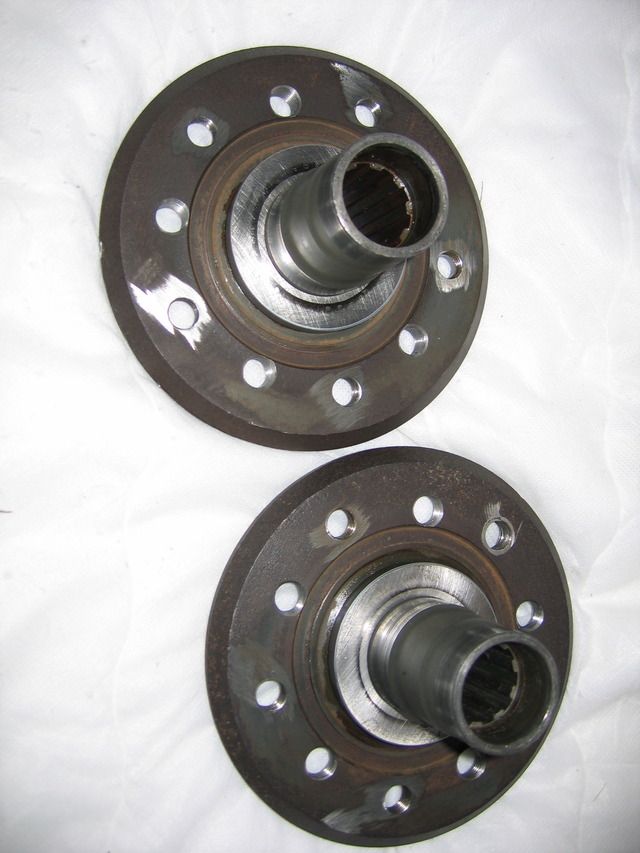
Rear hubs will be blasted to clean and just a flash coat for surface protection.
Diff housing stripped of parts and internals.
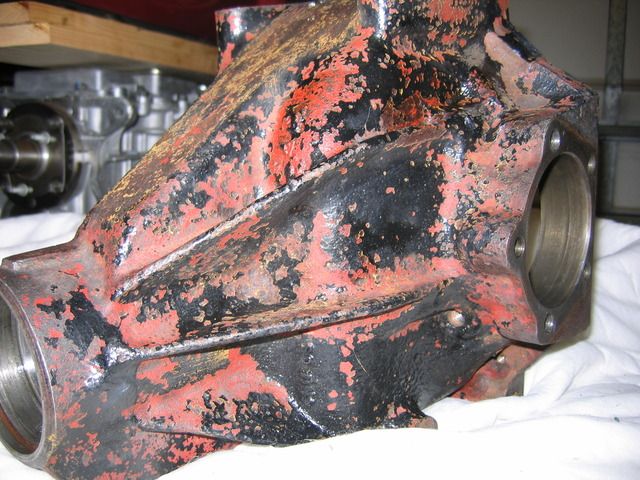
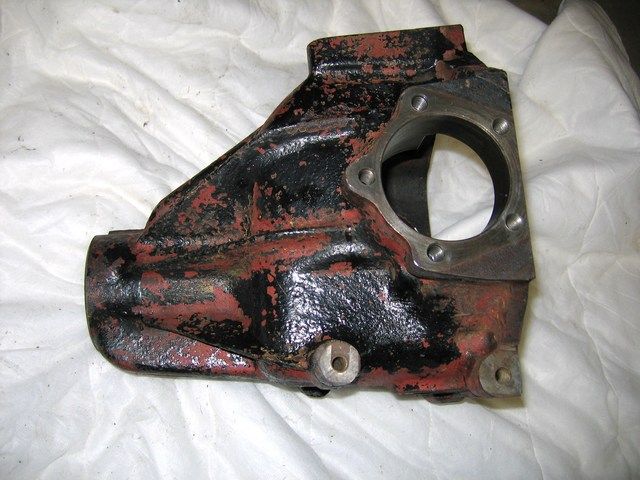
Diff parts before.
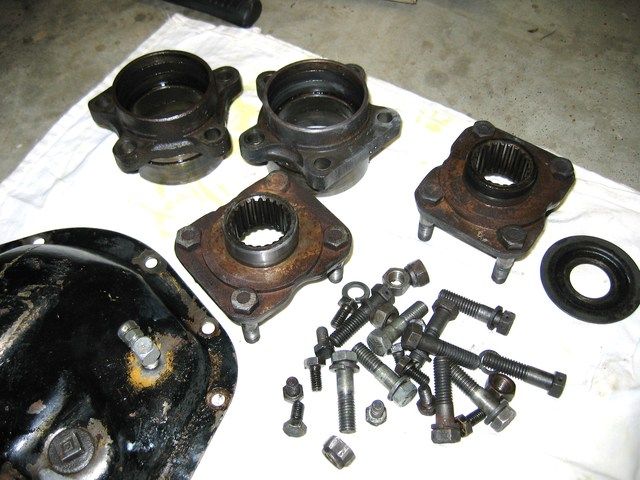
Rear hubs.
Last edited by leroy17; 09-07-2015 at 11:55 AM..
|
09-07-2015, 05:55 PM
|
 |
CC Member
|
|
|
Join Date: May 2011
Cobra Make, Engine:
Posts: 49
|
|
Not Ranked
What size master cylinder bore are you planning on using? Will you have a booster too?
|
09-07-2015, 07:30 PM
|
|
CC Member
|
|
|
Join Date: Mar 2010
Location: Gold Coast,
QLD
Cobra Make, Engine: Arntz, TKO600, 460
Posts: 818
|
|
Not Ranked
Quote:
Originally Posted by jr289
What size master cylinder bore are you planning on using? Will you have a booster too?
|
No booster currently. I can not recall the current sizes, but I have not looked properly as the plan is for top mount pedals replacing the floor mount Arntz setup.
I have not got to this stage yet, other things first, but getting closer. |
09-17-2015, 11:38 AM
|
|
CC Member
|
|
|
Join Date: Mar 2010
Location: Gold Coast,
QLD
Cobra Make, Engine: Arntz, TKO600, 460
Posts: 818
|
|
Not Ranked
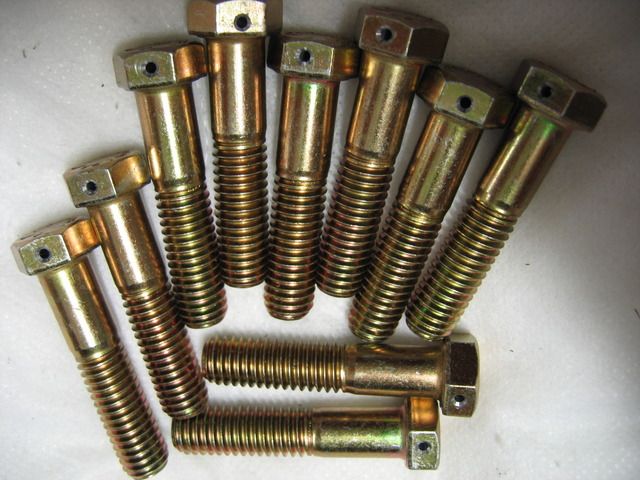
Will be getting the diff back today. Rebuild internals, blasted, painted, new bearings and seals and bolts.
When pulled apart, the bearing cap bolts were a mix of hi tensile, standard and drilled for safety wiring. The 5 bolts are also used to secure the bearing caps and caliper brackets, the rear two for the aftermarket wilwoods, and the front three for the factory jag caliper. As these factory ones have been junked i may use these for a custom mount for an ebrake caliper (yet to be confirmed).
Anyway, new bolts obtained and drilled to safety wire. Possibly an overkill, but whilst I have it all out its east to do.
Next update will be starting to re-assemble rear.
Last edited by leroy17; 09-18-2015 at 06:17 AM..
|
10-04-2015, 12:55 PM
|
|
CC Member
|
|
|
Join Date: Mar 2010
Location: Gold Coast,
QLD
Cobra Make, Engine: Arntz, TKO600, 460
Posts: 818
|
|
Not Ranked
Looking back at the pics from when the diff was first removed, reminds me just what I started with and where I am now.
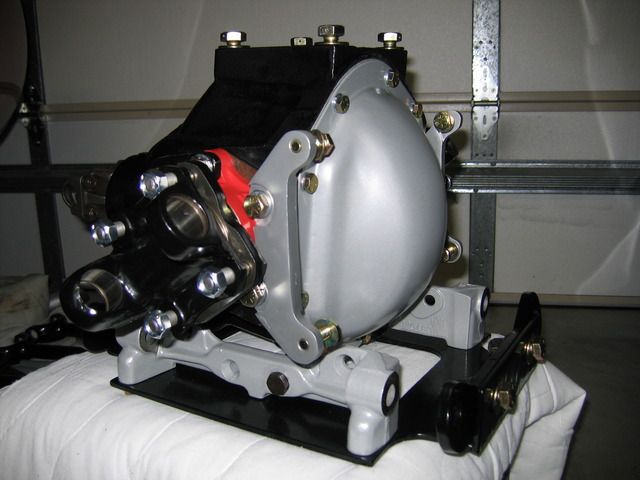
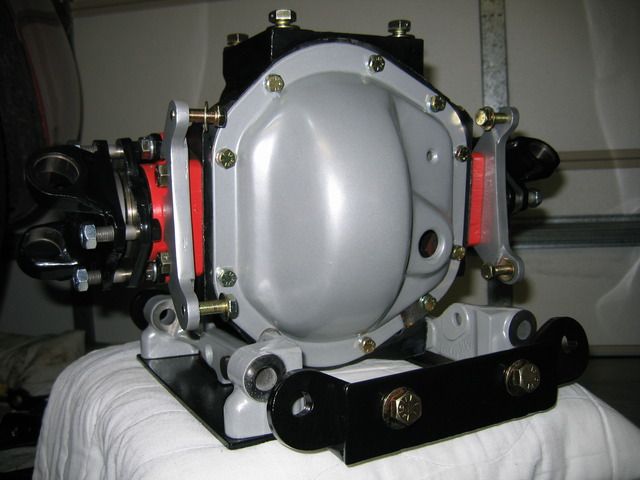
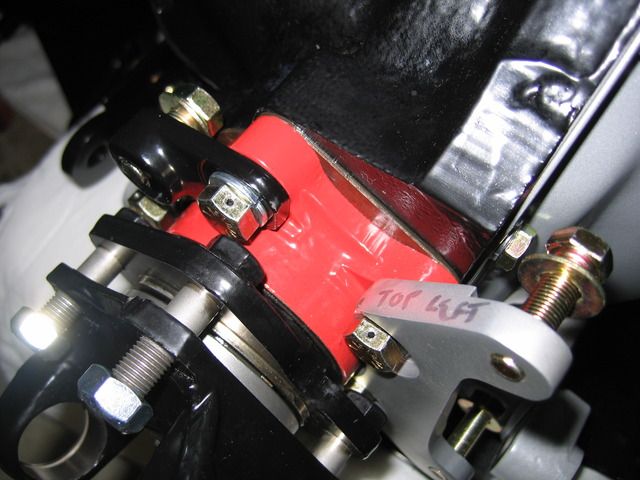
Diff has been fully rebuilt, repainted, every nut and bolt has been replaced as there were some miss matching bolts which is sure to happen in its near 50 year history and the Arntz 34 year history.
Diff now just waiting for disks, calipers, bearing cap bolts to be lock wired as will the caliper mount bolts and the housing mount to the chassis once fitted. Actually, now that I have the lock wire pliers and 60 meters of wire, I will be looking to lock wire anything.
Rear hubs still to be rebuilt and half shafts and stub axles to have unis fitted.Then finally will be the handbrake spot calipers which most likely will mount on custom brackets off the original jag caliper mount bracket as the Wilwoods are mounted on a fabricated bracket at the rear.
Last edited by leroy17; 10-04-2015 at 01:03 PM..
|
10-04-2015, 07:42 PM
|
|
CC Member
|
|
|
Join Date: Mar 2005
Location: Perth,
wa
Cobra Make, Engine: Pace Alumina 427 #69
Posts: 1,615
|
|
Not Ranked
Awesome detail.....best looking Jag diff I have ever seen...
__________________
RF12 414 Windsor 8 stack ,6spd, Avons
|
 Posting Rules
|
You may not post new threads
You may not post replies
You may not post attachments
You may not edit your posts
HTML code is Off
|
|
|
All times are GMT -7. The time now is 02:05 PM.
|
|


 Linear Mode


