Welcome to Club Cobra! The World's largest
non biased Shelby Cobra related site!
- » Representation from nearly all
Cobra/Daytona/GT40 manufacturers
- » Help from all over the world for your
questions
- » Build logs for you and all members
- » Blogs
- » Image Gallery
- » Many thousands of members and nearly 1
million posts!
YES! I want to register an account for free right now!
p.s.: For registered members this ad will NOT show
 
 Main Menu
|
|
Nevada Classics
|
|
Advertise at CC
|
|
May 2026
|
| S |
M |
T |
W |
T |
F |
S |
| |
|
|
|
|
1 |
2 |
| 3 |
4 |
5 |
6 |
7 |
8 |
9 |
| 10 |
11 |
12 |
13 |
14 |
15 |
16 |
| 17 |
18 |
19 |
20 |
21 |
22 |
23 |
| 24 |
25 |
26 |
27 |
28 |
29 |
30 |
| 31 |
|
|
|
|
|
|
|
|
CC Advertisers
|
|
 10Likes 10Likes

01-30-2005, 06:51 PM
|
 |
CC Member

|
|
|
Join Date: Jan 2001
Location: Sunbury,
VIC
Cobra Make, Engine: Rat Rod Racer, LS1 & T56
Posts: 5,391
|
|

 Not Ranked
Jag and Ford actually 
__________________
Mike Murphy
Melbourne Australia
|
-
Advertising

01-30-2005, 06:52 PM
|
|
CC Member
|
|
|
Join Date: Jan 2001
Location: Sunbury,
VIC
Cobra Make, Engine: Rat Rod Racer, LS1 & T56
Posts: 5,391
|
|
Not Ranked
I want to do the same measurements on the rear end as well. Since it's a double wishbone setup with track rods it has some changes in toe during suspension movement.
Cheers
__________________
Mike Murphy
Melbourne Australia
|
01-30-2005, 07:06 PM
|
|
CC Member
|
|
|
Join Date: May 2002
Location: Brisbane Australia,
QLD
Cobra Make, Engine: RMC under re-construction, GenIV with tremec 600, Jag 3.31 L/S diff
Posts: 3,318
|
|
Not Ranked
Mike....I'm having uncle ozvenom do some mods to my suspension.
He has already sussed out mods for the RMC and long ago identified the need for spacers to lower the steering rack.
But whether that spacer needs to be 18mm or 18mm and a few poofteenths only this tool can tell.
Oz has also invented a modification for the jag rear ends to adjust the toe without using shims. Some sort of concentric thingamejig.
I'll leave my handling to him. Maybe he already has one of these tools. 
__________________
It's impossible to soar like an eagle when you're surrounded by turkeys.
|
01-30-2005, 07:23 PM
|
|
CC Member
|
|
|
Join Date: Jan 2001
Location: Sunbury,
VIC
Cobra Make, Engine: Rat Rod Racer, LS1 & T56
Posts: 5,391
|
|
Not Ranked
it doesn't need to be very fancy like the one in the picture. Just a simple frame to hold the two dial indicators steady and horisontal. Take the spring off the coil over and use a trolley jack or a scisor jack to wind the suspenion up and down through it's full travel.
Cheers
__________________
Mike Murphy
Melbourne Australia
|
01-30-2005, 07:32 PM
|
|
CC Member
|
|
|
Join Date: May 2002
Location: Brisbane Australia,
QLD
Cobra Make, Engine: RMC under re-construction, GenIV with tremec 600, Jag 3.31 L/S diff
Posts: 3,318
|
|
Not Ranked
Yeppers.....I agree.
Kewl tool though.
I've always wondered about the tolerances the likes of RMC manage to achieve in their frames. That tool allows one to tune/modify/play with the alignment/chassis in the shed.
My theory is what works for one (say RMC) may not nessessarilly be the optimum alignment for another RMC.
__________________
It's impossible to soar like an eagle when you're surrounded by turkeys.
|
01-31-2005, 01:14 AM
|
 |
CC Member
|
|
|
Join Date: Jul 2004
Cobra Make, Engine: 347 Stroker Morrison Injection. Registered.
Posts: 1,440
|
|
Not Ranked
Hi Phil,
your last post indicates that the next step is to shorten the rack. Why go to the trouble if everything seems good now that youve lowered the rack?
Regards.
__________________
Mando
|
01-31-2005, 01:17 PM
|
 |
CC Member
|
|
|
Join Date: Oct 2002
Location: Sydney,
NSW
Cobra Make, Engine: Classic Revival. 6 litre Chev
Posts: 669
|
|
Not Ranked
Morning Mando,
I wont shorten the rack until I get some real bump figures from the dial gauge set up as described above.
I however expect that to get it spot on I will need to make other changes. Once I get the front right I 'll move to the rear.
My basic philosophy is to get the chassis handling as best as it could be , fit the stickiest tyres, the biggest brakes and not go overboard with rear wheel kW. Aiming for 300 rwkw.
Hope to catch up at Winton.
Phil
__________________
COBRA 350 Powered by the Dark Side
|
02-05-2005, 05:56 AM
|
 |
CC Member
|
|
|
Join Date: Feb 2002
Location: Alice Springs, central Australia,
NT
Cobra Make, Engine: Classic revival kit (CR3181), gen III engine, T56 6 speed box, AU XR8 lsd diff
Posts: 5,699
|
|
Not Ranked
Here is a pic showing my latest play with the steering system.
I have lowered the rack so the bottom of the rack mounting bolts are level with the bottom of the front crossmember ( I welded a plate straight of from the crossmember)
It now sits approx 15 - 20 mm lower.
I have also bought a pair of titanium and teflon rose joints to replace the tie rod ends.
I am not sure yet if it is best to mount the joint on top or below the steering knuckle arm.
If any of the classic revival builders are thinking of doing this then dont shorten your tie rod until after all is done (if I am to use the rose joint on the bottom I am going to have to get 2 new tie rods as I have cut them as recomended but are too short now, they are ok if useing the original VL tie rod end though)
__________________
Cruising in 5th

---------------------------------------------
Never be afraid to do something new, Remember, Amateurs built the Ark: Professionals built the Titanic.
|
02-05-2005, 08:07 PM
|
|
CC Member
|
|
|
Join Date: Jan 2001
Location: Sunbury,
VIC
Cobra Make, Engine: Rat Rod Racer, LS1 & T56
Posts: 5,391
|
|
Not Ranked
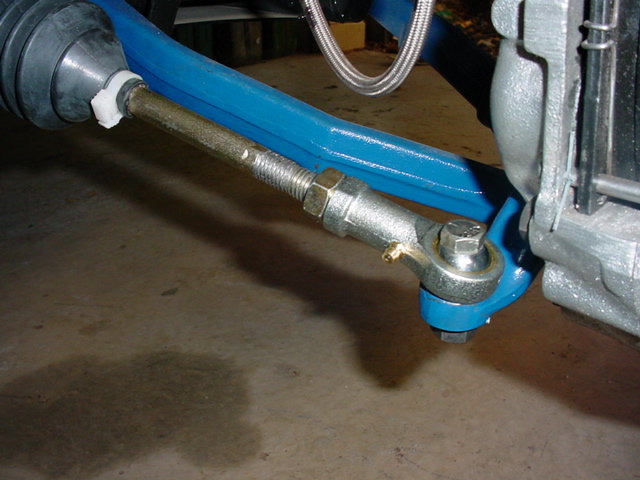
I did a similar setup. I didn't lower the rack I just switched the rod ends to the top of the steering arms rather than the bottom.
I used Crome Molly Teflon lined male rod ends rith a left hand 5/8' UNF thread. I replace the rack ends with later model VP Commodore rack ends which screw straight in to the VL rack. the VP ends are much thicker and use a 16mm fine pitch metric thread which is pretty close in size to 5/8. I machined up a pair of collars with a 5/8" LH thread in one end and 16mm RH thread in the other. The reason for doing this was that for 1 turn of the thread I get twice the adjustment leaving more of the thread still engaged in the collar.
I also machined up some mushroom shaped washers that will hopefully stop the rod end popping off the steering arm if it fails.
Here's a pic:

__________________
Mike Murphy
Melbourne Australia
|
03-26-2017, 02:27 AM
|
 |
CC Member
|
|
|
Join Date: Nov 2004
Location: Sydney,
NSW
Cobra Make, Engine: Classic Revival #3199. 366ci L76, T56 6 speed, Blue circle custom paint, Australias most original cobra 2009-2010
Posts: 2,396
|
|
Not Ranked

Reviving a very old thread......
Been doing a tidy up on the front end after I discovered a worn inner tie rod end. Thought I would change a few things and stripped the whole lot off and:
* Got it all powdercoated - the poor 15 was looking very tired.
* New uprights and larger stub axles as I suspect I was getting axle flex when braking
* Changed to series I straighter\asymmetrical upper arms so I could get a little more castor
* New poly bushes all round
* New ball joints
* Heim joints instead of tie rod ends so I can play around with the bump steer.
So I originally had a spacer so the rack is 25mm lower than stock, but I found when I flipped the joints to the top of the steering arm the Bump steer was awful. It was actually so obviously bad I didnt even take a measurement. Here are the plots with the joint mounted below the arms and spaced different amounts.
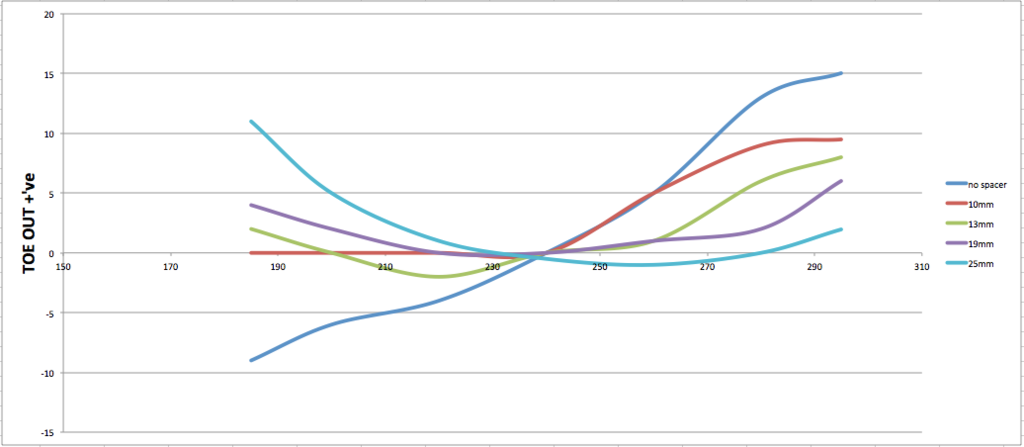
19mm is probably has the least bump steer, but that spacer ends up a bit large so I will try and move the rack back up about 9mm and use the single 10mm cone spacer I have to get enough clearance on the joint.
Ill put some pics of the setup shortly. If you have flipped that joint to the top of the arm though I would take a good look at the bump steer - its probably not as bad as I saw if you haven't spaced the rack, but worth checking out.
Cheers
__________________
Proudly registered since 2013.
|
03-26-2017, 03:04 AM
|
|
CC Member
|
|
|
Join Date: Jun 2012
Location: Naracoorte,
SA
Cobra Make, Engine: CR Cobra 3169
Posts: 818
|
|
Not Ranked
I used the 25 mm spacer on the rack that came with the car. It's a VL rack and I never looked at it, until inspection time and the suspension on full droop was 70mm toe in. Shocking. I'm kicking myself that I missed it, but it drove fine on the engineers road test. So I bought a VC rack and shorten the rack to pivot exactly the same distance as the lower control arm pivot. It ended up 485 mm between rack ball joint centres. I used a 6.5mm barr between the rack brackets and bolted the shortened rack to that with a 19mm spacer. I got 1 mm bump steer.
JD
|
03-26-2017, 05:14 AM
|
|
CC Member
|
|
|
Join Date: Nov 2004
Location: Sydney,
NSW
Cobra Make, Engine: Classic Revival #3199. 366ci L76, T56 6 speed, Blue circle custom paint, Australias most original cobra 2009-2010
Posts: 2,396
|
|
Not Ranked
Was that 70mm of toe with the rod end mounted on the top if the steering arm JD? That looked about what I was seeing when I did that. What size wheels you running? With 15's you would have to mount on the top for clearance I think.
__________________
Proudly registered since 2013.
|
03-26-2017, 05:14 PM
|
|
CC Member
|
|
|
Join Date: Nov 2004
Location: Sydney,
NSW
Cobra Make, Engine: Classic Revival #3199. 366ci L76, T56 6 speed, Blue circle custom paint, Australias most original cobra 2009-2010
Posts: 2,396
|
|
Not Ranked
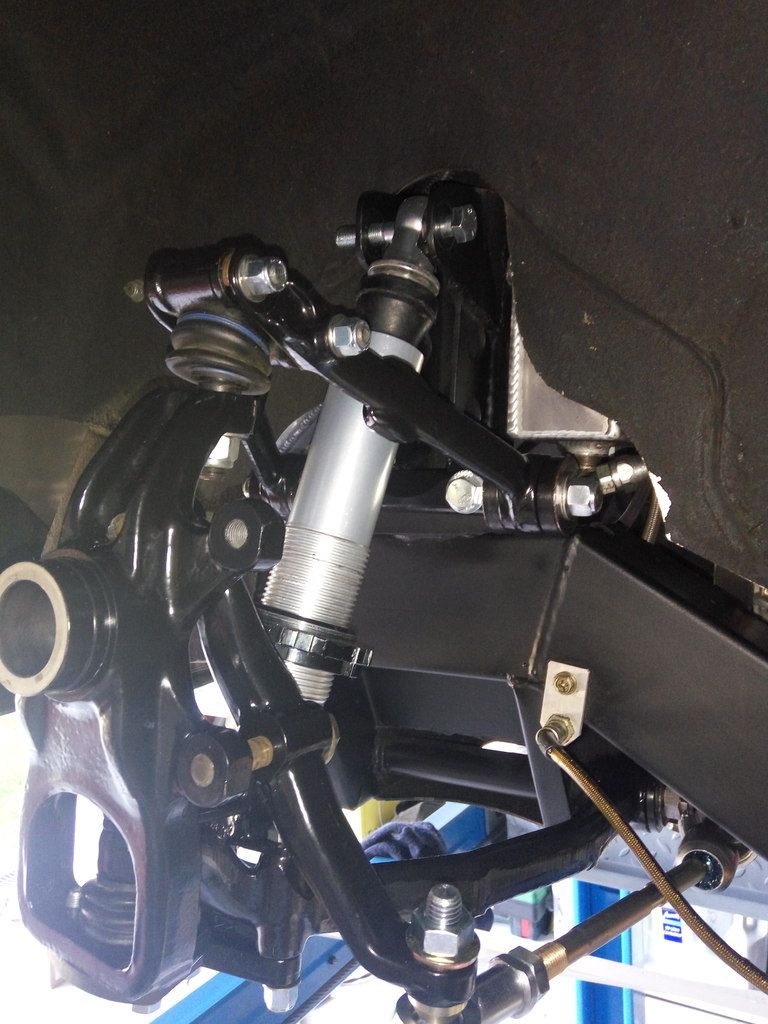
Front end all powdercoated - looks so much better than that por15 stuff. Spring is off the shock so I can do the bump measurements
__________________
Proudly registered since 2013.
Last edited by Tenrocca; 03-26-2017 at 06:52 PM..
|
03-27-2017, 05:39 AM
|
|
CC Member
|
|
|
Join Date: Nov 2016
Location: Brisbane,
QLD
Cobra Make, Engine: G Force Cobra 347 stroker
Posts: 60
|
|
Not Ranked
Hi Guys. A little bit of info on bump steer. On the ASRF website Hot Rod build guidelines. They have a basic rule of thumb for setting rack height, length of steering arm and position of rack balljoint in regard to bump steer. If you draw a line between the lower control arm inner pivot and the top control arm inner pivot. Whatever height you position the rack.The ball joint of the rack should be on that line. Simple Huh.
Most racecars have the rack ball at the same height and position as the lower control arm inner pivot. The outer tie rod end centreline height is the same as the outer balljoint. That way camber changers can be made for wet and dry conditions without needing to redo toe in. Also zero bump steer. I realise sometimes there are other restriction that means we cannot achieve those goals. Building modified/competition cars is always a case of best compromise.
Bender
|
03-27-2017, 02:35 PM
|
|
CC Member
|
|
|
Join Date: Nov 2004
Location: Sydney,
NSW
Cobra Make, Engine: Classic Revival #3199. 366ci L76, T56 6 speed, Blue circle custom paint, Australias most original cobra 2009-2010
Posts: 2,396
|
|
Not Ranked
One of the problems with the setup of jag front ended CR's is how close the rack is to the end of the pivot bolt. If it is set with the inner joint right on the pivot it fouls on the bolt. I have a crazy idea to turn the pivot bolt around as the other end has a large flat hex section which should get 15mm more clearance and free me up to space the rack wherever is best.
Also discovered it is currently a little different left to right, with the right side rack mount being about 3mm lower than the left relative to the pivot bolt. Again, worth looking at if your wanting to dial in the front end.
__________________
Proudly registered since 2013.
|
03-27-2017, 04:10 PM
|
|
CC Member
|
|
|
Join Date: Jan 2001
Location: Sunbury,
VIC
Cobra Make, Engine: Rat Rod Racer, LS1 & T56
Posts: 5,391
|
|
Not Ranked
Hi Andrew,
I looked at putting the bolt in from the other direction but the chassis rail is in the way. I got myself a bit more clearance by cutting the bolt down slightly and using a half nylock rather than the castle nut.
Cheers
__________________
Mike Murphy
Melbourne Australia
|
03-27-2017, 04:17 PM
|
|
CC Member
|
|
|
Join Date: Nov 2004
Location: Sydney,
NSW
Cobra Make, Engine: Classic Revival #3199. 366ci L76, T56 6 speed, Blue circle custom paint, Australias most original cobra 2009-2010
Posts: 2,396
|
|
Not Ranked
The other end with the large flat hex is actually threaded and screwed on then braised I think - thinking I might be able to take it off with the help of an angle grinder and screw on from the other side with some loctite....What do you think?
__________________
Proudly registered since 2013.
|
03-28-2017, 12:17 AM
|
 |
CC Member
|
|
|
Join Date: Apr 2006
Location: Mildura,
vic
Cobra Make, Engine: FFR Coupe, 416ci of LS goodness
Posts: 2,349
|
|
Not Ranked
Quote:
Originally Posted by Tenrocca

Front end all powdercoated - looks so much better than that por15 stuff. Spring is off the shock so I can do the bump measurements
|
Shame it won't look like that after your first off at this years Nationals.
__________________
Powered by Cu
|
03-28-2017, 02:29 AM
|
|
CC Member
|
|
|
Join Date: Nov 2004
Location: Sydney,
NSW
Cobra Make, Engine: Classic Revival #3199. 366ci L76, T56 6 speed, Blue circle custom paint, Australias most original cobra 2009-2010
Posts: 2,396
|
|
Not Ranked
I don't think I spent any time in the dirt last year did I? Going too slow obviously......or getting too old to remember.
__________________
Proudly registered since 2013.
|
03-28-2017, 03:19 AM
|
|
CC Member
|
|
|
Join Date: Apr 2006
Location: Mildura,
vic
Cobra Make, Engine: FFR Coupe, 416ci of LS goodness
Posts: 2,349
|
|
Not Ranked
Just keeping us guessing I'd say!
That front end does look great though bud
__________________
Powered by Cu
|
 Posting Rules
|
You may not post new threads
You may not post replies
You may not post attachments
You may not edit your posts
HTML code is Off
|
|
|
All times are GMT -7. The time now is 09:32 PM.
|
|


 Linear Mode


