Absolute Pace

Go Back   Club Cobra > Club Forums > Australian Cobra Club

Welcome to Club Cobra!  The World's largest non biased Shelby Cobra related site!

  •  » Representation from nearly all Cobra/Daytona/GT40 manufacturers
  •  » Help from all over the world for your questions
  •  » Build logs for you and all members
  •  » Blogs
  •  » Image Gallery
  •  » Many thousands of members and nearly 1 million posts! 

YES! I want to register an account for free right now!  p.s.: For registered members this ad will NOT show

Keith Craft Racing
Nevada Classics
MMG Superformance
Main Menu
Nevada Classics
Nevada Classics
Keith Craft Racing
Keith Craft Racing
Advertise at CC
Banner Ad Rates
MMG Superformance
MMG Superformance
Keith Craft Racing
Keith Craft Racing
November 2025
S M T W T F S
            1
2 3 4 5 6 7 8
9 10 11 12 13 14 15
16 17 18 19 20 21 22
23 24 25 26 27 28 29
30            

Kirkham Motorsports

Reply
 
LinkBack Thread Tools Rate Thread Display Modes
  #1 (permalink)  
Old 01-18-2008, 08:47 PM
Aussie Mike's Avatar
CC Member
Visit my Photo Gallery

 
Join Date: Jan 2001
Location: Sunbury, VIC
Cobra Make, Engine: Rat Rod Racer, LS1 & T56
Posts: 5,391
Not Ranked     
Default

I've made a bit more progress this last couple of nights. I've really got to get cracking on it or I won't be ready for Shelby fest. I'm also working up in India for the next couple of weeks so time is short.

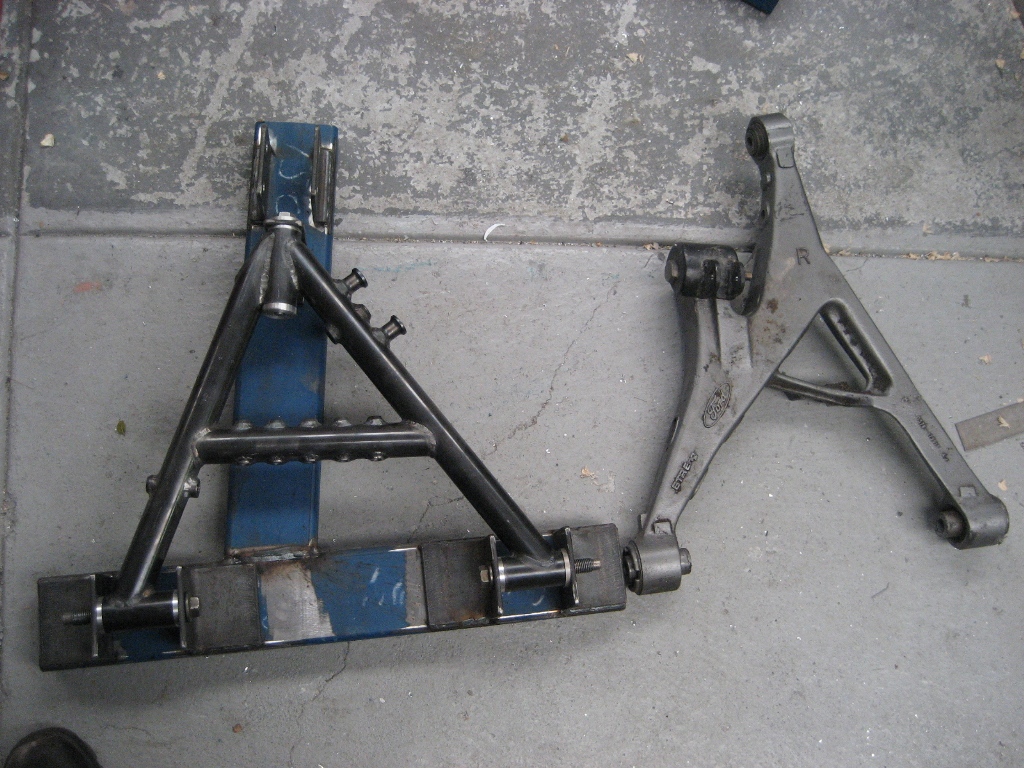
Here'a pic of the new lower arm in the jig sitting next to the original arm. The bushings used in the jig are all machined from aluminum and locate all the pieces so they don't move when welding. They arms do spring a little when they come out of the jig so I still have to tweek them a little in the hydraulic press afterwards. I made some fixtures to let me do that accurately.

You can also see in this pic how the shock mout position is about the same place as the original. I've tried to move it in closer to the center line so it doesn't put as much of a twisting force on the arm.


Here's the finished upper arm in it's jig sitting next to the original. This took a bit of thinking to make an arm that would clear the upper chassis rail without having to cut anything.


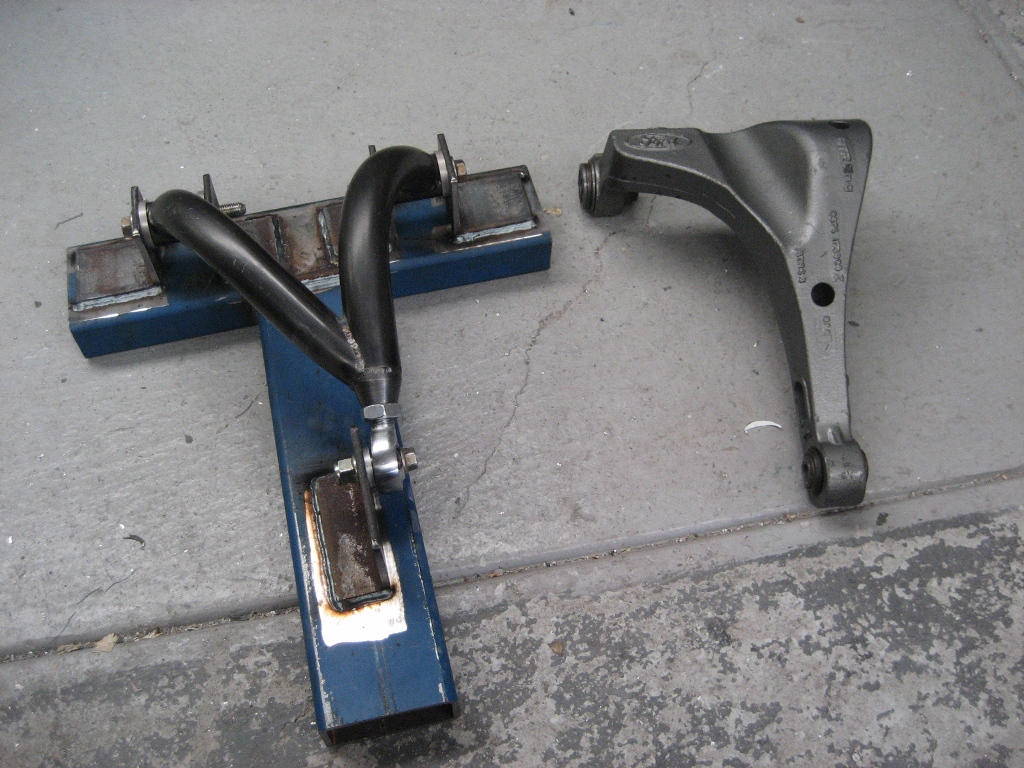
The upper arm turned out nice and looks pretty cool with it's swoopy curves.


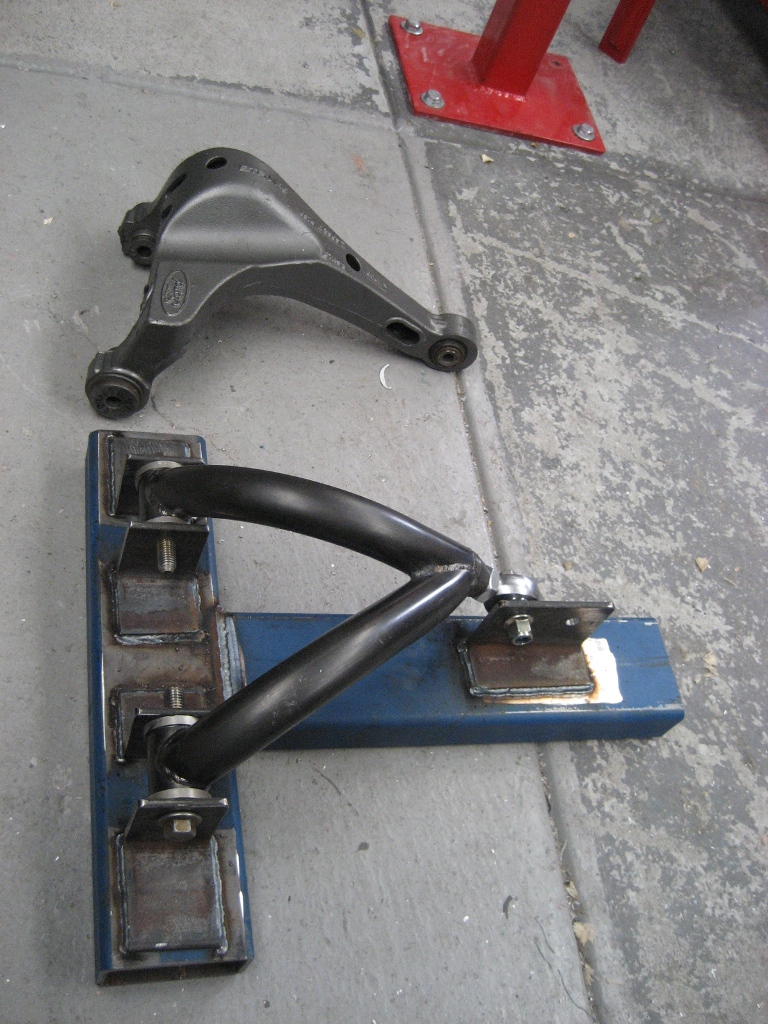
Both Jigs are made from some heavy wall RHS and are designed to make standard length or shortened arms. You wouldn't want to drop one on your toe either as they weigh a ton.

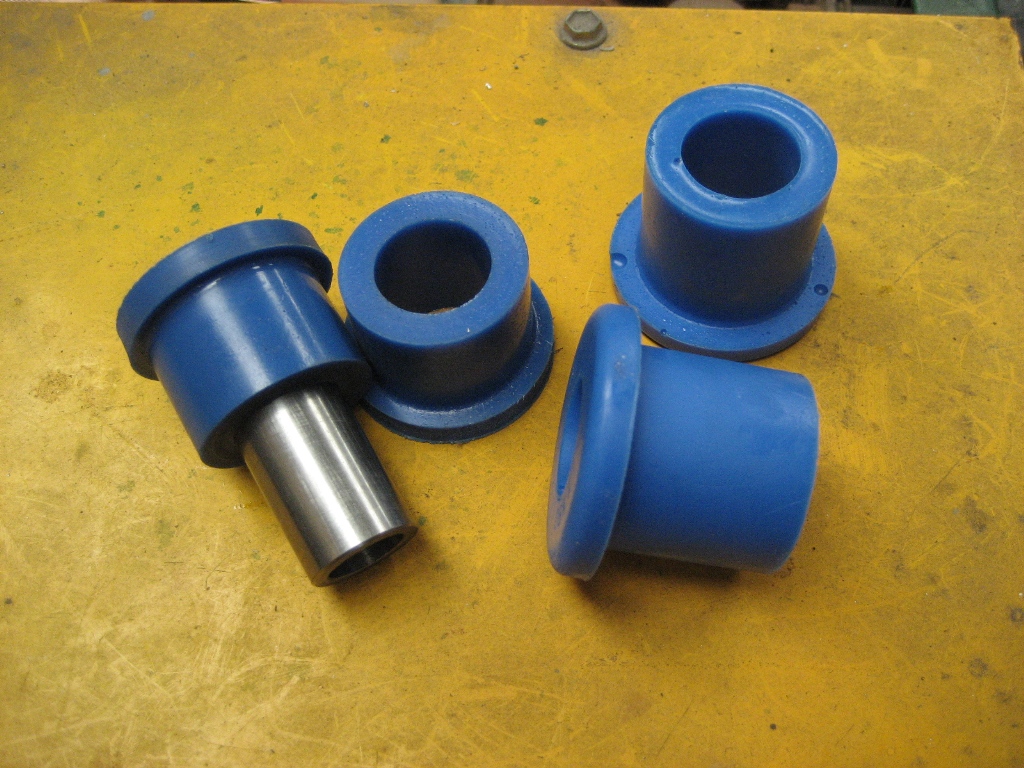
The next thing to sort out is the supension bushes. I've given away the idea of using nylon as I reckon it would pound out into an oval shape over time. I setled on Urethane as it has a little give in it that should make it last.

My local auto parts shop (who I often frequent) kindly let me go over their range of urethane bushes with a vernier caliper looking for something suitable. I finally found some bushes that had about the right dimensions or ID and OD. I made a small fixture that let me clamp the bush in the lathe and then with some very sharp tooling and a fast spindle speed I was able to trim them down to exactly what I wanted. I also machined up some steel sleeves for them to run on and they should work a treat.

The bushes on the right are the original. The ones on the left have been trimmed.


Now I've got to build the arms for the passengers side and paint everything ready for assembly.

Cheers
__________________
Mike Murphy
Melbourne Australia


Last edited by Aussie Mike; 02-03-2008 at 07:55 AM.. Reason: spelling
Reply With Quote
  #2 (permalink)  
Old 01-18-2008, 10:04 PM
CC Member
Visit my Photo Gallery

 
Join Date: May 2002
Location: Brisbane Australia, QLD
Cobra Make, Engine: RMC under re-construction, GenIV with tremec 600, Jag 3.31 L/S diff
Posts: 3,318
Not Ranked     
Default

That's gonna be one nice ride when you're finished Mike.

By the way.... The trick for machining urethane is to put the bushes into the freezer for a few hours prior to turning.

Now....back to the shed to work on my simple jag based ars....ermmmm.....rear end.
__________________
It's impossible to soar like an eagle when you're surrounded by turkeys.
Reply With Quote
  #3 (permalink)  
Old 02-12-2008, 12:38 AM
Aussie Mike's Avatar
CC Member
Visit my Photo Gallery

 
Join Date: Jan 2001
Location: Sunbury, VIC
Cobra Make, Engine: Rat Rod Racer, LS1 & T56
Posts: 5,391
Not Ranked     
Default

Peter from Ozwheel just sent me a couple of pics of my new rear wheels. Hopefully I should have them by Thursday.

It's only 50mm more dish than the old setup but I reckon it makes quite a difference in the look. The spinner is almost all inside the wheel now and not sticking out like Ben Hur's Charriot.


I ordered them with the centers un coated as I plan to get all 4 centers recoated together and wanted them all to match.


Cheers
__________________
Mike Murphy
Melbourne Australia

Reply With Quote
  #4 (permalink)  
Old 02-12-2008, 05:12 AM
acecob's Avatar
CC Member
Visit my Photo Gallery

 
Join Date: Jan 2007
Location: Sydney, NSW
Cobra Make, Engine: DRB. Engine out :)
Posts: 517
Not Ranked     
Default wooooo

Awsome wheels Mike they look magic.
what colour are they going to be
__________________
"I'd open my mind, but I don't want the stupid to corrupt it."
Reply With Quote
  #5 (permalink)  
Old 02-12-2008, 05:32 AM
Aussie Mike's Avatar
CC Member
Visit my Photo Gallery

 
Join Date: Jan 2001
Location: Sunbury, VIC
Cobra Make, Engine: Rat Rod Racer, LS1 & T56
Posts: 5,391
Not Ranked     
Default

The centers are going to be HPC coated silver the same as the side pipes.

I restored Garrett's (Justbetter)wheels a little while back. I stripped them down and had the rims re polished and sent the centers away to be HPC coated. They came up magic. Probably as close as you'll get one of these cast centers to looking like polished aluminum.

I'll see if I took a pic of them. Otherwise I'll call in and see Garrett and snap a pic. I think he's using them as a fancy coffee table

Cheers
__________________
Mike Murphy
Melbourne Australia

Reply With Quote
  #6 (permalink)  
Old 02-13-2008, 06:33 AM
Aussie Mike's Avatar
CC Member
Visit my Photo Gallery

 
Join Date: Jan 2001
Location: Sunbury, VIC
Cobra Make, Engine: Rat Rod Racer, LS1 & T56
Posts: 5,391
Not Ranked     
Default

Well I had an interesting evening in the shed. I decided since I had one side all together that I should see if my geometry theories were going in the right direction.

I built a Bump steer guage to check what the rear end is really doing. The guage uses 2 dial indicators spaced 600mm apart. This is roughly the diameter of a tyre. To measure the bump steer I moved the suspension up 10mm at a time and calculated the difference between the readings on the 2 dial indicators. This shows how much the rear upright is rotating. I then put all the data in an excell spread sheet that let me calculate the change in toe in mm


I first measured the rear bump steer on the stock setup with the donor Falcon arms to see how much toe in they added as the suspension compressed. I was shocked to see about 41mm of toe in added from fully relaxed to fully compressed. It's no wonder my tyres keep rubbing on the inner tub as the suspension compresses.

Next I measured my chrome molly arms with the Murphy track locator. On my first pass I the rear suspension went from zero toe to 14mm of toe in from relaxed to compressed. A definite improvement plus I also gained 20mm in wheel travel with the new setup.

This graph shows the comparison between the stock setup and the 4130 arms with a 54mm clevis.


I designed the rear bump steer to be adjustable by changing the height of the rod end where it attaches to the clevis on the upright. My initial setup has a 54mm clevis length so I thought I'd try a shorter length to see what happens. I set it at 21mm and ran the measurments again. The results were horrible with 22mm of toe out being added from relaxed to compressed. Well it proves the adjustment works at least.

Here's the graph


OK how about a length somewhere in between. I tried 41mm next and measured the bump. This time it only added 7mm of toe out when fully compressed. I'm heading in the right direction.


It was getting to late to try another clevis length but I reckon about 48mm will be about spot on.

It's all good fun and I'm learning heaps.

Cheers
__________________
Mike Murphy
Melbourne Australia


Last edited by Aussie Mike; 02-13-2008 at 06:35 AM..
Reply With Quote
Reply


Posting Rules
You may not post new threads
You may not post replies
You may not post attachments
You may not edit your posts

BB code is On
Smilies are On
[IMG] code is On
HTML code is Off
Trackbacks are On
Pingbacks are On
Refbacks are On


All times are GMT -7. The time now is 08:07 PM.


Powered by vBulletin® Version 3.8.0
Copyright ©2000 - 2025, Jelsoft Enterprises Ltd.
Search Engine Friendly URLs by vBSEO 3.6.0
The representations expressed are the representations and opinions of the clubcobra.com forum members and do not necessarily reflect the opinions and viewpoints of the site owners, moderators, Shelby American, any other replica manufacturer, Ford Motor Company. This website has been planned and developed by clubcobra.com and its forum members and should not be construed as being endorsed by Ford Motor Company, or Shelby American or any other manufacturer unless expressly noted by that entity. "Cobra" and the Cobra logo are registered trademarks for Ford Motor Co., Inc. clubcobra.com forum members agree not to post any copyrighted material unless the copyrighted material is owned by you. Although we do not and cannot review the messages posted and are not responsible for the content of any of these messages, we reserve the right to delete any message for any reason whatsoever. You remain solely responsible for the content of your messages, and you agree to indemnify and hold us harmless with respect to any claim based upon transmission of your message(s). Thank you for visiting clubcobra.com. For full policy documentation refer to the following link: CC Policy