Club Cobra Keith Craft Motorsports  

Go Back   Club Cobra > Cobra Talk Areas > Cobra Build Logs

MMG Superformance
Nevada Classics
Main Menu
Module Jump:
Nevada Classics
Nevada Classics
MMG Superformance
Keith Craft Racing
Advertise at CC
Banner Ad Rates
Keith Craft Racing
MMG Superformance
Keith Craft Racing
May 2026
S M T W T F S
          1 2
3 4 5 6 7 8 9
10 11 12 13 14 15 16
17 18 19 20 21 22 23
24 25 26 27 28 29 30
31            

Kirkham Motorsports

Like Tree390Likes

Reply
 
LinkBack Thread Tools Rating: Thread Rating: 4 votes, 3.00 average. Display Modes
  #1 (permalink)  
Old 12-14-2018, 09:46 PM
CC Member
Visit my Photo Gallery

 
Join Date: Dec 2013
Cobra Make, Engine: Evans chassis, jag fr. & rear.
Posts: 149
Not Ranked     
Default

No, no, no.

I was referring to a scene out of the ABC sitcom with "Kath and Kim".
To explain it, she wanted the hallway painted duck egg green.
He painted it using duck egg (read bright yellow) and green (read dark green).
The characters name was brett

I wasn't being nasty to anyone.

Dave
Reply With Quote
  #2 (permalink)  
Old 12-14-2018, 09:49 PM
xb-60's Avatar
CC Member
Visit my Photo Gallery

 
Join Date: Aug 2009
Location: Adelaide, SA
Cobra Make, Engine: AP 289FIA 'English' spec.
Posts: 13,152
Not Ranked     
Wink

Dave....
Reply With Quote
  #3 (permalink)  
Old 12-20-2018, 11:52 PM
xb-60's Avatar
CC Member
Visit my Photo Gallery

 
Join Date: Aug 2009
Location: Adelaide, SA
Cobra Make, Engine: AP 289FIA 'English' spec.
Posts: 13,152
Not Ranked     
Default

Painting the vents was definitely the way to go. Here's what the right hand vent looks like:


....and no, the rubber bands won't be staying there once the glue's dried


Cheers!
Glen
Beejay and Alfa02 like this.
Reply With Quote
  #4 (permalink)  
Old 12-21-2018, 09:00 PM
xb-60's Avatar
CC Member
Visit my Photo Gallery

 
Join Date: Aug 2009
Location: Adelaide, SA
Cobra Make, Engine: AP 289FIA 'English' spec.
Posts: 13,152
Not Ranked     
Default

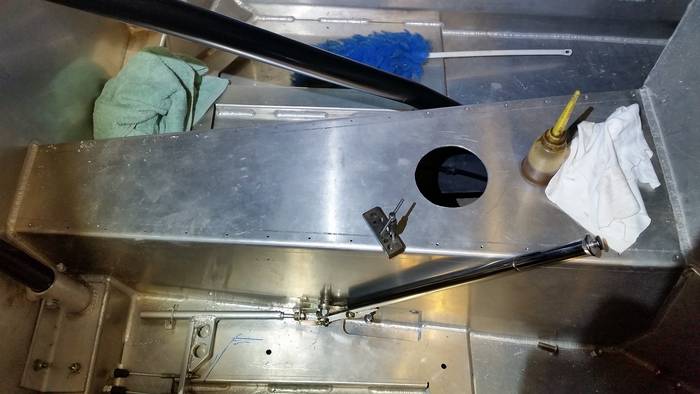
Also been working on the tunnel. The clearance hole for the Toploader is now there, and I’m working on making the tunnel looker close to original. I’m not carpeting the tunnel top and sides, so I’ll be adding a 16 gauge (1.6mm) aluminium alloy sheet to the top.


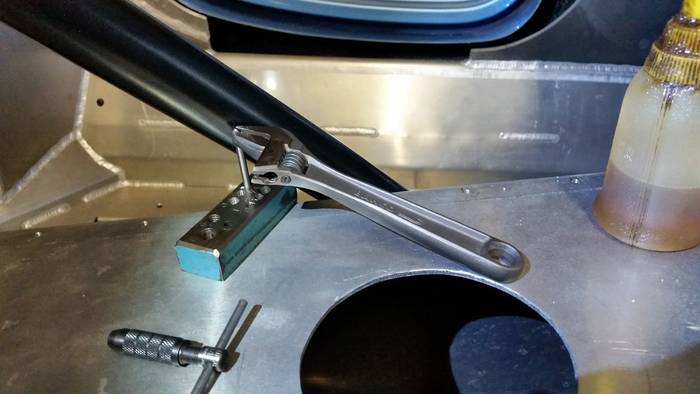
Tapping one of the holes near the roll-over bar strut needed the slow approach:


This is closer to what it will look like (alloy sheet in place, but no screws yet):


I'll wait until the engine and gearbox are in to cut the hole in the sheet


Cheers!
Glen
Reply With Quote
  #5 (permalink)  
Old 12-22-2018, 04:57 AM
1795's Avatar
CC Member
Visit my Photo Gallery

 
Join Date: Aug 2013
Location: Canandaigua, NY
Cobra Make, Engine: SPF MKII Riverside Racer FIA
Posts: 2,504
Not Ranked     
Default

That looks real nice Glen, and I imagine that there are many hours of work in that tunnel.

Jim
__________________
Reply With Quote
  #6 (permalink)  
Old 12-22-2018, 08:20 PM
xb-60's Avatar
CC Member
Visit my Photo Gallery

 
Join Date: Aug 2009
Location: Adelaide, SA
Cobra Make, Engine: AP 289FIA 'English' spec.
Posts: 13,152
Not Ranked     
Default

Thanks Jim. More hours to be spent underneath the tunnel - I haven't started on the insulation yet.
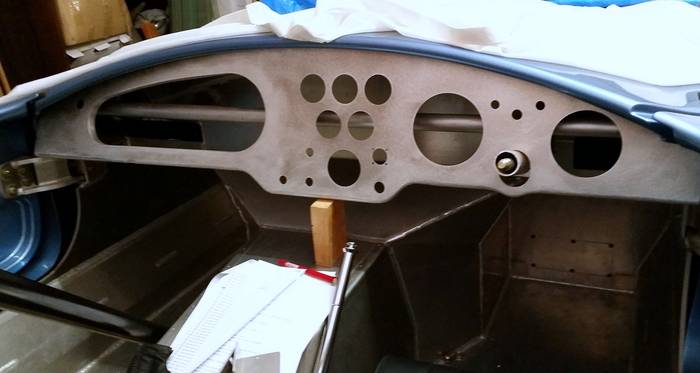
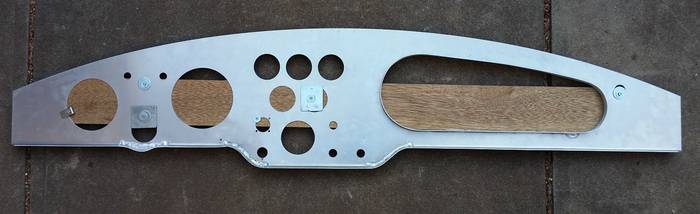
Want to do something challenging and fun before that. The dashboard 'challenge' is at the top of the list for new year.

Last edited by xb-60; 12-22-2018 at 08:22 PM..
Reply With Quote
  #7 (permalink)  
Old 01-06-2019, 02:03 AM
xb-60's Avatar
CC Member
Visit my Photo Gallery

 
Join Date: Aug 2009
Location: Adelaide, SA
Cobra Make, Engine: AP 289FIA 'English' spec.
Posts: 13,152
Not Ranked     
Default

Started on the dash install today.

Here it is sitting in place with the angle around the 17⁰ mark as a rough starting point; will probably have to make it closer to 20⁰.


The ‘challenge’ is allowing enough rear clearance for the speedo (the larger round opening) and also the water temp gauge (capilliary type) in the second row.
Oh, and the glovebox…..I’ll just have to wait and see what I can achieve there. Yes, the round tubular cross tube is very much a structural member, so no mods permitted there.


Because the glovebox opening and also the lower edge have been welded, there is some distortion, so I’ve added a length of timber as a temporary straightener. That will stay there until I’m happy with the rigidity of the installed dash panel.


Cheers!
Glen
120mm likes this.
Reply With Quote
Reply

Thread Tools
Display Modes Rate This Thread
Rate This Thread:

Posting Rules
You may not post new threads
You may not post replies
You may not post attachments
You may not edit your posts

BB code is On
Smilies are On
[IMG] code is On
HTML code is Off
Trackbacks are On
Pingbacks are On
Refbacks are On


All times are GMT -7. The time now is 06:26 AM.


Powered by vBulletin® Version 3.8.0
Copyright ©2000 - 2026, Jelsoft Enterprises Ltd.
Search Engine Friendly URLs by vBSEO 3.6.0
The representations expressed are the representations and opinions of the clubcobra.com forum members and do not necessarily reflect the opinions and viewpoints of the site owners, moderators, Shelby American, any other replica manufacturer, Ford Motor Company. This website has been planned and developed by clubcobra.com and its forum members and should not be construed as being endorsed by Ford Motor Company, or Shelby American or any other manufacturer unless expressly noted by that entity. "Cobra" and the Cobra logo are registered trademarks for Ford Motor Co., Inc. clubcobra.com forum members agree not to post any copyrighted material unless the copyrighted material is owned by you. Although we do not and cannot review the messages posted and are not responsible for the content of any of these messages, we reserve the right to delete any message for any reason whatsoever. You remain solely responsible for the content of your messages, and you agree to indemnify and hold us harmless with respect to any claim based upon transmission of your message(s). Thank you for visiting clubcobra.com. For full policy documentation refer to the following link: CC Policy
Links monetized by VigLink