 
 Main Menu
|
|
Nevada Classics
|
|
Advertise at CC
|
| S |
M |
T |
W |
T |
F |
S |
| |
|
|
1 |
2 |
3 |
4 |
| 5 |
6 |
7 |
8 |
9 |
10 |
11 |
| 12 |
13 |
14 |
15 |
16 |
17 |
18 |
| 19 |
20 |
21 |
22 |
23 |
24 |
25 |
| 26 |
27 |
28 |
29 |
30 |
|
|
|
|
CC Advertisers
|
|
 390Likes 390Likes

11-04-2021, 08:14 AM
|
 |
Half-Ass Member

|
|
|
Join Date: Jun 2005
Cobra Make, Engine: ERA #732, 428FE (447 CID), TKO600, Solid Flat Tappet Cam, Tons of Aluminum
Posts: 22,025
|
|

 Not Ranked
Quote:
Originally Posted by 1795

Glen,
Looks like it should work. Nice looking bracket. My only question is, how long is that extension cord that comes out of the boot to power the light? Will it be long enough for a spirited drive?  |
And can you remove it after you're inspected? Or does it stay on forever?  |
11-04-2021, 04:14 PM
|
 |
CC Member
|
|
|
Join Date: Aug 2009
Location: Adelaide,
SA
Cobra Make, Engine: AP 289FIA 'English' spec.
Posts: 13,152
|
|
Not Ranked
Quote:
Originally Posted by patrickt
And can you remove it after you're inspected? Or does it stay on forever? |
The brake light.... or the extension cord? |
11-04-2021, 04:32 PM
|
|
Half-Ass Member
|
|
|
Join Date: Jun 2005
Cobra Make, Engine: ERA #732, 428FE (447 CID), TKO600, Solid Flat Tappet Cam, Tons of Aluminum
Posts: 22,025
|
|
Not Ranked
Quote:
Originally Posted by xb-60
The brake light.... or the extension cord?
|
Well, I can ask it another way. What do you have to keep there permanently, or at least while driving in OZ, and what can you politely remove after passing your initial inspection? |
11-04-2021, 05:41 PM
|
|
CC Member
|
|
|
Join Date: Aug 2009
Location: Adelaide,
SA
Cobra Make, Engine: AP 289FIA 'English' spec.
Posts: 13,152
|
|
Not Ranked
Quote:
Originally Posted by patrickt
Well, I can ask it another way. What do you have to keep there permanently, or at least while driving in OZ, and what can you politely remove after passing your initial inspection?
|
Patrick, in the case of the eye-level brake light, it certainly is an added safety feature, so it will be staying there. Legally, as well, it must stay there.
The light itself is period correct, so I'm happy enough with its necessary inclusion.
Cheers,
Glen
Last edited by xb-60; 11-04-2021 at 09:30 PM..
Reason: edit
|
11-21-2021, 01:33 PM
|
|
CC Member
|
|
|
Join Date: Aug 2009
Location: Adelaide,
SA
Cobra Make, Engine: AP 289FIA 'English' spec.
Posts: 13,152
|
|
Not Ranked
I'm at the stage of tidying up some of the less significant areas on the car.
The boot/trunk has some 'gaps' to fill....

Made up a couple of simple panels to make it a little neater looking....
edit:

edit:
This area of the trunk still isn't sealed ....but I really can't see how I can 100% seal it against dust and water ingress.
No IP rating for me, huh 
Still, can't see myself driving on unsealed roads or in the rain too often.…
Cheers!
Glen
Last edited by xb-60; 11-23-2021 at 05:25 PM..
Reason: changed out a pic file
|
11-25-2021, 01:49 AM
|
|
CC Member
|
|
|
Join Date: Aug 2009
Location: Adelaide,
SA
Cobra Make, Engine: AP 289FIA 'English' spec.
Posts: 13,152
|
|
Not Ranked
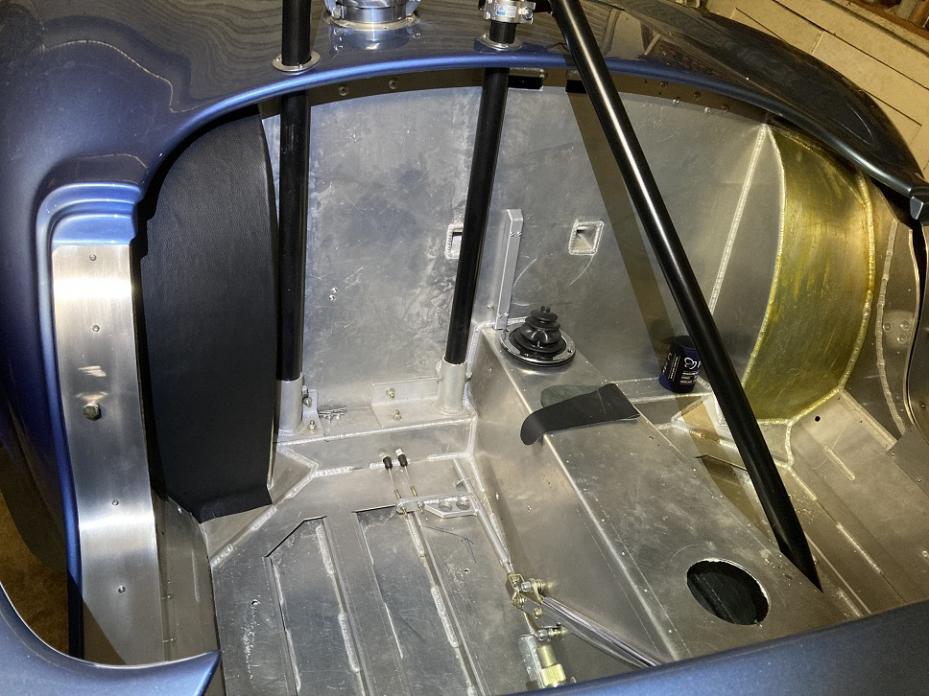
I have some leather left over from the seats and dash, so I'm using some of it to cover part of the inner guards/fenders.
Most of the car's interior will stay as-is in bare aluminium alloy, but I'm thinking that covering the inner areas mentioned will tone it done just a little.
Add a little visual "warmth" .... 
Here's the right hand side done, and left side with contact adhesive applied ready for the leather ....
Cheers!
Glen
|
11-25-2021, 07:11 AM
|
|
Senior Club Cobra Member
|
|
|
Join Date: Dec 2007
Cobra Make, Engine: ERA FIA 'Street' Build
Posts: 2,129
|
|
Not Ranked

Quote:
Originally Posted by xb-60
... This area of the trunk still isn't sealed ....but I really can't see how I can 100% seal it against dust and water ingress ...
|
Hi Glen,
Nice work with the trim panel, looks like the boot / trunk is pretty well sealed up. How much dirt / dust / water will find its way in is hard to say, probably not much at all but time will tell.
If you really want to get the last bits closed off around the push rod and spring & damper shaft, here are a few ideas if you are so inclined:
- Fabricate some more aluminum panels to box the whole area in. The downside is you cover up the suspension bits, which are works of art themselves.
- Close the area off with some leather 'flaps'. Outline the area with self adhesive velcro then fabricate some leather 'flaps' or a 'bag' with Velcro sewn onto the edges to cover the whole area. No holes to drill and if it you don't like it, the self adhesive velcro will come off and the glue cleans up with some isopropyl alcohol. Once again, the downside is it hides the suspension.
- Fabricate a gaiter / boot similar to what is used for a gear shift lever, from the top of the spring perch to the area where it exits the boot / trunk. A drawstring on the top and a split ring & screws on the bottom or use velcro. This would leave the rocker arms exposed. The pushrods are a bit simpler, some kind of a split leather or rubber washer / gasket.
Best bet is to probably just continue making great progress in getting the car up & running and see if it's an issue down the road, so to speak.
- Tim

|
 Posting Rules
|
You may not post new threads
You may not post replies
You may not post attachments
You may not edit your posts
HTML code is Off
|
|
|
All times are GMT -7. The time now is 10:44 PM.
Links monetized by VigLink
|


 Hybrid Mode

