 
 Main Menu
|
|
Nevada Classics
|
|
Advertise at CC
|
| S |
M |
T |
W |
T |
F |
S |
| |
1 |
2 |
3 |
4 |
5 |
6 |
| 7 |
8 |
9 |
10 |
11 |
12 |
13 |
| 14 |
15 |
16 |
17 |
18 |
19 |
20 |
| 21 |
22 |
23 |
24 |
25 |
26 |
27 |
| 28 |
29 |
30 |
|
|
|
|
|
|
CC Advertisers
|
|
 9Likes 9Likes

03-12-2020, 12:32 PM
|
|
CC Member

|
|
|
Join Date: Dec 2003
Location: Gurnee,
IL
Cobra Make, Engine: Kirkham #259
Posts: 1,396
|
|

 Not Ranked
 Bump Steer
Bump Steer Front and Rear
1965 Kirkham 427 Roadster written back in 2005 ( I went to another site that I wrote this back in 2005 and copied it and pasted it over here where it will help more folks....)
Some of the pages maybe out of order .... so I'll edit and go thru it tomorrow.... hope it helps some folks what Bump Steer is...and how to check it and change it....
Now that we have finished the front of the car .... we need to address the rear suspension and alignment of KMP 259.....
I'm amazed at how many folks build their car and then go to a Firestone or Goodyear or Tire store and have their car alignment..... then they drive out and as long as the street is smooth....everything is OK..... but then they hit a bump or get on the power and the car get's to acting like it want to go in two different directions at one time......
You see sitting on a Alignment rack is nice but only at that ride height....and then when you hit a bump the Toe-in or out of the wheels moves and the car acts as if it has a mind of it's own....
Part of the process of building a car is to do the Bump Steer and get it right.... if you don't ...the car will change lanes on you when you do hit a bump.... that's interesting....especially when you don't turn the wheel and the car just move over a lane..... Oh boy....
Well we are going to take you thru Bump Steer of the Front & Rear suspension ....and everything applies to both ends of the car.... meaning front or rear....
Only certain folks understand this Bump Steer thing and it's not a black magic.....
The first thing you have to have is a plate to mount to the hub so you can measure moving the suspension up into bump or down into droop....
__________________
Morris
|
03-12-2020, 12:34 PM
|
|
CC Member
|
|
|
Join Date: Dec 2003
Location: Gurnee,
IL
Cobra Make, Engine: Kirkham #259
Posts: 1,396
|
|
Not Ranked
Photo #2
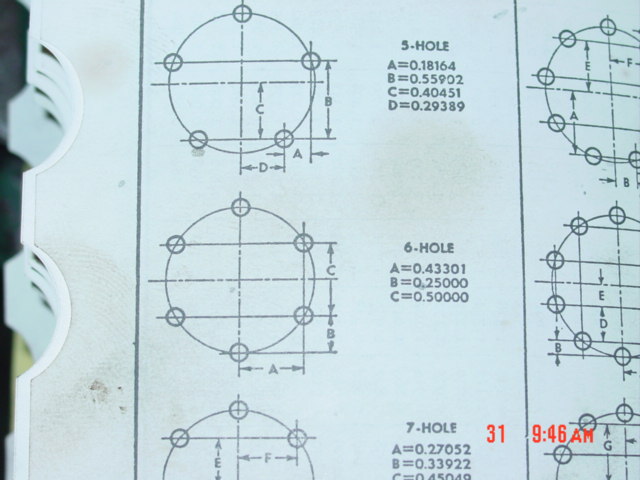
How do you know where to put the holes.... do they spin the plate and throw a dart at it..... maybe they get out a string and do a circle and then start making marks for the holes..... Not.....
You go to your friendly Machinist Manual and look up the factors that will give you your X and Y measurements

__________________
Morris
|
03-12-2020, 12:36 PM
|
|
CC Member
|
|
|
Join Date: Dec 2003
Location: Gurnee,
IL
Cobra Make, Engine: Kirkham #259
Posts: 1,396
|
|
Not Ranked
Here it show you the factors that you multiply times the Bolt circle and then you can start drilling your holes
__________________
Morris
|
03-12-2020, 12:40 PM
|
|
CC Member
|
|
|
Join Date: Dec 2003
Location: Gurnee,
IL
Cobra Make, Engine: Kirkham #259
Posts: 1,396
|
|
Not Ranked
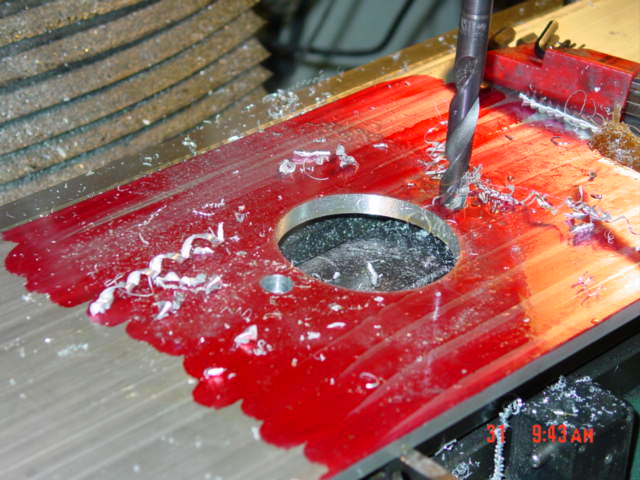
Just so you know .... the plate came from McMasters Carr...... it's 3/8" thick and was a 36" long by 8" wide .... we cut it down to 28" before we started.....
Find Center ....bore the center hole 3.100" ..... then 4 1/4" bolt circle .... 6 pins..... .530" holes
You need a 3/8" plate so when your dial indicators are out at the ends it will be stable....
__________________
Morris
|
03-12-2020, 12:42 PM
|
|
CC Member
|
|
|
Join Date: Dec 2003
Location: Gurnee,
IL
Cobra Make, Engine: Kirkham #259
Posts: 1,396
|
|
Not Ranked
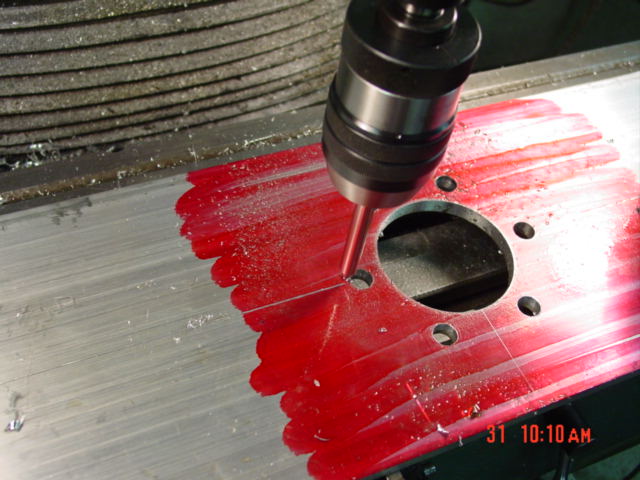
Now we take a Centering bit and with slight pressure .... we drag it across the plate in a Horizontal line from one end to another... 25.5" long
We also scribe a line going verticle in the center of the plate and also at the ends at 12.75" radius poing so we can easily see when we are doing the Bump Steer....
When it's done we'll take a fine point Sharpie and put ink into the scribed line so we don't have to use a tape measure when we go into bump or droop...
__________________
Morris
|
03-12-2020, 12:46 PM
|
|
CC Member
|
|
|
Join Date: Dec 2003
Location: Gurnee,
IL
Cobra Make, Engine: Kirkham #259
Posts: 1,396
|
|
Not Ranked
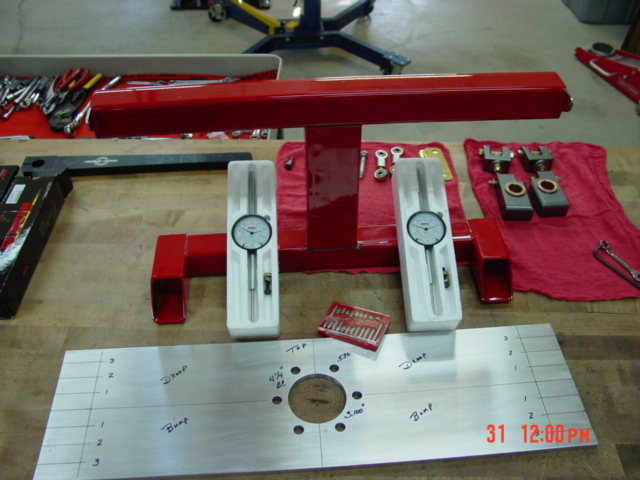
Here's what the plate will look like when completed ..... nice and strong and we have it marked so we can be consistant when we do bump steer....
__________________
Morris
|
03-12-2020, 12:48 PM
|
|
CC Member
|
|
|
Join Date: Dec 2003
Location: Gurnee,
IL
Cobra Make, Engine: Kirkham #259
Posts: 1,396
|
|
Not Ranked
The lines on the side of the plate have to be in ink so your Dial indicator will move over them without falling into a scribed line and cause and error in the readings ......
Later we added a 1/2" mark above the 2" mark on both Bump and Droop.....
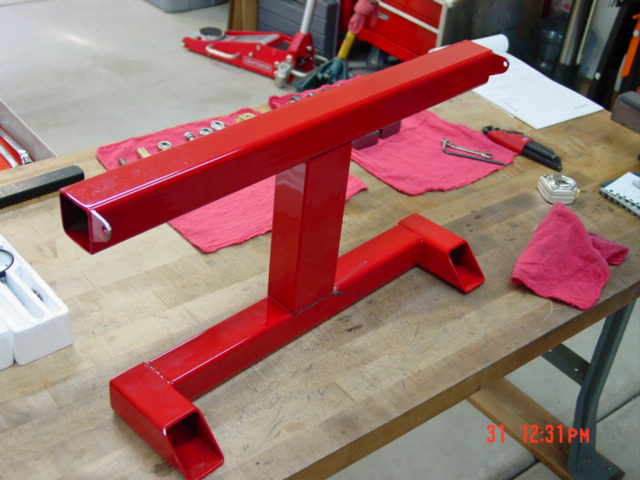
Now if we are going to use Dial indicators to measure how much the hub or spindle moves we need a good strong and heavy base to attach the dial indicators to....
This one we made out of some 2"X 2" .120 wall tube we had laying around..... cost $12.00
__________________
Morris
|
03-12-2020, 12:50 PM
|
|
CC Member
|
|
|
Join Date: Dec 2003
Location: Gurnee,
IL
Cobra Make, Engine: Kirkham #259
Posts: 1,396
|
|
Not Ranked
And of course you need a couple of Dial indicators.....
These we got from Enco...... $20.95...each.....
You want the 2" kind because it allows the pointer to reach the plate and also you want to set it at the 1" mark and at depending on the hub's direction of travel will go in or out...... so on the 1" mark we can measure the amount of movement we have and which direction it goes....
__________________
Morris
|
03-12-2020, 12:52 PM
|
|
CC Member
|
|
|
Join Date: Dec 2003
Location: Gurnee,
IL
Cobra Make, Engine: Kirkham #259
Posts: 1,396
|
|
Not Ranked
Now we need a piece of 3" PVC pipe.... to hold the plate on the hub nice and tight.....
__________________
Morris
|
03-12-2020, 12:54 PM
|
|
CC Member
|
|
|
Join Date: Dec 2003
Location: Gurnee,
IL
Cobra Make, Engine: Kirkham #259
Posts: 1,396
|
|
Not Ranked
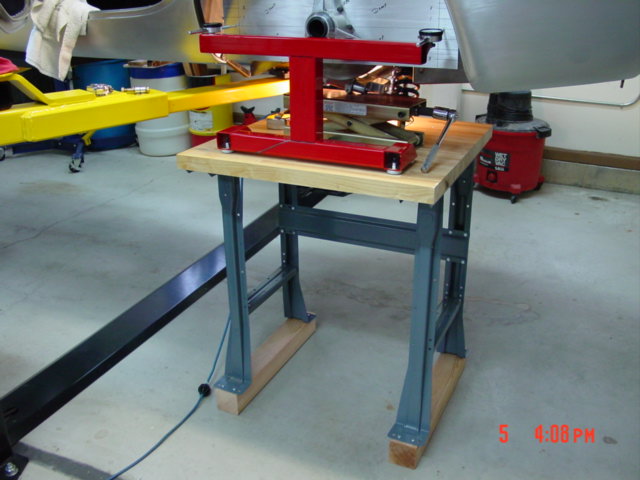
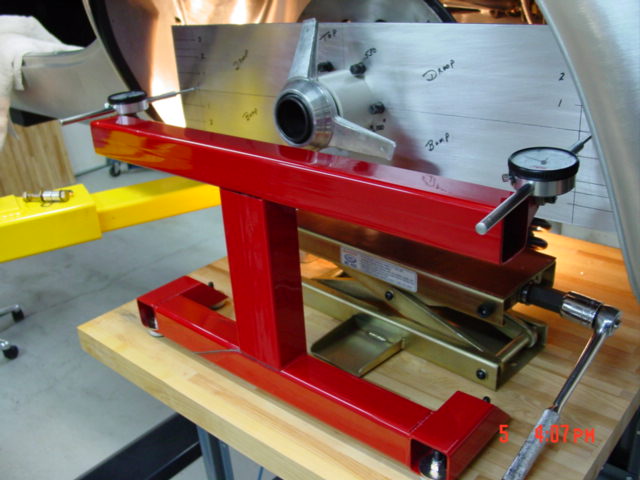
The stand for the indicators has to be stong and stable........
But so does the stand that the Bump Steer gauge sits on ......
So we bought a Butcher Block Work bench..... 30" X 60" ....and found a Stair Mfg locally and took it over and had it cut in Half......
Now we have a 30"X 30" work bench ..... then we wanted to add some height to it so we put some 4'' X 4" to stablize the legs ....
This is a strong and stable table to work off of.... and the best part is I just need to get another pair of legs and I got another small work bench..... like for the front and rear at the same time.....
__________________
Morris
|
03-12-2020, 12:59 PM
|
|
CC Member
|
|
|
Join Date: Dec 2003
Location: Gurnee,
IL
Cobra Make, Engine: Kirkham #259
Posts: 1,396
|
|
Not Ranked
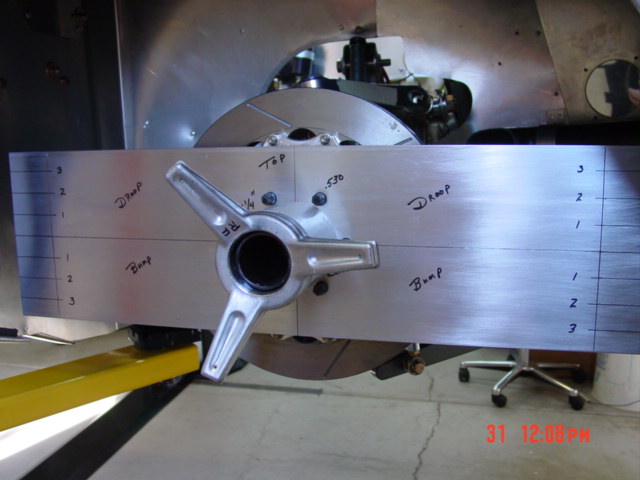
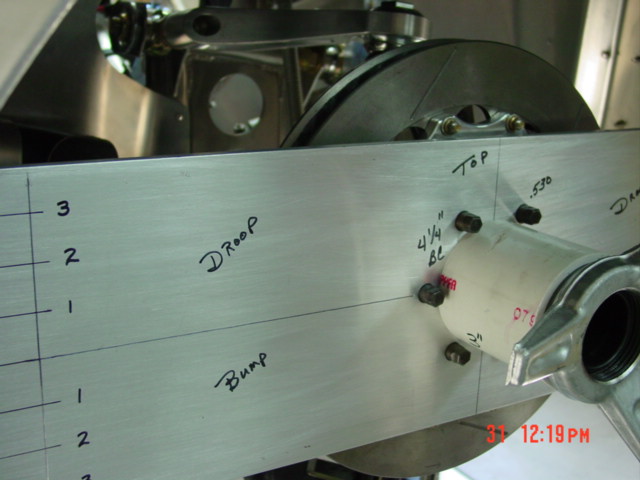
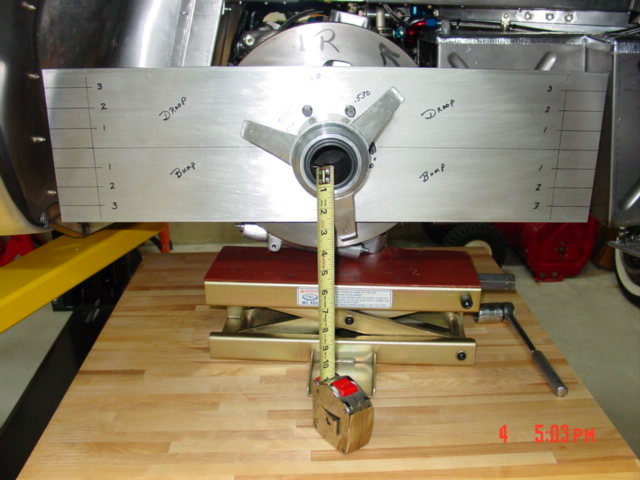
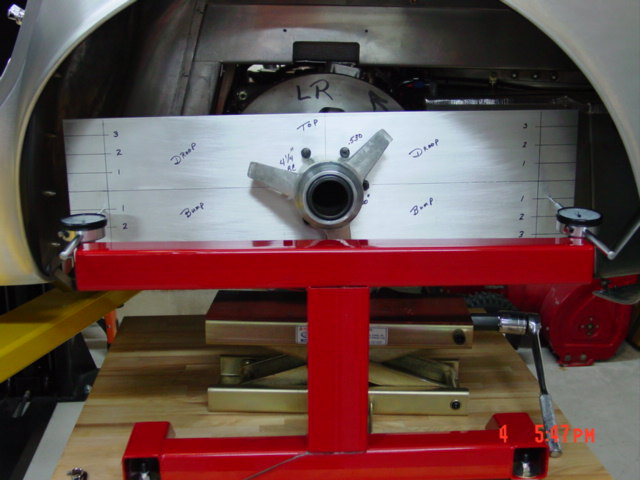
To start with we mount the plate to the hub and tighten it down.... reverse the Knock off so it is not in your way when you put the Bump Steer stand up next to it.....
Set the table at ride height..... we do that with the lift.... 4 3/4"..... move the car so it's 4 3/4" above the table....and level with each other....
We are running a 335 X 30 X 18" rear wheel that is 25.6" in Diameter.....
So our radius is 12.750" counting some deflection of the side wall.... so we line up the hub with the center of our Radius
__________________
Morris
|
03-12-2020, 01:01 PM
|
|
CC Member
|
|
|
Join Date: Dec 2003
Location: Gurnee,
IL
Cobra Make, Engine: Kirkham #259
Posts: 1,396
|
|
Not Ranked
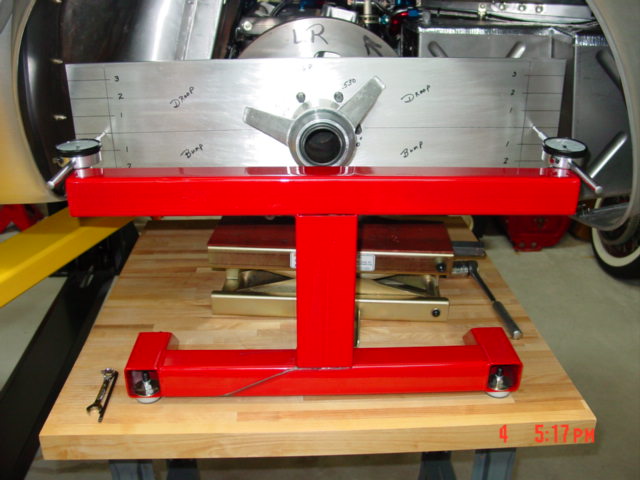
BTW that neat Jack is one we got for the Harley's when they are on the big lift..... but it works great for what we are doing because it is stable in both directions fore and aft....
Set the stand up and attach the Dial indicators ..... since the hub is at ride height .... then your lines on the plate at 0"....should line up .... if they are off alittle bit its no big deal....
Now move the stand into the plate so you compress the dial indicators to the 1" mark ...that way the hub can go either way and you can record the data.....
This is the Analog way of doing Bump Steer...... but this way works.....
Set the pointers and then lock down with a wrench the dial indicators so they don't move in any direction....
__________________
Morris
|
03-12-2020, 01:04 PM
|
|
CC Member
|
|
|
Join Date: Dec 2003
Location: Gurnee,
IL
Cobra Make, Engine: Kirkham #259
Posts: 1,396
|
|
Not Ranked
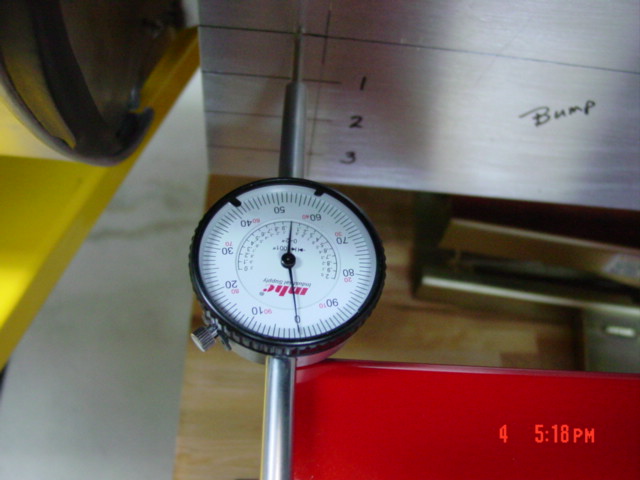
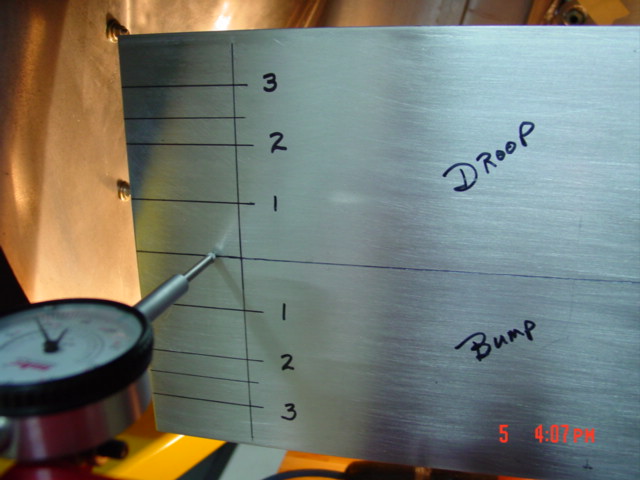
Here's a shot of the Dial indicator showing it centered out at Zero at the 1"Compression mark....
__________________
Morris
|
03-12-2020, 01:06 PM
|
|
CC Member
|
|
|
Join Date: Dec 2003
Location: Gurnee,
IL
Cobra Make, Engine: Kirkham #259
Posts: 1,396
|
|
Not Ranked
I always like to do bump first..... don't know why just a habit.....
Start raising the hub up to the 1" mark on the plate and make sure the indicators end up on the 1" mark on both sides of the plate....
Sometimes you will have to slightly rotate the plate one way or the other to make sure the indicators line up.....
Consistency is the name of the game and knowing we are going to be doing this many times we want to be able to repeat everything we do....
__________________
Morris
|
03-12-2020, 01:09 PM
|
|
CC Member
|
|
|
Join Date: Dec 2003
Location: Gurnee,
IL
Cobra Make, Engine: Kirkham #259
Posts: 1,396
|
|
Not Ranked
Once you are at the 1" mark ..... read the indicators...... and note which way they moved ..... meaning in towards the center of the car or out towards the outside of the car...... very important to know which way the plate moves....easy to get confused.....
I have to put my hands together infront of my chest with my index fingers touching and act like my chest is the dial indicators and stand and my hands are the plate... then I go thru the motions the make sure I understand just what is going on.....
Then you write down the amount the gauge moved ...like going into bump the hub will move in towards the center of the car so the gauges will read lower than the 1" setting we started at..... and what we write down is the amount the gauge moved .... like .090 In or out ...which ever way it moved..... '
And you do the same thing on the rear gauge..... read the gauge to see if it moved in or out and then how much..... write it down.....
We'll write it down for the 1", 2", 2.5" marks in Bump and the 1" and 2" marks in Droop...
__________________
Morris
|
03-12-2020, 01:12 PM
|
|
CC Member
|
|
|
Join Date: Dec 2003
Location: Gurnee,
IL
Cobra Make, Engine: Kirkham #259
Posts: 1,396
|
|
Not Ranked
After we do our measuring at 1", 2", and 2.5" in Bump....... and write it down
Then we bring the hub back down to Zero and re Zero out the Dial Indicators...... they will move coming back to Zero.... so we just re calibrate the indicators and get ready to do the same thing in Droop we just did in Bump....
__________________
Morris
|
03-12-2020, 01:14 PM
|
|
CC Member
|
|
|
Join Date: Dec 2003
Location: Gurnee,
IL
Cobra Make, Engine: Kirkham #259
Posts: 1,396
|
|
Not Ranked
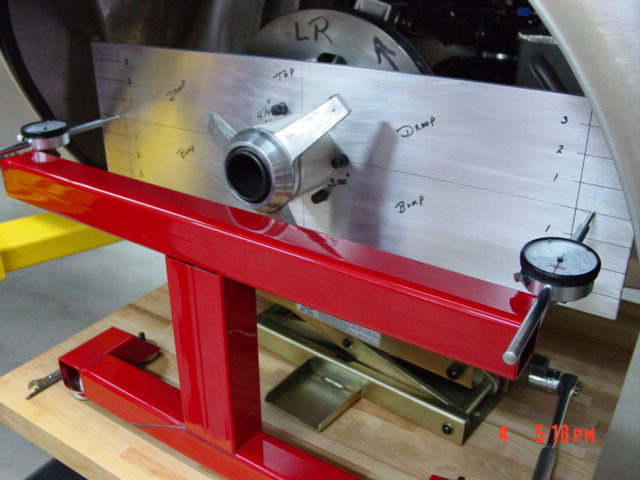
Now again we do the same thing in Droop...... lower to 1" mark ...make sure the pointers are both on the 1" lines (constency)....
Then we read the gauges again ...
First the front gauge...... did it come in or out.....and how much ......
Then do the Rear gauge and see which way it moves and how much it moves......
Then you can take a calculator and start figuring out the differences in both readings to know how much the tire moves and look at the direction to know whether it's in Toe-in or Toe-out
__________________
Morris
|
03-12-2020, 01:17 PM
|
|
CC Member
|
|
|
Join Date: Dec 2003
Location: Gurnee,
IL
Cobra Make, Engine: Kirkham #259
Posts: 1,396
|
|
Not Ranked
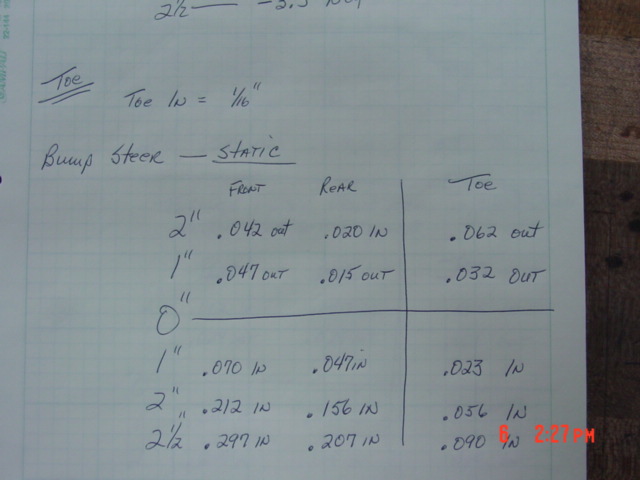
Now here is how we write down the readings we just took ..... both in bump and Droop......
Also you can see which direction the plate moved..... in or out..... this will tell us when we do the calculator ...whether to add the two numbers or subtract the two numbers.....
The Standard that you shoot for is .015" for 1" of travel in either direction.....
This is where I believe allot of folks are off just like our suspension and think that a Alignment at their local tire store will fix it.....Wrong..... Wrongggggg
If you look at my numbers they are not very good and when the suspension goes into bump ...it toes in allot ..... to much.....
I bet their aren't 10 cars on this Webb sight that have ever gone this far...... Well now you know cause we are trying to teach you how to do Bump Steer and make your suspension allot better at handling....
Enough Soap Box.....move on....
__________________
Morris
|
03-12-2020, 01:20 PM
|
|
CC Member
|
|
|
Join Date: Dec 2003
Location: Gurnee,
IL
Cobra Make, Engine: Kirkham #259
Posts: 1,396
|
|
Not Ranked
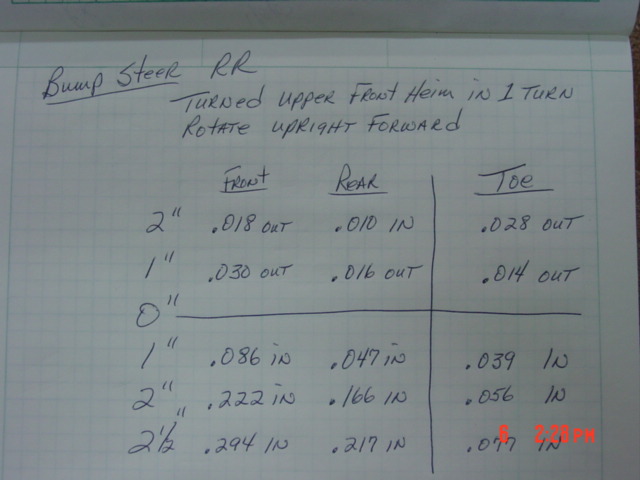
This is the Rear Bump numbers
So ...Now we need to make an adjustment...... well on the front you would move the tie rod end at the spindle or upright..... or you would move the Steering rack up or down or in or out......
Not many people know about changing the bump steer in the rear of the car..... the way you change it is to rotate the upright on the axil.....
And it doesn't take much..... all you are trying to do is make the two different Arc of the upper control arm and the lower control arm work together and not try and steer the car...... that's what the front wheels do.....
So as the notes show.... we turned the forward heim in the upper control arm IN.... one turn.....there by causeing the upright to move towards the front of the car......
Then we put everything back together and then start all over again with setting up the Bump Steer Gauge and Plate and everything......
Then we go thru the motions of measureing the Bump as we did before....1', 2" and 2.5" in Bump and 1"and 2" in Droop....againg
And write down the numbers so we can compare......
Now you see why we spend so much time making sure our bases are stable and strong .... that will equal Consistency
And now is time for Repeatability.....
And you can see the numbers changed....
__________________
Morris
|
03-12-2020, 01:24 PM
|
|
CC Member
|
|
|
Join Date: Dec 2003
Location: Gurnee,
IL
Cobra Make, Engine: Kirkham #259
Posts: 1,396
|
|
Not Ranked
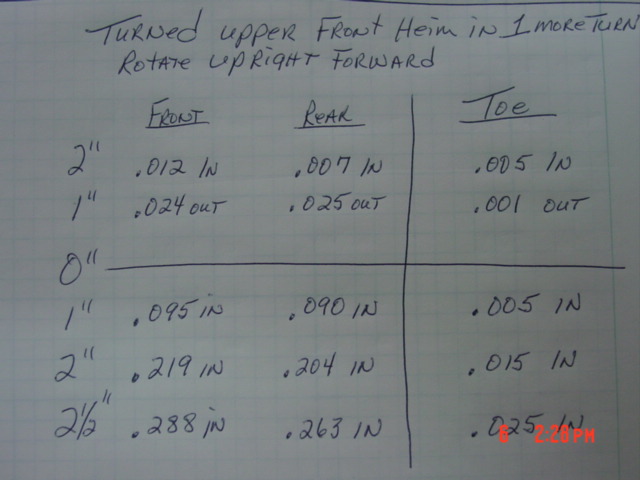
So we removed the top control arm on the Left Rear and again made an adjustment.....
Turn the forward heim in 1 more Turn ......
As we turn the forward control arm heim in we are moving the top of the upright towards the front of the car.....which is rotating the upright on the axil......
It took many years and lots of books to understand this ...but it does work.....
Now the killer is that the Billet lower control arm has the trailing arm mounted in the middle of the lower control arm ...unlike the old style steel lower control arms where the link is mounted below the lower control arm about 1.5"......
This change that Kirkham has made will make a big difference in Bump steer on the rear of the car and the old style lower control arm would never get the Bump Steer very good at all..... therefore what they did was to dial in more Toe-In to compensate for the poor Bump Steer characteristics ......
Any way .... Look at how we ended up ..... our Bump Steer is Great .... that means as the tire move up and down in the Wheel Well ... it is going to point in the direction we set it when we do our alignment.....
This is very important when you are trying to make a car handle and get around a corner of any kind..... be it at Speed or Street..... probably more important on the street because most race tracks are somewhat smooth....
Check out these numbers.....
__________________
Morris
|
 Posting Rules
|
You may not post new threads
You may not post replies
You may not post attachments
You may not edit your posts
HTML code is Off
|
|
|
All times are GMT -7. The time now is 02:22 PM.
Links monetized by VigLink
|


 Linear Mode


