 
 Main Menu
|
|
Nevada Classics
|
|
Advertise at CC
|
| S |
M |
T |
W |
T |
F |
S |
| 1 |
2 |
3 |
4 |
5 |
6 |
7 |
| 8 |
9 |
10 |
11 |
12 |
13 |
14 |
| 15 |
16 |
17 |
18 |
19 |
20 |
21 |
| 22 |
23 |
24 |
25 |
26 |
27 |
28 |
|
|
CC Advertisers
|
|
 15Likes 15Likes

02-23-2012, 07:23 AM
|
 |
CC Member

|
|
|
Join Date: Mar 2003
Location: McConnellsburg,
PA
Cobra Make, Engine: ERA FIA #2124
Posts: 687
|
|

 Not Ranked

Quote:
Originally Posted by ceslaw

Question: regarding that fuel pressure gauge, do you plan to add an interface of some sort so that there won't be a fuel line under the dash above your right knee? If yes, curious as to what you will be using.
|
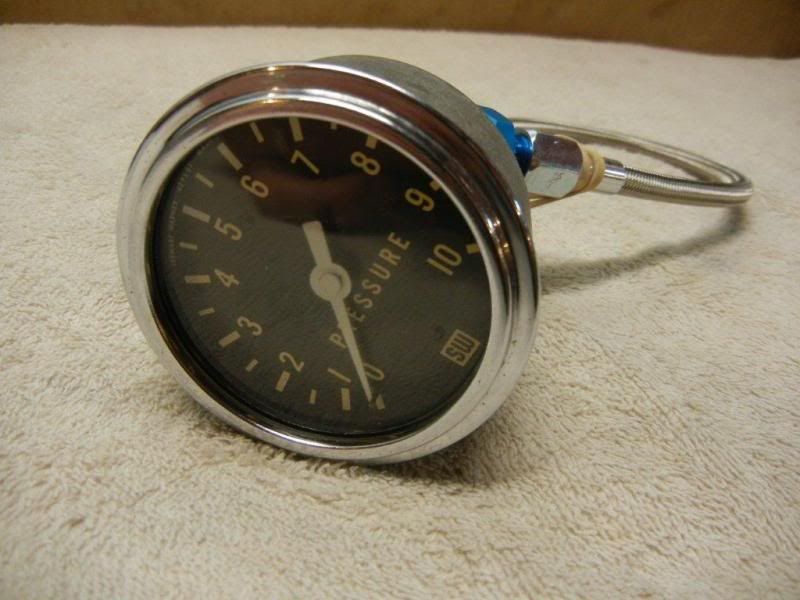
Not sure I'm following, Chuck. Not sure if your concern is something interfering with my right knee or more so with the fact I'm bring fuel into the interior of the car...?? Anywho, CobraPack suggested I use a brided brake line with -4 AN swivel ends, which I thought was a brilliant idea. A 14" flexible braided stainless line can be had for ($11). This is connected to a -4 AN to 1/8 NPT female adaptor on the gauge side, and a -4 AN 45 degree bulkhead fitting that will be on the dash side. I'll then run a line from the bulkhead fitting in the engine compartment to the comp fuel log. All this stuff was purchased from Jegs..
Here are some pics of the fuel gauge and location I plan on for the dash.
BTW, Chuck, good to have you in the thread. I'm really interested in the direction you are going with your car. My next one will be an adaptation of ERA's slab come comp car....they should probably put some effort into creating some molds for Jones Flares and front Spats, IMHO. I could see that area growing..
- Allen.

|
02-23-2012, 07:31 AM
|
|
CC Member
|
|
|
Join Date: Mar 2003
Location: McConnellsburg,
PA
Cobra Make, Engine: ERA FIA #2124
Posts: 687
|
|
Not Ranked
Paul:
Thanks very much for the assembly tips and photos. I had a suspicion that I would need to do something back there with the bell housing and now you've confirmed it. I don't have a cut-off wheel like you, so I'll have to come up with something clever there. Jim said he was starting my system this week and was sending the fuel log and bell crank tower so I could do some fitting...should have those pieces today or tomorrow. I plan to modify the fuel log to incorporate a coolant bypass circuit, so I will detail that here as well.
Great Hp numbers, btw! How is the transition from low to high jet circuits? Any flat spots/stumbling at all?
- Allen.
|
02-23-2012, 07:52 AM
|
 |
CC Member
|
|
|
Join Date: May 2006
Cobra Make, Engine:
Posts: 140
|
|
Not Ranked
The concern with bringing the fuel line from the fuel log to the pressure gauge is essentially a safety issue. A fitting or line failure could spray fuel under the dash.
I have not yet researched it, but I suspect there is an interface that the fuel line will connect to under the hood, and then a line carrying nonflammable fluid will connect to the gauge so that in the event of a line failure one would not have fuel spraying in the passenger compartment.
|
02-23-2012, 08:04 AM
|
|
CC Member
|
|
|
Join Date: Mar 2003
Location: McConnellsburg,
PA
Cobra Make, Engine: ERA FIA #2124
Posts: 687
|
|
Not Ranked
Chuck:
For what it's worth, the components/connections used to bring the fuel into the engine compartment are rated for much higher working pressures than typical for the fuel system application. These connection points will only see a max of 3psi. Definitely not a high pressure application. Totally understand the concern, tho. For a point of reference, my mechanical oil pressure gauge runs 60-80psi and no issues.
- Allen. |
02-24-2012, 05:54 AM
|
 |
CC Member
|
|
|
Join Date: Jun 2010
Cobra Make, Engine: Viking Blue "64" 289 FIA comp car by Superformance #0002, Keith Craft - 331 (460HP), Jim Inglese - 48IDA Weber carbs, BW T10 4spd.
Posts: 430
|
|
Not Ranked
........................
Last edited by LightNFast; 09-01-2012 at 10:27 AM..
|
02-24-2012, 06:46 PM
|
|
CC Member
|
|
|
Join Date: Mar 2003
Location: McConnellsburg,
PA
Cobra Make, Engine: ERA FIA #2124
Posts: 687
|
|
Not Ranked
Kurt:
Jim is documenting some changes to my bellcrank tower so that future customers don't have to modify the flanges on their blow-proof bellhousings. The flange on mine is quite extended and with the backing plate on the engine I'm having to carve my way through nearly 0.5" thick of material. Not my idea of a good time....a more elegant solution will be the order of the day without taking away from any visible authenticity.
(Nice car by the way.  )
- Allen.
Last edited by Fullchat289; 02-24-2012 at 06:50 PM..
|
02-25-2012, 05:50 AM
|
|
CC Member
|
|
|
Join Date: Mar 2003
Location: McConnellsburg,
PA
Cobra Make, Engine: ERA FIA #2124
Posts: 687
|
|
Not Ranked
Bellcrank Tower Changes
For those wondering what the discussion was all about regarding the trimming of the bell housing for use with the bellcrank tower, here is a picture of the trim line to the bellcrank tower, as well as a reference template that shows the holes in the head and the profile of the blowproof bellhousing flange. Jim and I talked about modifying the tower to pick up the upper third hole rather than the one covered up by the flange. This will save some messy, tedious work for others retrofitting a bellcrank tower while using a blowproof bellhousing in the future.
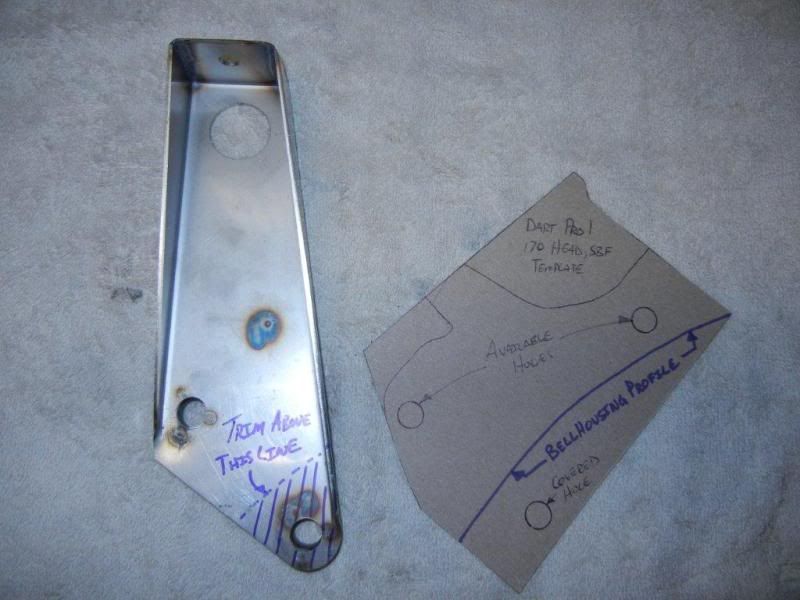
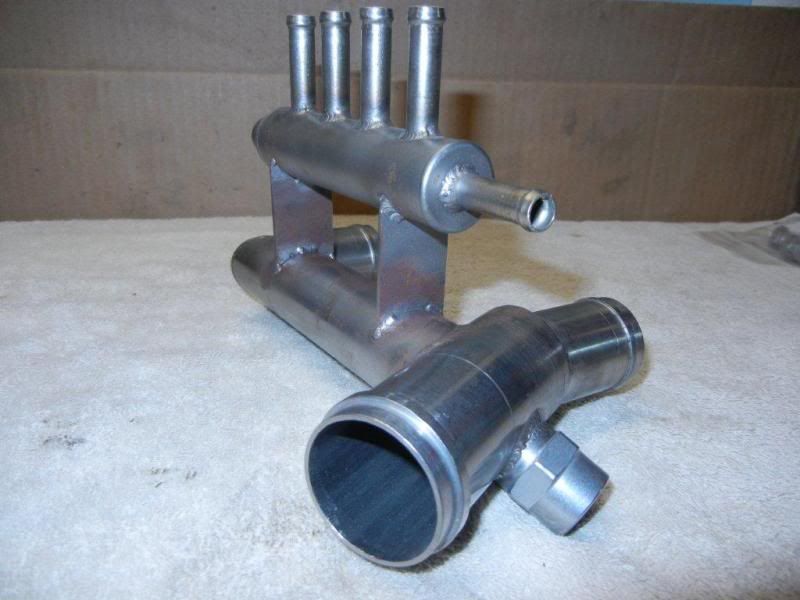
Also, here is one of the most artistic pieces of the whole set-up. This is the FIA comp fuel log that I will be modifying to implement a coolant bypass circuit port as done by Rick Parker and others. This is a "belts and braces" approach for those of us running the duel outlet weber manifold combined with a thermostat. I'll detail this a bit more later.
- Allen. |
02-25-2012, 06:14 AM
|
|
CC Member
|
|
|
Join Date: Nov 2003
Location: New Britain,
CT
Cobra Make, Engine: Size 10 Feet
Posts: 3,032
|
|
Not Ranked
There's a surprising amount of force on the linkage pivot bracket. Flex is a definite problem if the bracket isn't designed and secured well. I'm afraid that removing that third attachment without further modifications is going to create a "function" problem. We had a car in here with a wimpy bracket that made the linkage near-unusable.
|
02-25-2012, 07:41 AM
|
|
CC Member
|
|
|
Join Date: Jun 2010
Cobra Make, Engine: Viking Blue "64" 289 FIA comp car by Superformance #0002, Keith Craft - 331 (460HP), Jim Inglese - 48IDA Weber carbs, BW T10 4spd.
Posts: 430
|
|
Not Ranked
........................
Last edited by LightNFast; 09-01-2012 at 10:26 AM..
|
02-25-2012, 05:17 PM
|
|
CC Member
|
|
|
Join Date: Mar 2003
Location: McConnellsburg,
PA
Cobra Make, Engine: ERA FIA #2124
Posts: 687
|
|
Not Ranked
Quote:
Originally Posted by strictlypersonl
There's a surprising amount of force on the linkage pivot bracket. Flex is a definite problem if the bracket isn't designed and secured well. I'm afraid that removing that third attachment without further modifications is going to create a "function" problem. We had a car in here with a wimpy bracket that made the linkage near-unusable.
|
Bob:
Yep. I agree that we need to get the proper footprint such that we can counter the moment forces... In light of your comments, I think what we may do is instead of totally trimming that area off, we'll adjust some of the return flange so it fits between the bell housing flange and the head. We'll then weld on another flanged "wing" to take up the third attachment point for securing the bracket with the remaining "ear" at the bottom serving to counter the forces you describe. Good input there - appreciated as always!
- Allen. |
02-26-2012, 08:00 AM
|
|
CC Member
|
|
|
Join Date: May 2006
Cobra Make, Engine:
Posts: 140
|
|
Not Ranked
Allen
Another option is to mount the bell crank on the wheel housing rather than on a pedestal bolted to the back of the enigne. That would be original as well and indeed is the way I plan to do it. You won't be able to use Jim Ingelese' push rods and they would have to be fabricated. But the bell crank itself appears to be exactly the same.
Chuck
|
02-26-2012, 08:11 AM
|
|
CC Member
|
|
|
Join Date: Jun 2010
Cobra Make, Engine: Viking Blue "64" 289 FIA comp car by Superformance #0002, Keith Craft - 331 (460HP), Jim Inglese - 48IDA Weber carbs, BW T10 4spd.
Posts: 430
|
|
Not Ranked
........................
Last edited by LightNFast; 09-01-2012 at 10:23 AM..
|
03-01-2012, 06:40 AM
|
|
CC Member
|
|
|
Join Date: Mar 2003
Location: McConnellsburg,
PA
Cobra Make, Engine: ERA FIA #2124
Posts: 687
|
|
Not Ranked
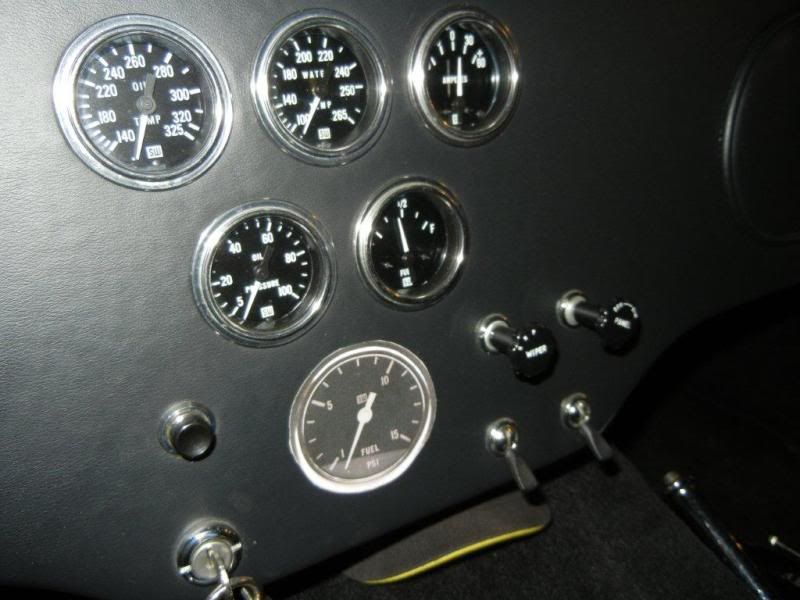
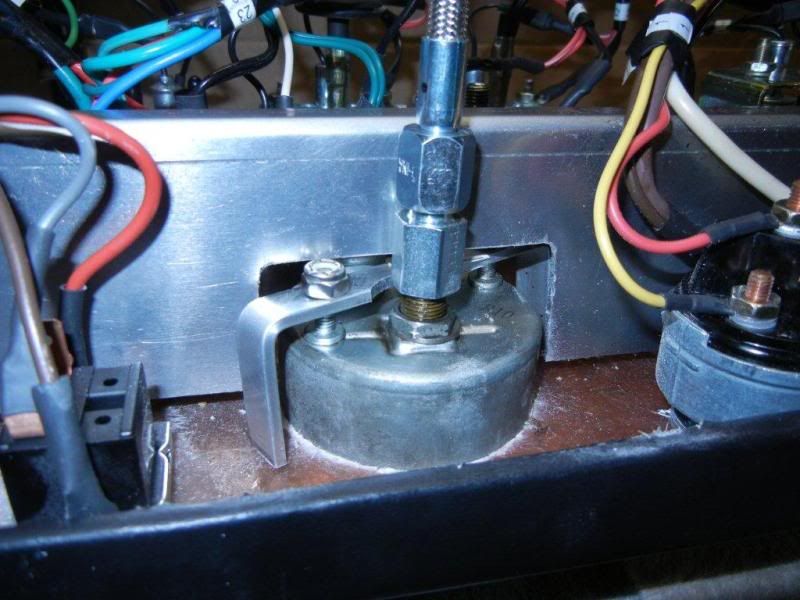
FP Gauge Installed.
Just a quick update to show how the Fuel Pressure Gauge install turned out. Im pretty happy with it.

In this next picture, you can see the modifications required to the aluminum cross beam that stabilizes the bottom of the ERA dash. I also had to fab up a little bracket to clamp the gauge to the back of the dash as it didnt come with one when I purchased it. The whole installation went really smoothly.
I also acquired a different set of sidepipes over the past few weeks, and I will be having those modified along with my headers to feature a ball & socket joint in place of the current slip joint. These ball & socket joints are available through JEGS and can be had in aluminized or stainless steel.

- Allen. |
03-01-2012, 07:18 PM
|
|
CC Member
|
|
|
Join Date: May 2006
Cobra Make, Engine:
Posts: 140
|
|
Not Ranked
Hey Allen
Dash looks great. The fuel pressure gauge looks like it belongs there.
So how do you manage to have a half tank of gas with the dash out of the Cobra?
|
03-02-2012, 05:39 AM
|
|
CC Member
|
|
|
Join Date: Mar 2003
Location: McConnellsburg,
PA
Cobra Make, Engine: ERA FIA #2124
Posts: 687
|
|
Not Ranked
Quote:
Originally Posted by ceslaw
So how do you manage to have a half tank of gas with the dash out of the Cobra?
|
Bluetooth. 
- Allen. |
03-13-2012, 07:37 AM
|
|
CC Member
|
|
|
Join Date: Mar 2003
Location: McConnellsburg,
PA
Cobra Make, Engine: ERA FIA #2124
Posts: 687
|
|
Not Ranked
Bits and Bobs..:
Should be receiving my 48IDA induction system from Jim today or tomorrow, so pretty excited about that. In the meantime, Ive been working on revising my fuel delivery from the tank replacing the ill-placed canister filter with a simple in-line and adding a fuel shutoff valve so that I can work on the fuel system in the future w/o having to drain the tank. I will be hard-mounting my fuel pressure regulator directly off the Mechanical Fuel pump, and adding a small Moroso 15psi fuel pressure gauge off the regulator for accuracy sake in addition to the Stewart Warner gauge on the dash that I detailed earlier.
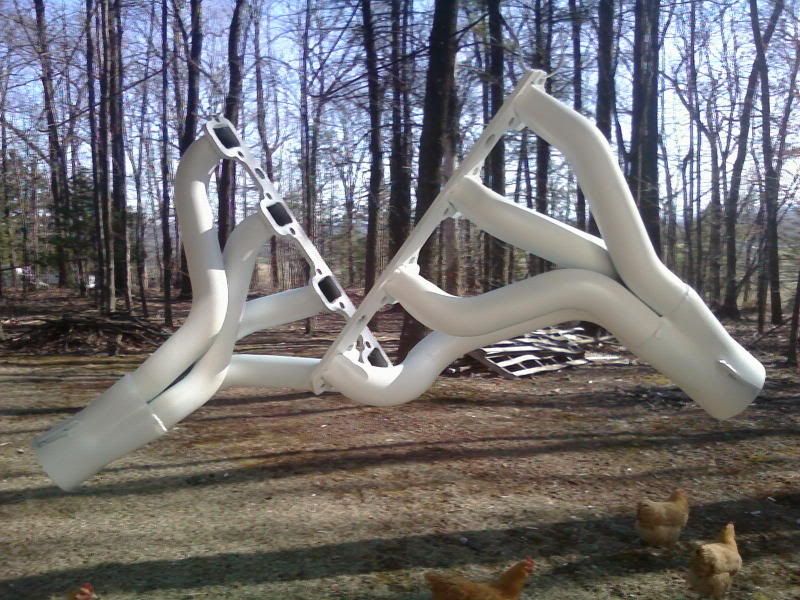
Over the weekend, I sanded my headers which were black, and decided to try white just for a change of pace. I fully expect that these will yellow quite quickly, but no matter. I see the coating of exhaust as a routine maintenance item anyway. I plan on keeping the pipes black for now. Im not sure the car could carry white sidepipes
VHT FlameProof White on the Headers:
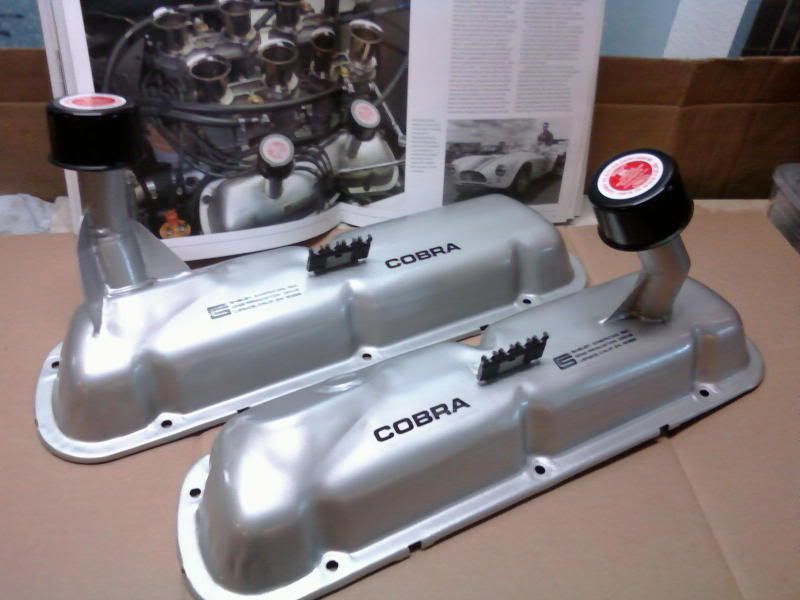
I also decided to freshen the competition valve covers a bit with a new coat of silver and added the CS and COBRA stickers to them. (Thanks to Chuck (ceslaw) for detailing the decal application on his set.) I am quite pleased with the result:
Freshened Valve Covers:
So aside from the 48s Im expecting any time, I also have a Kirkey Vintage Race seat on its way. With a trip to Sweden coming up this coming weekend, I hope to get the IDAs trial fitted so that I can mock up my water bypass return modification to the FIA water neck/fuel log and get that off to my fab guy before leaving
fingers crossed.
- Allen.
|
03-13-2012, 01:07 PM
|
|
CC Member
|
|
|
Join Date: May 2006
Cobra Make, Engine:
Posts: 140
|
|
Not Ranked
Really nice progress.
Valve covers look great.
Curious about fuel shut off valve. Mechanical or remote electric? Where will the valve be located? Another advantage of the shut off valve is you can drain the carbs of fuel easily by letting them run dry; good idea if it won't be driven for a while.
What is the book in the background with the covers?
Chuck
|
03-13-2012, 01:21 PM
|
|
CC Member
|
|
|
Join Date: Mar 2003
Location: McConnellsburg,
PA
Cobra Make, Engine: ERA FIA #2124
Posts: 687
|
|
Not Ranked
Thanks, Chuck!
This is the book:

...and this is the fuel shut-off valve:
Earl's 230501 Earl's Fuel Shut-Off Valves
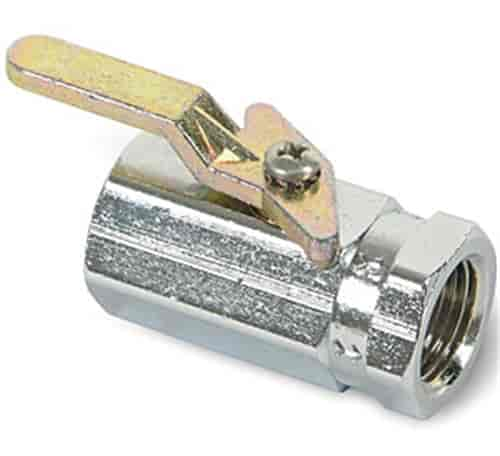
On my car, there is a 5/8-18 union that connects the 3/8 hardline coming from the tank to the one that goes forward to the mechanical fuel pump. The union is approx under the driver's seat and along the frame rail. I intend to replace the existing union with this shut-off valve, which is 3/8 NPT, so I plan on using some AN to hardline fitting adapters and AN6 to 3/8 NPT adapters to join everything. It's actually a pretty nice little valve and well suited to my fuel system pressures. I can follow up with some pictures once I get that job finished.
- Allen. |
03-14-2012, 07:09 PM
|
|
CC Member
|
|
|
Join Date: May 2006
Cobra Make, Engine:
Posts: 140
|
|
Not Ranked
I have that book . . . .guess need to go take another look.
Post a pic when you get that shut valve installed. I like that idea.
|
 Posting Rules
|
You may not post new threads
You may not post replies
You may not post attachments
You may not edit your posts
HTML code is Off
|
|
|
All times are GMT -7. The time now is 10:32 AM.
Links monetized by VigLink
|


 Hybrid Mode

