 
 Main Menu
|
|
Nevada Classics
|
|
Advertise at CC
|
| S |
M |
T |
W |
T |
F |
S |
| |
1 |
2 |
3 |
4 |
5 |
6 |
| 7 |
8 |
9 |
10 |
11 |
12 |
13 |
| 14 |
15 |
16 |
17 |
18 |
19 |
20 |
| 21 |
22 |
23 |
24 |
25 |
26 |
27 |
| 28 |
29 |
30 |
|
|
|
|
|
|
CC Advertisers
|
|

02-15-2012, 06:59 PM
|
|
CC Member

|
|
|
Join Date: Oct 2003
Posts: 4,078
|
|

 Not Ranked
Quote:
Originally Posted by ceslaw

The "we" is my son, Ryan, and myself. Not profesionals. Just a couple of amateurs having a blast building reproductions.
|
Great - enjoy the process.
__________________
Chas.
|
02-16-2012, 05:33 AM
|
 |
CC Member
|
|
|
Join Date: Aug 2006
Cobra Make, Engine: ERA #3002 Slabside
Posts: 24
|
|
Not Ranked
Quote:
Originally Posted by ceslaw
The "we" is my son, Ryan, and myself. Not profesionals. Just a couple of amateurs having a blast building reproductions.
|
Sounds like a really great project hope to follow your progress here. I was also hoping to do something similar (as photo) but have backed off to just a street version. Plan on using the Trigo 16 inch kidney beans. Been a long wait, picking up mine (pile of parts) end of next month and anxious to get started. |
02-19-2012, 04:16 PM
|
 |
CC Member
|
|
|
Join Date: May 2006
Cobra Make, Engine:
Posts: 140
|
|
Not Ranked
Quote:
Originally Posted by S1013
Sounds like a really great project hope to follow your progress here. I was also hoping to do something similar (as photo) but have backed off to just a street version. Plan on using the Trigo 16 inch kidney beans. Been a long wait, picking up mine (pile of parts) end of next month and anxious to get started.
|
That is, I believe, CSX 2136. One of the Lemans cars. Saw it at Leguna Seca in August, beautifully restored. Took lots of pictures. That would be a great car to copy. |
02-19-2012, 04:21 PM
|
|
CC Member
|
|
|
Join Date: May 2006
Cobra Make, Engine:
Posts: 140
|
|
Not Ranked

So here is a short historical background per Quick 289 request:
February 19, 2012. This history of CSX2129 and its first driver are noteworthy. It was the third of three cars to receive the Sebring treatment, following CSX2127 and CSX2128. The earlier two were completed a couple of weeks before Sebring in early 1963. CSX2129 was not completed until after Sebring, but still got the Sebring treatment. It first raced in May, 1963: the start of a remarkable season.
The three Sebring cars had several variations, but shared significant common characteristics. They were ordered from AC in England as stock, slab sided Cobras. The rear wheel openings were opened up to accommodate the bean race wheels and tires. They were the first Cobras to use the new rack and pinion steering. All were fitted with Weber carburetors and a hood scoop held in place with rivets. The leading edge of the hood was held down with rivets, similar to the later 427 SC.
The instrumentation on these three cars was a mixture including a Sunpro tachometer, Smith speedometer, oil pressure, oil temp and water temp, and Stewart Warner amperes gauge. It also had a larger Stewart Warner fuel pressure gauge.
Ken Miles was the predominant driver of CSX2129 in 1963. He scored a noteworthy victory at Road America, Elkhart Lake, Wisconsin, placing 1st in the over 2 liter class and 2nd place overall. This was the era of stiff competition from the Jaguars and Ferraris, so this was no small achievement. Later at Mid Ohio Miles scored an outright victory. He scored another victory in the GT class at the Canadian Grand Prix. It was a very good year for Cobra Number 98 and Ken Miles.
Driving the Cobra was only a part of Ken Miles race care life. Not only was he an excellent driver, but also a talented engineer. He was intimately involved in Carroll Shelbys development of the GT40.
In 1966 Miles drove the first of the three victorious GT40s across the finish line at Lemans, but was refused the first place trophy because under the French race rules he had started closer to the pole position and thus had driven twenty meters less distance than the second GT40. Before crossing the finish line Miles was enjoying a substantial lead over his two team mates. Because Henry Ford II wanted a photo finish with three GT40s crossing the finish line together, Miles was directed to slow down at the last pit stop so his two teammates could catch up. A team player, he agreed. Henry Ford II got his photo finish.
Earlier that year Miles had won the races at Sebring and Daytona driving GT40s. Had he won Lemans it would have been the triple crown of motor racing. Henry Ford got his picture but Miles missed the chance at the ultimate race victory.
Ken Miles was killed in August, 1966 just a few weeks after the Lemans race while testing the new J car intended to be the successor to the GT40. An amazing career was brought to an abrupt and untimely end.
CSX2129 was sold at auction in August 2011 by Gooding and Company, Pebble Beach, California for the sum of $2,585,000.

|
02-23-2012, 01:16 AM
|
 |
CC Member
|
|
|
Join Date: Aug 2009
Location: Adelaide,
SA
Cobra Make, Engine: AP 289FIA 'English' spec.
Posts: 13,152
|
|
Not Ranked
Quote:
Originally Posted by ceslaw
This Cobra and its most prominent driver, Ken Miles, share a fascinating history
|
This should be a great project. I'm a big fan of Ken Miles, and also the 289 cars, whether a standard roadster, Comp 289 or FIA.
Please post plenty of words and plenty of pics!
Cheers,
Glen |
02-25-2012, 08:19 PM
|
|
CC Member
|
|
|
Join Date: May 2006
Cobra Make, Engine:
Posts: 140
|
|
Not Ranked
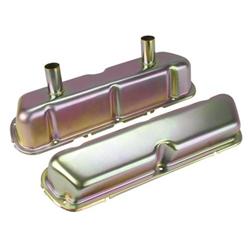
Valve Covers
Photos of CSX2129 reveal two different types of valve covers were used at various times in the cars life. The four stack and two stack both use stamped steel valve covers, but have two oil fills per side and one per side, respectively.
The four stack starts with an early 289 valve cover that had no oil filler pipe. (The oil fill / breather was on the block / manifold). Two fillers, each about five inches long, were added to each side with small reinforcing gussets.
The two stack starts with the valve covers that had a hump for filler pipes on both sides, but on the drivers side a filler pipe was fitted and on the passenger side a PCV opening was added. The existing filler pipe on the drivers side had an angled extension added, a straight pipe was added to the front of the passenger side, and the PCV opening was sealed. Gussets were added to support the extended filler tubes.
I can just imagine the Shelby factory out in California on a hot summer day in 1963. The engine builder yells hey Joe, make me a couple of valve covers for the Cobra. Joe than cuts off some lengths of 1 3/8 inch pipe, eyeballing the length. Joe adds the new pipe to the passenger side without much attention to the location, other than somewhere close to the front, and then adds the extension to the existing filler, angling it a bit. Gussests were then fashioned, without a pattern, from whatever scraps were lying around and welded in place where they would add a bit of strength. When one looks at original pictures it is obvious there was substantial variation in the details. No two are exactly alike.
We opted for the two stack style.
The starting point was the valve covers which are available from CJ Pony Parts and Mustang Depot. The pair costs around $50. You will also need the breather caps and the little decal that goes in the center of the oil cap. The parts will set you back about $75 dollars.
So why not just buy a set already assembled from Shelby Parts and Restoration? Two reasons. They cost $400, so we are saving $300. And the kick we get from doing it ourselves. Also, recall the slight variations noted above? We will be emulating the ones actually installed on CSX2129, so they will vary slightly from the ones sold by Shelby Parts and Restoration.
|
02-26-2012, 03:01 AM
|
 |
CC Member
|
|
|
Join Date: Mar 2003
Location: McConnellsburg,
PA
Cobra Make, Engine: ERA FIA #2124
Posts: 687
|
|
Not Ranked
Chuck:
I might have an extra set of the "COBRA" & "CS" stickers that go on these valve covers lying around if you are interesed. They are black text on a clear adhesive membrane, so would work for you if painting the covers silver.
- Allen.
|
02-26-2012, 05:10 AM
|
|
CC Member
|
|
|
Join Date: May 2006
Cobra Make, Engine:
Posts: 140
|
|
Not Ranked
Quote:
Originally Posted by Fullchat289
Chuck:
I might have an extra set of the "COBRA" & "CS" stickers that go on these valve covers lying around if you are interesed. They are black text on a clear adhesive membrane, so would work for you if painting the covers silver.
- Allen.
|
Thanks for the offer Allen. I ordered a set and they arrived in Saturdays mail. If I build a second set I may take you up on that offer.
Have you seen a source for the plain covers without the breather tube or PCV opening? I would like to find a set so we can make a four stack. No one seems to sell them and have not seen them on EBay. |
02-26-2012, 05:18 AM
|
 |
Senior Club Cobra Member
|
|
|
Join Date: Sep 2000
Location: Holderness, NH, US of A,
NH
Cobra Make, Engine: CSX 4772 old iron FE
Posts: 5,499
|
|
Not Ranked
I'm chuckling at your "Hey Joe" analogy. We were looking at the stripes on an original car that are off centre, masked with a piece of cardboard held in place etc and said to ourselves "I'm going out for a haircut and want stripes on that when I get back". I think you're exactly right when you look at the variations. I also think you'll find the devil (or cost) is in the details. You'll see I grooved the tubes which funnily enough doesn't even grab the clips inside the cap as it's too big a radius on the clips. It does make for an interesting and entertaining study.
|
02-26-2012, 07:10 AM
|
|
CC Member
|
|
|
Join Date: May 2006
Cobra Make, Engine:
Posts: 140
|
|
Not Ranked
Assembling the valve covers
Note the following:
1. The oil fill caps need to be at the same angles on both sides.
2. The oil fill caps need to be at the same level on both sides.
This requires a bit of planning. We made a pattern for each side. I like patterns. They make locating things a lot easier.
First we assembled the driver side cover. The existing filler pipe needs to be ground down so that it is angled at about 15 degrees. We screwed the cover to a wooden board to hold it securely in place, used an angle grinder, then a good bit of hand filing until the surface was smooth. The 1 3/8 extension pipe also was angled on one end at about 15 degrees. Ryan then TIG welded the two together. The angle when welded is about 30 degrees. The total height is around 4 ½ inches. One could vary the angle or height and it would probably look just fine, provided the two rules noted above are followed.
The passenger side was next, and was actually easier. A 1 ¼ hole was drilled, which is slightly undersized. The pipe was then welded in place. The inside diameter of the pipe is only slightly greater than 1 ¼ inch so we saw no need to grind out the hole to match the inside diameter of the pipe. Before welding, however, the two covers were placed end to end and the pipe carefully aligned so that it was parallel to the driver side pipe. I doubt Joe was as careful about the alignment working in the Shelby shop 49 years ago.
The PVC hole was sealed with a washer. The center hole of the washer was welded closed.
Once the pipes were in place, patterns for the four gussets were made, the steel cut, and Ryan TIG welded them place. Once again there are noticeable variations in the shape and size of the gussets originally used, since I doubt Joe ever used a standard pattern. Ours are intended to look like the ones used on the specific Cobra we are replicating.
The shields on the back side of the covers were removed by grinding away the tack welds. With the long filler tubes they should not be necessary. A look at the backside confirmed good penetration with the TIG welder.
|
02-26-2012, 11:22 PM
|
|
CC Member
|
|
|
Join Date: Aug 2009
Location: Adelaide,
SA
Cobra Make, Engine: AP 289FIA 'English' spec.
Posts: 13,152
|
|
Not Ranked
Quote:
Originally Posted by mickmate
I'm chuckling at your "Hey Joe" analogy. We were looking at the stripes on an original car that are off centre, masked with a piece of cardboard held in place etc and said to ourselves "I'm going out for a haircut and want stripes on that when I get back". I think you're exactly right when you look at the variations....
|
I'm just imagining "Hey Joe, you dummy, I wanted them on the other end" |
02-27-2012, 04:39 AM
|
|
Senior Club Cobra Member
|
|
|
Join Date: Sep 2000
Location: Holderness, NH, US of A,
NH
Cobra Make, Engine: CSX 4772 old iron FE
Posts: 5,499
|
|
Not Ranked
That's funny. "Well boss we could turn them around or put a couple more on the other end, what would like to do?"
"Let's do both and really keep em guessing."
|
02-27-2012, 06:58 AM
|
|
CC Member
|
|
|
Join Date: Mar 2003
Location: McConnellsburg,
PA
Cobra Make, Engine: ERA FIA #2124
Posts: 687
|
|
Not Ranked
Quote:
Originally Posted by ceslaw
Thanks for the offer Allen. I ordered a set and they arrived in Saturdays mail. If I build a second set I may take you up on that offer.
Have you seen a source for the plain covers without the breather tube or PCV opening? I would like to find a set so we can make a four stack. No one seems to sell them and have not seen them on EBay.
|
Chuck:
This is the closest i've come up with as reproductions go...available @ Speedway Motors..
 Small Block Ford Steel Valve Covers with Breather - Speedway Motors, America's Oldest Speed Shop
- Allen. |
02-27-2012, 05:09 PM
|
|
CC Member
|
|
|
Join Date: May 2006
Cobra Make, Engine:
Posts: 140
|
|
Not Ranked
Allen
I had seen those covers. They don't have the shape of the originals. I suspect those are intended for circle track cars.
Chuck
|
02-29-2012, 10:44 AM
|
|
CC Member
|
|
|
Join Date: May 2006
Cobra Make, Engine:
Posts: 140
|
|
Not Ranked
Paint and Labels
The gold paint was sanded and roughed up a bit and then the covers were painted with Duplicolor Cast Coat Aluminum paint. After drying for several days it was baked in the oven for a couple of hours at 200 degrees. Nothing fancy. Probably similar to what Joe would have done.
The COBRA decals were added. These were ordered from Cobra Restorers. Part number DC051. You will need two.
We took our time installing the labels. First the COBRA and the Shelby were cut apart. Then a tiny notch was taken out of each corner since sharp corners tend to peel back with time. Only a small 1/8 notch is necessary. Anything larger will be noticeable.
Blue masking tape was used to define the location of the labels to assure they would be even on both sides. Use the blue tape since it will come off more easily than the yellow or green tape. There is no need to press it into place; it is only being used as a guide.
Mix a cup of water with a drop of dish washing soap. (The soap breaks the surface tension of the water). Peel the backing off the label and then dip it in the soapy water. Using a tweezers, carefully place it where it should be. The water will prevent the label from grabbing into place before it is aligned. Using a squeegee, gently force the water out.
Pull the tape off as soon as the labels are in place, and then wipe away the excess water.
|
02-29-2012, 11:25 AM
|
|
CC Member
|
|
|
Join Date: Mar 2003
Location: McConnellsburg,
PA
Cobra Make, Engine: ERA FIA #2124
Posts: 687
|
|
Not Ranked
These have an adhesive backing, correct? The water/drop of dish soap was only used to aid in the positioning of the decals..??
I'll be doing this very shortly and wanted to make sure I understood you..the use of the water reminds me of the model decals I'm familiar with..
- Allen.
|
02-29-2012, 11:43 AM
|
|
CC Member
|
|
|
Join Date: May 2006
Cobra Make, Engine:
Posts: 140
|
|
Not Ranked
Yes, they have an adhesive backing. The soapy water is only to aid positioning and when the water is squeezed out you are less likely to have air bubbles.
|
02-29-2012, 12:24 PM
|
 |
CC Member
|
|
|
Join Date: Mar 2006
Location: San Marcos california,
CA
Cobra Make, Engine: 1989 KCC from South Africa Right Hand Drive
Posts: 1,607
|
|
Not Ranked
Window tint is just a huge sticker too!
|
02-29-2012, 01:39 PM
|
|
Senile Club Cobra Member
|
|
|
Join Date: Feb 2001
Location: Buffalo, NY USA,
NY
Cobra Make, Engine: Superformance
Posts: 4,575
|
|
Not Ranked
The paint used was "Ford Argent" and is available from your local Ford dealer P/N PM-19K207-AA
__________________
"I'm high all right, but on the real thing....powerful gasoline and a clean windshield..."
rick@autoventureusa.net
|
02-29-2012, 05:53 PM
|
|
CC Member
|
|
|
Join Date: May 2006
Cobra Make, Engine:
Posts: 140
|
|
Not Ranked
Quote:
Originally Posted by Mark IV
The paint used was "Ford Argent" and is available from your local Ford dealer P/N PM-19K207-AA
|
Excellent information ! I used the Duplicolor primarily because it is an engine paint rated for high temps. Probably not necessary but past experience with the durability of engine paints has been good. |
 Posting Rules
|
You may not post new threads
You may not post replies
You may not post attachments
You may not edit your posts
HTML code is Off
|
|
|
All times are GMT -7. The time now is 01:30 PM.
Links monetized by VigLink
|


 Linear Mode


