Welcome to Club Cobra! The World's largest
non biased Shelby Cobra related site!
- » Representation from nearly all
Cobra/Daytona/GT40 manufacturers
- » Help from all over the world for your
questions
- » Build logs for you and all members
- » Blogs
- » Image Gallery
- » Many thousands of members and nearly 1
million posts!
YES! I want to register an account for free right now!
p.s.: For registered members this ad will NOT show
 
 Main Menu
|
|
Nevada Classics
|
|
Advertise at CC
|
|
May 2026
|
| S |
M |
T |
W |
T |
F |
S |
| |
|
|
|
|
1 |
2 |
| 3 |
4 |
5 |
6 |
7 |
8 |
9 |
| 10 |
11 |
12 |
13 |
14 |
15 |
16 |
| 17 |
18 |
19 |
20 |
21 |
22 |
23 |
| 24 |
25 |
26 |
27 |
28 |
29 |
30 |
| 31 |
|
|
|
|
|
|
|
|
CC Advertisers
|
|
 2Likes 2Likes

06-30-2007, 10:22 AM
|
 |
CC Member

|
|
|
Join Date: Mar 2001
Location: Provo,
Ut
Cobra Make, Engine: Kirkham, 427
Posts: 6,990
|
|

 Not Ranked
 Kirkham Motorsports Assembly Manual
Fellow Car Nuts:
***IMPORTANT NOTE***
Because no one is posting on this thread (except me and Ron) you can SUBSCRIBE to this thread and have it EMAIL you updates every time I update the thread with a new post.
When viewing the thread...above the first post is a Pull-Down that is called THREAD TOOLS.
In there you can pull down "SUBSCRIBE TO THREAD."
Then you can pick how you want to be notified every time a new post is made!
This site is COOL!
Back to the thread:
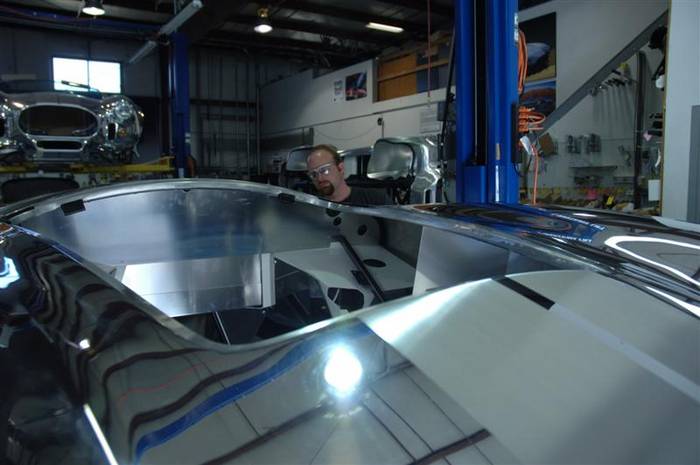
We are putting together two very special cars right now for a GREAT customer. I can't say who they are right now, but one of the cars will be shown at the SAAC Convention at Miller Motorsports Park this next weekend.
We figured as we put the cars together, we would photo document the process so everyone could see what we do and how we do it. Most importantly, we hope to show WHY we do what we do.
To keep the continuity of this thread, PLEASE post all questions on the Assembly Manual Questions Thread
Please keep this thread on topic--no discussions of the family dog, bench racing, politics, the war in Iraq, Nifong, or where to get a good burrito (well, maybe we'll let that one slide). We DO solicit your questions, comments, insights, ideas, suggestions and preferences! We want to make this thread as best as we can. We have sold well over 500 cars now and we probably can't see forest for the trees so we need your help to see what we can't see. Ain't the internet GREAT! How did we live before?
Next, a little advise. Putting a car together is EXTREMELY difficult and time consuming. It takes us about 100 man hours to assemble a car--without putting in an engine or transmission. I figure it would take a customer about 300-400 hours to do the same work. This blog can not and will not replace common sense. If you are not comfortable putting a car together or you do not have very much experience, then DON'T DO IT! Please leave it to someone else who is competent. I have seen many, many poor and DANGEROUS assembly jobs (a very few, unfortunately, even on our own cars--that customers or their own "mechanics" have put together). Some of the WORST work I have seen has been from "Professionals" who definitely should have known better. I have seen some things that I can not believe made it in our door without killing the customer (like the man who drove his original Cobra up here from California with a "little rattle" and didn't think much of it. When he pulled in I heard the rattle in the front end and I asked him about it. He quipped, "I don't know, it has ALWAYS been like that!" I took the wheel off and started checking things. I grabbed the caliper and it moved... I then removed the caliper bolts with my FINGERS (ONE THREAD LEFT BEFORE he was featured on You Tube) and handed them to him!
Now, back to the fun stuff!
The first thing to do, of course is to buy yourself a cool Kirkham Motorsports 427 KMS/SC and get it into your garage. Grab your son, son in law, neighbor, or buddy and SMILE because your dream is about to come true. Grab a cold drink and smile again.
It won't be long before you see you NEED to get yourself a car lift. It makes assembly MUCH easier. You can always tell your wife you NEED the lift to "save" money--or something like that. (Remind her this is a father-son, father-buddy bonding experience and besides, it it cheaper than seeing a shrink. We call it Garage Therapy.) You know what excuse works best on your wife so we will leave any other stories to you.

First thing to do is to get your car on the lift.
David

Last edited by David Kirkham; 08-03-2007 at 09:15 PM..
|
-
Advertising

06-30-2007, 10:28 AM
|
|
CC Member
|
|
|
Join Date: Mar 2001
Location: Provo,
Ut
Cobra Make, Engine: Kirkham, 427
Posts: 6,990
|
|
Not Ranked
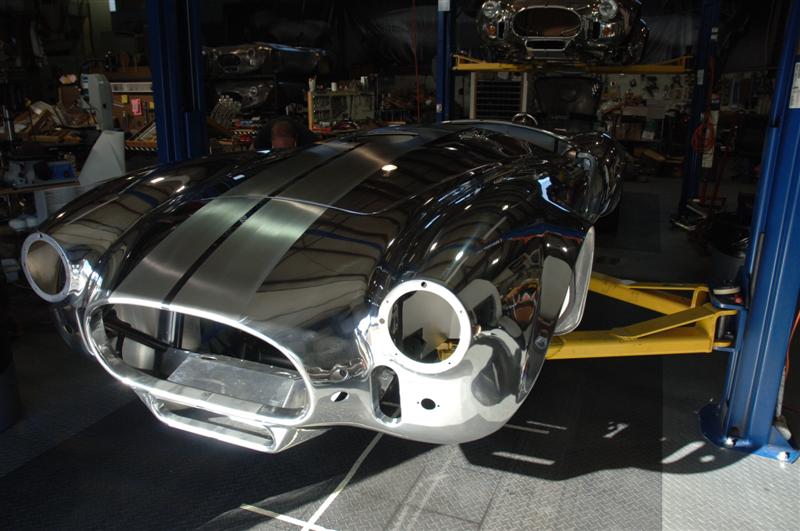
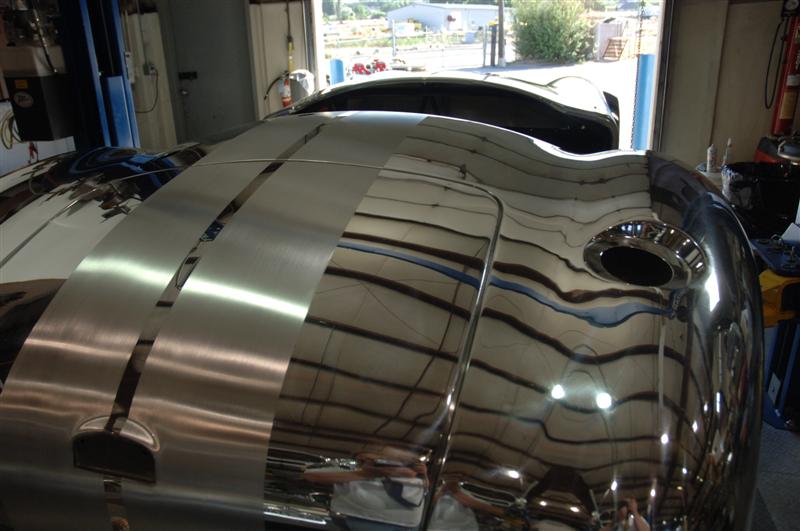
Rear of KMP0521
 |
06-30-2007, 10:31 AM
|
|
CC Member
|
|
|
Join Date: Mar 2001
Location: Provo,
Ut
Cobra Make, Engine: Kirkham, 427
Posts: 6,990
|
|
Not Ranked
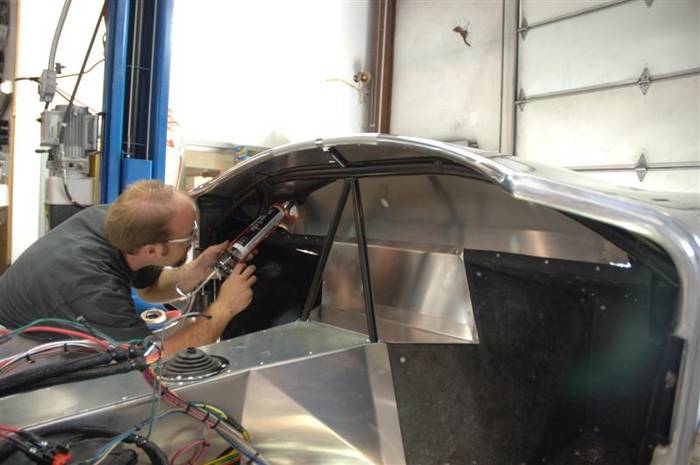
The first thing to do is to look at the car and seal up any holes in the firewall. Years ago, we had a friend, Chuck, who came to the shop and showed us his Nova he used for drag racing. When he opened the hood to show off his engine my brother, Thomas, noticed a BIG 4 inch hole in his firewall where the heater used to be. (Drag racers like to remove EVERYTHING from their car. They are crazy about removing just a few pounds. Funny thing is most of them could go to the gym and remove 50 pounds off their own rear end and get a much cheaper and better effect...I digress). Anyway, my brother saw the hole and informed him, "There is a reason they call it a firewall. If you have an engine fire, you will roast." Indeed that very weekend we saw on the evening news Life Flight had been called to the track. We knew Chuck was racing a Nova that looked too much like the black burned out bomb on the evening news...
When we went to visit him in the the University of Utah's burn unit, he was burned so badly we didn't recognize him. He searched our eyes and kept asking how he looked (they don't allow mirrors in the burn unit). He spent months in recovery. Fortunately, he finally finished therapy with full use of all the parts that got burned and remarkably little scarring. Luckily, his face was almost entirely spared because of his helmet and thanks to the excellent staff at the University of Utah Burn Unit who cared for him. Of course, as his friend, we now call him "Chuck Roast." So, anyone who works on a Kirkham, or any other cool car...SEAL YOUR FIREWALLS!
David
I just had a GREAT question PM'd to me.
David,
Don't want to mess up your thread with a question like this, so I thought I'd ask it offline: what do you use to caulk with?
After your stern lecture/story on sealing the firewall which I heartily endorse I must ask: is your caulking fireproof?
Not being critical, just asking,
Gents:
These are the EXACT questions I welcome people asking. PLEASE don't be shy...post any questions on the Assembly Manual Questions Thread
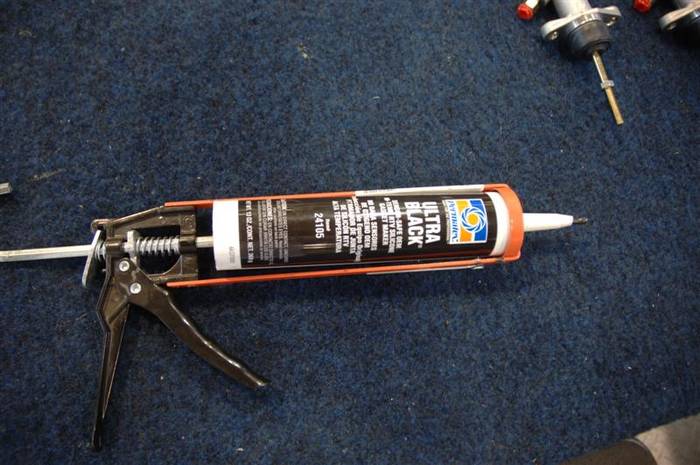
We use 100% silicon caulking because it has a very high temperature resistance. Is it "fire proof?" Well, no, but neither are you at 400 degrees! It is all about getting time to get out.
This is what we use. Notice it is HIGH TEMPERATURE!
Last edited by computerworks; 07-02-2007 at 08:24 AM..
|
06-30-2007, 11:56 AM
|
|
CC Member
|
|
|
Join Date: Mar 2001
Location: Provo,
Ut
Cobra Make, Engine: Kirkham, 427
Posts: 6,990
|
|
Not Ranked
Last edited by David Kirkham; 06-30-2007 at 03:59 PM..
|
06-30-2007, 12:15 PM
|
|
CC Member
|
|
|
Join Date: Mar 2001
Location: Provo,
Ut
Cobra Make, Engine: Kirkham, 427
Posts: 6,990
|
|
Not Ranked
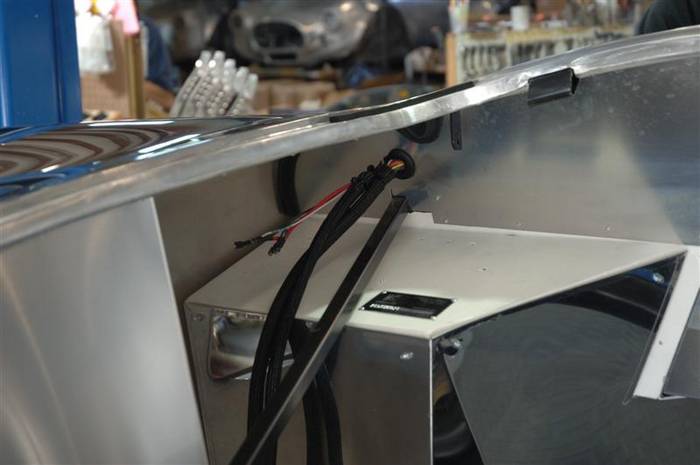
The first item of business it putting in the wiring harness. You want to put the wiring in NOW because nothing is in the way and the harness strings through the entire car.
In this picture, you are looking at the engine firewall. You are standing at the front of the car looking back across the engine bay. The hole in the firewall just above the foot box (the white box with the black Kirkham data tag on it) on the RIGHT side of the CAR is for the part of the harness that goes to the alternator, head lights, and MSD wires.
I suppose NOW is the best time to define LEFT and RIGHT. Whenever we say left or right, we are ALWAYS referring to the left or right side of the car--not the photo. (If we are referring to the left or right side of a photo we will very explicitly say just that.) By convention, LEFT and RIGHT is designated as if you were driving the car. That is why cars in England, Australia, and many other countries are called Right Hand Drive cars--the steering wheel is on the right hand side of the car.

David |
06-30-2007, 12:18 PM
|
|
CC Member
|
|
|
Join Date: Mar 2001
Location: Provo,
Ut
Cobra Make, Engine: Kirkham, 427
Posts: 6,990
|
|
Not Ranked
Close up of the hole.
 |
06-30-2007, 12:29 PM
|
|
CC Member
|
|
|
Join Date: Mar 2001
Location: Provo,
Ut
Cobra Make, Engine: Kirkham, 427
Posts: 6,990
|
|
Not Ranked
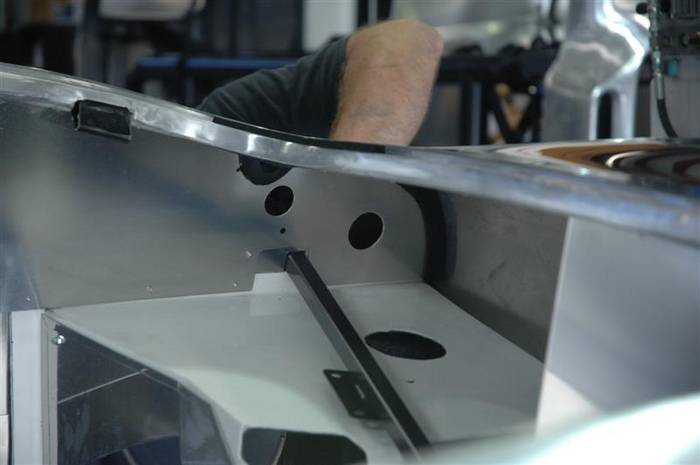
Left side hole.
The wiring goes in the hole closest to the center. The wiper tube and the sending unit wiring from the dash goes through the outboard hole.
The big round hole in the top of the foot box (to the right (in the photo) of the 3/4 x 3/4 square tubing) is for the fresh can from the fresh air system which will be installed later.
The funny shaped hole in the front corner of the foot box is for the accelerator pedal assembly which will be installed later.
You can see the stainless heat shields which were installed in Poland on the foot boxes.
and close up.
Last edited by David Kirkham; 07-03-2007 at 08:05 AM..
|
06-30-2007, 01:15 PM
|
|
CC Member
|
|
|
Join Date: Mar 2001
Location: Provo,
Ut
Cobra Make, Engine: Kirkham, 427
Posts: 6,990
|
|
Not Ranked
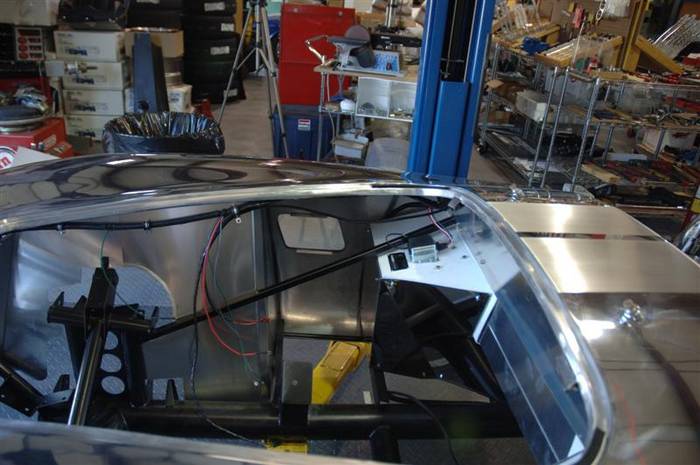
Next put the wiring harness in the cockpit of your car. All of the wiring is strung from the right side of the car.
 |
06-30-2007, 01:26 PM
|
|
CC Member
|
|
|
Join Date: Mar 2001
Location: Provo,
Ut
Cobra Make, Engine: Kirkham, 427
Posts: 6,990
|
|
Not Ranked
Put the fuse box on the right foot box floor. Drape the left-forward part of the harness (headlights, wiper motor, horn, fan) UNDER the tube in the center of the car (under the windshield cowl) and string the harness through the INBOARD hold in the firewall (pictured in the above photos). You run the harness UNDER the tubes in case you ever have to take the harness out again for some reason. Remember to put in the grommet when you get the fuse box bolted in.
Take the right-forward part of the harness and string it through the hole in the firewall above the right foot box. Remember to put in the grommet when you get the fuse box bolted in.
Last edited by David Kirkham; 06-30-2007 at 01:39 PM..
|
06-30-2007, 01:28 PM
|
|
CC Member
|
|
|
Join Date: Mar 2001
Location: Provo,
Ut
Cobra Make, Engine: Kirkham, 427
Posts: 6,990
|
|
Not Ranked
We hold the harness in (under the dash) with plastic "zip" ties.
 |
06-30-2007, 01:32 PM
|
|
CC Member
|
|
|
Join Date: Mar 2001
Location: Provo,
Ut
Cobra Make, Engine: Kirkham, 427
Posts: 6,990
|
|
Not Ranked
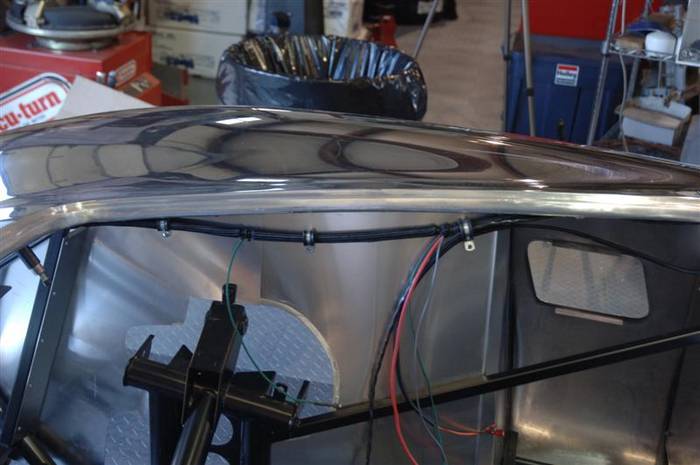
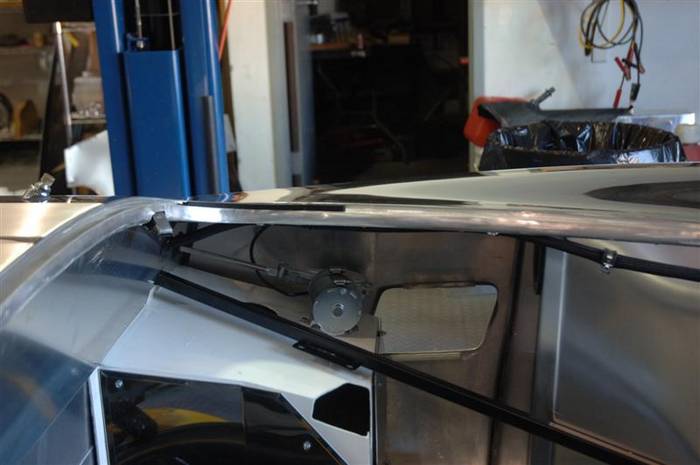
Left side wiring going forward.
Engine compartment side:
Cockpit view left side. You can see we have already run the wiper tube, but I can't type as fast as they are installing the parts! We will get the the wiper system shortly.
Last edited by David Kirkham; 06-30-2007 at 04:07 PM..
|
06-30-2007, 01:37 PM
|
|
CC Member
|
|
|
Join Date: Mar 2001
Location: Provo,
Ut
Cobra Make, Engine: Kirkham, 427
Posts: 6,990
|
|
Not Ranked
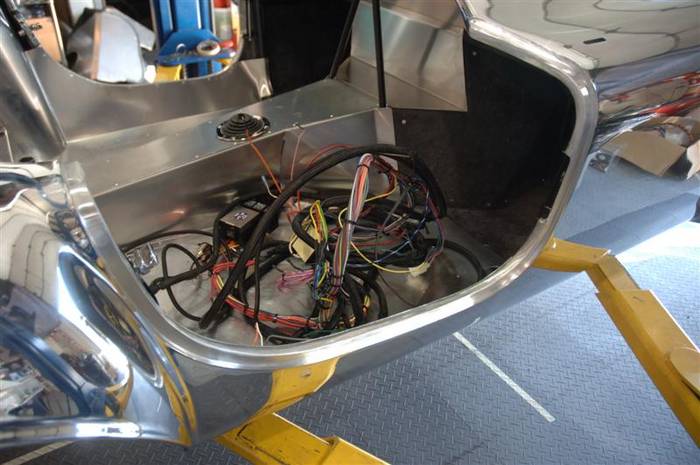
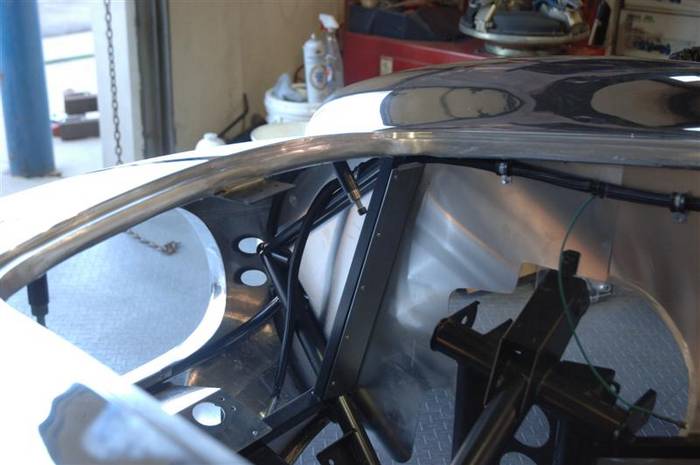
Right side wiring.
Engine compartment view, right side:
Cockpit view. At this time, if you are running a MSD (we recommend the Digital 6 Plus) then you will need to run the coil leads and the distributor lead out along with the rest of the wires.
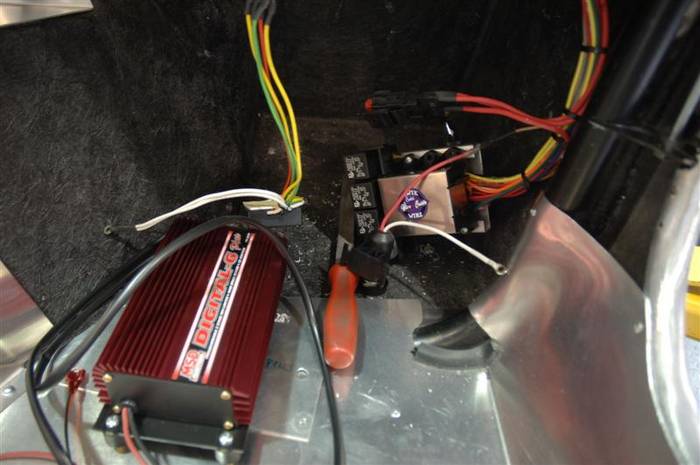
Now let's get the fuse box, power outlet, and main bus fuse (very important) bolted up to the under side of the right foot box.
Now you can bolt in your MSD box.

Last edited by David Kirkham; 07-03-2007 at 08:07 AM..
|
06-30-2007, 02:27 PM
|
|
CC Member
|
|
|
Join Date: Mar 2001
Location: Provo,
Ut
Cobra Make, Engine: Kirkham, 427
Posts: 6,990
|
|
Not Ranked
Now that we are on the MSD (and if you don't want to be stuck on the side of the road with burned out points (and Corvette guys laughing at you), you SHOULD have an MSD), we should take a few moments to show you how to hook it up so you don't turn the key and wonder why your motor isn't running (or why your tach isn't working) while your friends start laughing at you.
Now for the question that has been asked us at least a million times. How do I hook up my MSD box?
To begin with, you will need to cut the blue and pink wires that come out of the box by the distributor lead. The distributor lead has the plastic fitting on the end (you can see it in the picture). You will also need to snip the green wire in half. (It comes as a loop from MSD). We heat shrink all those wires together to the distributor lead so they can't short out on something.

Coil wire hook up on MSD is as follows. This works if you are using a MSD distributor.
Find the pink and white wires that come out of the middle of the MSD box--they are covered in a plastic sheath. Cut them off to about 6 inches long and remove the plastic sheathing so you can see the wires and work with them. Cut the white wire off to about 3 inches long. Put a male 1/4 spade connector on the end of the pink wire (which is hopefully still 6 inches long). Make sure you heat shrink the junction between the spade and the wire to give it strength so it will not fatigue out over time.
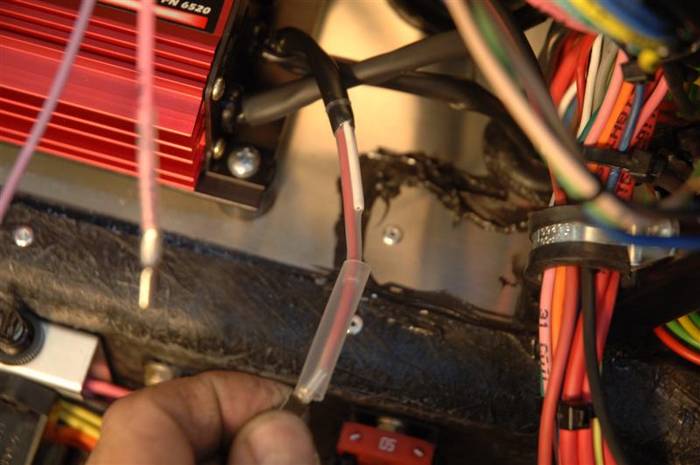
Take the pink wire labeled "Coil" from the wiring harness and...
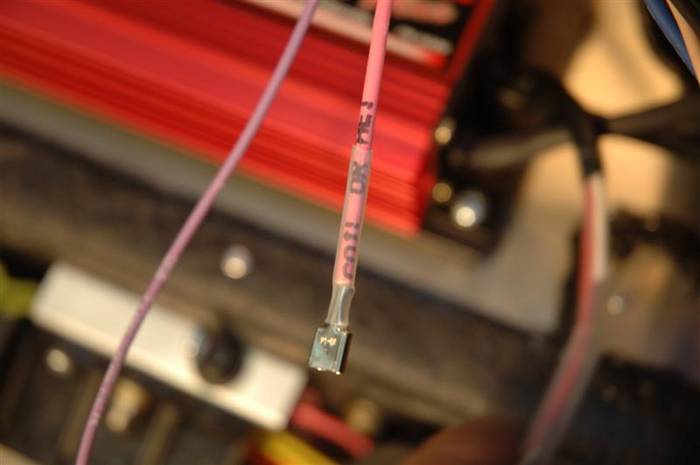
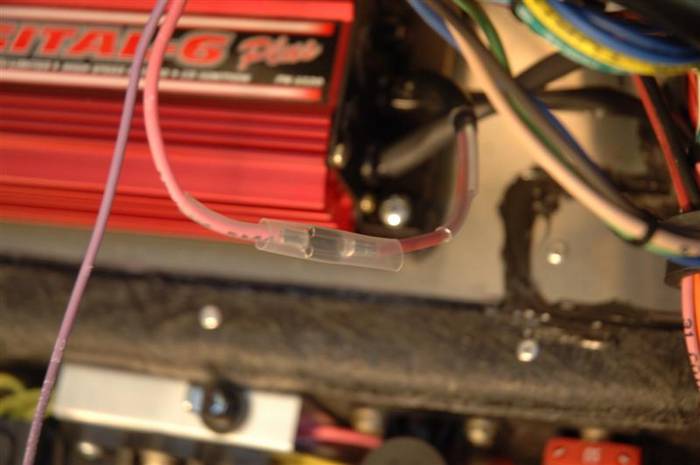
Then, connect it to the pink wire from the MSD box you just put the 1/4 male spade on (complete with the recommended heat shrink on the wire to connector joint). Notice how we put an additional heat shrink over the entire joint to make sure it can't come apart or short out somewhere. (We have not yet "shrunk" the heat shrink tubing in the bottom picture.) Almost ALL electrical failures are failures of connections--not failures of the part that is "not working."
Last edited by David Kirkham; 07-02-2007 at 07:22 AM..
|
06-30-2007, 02:31 PM
|
|
CC Member
|
|
|
Join Date: Mar 2001
Location: Provo,
Ut
Cobra Make, Engine: Kirkham, 427
Posts: 6,990
|
|
Not Ranked
See the purple wire in the above picture? (Right next to the pink wire we just plugged in).
Here is it...that wire is labeled tachometer--albeit upside down.
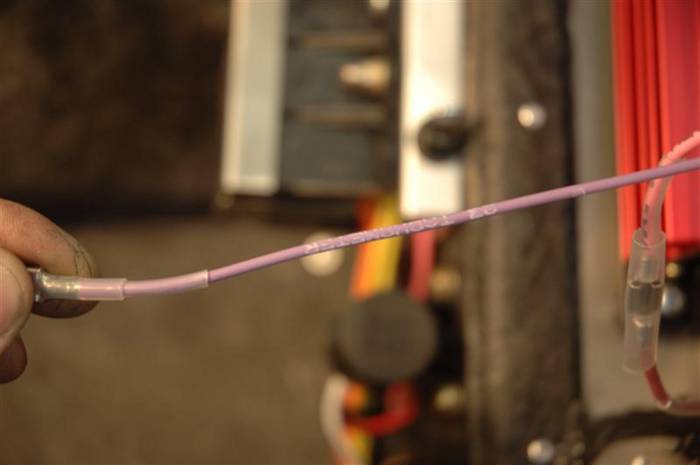
That wire plugs in right here on the MSD box.

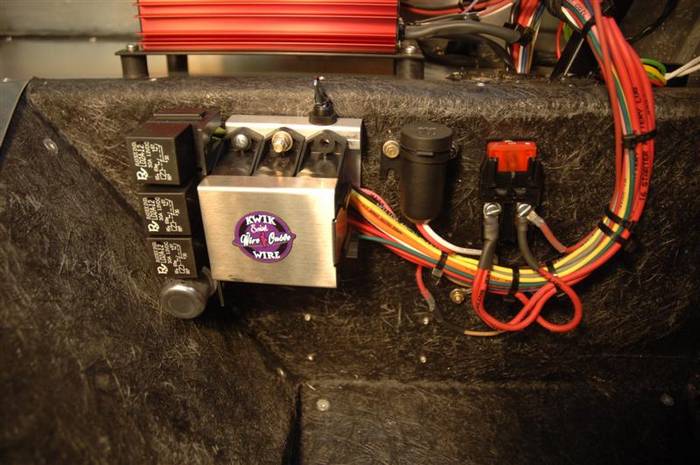
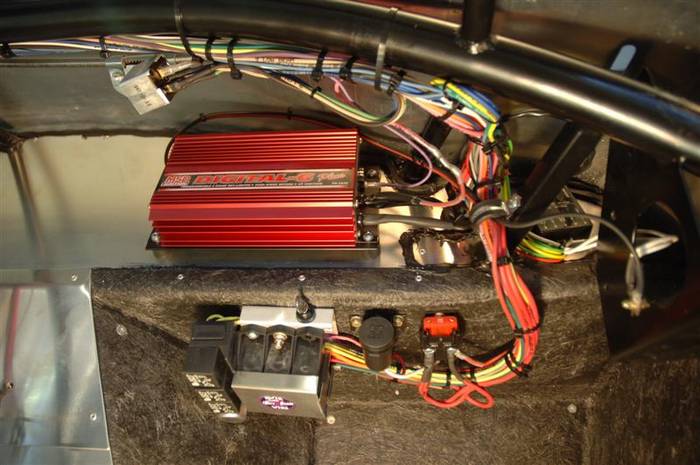
There is a BIG red wire that comes off of the other side of the MSD box. We are holding on to the wire in the picture. The wire comes from the opposite side of the MSD box from where we just plugged in the tach. This wire is hooked up to switched power. We conveniently have switched power right here at the main bus fuse. Hook it up.

Finally, you need to hook up your MSD ground. We do that by drilling a hole in the windshield bracket (right side) and bolting the wire to the bracket. Be sure to grind the powder coating off of the bracket so you get a good ground. (This is not necessary for those who have stainless chassis cars.) In the picture, we also bolted the stop/turn signal flasher relay (2 white wires) to the same grounding spot. You can see the relay in the upper right hand portion of the picture.

Here is a picture of everything hooked up and bolted down. Notice the power outlet we provide for you in the car. Very handy for cell phone chargers or anything else you may need power for.
Last edited by David Kirkham; 07-03-2007 at 08:16 AM..
|
06-30-2007, 04:44 PM
|
|
CC Member
|
|
|
Join Date: Mar 2001
Location: Provo,
Ut
Cobra Make, Engine: Kirkham, 427
Posts: 6,990
|
|
Not Ranked
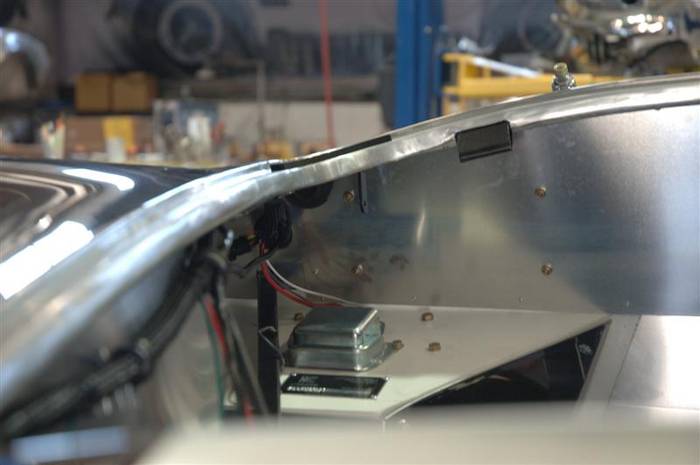
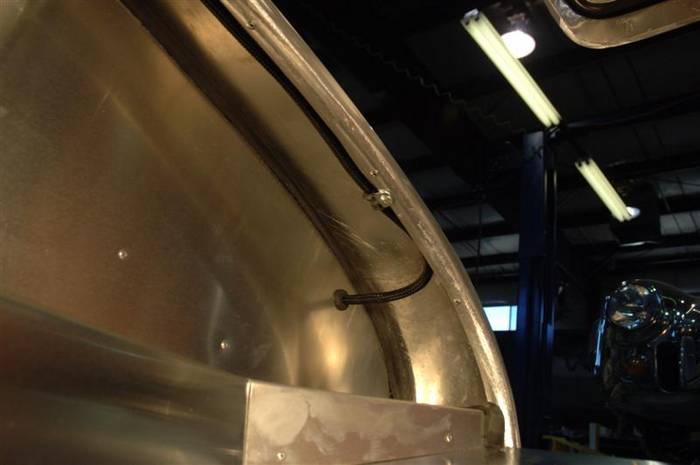
The wiring now runs down the sides of the engine compartment. We use adell clamps to hold the wiring in place. We rivet the adell clamps in place.
Here we have just run the right side wiring down the edge of the engine compartment.
Here is the middle of the engine compartment.
Here is the front of the engine compartment.
Then we passed the wiring over the aluminum panel at the front edge of the engine compartment. Notice we put a piece of plastic over the sharp edge of the aluminum panel to prevent chaffing of the wiring over time as you DRIVE your car with a BIG smile. Chaffing = electrical shorts = you are caught with your shorts down by electrical gremlins = your friends laughing at you again. So to keep yourself smiling (and driving), we recommend protecting your wiring harness at every corner.
Now you can hook up your voltage regulator! Unless you have right-angled fingers, it is MUCH easier to connect the voltage regulator BEFORE you bolt it down.
I took a little white paint and tried to bring out the letters on the regulator. They read (bottom up)
I= white wire (from ignition)
A= big red wire (from alternator)
S = grey wire (goes to stator on alternator)
F = green wire with brown stripe (goes to field on alternator) I always remember this because "Fields are Green."
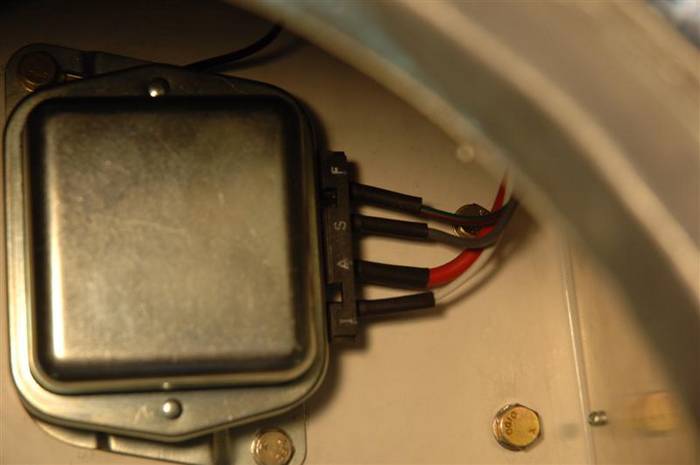
Now you can bolt down your voltage regulator.
This is how we rivet the wiring harness in place just as it leaves the firewall. You are looking up from the bottom of the car through the engine compartment.
Last edited by David Kirkham; 07-03-2007 at 08:18 AM..
|
06-30-2007, 05:23 PM
|
|
CC Member
|
|
|
Join Date: Mar 2001
Location: Provo,
Ut
Cobra Make, Engine: Kirkham, 427
Posts: 6,990
|
|
Not Ranked
Last edited by David Kirkham; 06-30-2007 at 05:26 PM..
|
06-30-2007, 05:29 PM
|
|
CC Member
|
|
|
Join Date: Mar 2001
Location: Provo,
Ut
Cobra Make, Engine: Kirkham, 427
Posts: 6,990
|
|
Not Ranked
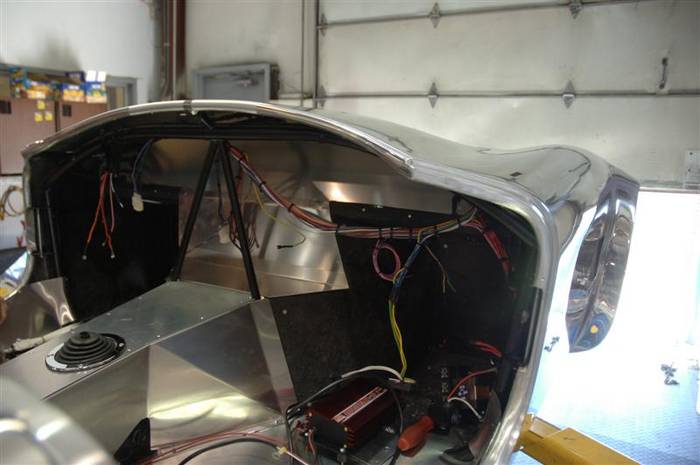
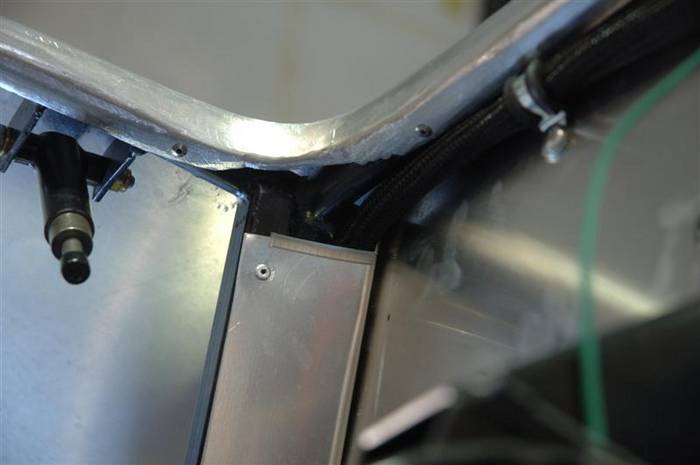
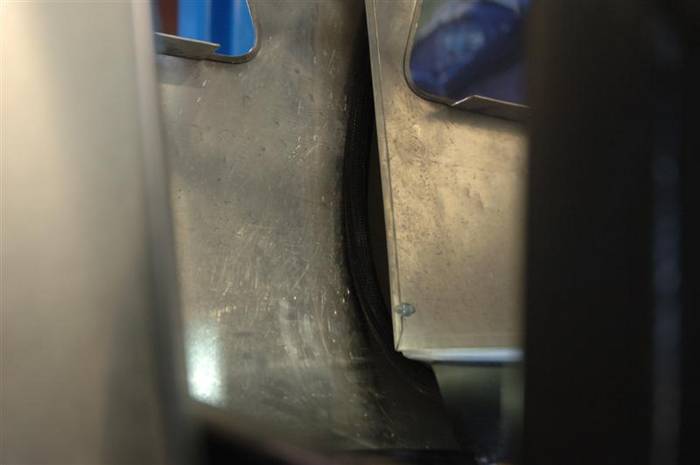
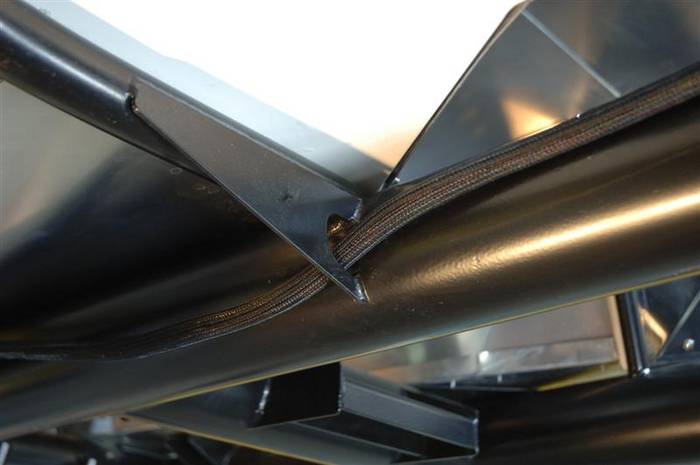
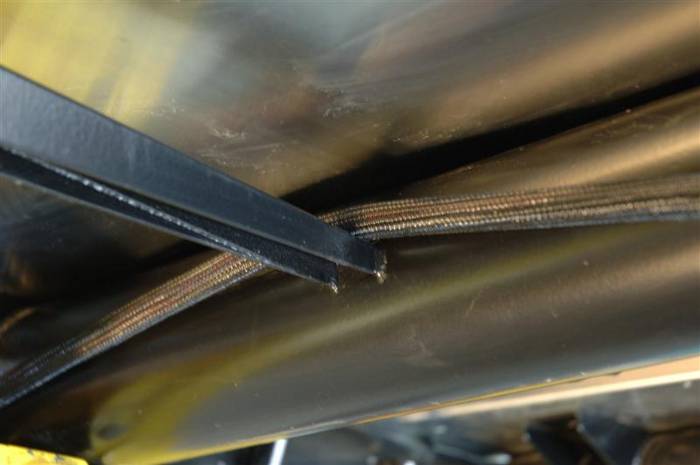
Back to the right side of the car.
The REAR wiring harness makes a sharp turn as it exits the firewall and runs down on the outside of the foot box to a cross lower cross member.

Last edited by David Kirkham; 07-02-2007 at 09:11 AM..
|
06-30-2007, 05:31 PM
|
|
CC Member
|
|
|
Join Date: Mar 2001
Location: Provo,
Ut
Cobra Make, Engine: Kirkham, 427
Posts: 6,990
|
|
Not Ranked
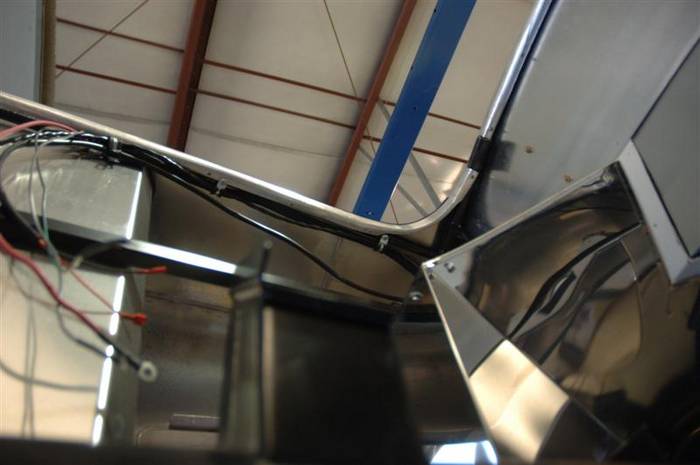
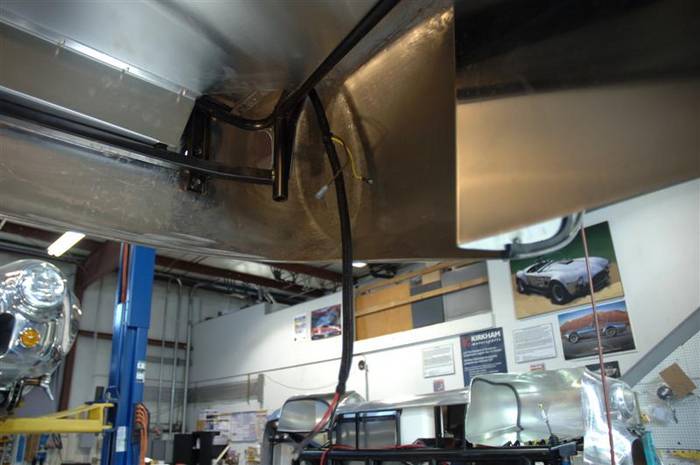
Here is the over view of how the wiring runs to the back of the car.
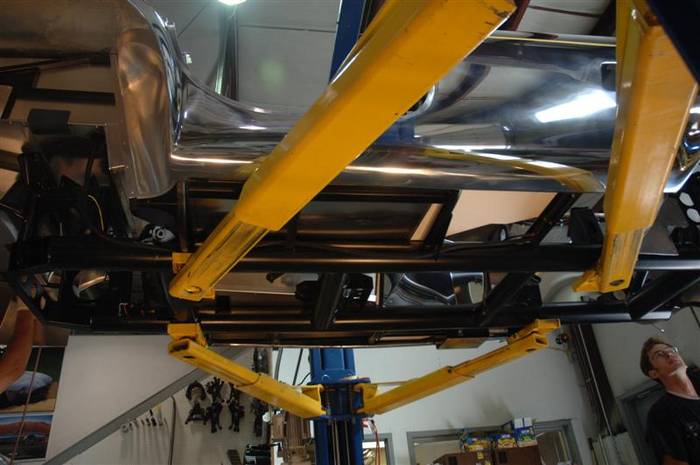
The wiring then rivets to the BACK of the bracket that holds the front of the right foot box.
Here are the connectors for the starter. They come out of the harness right at the right foot box bracket.

The harness then passes through the main cowl support bracket. We laser a hole in this bracket just so you can run the wiring, and battery cables through the hole. Original AC Cobras did NOT have this hole in them and the wiring, fuel lines, and battery cables ran UNDER the sharp edge of the bracket--not good if you have an unexpected 4 x 4 off road experience in your ride. In our cars, we run the fuel lines on the other side...we will get to them later.
Frankly, it is VERY BAD PRACTICE to have ANYTHING hanging under your frame rails--including the bell housing (we will get to that later). Trailer edges, rocks, jacks, jack stands, dips in the road (Al Queda and otherwise), and all sorts of other things have a very strong appetite for gouging and eating such things. The standard rule is, the more expensive the part (think a hole in your oil pan) the more likely a rock will miraculously evade the cheap parts and and eat the oil pan first!
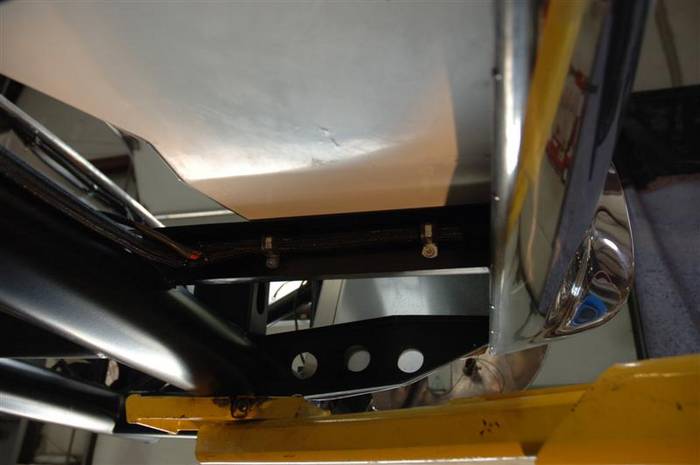
Next you go over the side pipe bracket.
Then through the square tubes that hold the back of the rocker sil onto the main chassis. Then finally, run the wiring up into the FRONT hole in the trunk panel. Don't forget the grommet! The yellow wire you see hanging down and across the frame rail goes to the fuel pump (more on that in a bit). Everything is loose and not riveted in right now on purpose. We run the battery cables down the same path, so we will tie them all up together at a later time.

These wires go to the brake light switch. It doesn't matter which terminal you plug them into on the sender.

Last edited by David Kirkham; 07-03-2007 at 08:27 AM..
|
06-30-2007, 05:32 PM
|
|
CC Member
|
|
|
Join Date: Mar 2001
Location: Provo,
Ut
Cobra Make, Engine: Kirkham, 427
Posts: 6,990
|
|
Not Ranked
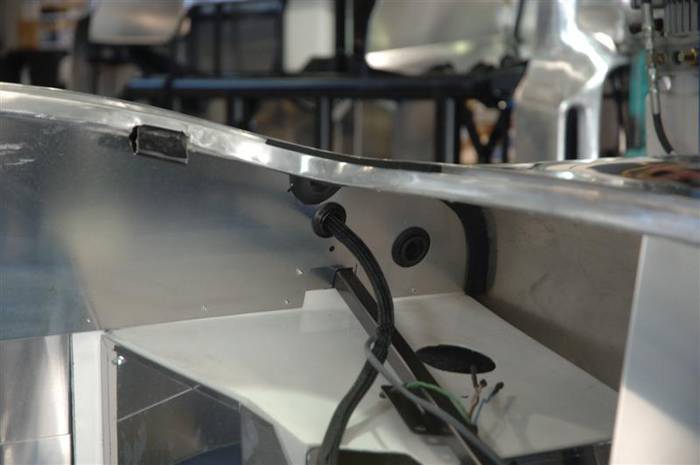
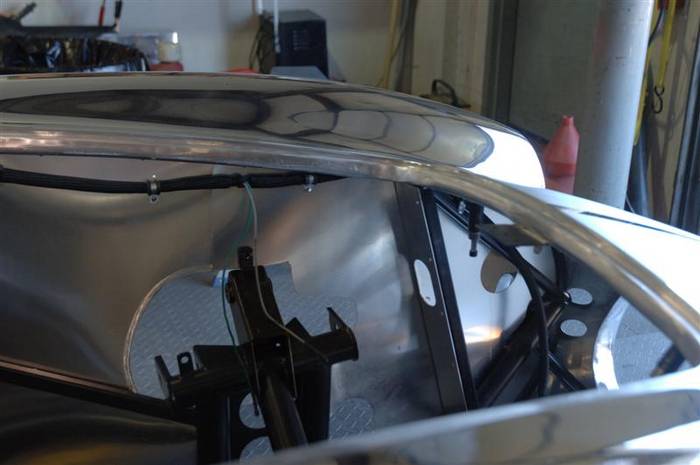
Now we will go to the trunk wiring. Here you can rivet in all of the wiring when you get it run correctly. You can see the battery cables in this picture (dang guys are putting parts in faster than I can post the pics!). Battery cables are pictured in detail below.
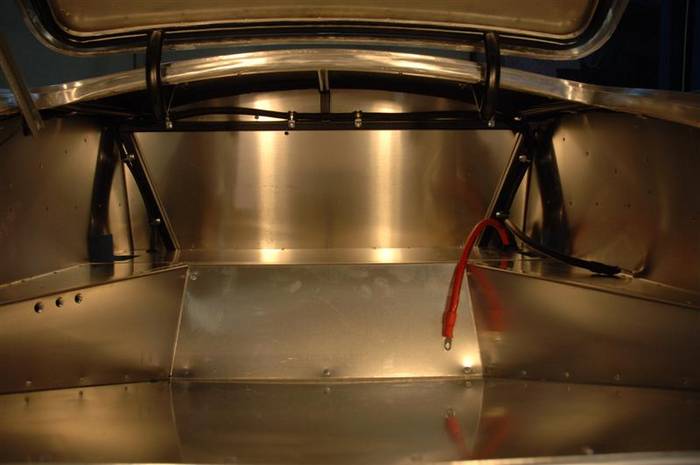
This is a picture of the left rear wiring harness where it connects to the tail lights and the fuel level sender (if you get that option).
Last edited by David Kirkham; 07-02-2007 at 10:00 AM..
|
06-30-2007, 05:45 PM
|
|
CC Member
|
|
|
Join Date: Mar 2001
Location: Provo,
Ut
Cobra Make, Engine: Kirkham, 427
Posts: 6,990
|
|
Not Ranked
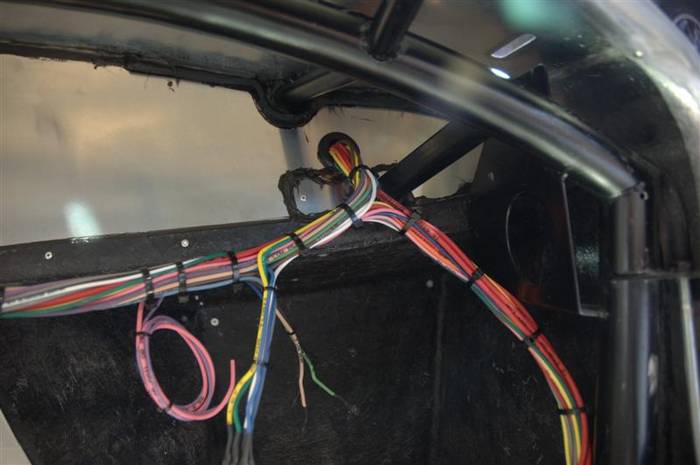
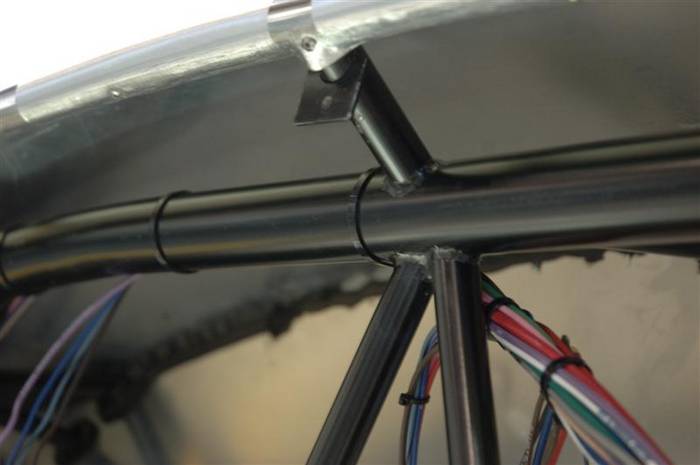
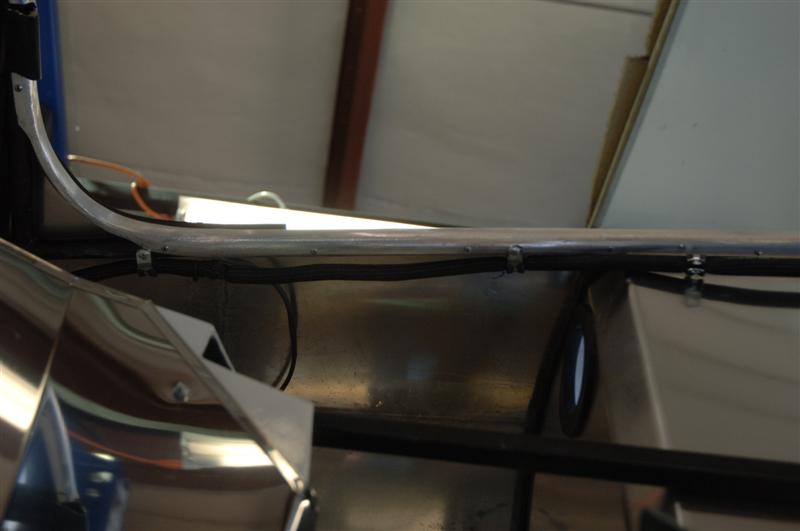
The rear wiring harness now travels along the edges of the trunk tubes.
The left side wiring harness also has the wires that go to the trunk license plate light. There is both a power and a ground that goes to the trunk. Notice how the harness rivets to the under side of the tubes in the trunk. This is the SAME on both the left and the right side.
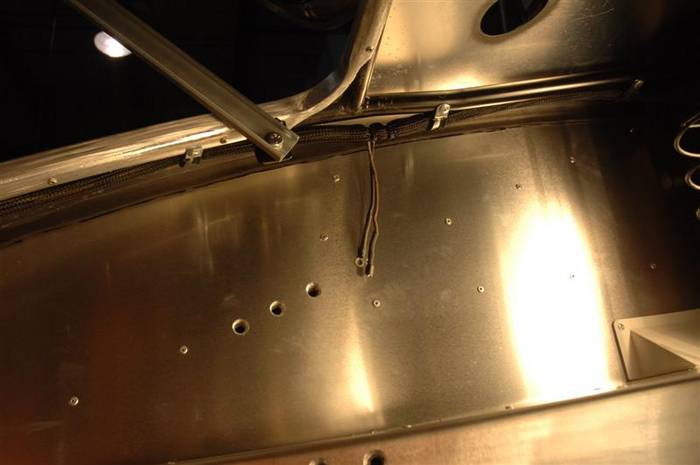
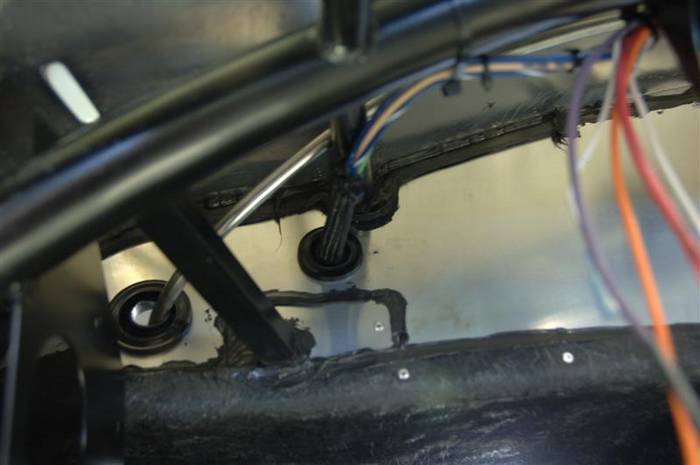
And then out through a hole in the aluminum side panels. REMEMBER THE GROMMET! This is a picture of the left side of the wiring harness. The left side has a BIGGER grommet than the right side as both the tail lights and the fuel tank sending unit wiring are in the same part of the harness here.
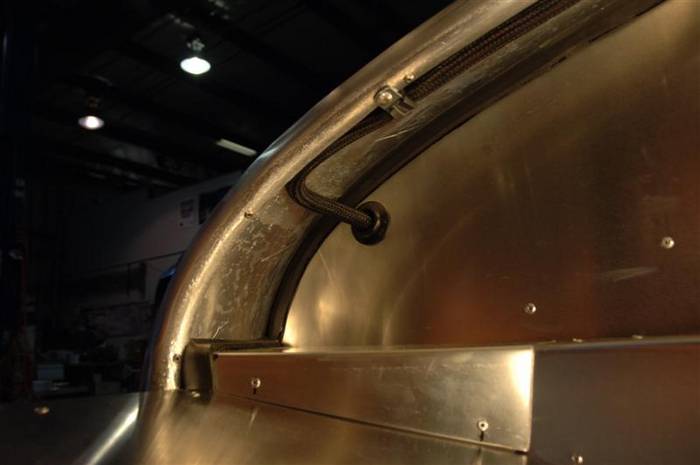
Here is a picture of how the right side harness runs and where it exits the panel to go to the tail lights. Original Cobras run the wiring the same way.
Last edited by David Kirkham; 07-24-2007 at 12:06 PM..
|
 Posting Rules
|
You may not post new threads
You may not post replies
You may not post attachments
You may not edit your posts
HTML code is Off
|
|
|
All times are GMT -7. The time now is 04:50 AM.
|
|


 Linear Mode


