Welcome to Club Cobra! The World's largest
non biased Shelby Cobra related site!
- » Representation from nearly all
Cobra/Daytona/GT40 manufacturers
- » Help from all over the world for your
questions
- » Build logs for you and all members
- » Blogs
- » Image Gallery
- » Many thousands of members and nearly 1
million posts!
YES! I want to register an account for free right now!
p.s.: For registered members this ad will NOT show
 
 Main Menu
|
|
Nevada Classics
|
|
Advertise at CC
|
|
December 2025
|
| S |
M |
T |
W |
T |
F |
S |
| |
1 |
2 |
3 |
4 |
5 |
6 |
| 7 |
8 |
9 |
10 |
11 |
12 |
13 |
| 14 |
15 |
16 |
17 |
18 |
19 |
20 |
| 21 |
22 |
23 |
24 |
25 |
26 |
27 |
| 28 |
29 |
30 |
31 |
|
|
|
|
|
CC Advertisers
|
|
 2Likes 2Likes

08-04-2007, 09:48 AM
|
 |
CC Member

|
|
|
Join Date: Mar 2001
Location: Provo,
Ut
Cobra Make, Engine: Kirkham, 427
Posts: 6,990
|
|

 Not Ranked
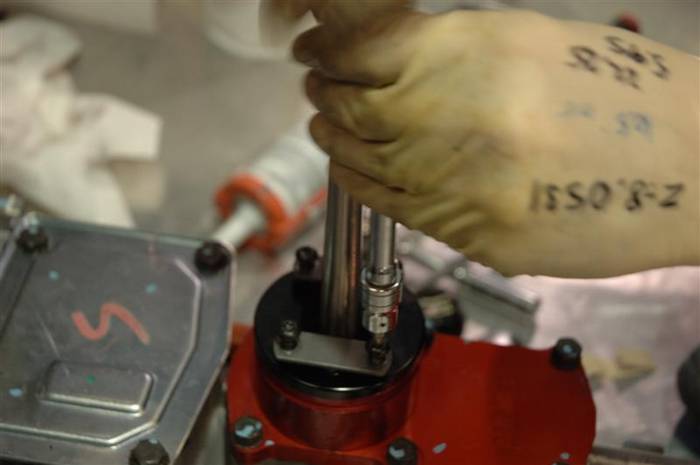
Then bolt the straps back down.
 |
08-04-2007, 09:50 AM
|
|
CC Member
|
|
|
Join Date: Mar 2001
Location: Provo,
Ut
Cobra Make, Engine: Kirkham, 427
Posts: 6,990
|
|
Not Ranked
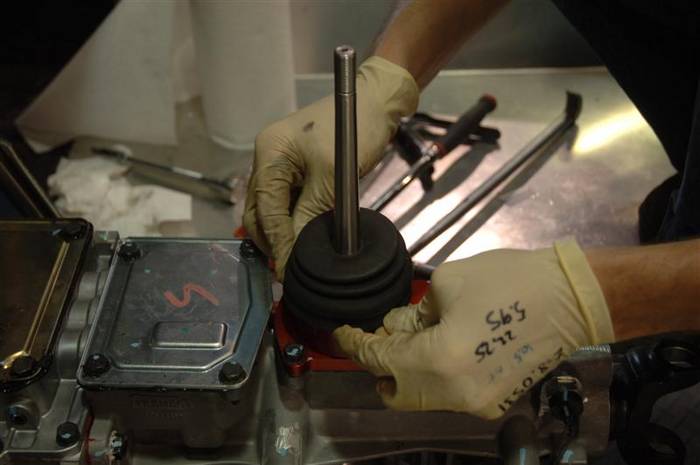
Now put the rubber boot back on.
 |
08-04-2007, 09:52 AM
|
|
CC Member
|
|
|
Join Date: Mar 2001
Location: Provo,
Ut
Cobra Make, Engine: Kirkham, 427
Posts: 6,990
|
|
Not Ranked
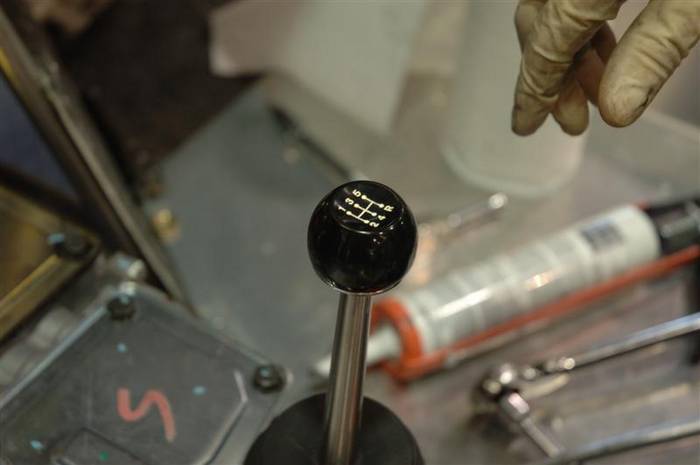
Now you can put the shift knob on and pretend you are Bobby Rahal, Mario Andretti, Jeff Gordon, or Michael Schumacher. 
Remember to take the knob back off before you put the shift boot cover on or you will tear the boot and be very unhappy.
Your Chariot of Fire is now 1 step closer...
 |
08-04-2007, 04:26 PM
|
|
CC Member
|
|
|
Join Date: Mar 2001
Location: Provo,
Ut
Cobra Make, Engine: Kirkham, 427
Posts: 6,990
|
|
Not Ranked
Now it is time to save that beautiful body from road gators, rocks, and gremilins flying up off the road. You know, the ones that like to make the little "outy stars" on the original cars? Well, we glue in 3/8 inch thick black, closed-cell foam. I have had mine on for 9 years now and I haven't had a single dent from a rock being thrown up into wheel well.
Last edited by David Kirkham; 08-04-2007 at 04:36 PM..
|
08-04-2007, 04:28 PM
|
|
CC Member
|
|
|
Join Date: Mar 2001
Location: Provo,
Ut
Cobra Make, Engine: Kirkham, 427
Posts: 6,990
|
|
Not Ranked
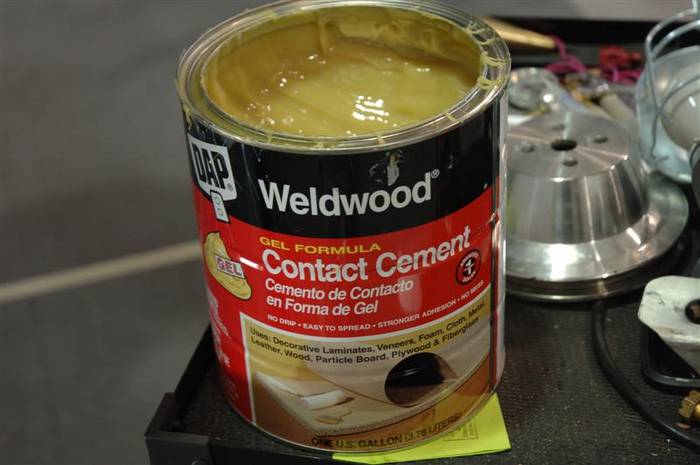
This is some of the stinkiest stuff ever created on earth. I personally HATE the stuff...but man does it stick! We have tried everything and NOTHING sticks like this goo.
Last edited by David Kirkham; 08-04-2007 at 04:43 PM..
|
08-04-2007, 04:36 PM
|
|
CC Member
|
|
|
Join Date: Mar 2001
Location: Provo,
Ut
Cobra Make, Engine: Kirkham, 427
Posts: 6,990
|
|
Not Ranked
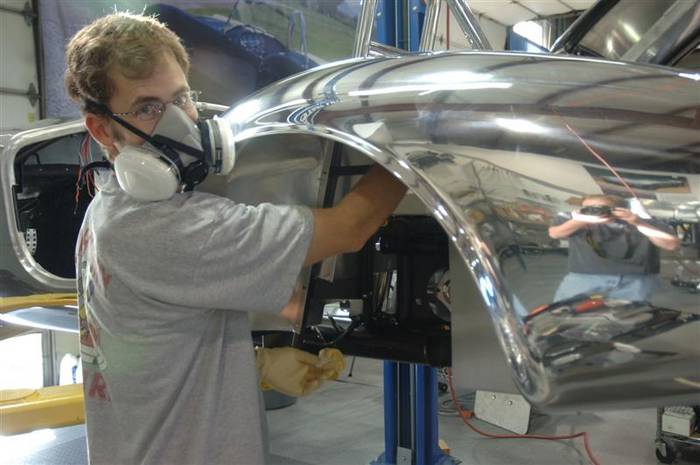
This is one of those times you really need a "buddy" to "help" you. If you are reallllllllly lucky, you can convince him to do it while you go search for parts, pick up cold drinks, go out for burritos, mow your lawn, do some of your wife's honey-do's or best of all, watch SHARK WEEK. If you are not very lucky, then you will need one of these. They are the only thing that will work to keep the fumes out. Even in the dead of winter, we open the overhead door, put a BIG fan in the door, and suck the fumes out. I don't care about the heating cost, but the fumes are deadly. I will never understand how how kids concentrate these fumes and breathe them!
On the bright side, if you or your friends had burritos for lunch, it'll save your nose...but your eyes may still burn
Last edited by David Kirkham; 08-04-2007 at 04:47 PM..
|
08-04-2007, 04:37 PM
|
|
CC Member
|
|
|
Join Date: Mar 2001
Location: Provo,
Ut
Cobra Make, Engine: Kirkham, 427
Posts: 6,990
|
|
Not Ranked

Carefully coat BOTH sides of the parts you want to stick together. In this case, coat the fender foam and then the fender. Don't make a mess or get it on your clothes; it is impossible to get out.
Let them DRY to the touch and then say a prayer. You have to pray to the Cobra gods that you get it right on the first stick--because you will NOT get another chance. Once this stuff touches each other in the dry state, it is permanent! You HAVE to push the CENTER of the fender foam in first to stick the center down. DO NOT BRIDGE the center of the fender and expect to push the foam into place up into a hole. It will never stick. I have NEVER understood this. If you put it where you don't want it, you will have to TEAR it off to change positions. If you push it up into a hollow without sticking the center first, it will fall off. This is really one of the worst jobs on the car.
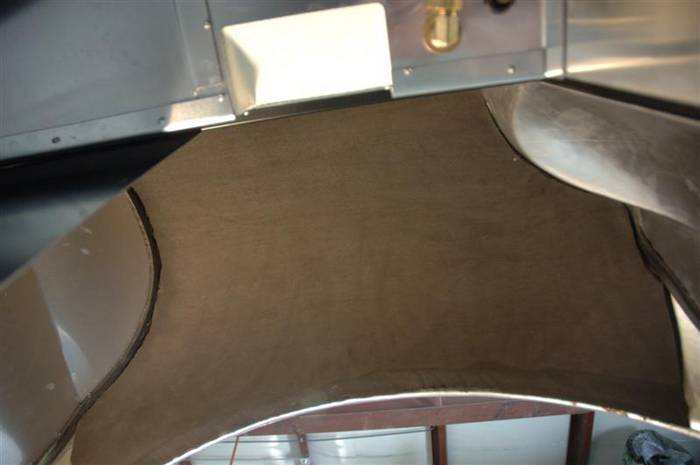
BUT, this is what a really nice job looks like. We actually cut the foam way over sized and then glue it in with the edges hanging out all over the place. We then trim the sides to perfect fit. DO NOT try to fit your foam in perfectly before you glue it in. You will miss and have a crappy job on your hands. You don't have to cover every square inch of exposed aluminum. Rocks are generally only thrown rather straight up.
This is a shot of the top of the left rear fender.
Forward is to the right in this picture. If you look closely at the bottom edge of the foam by the fender lip, you can see we took a small hand grinder and tapered the foam so it didn't stick out so much and look bad. If you are lazy and don't want to trim it (or you really want to have a LOT of fun), just take a few laps around Miller Motorsports Park (or drive up the nearest canyon) and your tire will do the trimming for you.
Last edited by David Kirkham; 08-05-2007 at 04:40 PM..
|
 Posting Rules
|
You may not post new threads
You may not post replies
You may not post attachments
You may not edit your posts
HTML code is Off
|
|
|
All times are GMT -7. The time now is 01:37 PM.
|
|


 Hybrid Mode

