 
 Main Menu
|
|
Nevada Classics
|
|
Advertise at CC
|
|
March 2026
|
| S |
M |
T |
W |
T |
F |
S |
| 1 |
2 |
3 |
4 |
5 |
6 |
7 |
| 8 |
9 |
10 |
11 |
12 |
13 |
14 |
| 15 |
16 |
17 |
18 |
19 |
20 |
21 |
| 22 |
23 |
24 |
25 |
26 |
27 |
28 |
| 29 |
30 |
31 |
|
|
|
|
|
|
CC Advertisers
|
|

08-07-2007, 01:49 PM
|
|
Senior Club Cobra Member

|
|
|
Join Date: Jul 2002
Cobra Make, Engine:
Posts: 15,712
|
|

 Not Ranked

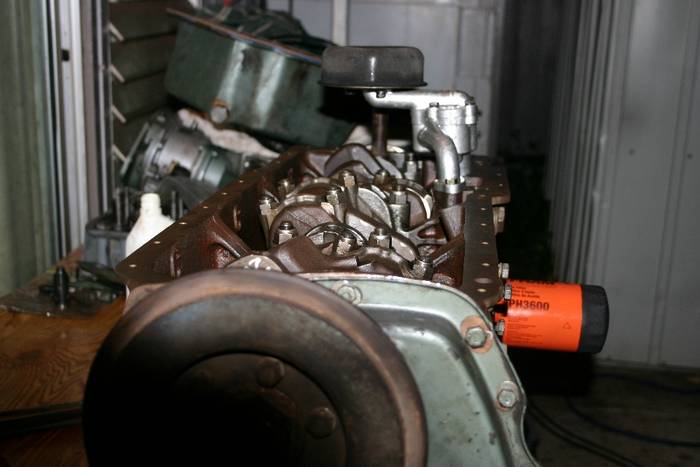
Good advice guys! I'll prime with the funnel through the oil pressure hole, leave the plugs and push rods out and spin it before I put it in the car. Thats the ticket!
I practiced putting the output shaft in the OD when I had the trans apart, knowing it might be a problem, and man was it. I know the bushing is a nice fit and with the output shaft alone it was still a bear to get into place. Now with the added weight and difficult to manuever handling of the trans it seems all but impossible. I'll keep trying... 
The rubber O ring seals go on AFTER the valve retainer is installed, THEN the O ring, then the valve keepers. The O rings are currently simply placed on the valve stem and sit on the top of the guide.
This just in:
The $500 new rocker arms I bought need to have a 'drilled hole' due to machining 'plugged' before use. It is MY responsibility to plug said hole. Sheessshhh, you'd think for $500 bucks they would plug the dang hole as well! I'm thinking a drop of solder... Kind of like building an FE, there seems to be a number of 'tricks' to this engine that aren't in the 'book'.

Last edited by Excaliber; 08-08-2007 at 12:51 AM..
|
08-09-2007, 12:20 AM
|
|
Senior Club Cobra Member
|
|
|
Join Date: Jul 2002
Cobra Make, Engine:
Posts: 15,712
|
|
Not Ranked
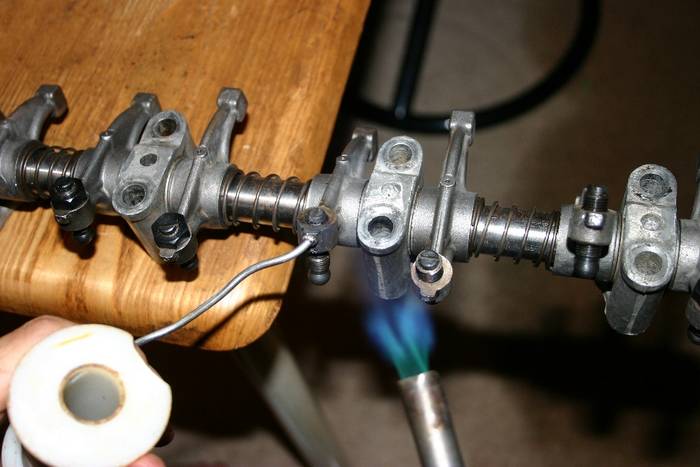
The new rocker arms had a hole that required soldering closed to maintain oil pressure to the rocker arm bushing and limit oil to the top end.
 |
08-09-2007, 07:21 PM
|
|
CC Member
|
|
|
Join Date: Mar 2003
Location: PVE,
CA
Cobra Make, Engine: ERA 289 FIA #2027, 65' 289" PS wheels
Posts: 345
|
|
Not Ranked
interesting engine build...but...SOLDER?
Am enjoying this thread on the A/H 3000 build.
I am not sure I would trust a blob of low temp solder to plug a hole on a rocker arm.
There is high vibration and some residual oil pressure conspiring to pop the solder plug out. Although solder is soft, I don't think I would want it floating around in my expensive engine build up.
At the least, can you get them BRAZED?...I was gonna say silver solder but brazing I believe is a lot stronger.
Best would be remove them, tap them, and put in a threaded plug. You are in pretty deep $$$, I would hate to see your effort compromised.
Maybe some of the machinists/engine builders reading have some ideas on the topic.
Have fun with the 3000, cool car...!
Pete
__________________
ERA 289 #2027
|
08-09-2007, 07:31 PM
|
|
Senior Club Cobra Member
|
|
|
Join Date: Jul 2002
Cobra Make, Engine:
Posts: 15,712
|
|
Not Ranked
After looking at my options for a 'plug' for that area I feel reasonably good about soldering it. A lot of that is because of the technique I used to make sure it has a good and deep in the hole bond. Am open to further suggestions on the topic however!
|
08-09-2007, 09:39 PM
|
 |
CC Member
|
|
|
Join Date: Feb 2006
Location: Gore. New Zealand.,
SI
Cobra Make, Engine: DIY Coupe, F/T ,MkIV.
Posts: 808
|
|
Not Ranked
A piece of alloy welding rod of the appropriate dia pressed in and the end of the hole peened over slightly should suffice.
Jac Mac
|
08-10-2007, 12:40 AM
|
 |
Regularly Offensive
|
|
|
Join Date: Feb 2006
Location: yuba city,
ca
Cobra Make, Engine: spf
Posts: 1,231
|
|
Not Ranked
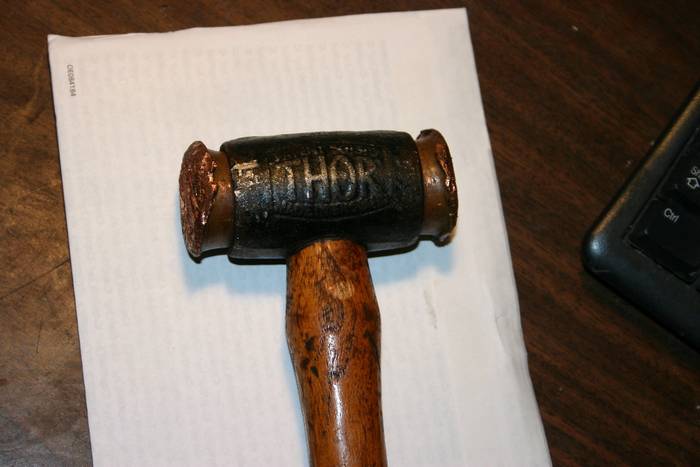
Ernie I noticed your small hammer in the first picutes. When I had my Triumph GT6 I always had a mini sledge nearby. It made it easier to hit my thumb and did more damage to the car and engine parts. These pictures bring back nightmares. I'm glad you shared them with us. Good luck.
__________________
Ed
Too close for missles, switching to guns.........
|
08-10-2007, 01:35 AM
|
|
Senior Club Cobra Member
|
|
|
Join Date: Jul 2002
Cobra Make, Engine:
Posts: 15,712
|
|
Not Ranked
This is my prefered hammer, by Thor of course! My son was surprised how often we used this hammer for diassembly as well as assembly.
Last edited by Excaliber; 08-10-2007 at 09:09 AM..
|
08-10-2007, 06:51 AM
|
 |
Senior Club Cobra Member
|
|
|
Join Date: Dec 2001
Location: Shasta Lake,
CA
Cobra Make, Engine:
Posts: 26,618
|
|
Not Ranked

Ernie,
This has been an interesting thread for sure. You will soon be an expert on British engines and that is something. As little as I know about engines, I can see where this one has some nightmares in it.
Ron  |
08-12-2007, 01:12 AM
|
|
Senior Club Cobra Member
|
|
|
Join Date: Jul 2002
Cobra Make, Engine:
Posts: 15,712
|
|
Not Ranked
Tentative schedule is to drop the motor in next weekend, Aug 18/19. Trans is done. What a hassle getting the OD GEARS to line up EXACTLY with the input shaft, that last 1/4 inch was a killer. Some rocker arm geometry issues will have to be addressed, need a few more parts, etc. Ready to paint the engine and accessories. Whew, clean more parts and engine bay up next, gonna be a busy week! Pics to follow soon...
OH, hooked up the starter and 'spun' the motor with the head off to prime the oil pump. Sweet, we had a gusher of oil in no time at all. |
08-12-2007, 10:56 PM
|
|
Senior Club Cobra Member
|
|
|
Join Date: Jul 2002
Cobra Make, Engine:
Posts: 15,712
|
|
Not Ranked
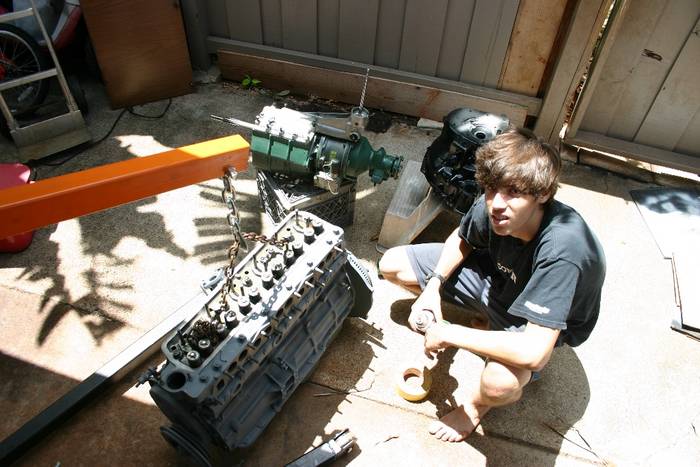
Cleaning, painting, assembly continues...
 |
08-13-2007, 10:18 PM
|
|
Senior Club Cobra Member
|
|
|
Join Date: Jul 2002
Cobra Make, Engine:
Posts: 15,712
|
|
Not Ranked
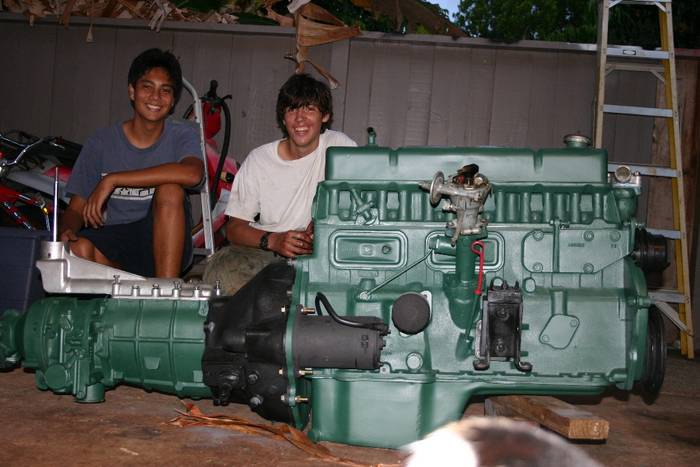
Ta Da!!! Almost ready now, with a little help from my son and his friend. "Wrinkle" finish black on the bell housing, water pump, front pulley, motor mounts and generator (my trade mark). I thought it needed a little 'spicing up' as to much green all ready! Starter in hi temp flat black, but I think we'll redo it in wrinkle finish black as well...
Last edited by Excaliber; 08-13-2007 at 11:09 PM..
|
08-15-2007, 07:20 AM
|
|
Senior Club Cobra Member
|
|
|
Join Date: Dec 2001
Location: Shasta Lake,
CA
Cobra Make, Engine:
Posts: 26,618
|
|
Not Ranked
Looks really nice Ernie. They had a show on the history channel last night about the history of the Austin Healey and it was pretty good.
Ron |
08-27-2007, 04:15 PM
|
|
Senior Club Cobra Member
|
|
|
Join Date: Jul 2002
Cobra Make, Engine:
Posts: 15,712
|
|
Not Ranked
Well Sunday was the big day, Fire it UP! My son in the drivers seat turned the ignition on and pushed the separate start button. It cranked over nicely but no fire... He pokes his head out the window and says, "Did you plug in the coil wire?" DOH!!! I hadn't... It roared to life all but instantly with that done. Sheesssshhh, it'll be sometime before I live THAT down, he strutted around and crowed about it ad nauseum. Motor sounds real good and was pushing 60 lbs of oil pressure!
We do have a few unexpected problems to rectify before a test drive. Clutch slave trouble, ruptured oil pressure gauge line (boy was that a mess), broken throttle linkage pivot (40 some year old piece of plastic) and the twin carbs are way out of balance. With luck we'll be driving by next weekend! Pictures to follow, had a problem with the camera...
Last edited by Excaliber; 08-27-2007 at 04:18 PM..
|
 Posting Rules
|
You may not post new threads
You may not post replies
You may not post attachments
You may not edit your posts
HTML code is On
|
|
|
All times are GMT -7. The time now is 01:23 AM.
|


 Hybrid Mode

