Starting a new build in early 2017. I am really excited about this one and have had some conversations with other members on this site. The car will be a dedicated vintage race car; what the original 289's were meant to be. The Sportscar Vintage Racing Association (SVRA) has approved the Superformance MKII FIA for vintage racing with some specific provisions. Those being it has to have a 289 with proper stroke, iron heads and a very limited choice of carbs. In addition, the differential must be a Salisbury and it has to have Girling brakes. Tires are very limited as well, and I will be going with Hoosier street TD's as they are one of the three that are approved for the car. There are size limitations on the tires as well.
The frame that I will be using is Ross Henry's Riverside Racer design. I have a 1965 289 that is being built and Dan Williams is putting together a close ratio top loader for me that I should have in a couple of weeks. Rick Muck, Ross Henry and Dennis Olthoff will be providing additional support and assistance with this build.
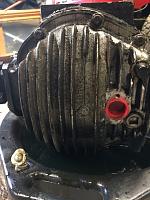
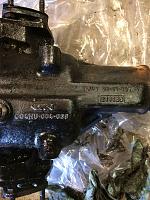
I have the Salibury differential and am in the process of making arrangements for it to be rebuilt and the gearing changed to 3.54. With that rear ratio I should be able to make some separation on long straights and the cobra should be able to out handle the mustangs, corvettes, jaguars and camaros that I will be primarily running against in the corners. The drain plug is drilled for the required safety wire.
Attached are some photos of the differential. As more parts arrive, I will provide more pictures and updates. Given the potential time frames that I am looking at for the roller, engine and transmission, I am hoping to have the car up and running for the SVRA vintage race at Mid Ohio in late June and then at the US Vintage Grand Prix a Watkins Glen in early September!
I will be ordering the Girling brakes from B&G development in the UK in January.
Looking forwards to hearing people's thoughts and comments and to have thee thrill of a lifetime racing a 289 cobra on the same tracks that they were raced on back in the 60's and 70's.
Jim


 323Likes


 Threaded Mode

