 
 Main Menu
|
|
Nevada Classics
|
|
Advertise at CC
|
| S |
M |
T |
W |
T |
F |
S |
| |
|
|
|
|
1 |
2 |
| 3 |
4 |
5 |
6 |
7 |
8 |
9 |
| 10 |
11 |
12 |
13 |
14 |
15 |
16 |
| 17 |
18 |
19 |
20 |
21 |
22 |
23 |
| 24 |
25 |
26 |
27 |
28 |
29 |
30 |
| 31 |
|
|
|
|
|
|
|
|
CC Advertisers
|
|
 323Likes 323Likes

07-19-2017, 05:37 PM
|
 |
CC Member

|
|
|
Join Date: Aug 2013
Location: Canandaigua,
NY
Cobra Make, Engine: SPF MKII Riverside Racer FIA
Posts: 2,504
|
|

 Not Ranked
Thank Mark, will do.
__________________

|
07-23-2017, 06:17 PM
|
|
CC Member
|
|
|
Join Date: Aug 2013
Location: Canandaigua,
NY
Cobra Make, Engine: SPF MKII Riverside Racer FIA
Posts: 2,504
|
|
Not Ranked
 Getting closer
Waiting on some fittings for the oil cooler, that will not arrive until Wednesday, so spent my time working on some small projects.
Hooked up the linkage for the carb, still need to add one more retaining bolt to the linkage, will pick that up tomorrow.
Then I moved on to address a concern regarding the gas cap. Being that the car is a vintage race car, I did not have the fuel tank installed as the race groups require a fuel cell. So, I have an opening cut out for the gas cap and an open area over the differential where the fuel tank would go.
 
I thought that the gas cap would have a gasket that would fit underneath it and I could just seal the cap to the bodywork. However, when I went to fit the gas cap I realized that the cap fit inside the hole in the bodywork and rested on top of the nonexistent gas tank for it's support  Now what do I do? 
The solutions that I was finding were to install a rubber plug, but that was not going to work and I was not happy with the look. I could adhere some aluminum from the underside to fill the hole, but that did not seem to be what I wanted to do either.
I really wanted to have the vintage look of the Monza gas cap, even though it wold not be functional. Eventually I came upon a decision that seemed to be workable. I took some measurements and then fabricated some spare sheet metal and a piece of aluminum to cover the hole and provide support from the frame. I then marked and drilled holes for the screws that mount the gas cap and then painted the sheet metal red in case some of it showed.
 
I then fitted the contraption into place and secured the gas cap and voila!
  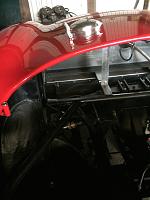
Hopefully it will work!
This coming week I am going to do a leak test of the fuel system and then hopefully by weeks end do an initial start-up. Will also be installing the passenger seat and the inner body panels.
Jim
__________________
Last edited by 1795; 07-24-2017 at 04:28 AM..
Reason: damn auto-correct!
|
07-24-2017, 05:46 PM
|
|
CC Member
|
|
|
Join Date: Aug 2013
Location: Canandaigua,
NY
Cobra Make, Engine: SPF MKII Riverside Racer FIA
Posts: 2,504
|
|
Not Ranked
Moving forward
Got a couple of things accomplished today. Spent a couple of hours with the tin snips cutting the rear panel to accommodate the changes due to the roll cage additions.
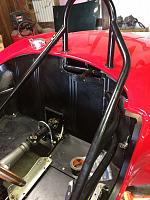 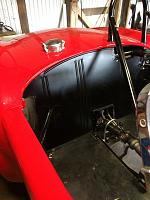
I also installed the side view mirrors and have a larger rear view mirror installed as well.

Then I figured, well, if you are going to be able to test start the car soon, it would be nice to have a seat installed.....so
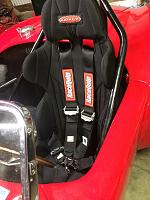
Will be working more on the throttle cable and finishing some small things off, in addition to installing the passenger seat and transmission tunnel over the next couple of days.
Jim
__________________
|
10-12-2017, 08:02 PM
|
|
CC Member
|
|
|
Join Date: Mar 2003
Cobra Make, Engine:
Posts: 1,515
|
|
Not Ranked
I am very impressed with your car build - tracking is rough on any car and your's seems to be handling it well. Also, kudos for you to bring such a car on track! A couple of observations: 1) Consider keeping your right hand more consistently at 3-o'clock - it drifts up to 12 to 1 too often while your left hand is at the 9 position; 2) also consider leaving your right hand on the wheel (as opposed to resting on the shifter) as you pull the straights. I am not trying to step on your toes with these tid-bits (I promise)! Again, I am impressed you are campaigning a Cobra and it appears you are doing a great job! Best of luck!
Tony
Last edited by Cracker; 10-13-2017 at 05:42 AM..
|
10-13-2017, 04:59 AM
|
|
CC Member
|
|
|
Join Date: Aug 2013
Location: Canandaigua,
NY
Cobra Make, Engine: SPF MKII Riverside Racer FIA
Posts: 2,504
|
|
Not Ranked
Tony,
Thanks for the kudos and the observations! One reason that I post videos is so that I can get some feedback. I watch my videos as a means of critiquing my driving and trying to improve it. Yes, I do have a tendency to almost drive with one hand and spend too much time with my right hand on the shifter. Part of that may be related to not trusting the shifter and making sure that it is engaged, thereby leaving my hand on the shifter a little to long. I will revisit the video and watch to see if there are certain times that my right hand tends to creep up.
In the paddock area I have been questioned more than once concerning why I would want to put such a nice looking car on the track. Always wanted to race a cobra, and having driven one on the road (my ERA 427), this is way better 
Jim
__________________
|
10-13-2017, 12:53 PM
|
 |
CC Member
|
|
|
Join Date: Jan 2004
Posts: 69
|
|
Not Ranked
Trailer logos
Jim - I have 2 large (3' x 4' x .050" thick 301 stainless steel) Cobra logos over the words "289 Cobra". I was going to put them on my trailer, but the car ran so good, I sold the trailer. I think either you or Morris needs these on your trailer. They were a digitizing software test for our CO2 lasers. If you can PM me or post an e-mail or phone #, I will send you a photo. Building a new house and am starting to clean out the garage.
Bill
|
10-13-2017, 02:11 PM
|
|
CC Member
|
|
|
Join Date: Aug 2013
Location: Canandaigua,
NY
Cobra Make, Engine: SPF MKII Riverside Racer FIA
Posts: 2,504
|
|
Not Ranked
Bill,
Thanks for the consideration. Sent you a pm with contact information.
Jim
__________________
|
10-14-2017, 01:48 PM
|
|
CC Member
|
|
|
Join Date: Aug 2013
Location: Canandaigua,
NY
Cobra Make, Engine: SPF MKII Riverside Racer FIA
Posts: 2,504
|
|
Not Ranked
Post season changes\s
Getting ready for next year. One of the issues that I encountered this year was some trouble shifting, mostly notably into third, but at the end all the gears were binding. I have a Hurst Competition Plus shifter and it was observed that the linkages were a little sloppy. We also spent some time changing the length on the linkages to try to resolve the problem.
So, I removed the seats and tunnel to gain easier access to the shifter and re-aligned neutral with the alignment pin. The 3rd/4th gear arm was a little of, so I lengthened that. I also disabused myself of a fallacy that I and others had when trying to adjust the arm for better 3rd gear engagement. We were assuming that when the gear arm was facing forward that it would be third gear and when the arm was moved backwards it would be fourth, wrong! As I shifted gears it became quite obvious that the reverse was true.
To deal with the sloppy levers, I ordered some steel bushings and spring clips from Summit. The top set is what was on the shifter, nylon bushing clip and washer, the bottom set is the steel bushing and spring clip.
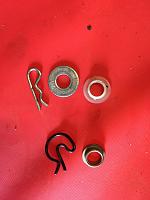
Removing the old ones with the transmission in place was a mild pain, replacing those with the steel bushings and spring clips was a major pain Not a lot of room o work with, had to move shift levers at times and disconnect arms to access other arms. But, after an hour or so, all were in place. A much better feel, no sloppiness and smoother shifting.
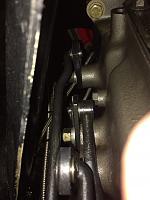
Started the car up with the tires in the air and she went through the gears no problem. Now on to the next project, new oil cooler lines and fittings as the old ones had some minor leaks at the fittings that just could not be stopped.
Jim
__________________
|
 Posting Rules
|
You may not post new threads
You may not post replies
You may not post attachments
You may not edit your posts
HTML code is Off
|
|
|
All times are GMT -7. The time now is 03:09 PM.
Links monetized by VigLink
|














 Hybrid Mode

