Absolute Pace

Go Back   Club Cobra > Club Forums > Australian Cobra Club

Welcome to Club Cobra!  The World's largest non biased Shelby Cobra related site!

  •  » Representation from nearly all Cobra/Daytona/GT40 manufacturers
  •  » Help from all over the world for your questions
  •  » Build logs for you and all members
  •  » Blogs
  •  » Image Gallery
  •  » Many thousands of members and nearly 1 million posts! 

YES! I want to register an account for free right now!  p.s.: For registered members this ad will NOT show

MMG Superformance
Nevada Classics
Keith Craft Racing
Main Menu
Nevada Classics
Nevada Classics
MMG Superformance
Advertise at CC
Banner Ad Rates
Keith Craft Racing
March 2024
S M T W T F S
          1 2
3 4 5 6 7 8 9
10 11 12 13 14 15 16
17 18 19 20 21 22 23
24 25 26 27 28 29 30
31            
  #1 (permalink)  
Old 02-15-2011, 01:03 AM
jcraigau's Avatar
CC Member
Visit my Photo Gallery

 
Join Date: Oct 2008
Location: Perth, WA
Cobra Make, Engine: G-Force Mk1, LS1, T56, Jag S3 suspension
Posts: 587
Not Ranked     
Default Jag Diff Toe-In Measurements

Hey Guys,

I'm in the process of getting the diff sorted out and in my excitement to pull it all apart and make it look pretty I can't remember if there were any shims to achieve the correct toe-in.

Now it's all back together I've heard all sorts of stories from 0 degree toe-in to lots of toe-in. But I can't find any measurements.

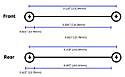
The manual I have says 9-1/8" is where it should be as this is where the G-Force chassis runs the bolts through it for mounting.

Mine measures 9.128" at the front and 9.118" at the rear, so at the moment it toes-out.

What is everybody running?

The following picture shows the measurements I took...


--Jamie
Reply With Quote
  #2 (permalink)  
Old 02-15-2011, 02:12 AM
CC Member
Visit my Photo Gallery

 
Join Date: May 2002
Location: Brisbane Australia, QLD
Cobra Make, Engine: RMC under re-construction, GenIV with tremec 600, Jag 3.31 L/S diff
Posts: 3,318
Not Ranked     
Default

Jamie, looks like you need shims under the pivot bracket rear bolts.
Keep in mind, shims under the back bolts will reduce the front dimension.

However, even if you shim the pivot brackets to give no toe at all is no guarantee that will translate out to the wheel when you fit the lower wishbone.

The reason for this is the accuracy of how the lower wishbones were shortened (if they were) or the accuracy of the original wishbones.

I found my shortened wishbones were not as accurate as I'd like. In fact, testing some unaltered original wishbones also indicated them to be not accurate. Testing involved running shafts thru both ends of the wishbone and measuring if they were parallel.

So that means even if you shimmed your inner pivot brackets to give zero toe you may not get that after fitting the lower wishbone. You would then have to start the shimming process all over again just to get the alignment correct.

You could assemble the whole diff out of the car and play with the shims until you get zero toe on the outboard end but then the diff may be slightly out of square in the chassis and that stuffs up all your work.

The best way to handle this is to shim your inner brackets parallel and have the toe adjustable at the outboard end of the wishbone.

If you contact Scotty at venom and arrange to send him your wishbones. He has the jigs etc. to make the modification. http://www.venomcobras.com/

If you have trouble following the above I can send you an email with a phone number and we can chat.
__________________
It's impossible to soar like an eagle when you're surrounded by turkeys.
Reply With Quote
  #3 (permalink)  
Old 02-15-2011, 03:20 AM
OZVENOM's Avatar
CC Member
Visit my Photo Gallery

 
Join Date: Aug 2002
Location: Brisbane Australia, Qld
Cobra Make, Engine: Now built a race cobra.
Posts: 433
Not Ranked     
Default getting it right.

Hi if you want to get it right it has to be all mounted in chassis . when on the ground at ride height you need 1- 1.5 mm of toe across the rim. Each side it will make the cobra drive stable in corners and on roundabouts. its is a lot of work to pull the arms in and out so put say .010" of shim under the rear bolt of the pivot block when you assemble it a good place to start.
Thanks for the mention Rebel.
I dont like to pedal my wares on here. as i am not an advertiser on cc.
Regards oz.
__________________
Left Foot Up Right Foot Down.
http://www.venomcobras.com
Reply With Quote
  #4 (permalink)  
Old 02-15-2011, 03:23 AM
CC Member
Visit my Photo Gallery

 
Join Date: Mar 2001
Location: E BRUNSWICK N.J. USA,
Posts: 3,841
Not Ranked     
Default It's easy to do

jcraigau Craig you need to get old style GM shims with slots. For setting camber you add or remove from the drive shaft between the rotor and the outputshaft. put car in the air and remove the 4 nuts. let top of assembly fall out, EASY and installed or remove shims. You have to be 100% correct on the end play for the outter driveshafts into the hubs, you really want no play when the hub is warm. As far as the toe, you loosen the bottom to bolts that mount the lower arm to the bracket on the carrier, add or remove to get to spec and tighten. Wiretie both bolts and the 4 nuts for the out put shafts. My specs are +3/4 camber and toe is 1/16" in on both wheels. This is with my weight in the drivers seat. If the car weights for the corners are not done, than you need to start there. Do all suspension work with your weight in the drivers seat. Also make sure the THRUST angle is "0" or +/- 1, no higher. Check all mounts for tightness and rubber for good condition. If the car drift out to one side, start with a tire pressure adjustment, if more than 3-4 psi, there is something wrong with alignment or loose part. car should track straight. Rick L. Ps ask the alignment shop when was the last time it was serviced and setup for trueness. The printout could read perfect and the machine could be 3/8" off and cause all kinds of problems.
Reply With Quote
  #5 (permalink)  
Old 02-15-2011, 03:31 AM
CC Member
Visit my Photo Gallery

 
Join Date: May 2002
Location: Brisbane Australia, QLD
Cobra Make, Engine: RMC under re-construction, GenIV with tremec 600, Jag 3.31 L/S diff
Posts: 3,318
Not Ranked     
Default

Quote:
Originally Posted by OZVENOM View Post
I dont like to pedal my wares on here. as i am not an advertiser on cc.
Regards oz.
You may not like to pedal your wares here Scotty but your lower arm toe mod is recognized as the best and easiest way to ensure that the rear alignment will be correct. Not only correct but easily adjustable at some later stage if one wants to play with it.

Modest bugga you are.
__________________
It's impossible to soar like an eagle when you're surrounded by turkeys.
Reply With Quote
  #6 (permalink)  
Old 02-15-2011, 05:17 AM
jcraigau's Avatar
CC Member
Visit my Photo Gallery

 
Join Date: Oct 2008
Location: Perth, WA
Cobra Make, Engine: G-Force Mk1, LS1, T56, Jag S3 suspension
Posts: 587
Not Ranked     
Default

Sounds like a case of assemble it all and get it on an alignment machine.
The last thing you want to have to be doing is dropping the driveshafts and bottom wishbones out to keep fiddling.

Thanks for the quick replies and info. I'll keep you all updated as the build gets closer to rolling...
Reply With Quote
  #7 (permalink)  
Old 02-15-2011, 05:29 AM
jcraigau's Avatar
CC Member
Visit my Photo Gallery

 
Join Date: Oct 2008
Location: Perth, WA
Cobra Make, Engine: G-Force Mk1, LS1, T56, Jag S3 suspension
Posts: 587
Not Ranked     
Default

Oh, also forgot to mention that I already have the cutdown wishbones supplied from G-Force. Apparently the cut-and-shut was performed by an aircraft mechanic. I haven't measured them but I can only assume that they are square.

Reply With Quote
  #8 (permalink)  
Old 02-15-2011, 05:42 AM
CC Member
Visit my Photo Gallery

 
Join Date: May 2002
Location: Brisbane Australia, QLD
Cobra Make, Engine: RMC under re-construction, GenIV with tremec 600, Jag 3.31 L/S diff
Posts: 3,318
Not Ranked     
Default

Jamie, My wishbones were supplied by RMC and I also assumed they would be square. They were only out a few thou but when you hang a 15" wheel fitted with a 26.5" tyre off the end they end up all over the place and it was damn near impossible to get both rear wheels aligned correctly. Cross fingers yours are better than mine.

But it is worth the effort to get them right as they are a proper bugger to do anything with once the car is built.
__________________
It's impossible to soar like an eagle when you're surrounded by turkeys.
Reply With Quote
  #9 (permalink)  
Old 02-15-2011, 06:20 AM
jcraigau's Avatar
CC Member
Visit my Photo Gallery

 
Join Date: Oct 2008
Location: Perth, WA
Cobra Make, Engine: G-Force Mk1, LS1, T56, Jag S3 suspension
Posts: 587
Not Ranked     
Default

Yea, last thing you want after spending all that time under it is to not enjoy it when you finally get it on the road. The Cobra club here has "a guy" that is meant to be a gun on suspension - specifically jag rear ended Cobras. Looks like I might give him a heads up!
Reply With Quote
  #10 (permalink)  
Old 02-15-2011, 07:03 AM
glenview289's Avatar
CC Member
Visit my Photo Gallery

 
Join Date: Jan 2004
Posts: 69
Not Ranked     
Default another read on it...

This is a reply I did on the same topic over on the "Unique Cobra" site:

Rod,
That is how Brian and I measured the toe in when we did our car. I can't remember the source, but probably did a search on the site. We put straight edges against the center of the tire and parallel to the floor. We then measured the outside edges of the straight edge in the front and rear of the tire. The difference should be 1/16" total (smaller number in front-very important). If I remember correctly, we had a .005" shim under the front screw and a .012" shim under the rear screw that holds the bracket that mounts the lower hub carrier arm to the rear end. If you do the math, the .007" difference in shim thickness between the 2 screws that are approximately 7-8" apart would carry out to .030" on a 32" tire, or about 1/32" per side (1/16" overall). Be careful not to have the straight edge on an raised lettering you may have on the tire. You will have the same advantage that Brian and I had in that the body is not on the chassis. It will be much easier this way. Be sure to get the rear end lined up and locked down exactly parallel to the centerline of the chassis before setting the toe. I remember how great a freshly powder coated chassis looks. I'm sure Rick will remind you that this is the perfect time to put that first coat of wax on the chassis. If you need more info I can measure anything you may need on the car this weekend. Its over in Brians garage up on stands getting ready for a track day next week at Hallet Raceway in Tulsa.

Bill
Reply With Quote
Reply


Thread Tools
Display Modes Rate This Thread
Rate This Thread:

Posting Rules
You may not post new threads
You may not post replies
You may not post attachments
You may not edit your posts

BB code is On
Smilies are On
[IMG] code is On
HTML code is Off
Trackbacks are On
Pingbacks are On
Refbacks are On


All times are GMT -7. The time now is 03:13 AM.


Powered by vBulletin® Version 3.8.0
Copyright ©2000 - 2024, Jelsoft Enterprises Ltd.
Search Engine Friendly URLs by vBSEO 3.6.0
The representations expressed are the representations and opinions of the clubcobra.com forum members and do not necessarily reflect the opinions and viewpoints of the site owners, moderators, Shelby American, any other replica manufacturer, Ford Motor Company. This website has been planned and developed by clubcobra.com and its forum members and should not be construed as being endorsed by Ford Motor Company, or Shelby American or any other manufacturer unless expressly noted by that entity. "Cobra" and the Cobra logo are registered trademarks for Ford Motor Co., Inc. clubcobra.com forum members agree not to post any copyrighted material unless the copyrighted material is owned by you. Although we do not and cannot review the messages posted and are not responsible for the content of any of these messages, we reserve the right to delete any message for any reason whatsoever. You remain solely responsible for the content of your messages, and you agree to indemnify and hold us harmless with respect to any claim based upon transmission of your message(s). Thank you for visiting clubcobra.com. For full policy documentation refer to the following link: CC Policy