Welcome to Club Cobra! The World's largest
non biased Shelby Cobra related site!
- » Representation from nearly all
Cobra/Daytona/GT40 manufacturers
- » Help from all over the world for your
questions
- » Build logs for you and all members
- » Blogs
- » Image Gallery
- » Many thousands of members and nearly 1
million posts!
YES! I want to register an account for free right now!
p.s.: For registered members this ad will NOT show
 
 Main Menu
|
|
Nevada Classics
|
|
Advertise at CC
|
|
May 2026
|
| S |
M |
T |
W |
T |
F |
S |
| |
|
|
|
|
1 |
2 |
| 3 |
4 |
5 |
6 |
7 |
8 |
9 |
| 10 |
11 |
12 |
13 |
14 |
15 |
16 |
| 17 |
18 |
19 |
20 |
21 |
22 |
23 |
| 24 |
25 |
26 |
27 |
28 |
29 |
30 |
| 31 |
|
|
|
|
|
|
|
|
CC Advertisers
|
|
 386Likes 386Likes

12-07-2014, 01:11 PM
|
 |
CC Member

|
|
|
Join Date: Apr 2008
Location: Melbourne,
VIC
Cobra Make, Engine: Classic Revival CR 3505, LS1, T56 6 Speed, VE 3.45 LSD Rear, 6 Spot AP Fronts, 4 Spot Wilwood Rears
Posts: 1,121
|
|

 Not Ranked
Mike, Looks great with the body back on.
Good idea Mike on the foam. I have a rattle at the back of mine that I just can't find, I reckon its the body on the chassis somewhere. Only hear it on speed humps and potholes so not too annoying.
Cheers Gregg
|
-
Advertising

12-07-2014, 04:51 PM
|
 |
CC Member
|
|
|
Join Date: Apr 2008
Location: Melbourne,
Vic
Cobra Make, Engine: Some polish thing... With some old engine
Posts: 2,286
|
|
Not Ranked
Nice... and what's the time line on that other toy in the background?
Also, not to digress from the lovely work, but can you even notice rattles with the engine bubbling away, and the pipes 2 feet from your ears?
|
12-07-2014, 05:41 PM
|
 |
CC Member
|
|
|
Join Date: Jan 2001
Location: Sunbury,
VIC
Cobra Make, Engine: Rat Rod Racer, LS1 & T56
Posts: 5,391
|
|
Not Ranked
Quote:
Originally Posted by Dimis

Nice... and what's the time line on that other toy in the background?
Also, not to digress from the lovely work, but can you even notice rattles with the engine bubbling away, and the pipes 2 feet from your ears?
|
I'll get stuck into the other toy after the Cobra is back on the road. A job for this Winter.
As for rattles... I reckon they would be more felt than heard. There was originally a strip of rubber between the chassis and body when I got the kit but it was just glued on with silicone sealer. I figured the self adhesive rubber would be a bit tidier.
Cheers
__________________
Mike Murphy
Melbourne Australia
|
12-07-2014, 06:59 PM
|
 |
CC Member
|
|
|
Join Date: Apr 2006
Location: Mildura,
vic
Cobra Make, Engine: FFR Coupe, 416ci of LS goodness
Posts: 2,349
|
|
Not Ranked
Sidepipes are not that loud, at cruise speed you can easily have a conversation with your passenger.
WOT is another matter all together though.
__________________
Powered by Cu
|
12-08-2014, 02:31 AM
|
 |
CC Member
|
|
|
Join Date: Jul 2011
Location: Sydney,
NSW
Cobra Make, Engine: Puckett 250 GTO - LS1
Posts: 567
|
|
Not Ranked
Quote:
Originally Posted by Aussie Mike
...I think an AC compressor would be a very tight fit (The factory one at least). It may be possible to find a smaller unit from another car that would go in there.
Cheers
|
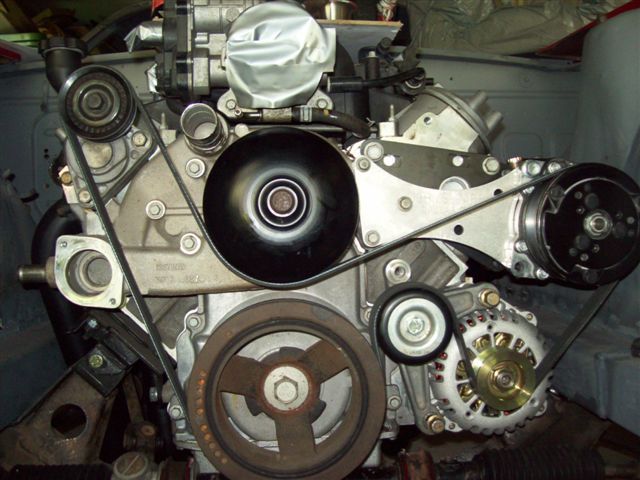
Mike, the 240Zs have a custom made bracket to mount the a/c as shown. The picture distorts it a bit - it doesn't protrude as much as appears.
If you are interested I can take some measurements and/or trace a template of the brackets.
 |
12-08-2014, 05:50 AM
|
 |
CC Member
|
|
|
Join Date: Aug 2013
Location: redcliffe,
qld
Cobra Make, Engine: Kirkham 427SC 482 Cammer
Posts: 700
|
|
Not Ranked
Quote:
Originally Posted by Gav
Sidepipes are not that loud, at cruise speed you can easily have a conversation with your passenger.
WOT is another matter all together though.
|
My side pipes may be too quite then, I could still hear my wife screaming at WOT on the front straight at Lakeside. |
12-08-2014, 03:06 PM
|
|
CC Member
|
|
|
Join Date: Jan 2001
Location: Sunbury,
VIC
Cobra Make, Engine: Rat Rod Racer, LS1 & T56
Posts: 5,391
|
|
Not Ranked
Quote:
Originally Posted by PeterAllen
Mike, the 240Zs have a custom made bracket to mount the a/c as shown. The picture distorts it a bit - it doesn't protrude as much as appears.
If you are interested I can take some measurements and/or trace a template of the brackets.
|
Looks like a neat fit Peter.
AC in a Cobra seems pretty pointless to me. It's only any good if you have a roof and I can't see me driving with any kind of roof.
I am tempted to fit AC to my Corvette though.
Cheers
__________________
Mike Murphy
Melbourne Australia
|
05-19-2015, 08:00 AM
|
|
CC Member
|
|
|
Join Date: Jan 2001
Location: Sunbury,
VIC
Cobra Make, Engine: Rat Rod Racer, LS1 & T56
Posts: 5,391
|
|
Not Ranked

Been a long time between updates but I'm back into it now.
A lot of the work I've been doing has been pretty boring. Fiberglass repairs from where I cut holes in the wrong spot or changed mounting points etc.
I've been concentrating on getting the boot area sorted and then I'll be working my way forward in preparation for finishing the bodywork and paint. This means sorting out all those body mounting points brackets and roll bars etc.
Changing the way the roll bars mount to the chassis has meant some changes to the body mountings. The rear roll bar stays provide one of those mountings.
Most of the floor in the cabin and the boot is a sandwich construction for light weight and strength. Great stuff but the foam core means that you can crush it when bolting though it. To combat this I've been making aluminum bosses that act as a crush tube for all the hold down points. The the boss limits the amount the sandwich section can be crushed and transmits loads directly to the chassis. I've done this for seat mountings and harness attachment points etc.
Cutting neat accurate holes for the bosses has meant making some different drill guide tools that use the bolt holes to index the drill. This one let me cut the floor for the roll bar mounts. It only lets the hole saw through far enough to cut the fiberglass and not touch the chassis powder coat underneath.

The aluminum boss is then machined to be an exact for for the hole which doesn't allow the floor to move in any direction and limits the crush. It also means you can tighten any bolts down firmly to the chassis.
I had to change my roll bar rear stay mount design a little. It didn't allow enough up and down movement to easily get the rear stay installed into the socket in the hoop. It's not as pretty as the original setup but it's strong and will do the job. It should look better when polished at least.

Note some of the many patched up holes.
Sorting the roll bar mounts means I can fit the roll bar bezels. This was satisfying to finally see.

The other enjoyable job has been making the mounts for the quick jacks. When originally registered the car had no bumpers, just had plates to anchor the floor. The new mounts are made from 5mm stainless plate and should be plenty strong. The standoffs for the quick jacks are 3/4" aluminum rod that's drilled and threaded at both ends.

The lower rod mounts to the chassis under the floor. I reckon the whole thing would be strong enough to use the quick jacks for their intended purpose.
Here's one of the quick jacks mounted. These are home made. Chris L had some 6mm aluminum plate water jet cut for the profiles and I just welded them together. This one has been bead blasted. It was a finish I've been experimenting with. What do you think? This one is a bit dusty but the finish is a normally satin with a dull shine.

More fiberglass repairs where I originally made a mess of the lower quick jack mount hole. I made a nifty drilling guide for the quick jack holes to drill them accurately after the repairs. It should prove very handy for the front of the car where the holes go through an angled section of the body.
Cheers
__________________
Mike Murphy
Melbourne Australia
Last edited by Aussie Mike; 05-19-2015 at 08:08 AM..
|
05-19-2015, 05:06 PM
|
|
CC Member
|
|
|
Join Date: Feb 2006
Cobra Make, Engine:
Posts: 2,752
|
|
Not Ranked
Quote:
Originally Posted by PeterAllen
Mike, the 240Zs have a custom made bracket to mount the a/c as shown. The picture distorts it a bit - it doesn't protrude as much as appears.
If you are interested I can take some measurements and/or trace a template of the brackets.
|
Peter, is your pulley set up for 5 or 6 rib belt? I assume 6? What is the belt code for this set up? SPK1875?
I've got some issues with my Daytona belt alignments and seeking to find an answer to make it work. I chew belts due to the AC pump being run using a 5pk pulley (off a suzi jimny diesel would you believe) and the rest being 6pk.
The Daytona guys were running a 6pk belt with a rib cut off manually to make it work. DODGY and not what I want for racing. Any suggestions would be super helpful.
Spookypt |
05-19-2015, 05:29 PM
|
|
CC Member
|
|
|
Join Date: Jan 2001
Location: Sunbury,
VIC
Cobra Make, Engine: Rat Rod Racer, LS1 & T56
Posts: 5,391
|
|
Not Ranked
Hi Spook,
Not sure if you know but the belt numbering system is actually fairly easy to interpret.
The part number you quote "SPK1875" should probably read 5PK meaning 5 rib. 4PK is 4 rib, 6pk is 6 rib etc. The following number is the length 1875mm
To work out the belt that will suit your application you just need to get a length of webbing, a tie down strap works well. Wrap it around the path the belt would take and mark it for length with the tensioner in the relaxed and compressed positions. Then just roll out the tie down strap and measure the length to the two marks. Then order a belt that is somewhere between the two.
The belts seem to go up in length of 5mm increments. Once you know the length and the number of ribs you can punch that into the Gates web page and get a bunch of cross reference part numbers or at least see if that size is available.
Gates Search
Bearing shops that stock gates will have universal belts available that you can just order based on that part number i.e 6PK1995 (6 Rib belt 1995mm long)
You can also search through some of their online catalogs and you might find the vehicle that belt suits. Buying them from automotive shops can often work out cheaper as the bearing supplies can charge a premium.
Gates Automotive cataligue
Hope this helps
Cheers
__________________
Mike Murphy
Melbourne Australia
|
05-19-2015, 05:34 PM
|
|
CC Member
|
|
|
Join Date: Jan 2001
Location: Sunbury,
VIC
Cobra Make, Engine: Rat Rod Racer, LS1 & T56
Posts: 5,391
|
|
Not Ranked
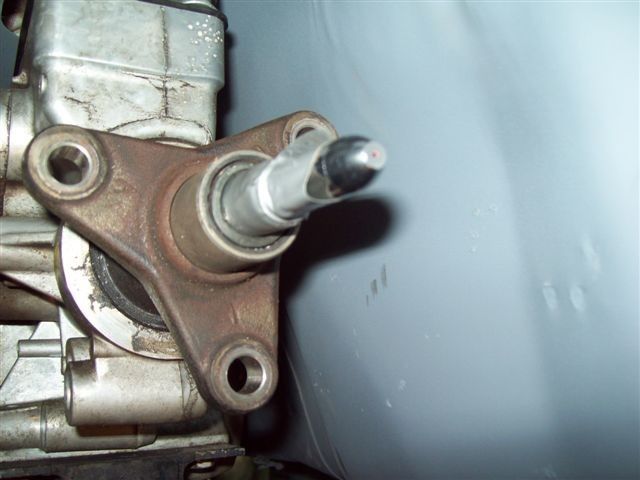
If you have a belt alignment issue then you might find this tool usefull.

It's a LASER belt alignment tool made by Gates. I picked it up at a swap meet years back and it's brilliant for working out serpentine belt alignment. You can use it to check all of the pulleys, idlers and tensioners in the system using the crank pulley as the reference.
You are welcome to borrow it.
Cheers
__________________
Mike Murphy
Melbourne Australia
|
05-19-2015, 06:18 PM
|
|
CC Member
|
|
|
Join Date: Feb 2006
Cobra Make, Engine:
Posts: 2,752
|
|
Not Ranked
belts
Yep thanks Mike. yeah I understood the 6pk1875 ref. The problem with the set up of my car is that it runs 6pk pulleys on the engine (alt, crank etc) but then runs a 5pk pulley on the AC.
What Daytona did was get a 6pk belt and then manually slice a rib off the belt to run it into a 5pk belt as a 5pk1875 belt doesn't exist.
Whats even worse is it runs off the rear of the crank and alt pulley but the front of the guide pulley going to the 5pk pulley on the AC. Its a freeken debacle and not something I'm happy with despite DSC assurances its OK. I've wrecked 2 x $60 belts already due to running the belt on the wrong section of pulley face,
Argh!
Last edited by spookypt; 05-19-2015 at 06:21 PM..
|
05-19-2015, 06:21 PM
|
|
CC Member
|
|
|
Join Date: Jan 2001
Location: Sunbury,
VIC
Cobra Make, Engine: Rat Rod Racer, LS1 & T56
Posts: 5,391
|
|
Not Ranked
Traditionally the LS motors run a 4PK belt of the rear pulley just for the AC on it's own. Are you able to set up a 2 belt configuration?
What about making a 6pk pulley for the AC pump? I reckon I could knock one up.
Cheers
__________________
Mike Murphy
Melbourne Australia
|
05-19-2015, 06:36 PM
|
|
CC Member
|
|
|
Join Date: Feb 2006
Cobra Make, Engine:
Posts: 2,752
|
|
Not Ranked
Yep you're right again Mike. Due to the narrow chassis rails the DSC cars had to run a smaller AC pump etc to fit. Thus creating a large 1875mm single serpentine belt. They tension it off the Alt manually.
I got my earlier post wrong in that the same size pump I need with a 6pk pulley is only available off a Diesel Suzi Jimny which didn't come out in Oz so a simple new or wrecker swap isn't an option.
I'm not super savvy on AC pumps so I'm not even sure I can pull the 5pk pulley off that pump? Best case I'd guess I'd need to drain the gas, disconnect and pull the pump out for inspection I'd guess?? Correct?
|
05-19-2015, 07:06 PM
|
|
CC Member
|
|
|
Join Date: Jan 2001
Location: Sunbury,
VIC
Cobra Make, Engine: Rat Rod Racer, LS1 & T56
Posts: 5,391
|
|
Not Ranked
Most pump you can remove the pulley with the pump in place. It takes a special pulley removal tool.
If you are destroying belts there must be a reason. Are they jumping a rib for some reason? You may need to look closer at the alignment in the rest of the system. Something out of alignment in the system may be putting some side loads on the belt causing it to jump. I'd start with this before going to the trouble of machining new pulleys.
I also wonder at putting that much load through a single 5 rib belt. The original system had a 6 rib just for driving water pump alternator and PS and a separate 4 rib for the AC. All that load is now pushing through a 5 rib. The serpentine belts rely on surface area to transmit the power. It's basically a row of micro v belts joined together. The V shaped belt forced into it's grove provides the friction to transmit the drive. The big advantage of the small V shape is you can turn it through a much smaller radius than a traditional V belt and you can use the back of the belt to drive.
Transmitting the drive relies on getting as much surface area connected between the belt and the pulley as possible. Going from a 6 rib to a 5 rib means you suddenly have 16.6% less surface area available. You would have to wonder how many HP you are actually trying to transmit through the one belt and what it is rated to.
Cheers
__________________
Mike Murphy
Melbourne Australia
|
05-19-2015, 07:54 PM
|
|
CC Member
|
|
|
Join Date: Feb 2006
Cobra Make, Engine:
Posts: 2,752
|
|
Not Ranked
Yeah belts were dying as I hadn't applied and installed the DSC original belt rib to pulley set up as they'd had. Front on one, rear on another. Its really avo considering how great the rest of the car is. I'm going to fix it, run a proper 6pk belt and change the AC pulley. I need a little bit more expertise to get it right but I will work it out in the end hopefully.
|
05-20-2015, 03:17 AM
|
 |
CC Member
|
|
|
Join Date: Jan 2002
Location: Melbourne, Australia,
VIC
Cobra Make, Engine: AP Pace427 (AP4033) GM L77 6.0L TR6060
Posts: 838
|
|
Not Ranked
Mike, I'd be interested in borrowing your nifty alignment tool for the quick jack holes. I elected not to get my holes drilled at the factory, because I can get the car registered easily without bumpers. But not quick jacks. And I'm not 100% sure what I'll put on yet. But the holes, especially at the front as you mentioned, will be a bit tricky at the surface is uneven.
__________________
Guy
Cobra Progress guye-cobra.blogspot.com
Last edited by guye; 05-20-2015 at 06:07 AM..
|
05-20-2015, 03:35 AM
|
|
CC Member
|
|
|
Join Date: Jul 2011
Location: Sydney,
NSW
Cobra Make, Engine: Puckett 250 GTO - LS1
Posts: 567
|
|
Not Ranked
Guy. You might be just as well off buying a laser pointer from Jaycar or Dick Smith or the like. (Do they still use them for pointing at overheads in training sessions?) I held them switched on with a bit of tape over the button and mounted them with plasticine to align my drivetrain and some body panels... Worked a treat and cheap as chips.
I think Mike's has a grooved base specific for pulley alignment.
 |
05-20-2015, 05:51 AM
|
|
CC Member
|
|
|
Join Date: Jan 2002
Location: Melbourne, Australia,
VIC
Cobra Make, Engine: AP Pace427 (AP4033) GM L77 6.0L TR6060
Posts: 838
|
|
Not Ranked
That's cool, Pete, but I was referring to his last paragraph in post #148 - I think he made a jig or something to cut the holes in the fibreglass for the overrider/quickjack mounts.
__________________
Guy
Cobra Progress guye-cobra.blogspot.com
Last edited by guye; 05-20-2015 at 05:53 AM..
|
05-20-2015, 10:48 AM
|
|
CC Member
|
|
|
Join Date: Jul 2011
Location: Sydney,
NSW
Cobra Make, Engine: Puckett 250 GTO - LS1
Posts: 567
|
|
Not Ranked
Oops... Too old, too slow, too stupid.
|
 Posting Rules
|
You may not post new threads
You may not post replies
You may not post attachments
You may not edit your posts
HTML code is Off
|
|
|
All times are GMT -7. The time now is 09:57 AM.
|
|


 Linear Mode


