Welcome to Club Cobra! The World's largest
non biased Shelby Cobra related site!
- » Representation from nearly all
Cobra/Daytona/GT40 manufacturers
- » Help from all over the world for your
questions
- » Build logs for you and all members
- » Blogs
- » Image Gallery
- » Many thousands of members and nearly 1
million posts!
YES! I want to register an account for free right now!
p.s.: For registered members this ad will NOT show
 
 Main Menu
|
|
Nevada Classics
|
|
Advertise at CC
|
|
June 2026
|
| S |
M |
T |
W |
T |
F |
S |
| |
1 |
2 |
3 |
4 |
5 |
6 |
| 7 |
8 |
9 |
10 |
11 |
12 |
13 |
| 14 |
15 |
16 |
17 |
18 |
19 |
20 |
| 21 |
22 |
23 |
24 |
25 |
26 |
27 |
| 28 |
29 |
30 |
|
|
|
|
|
|
CC Advertisers
|
|

01-19-2005, 11:57 PM
|
|
CC Member

|
|
|
Join Date: Jul 2003
Location: Sydney,
NSW
Cobra Make, Engine: Classic Revival. LS1, T56, Billy Cart
Posts: 231
|
|

 Not Ranked
 Front End Preparation
Hi Guys,
Thanks for all your words of encouragement and advice last week. As mentioned it is now time for the stupid questions.
We have taken the jag front end apart and are getting it ready for some kind of treatment. In your experience is sandblasting then powder coating the best way to prepare these or is there some other way ?
We are obvioulsy going to put new everthing else in but the main Jag components need a bit of work. And advie or experience greatly appreciated.
Cheers
|
-
Advertising

01-20-2005, 12:35 AM
|
 |
CC Member
|
|
|
Join Date: Feb 2002
Location: Alice Springs, central Australia,
NT
Cobra Make, Engine: Classic revival kit (CR3181), gen III engine, T56 6 speed box, AU XR8 lsd diff
Posts: 5,699
|
|
Not Ranked
With your jag front end all you need to keep and use are the parts that come off when you remove the 2 9/16 bolts that hold the upper inner control arm pivot and remove the long lower control arm inner pivot, remove the tie rod ends from the spindles and cut the brake hose.
Keep the upper and lower arms, keep the spindles, rotor and caliper, keep the lower control arm mounting bolts, keep the upper control arm inner pivots.
When I get home I will post a pic showing all the parts you need to keep.
__________________
Cruising in 5th

---------------------------------------------
Never be afraid to do something new, Remember, Amateurs built the Ark: Professionals built the Titanic.
|
01-21-2005, 05:53 PM
|
|
CC Member
|
|
|
Join Date: May 2002
Location: Brisbane Australia,
QLD
Cobra Make, Engine: RMC under re-construction, GenIV with tremec 600, Jag 3.31 L/S diff
Posts: 3,318
|
|
Not Ranked
Churchy... I just pulled mine apart as mentioned by Boxhead..then I soaked them in a good degreaser and washed them off.
I then power wire brushed the bits to remove remaining paint and any rust and then gave them a coat of POR15.
Most folks who see them believe they are powder coated.
__________________
It's impossible to soar like an eagle when you're surrounded by turkeys.
|
01-21-2005, 06:01 PM
|
|
CC Member
|
|
|
Join Date: Feb 2002
Location: Alice Springs, central Australia,
NT
Cobra Make, Engine: Classic revival kit (CR3181), gen III engine, T56 6 speed box, AU XR8 lsd diff
Posts: 5,699
|
|
Not Ranked
With the Classic Revival kit you wont need the crossmember so dont bother cleaning it.
You also wont need the springs or shockies
I didnt use the lower plate that is bolted to the lower arms, the one the spring sits on.
__________________
Cruising in 5th
---------------------------------------------
Never be afraid to do something new, Remember, Amateurs built the Ark: Professionals built the Titanic.
|
01-22-2005, 10:34 PM
|
|
CC Member
|
|
|
Join Date: Jul 2003
Location: Sydney,
NSW
Cobra Make, Engine: Classic Revival. LS1, T56, Billy Cart
Posts: 231
|
|
Not Ranked
Hi Boxhead,
Thanks for that, saves a bot of cleaning :-) I have cleaned up the bits and it appears the $%^& wrecker has sold me different left and right side upper control arms.
The left has a slight offset when the arm reaches the pivot point and the other has no deviation at all. I think I may have a series and a series 3, but want to know which is which. With all the combined talent here does soomebody know how to tell the difference between the series 2 and series 3. Ian mentions in his manual to linish off the bump stops so I am assuming the one with the slight kick into the pivot are the correct ones. Cuase on of them is going bacj tot he wreckers.
The lower control arms and all other bits seem to be exactly the same.
arrhhh the fun begins
|
01-23-2005, 01:57 AM
|
|
CC Member
|
|
|
Join Date: Oct 2004
Cobra Make, Engine: Classic Revival, LS1, Shift kitted auto, high stall, AU LSD rear.
Posts: 128
|
|
Not Ranked
I spoke to Ian about linishing the upper control arms and his reply was that it was only a cosmetic thing.
If I am not mistaken if you look at Aussie Mikes photos of his front end you will see that he hasn't.
Ian said that the coil overs will fit without linishing.
I was confused when I was assembling my front end in December as I thought that I had different upper arms to Box head and P Neal. I do (I think) but after looking at Mikes his looked to be the same as mine. I couldn't tell you whether they are series 1 or 2 but there was a changed made during production at some time.
Gav
|
01-23-2005, 02:12 AM
|
 |
CC Member
|
|
|
Join Date: Jul 2004
Cobra Make, Engine: 347 Stroker Morrison Injection. Registered.
Posts: 1,440
|
|
Not Ranked
I had to machine my top arms to allow the shocker to clear when the arms were fully extended on a hoist. I was told my arms were series III.
Regards.
__________________
Mando
|
01-23-2005, 03:28 AM
|
|
CC Member
|
|
|
Join Date: May 2002
Location: Brisbane Australia,
QLD
Cobra Make, Engine: RMC under re-construction, GenIV with tremec 600, Jag 3.31 L/S diff
Posts: 3,318
|
|
Not Ranked
Anyone want any pics & dimentions of series 1 and 2 can email me and I'll send you some files.
Upper a arms
Lower arms
uprights
got em all except series 111
Cheers
__________________
It's impossible to soar like an eagle when you're surrounded by turkeys.
|
01-23-2005, 05:16 AM
|
|
CC Member
|
|
|
Join Date: Feb 2002
Location: Alice Springs, central Australia,
NT
Cobra Make, Engine: Classic revival kit (CR3181), gen III engine, T56 6 speed box, AU XR8 lsd diff
Posts: 5,699
|
|
Not Ranked
 Upper control arms
Hey there Churchy, here are 2 pics.
The first pic shows the wrong arms, I have been told these where used on both series 2 & 3.
The second pic shows the correct arms (not very good pic) you can see these arms are very straight as opposed to the first pic where you can see the arms tapper in.
 Wrong
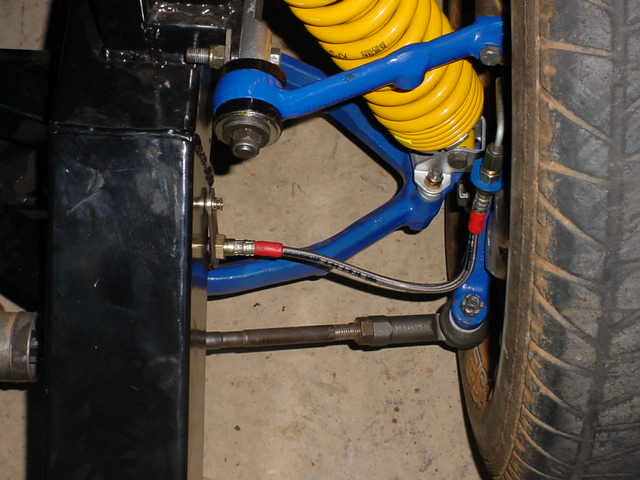 Correct
__________________
Cruising in 5th
---------------------------------------------
Never be afraid to do something new, Remember, Amateurs built the Ark: Professionals built the Titanic.
Last edited by boxhead; 01-23-2005 at 05:19 AM..
|
01-23-2005, 01:32 PM
|
 |
CC Member
|
|
|
Join Date: Oct 2002
Location: Sydney,
NSW
Cobra Make, Engine: Classic Revival. 6 litre Chev
Posts: 669
|
|
Not Ranked
Churchy,
I flapped discked all the casting flashing off and yes you do need to remove bump stop boss on upper arms to get springs to clear with full travel.
Recommend the POR 15. Great finish off the brush and hard finish.
You may also find that the coil overs do not sit in middle of upper or lower mounts to give clerance for springs and upper arms.
Good fun this cleaning stuff.
I live in Hornsby so if you want to look at completed things send me a PM and we can arrange.
Phil.
__________________
COBRA 350 Powered by the Dark Side
|
01-23-2005, 04:22 PM
|
 |
CC Member
|
|
|
Join Date: Jan 2001
Location: Sunbury,
VIC
Cobra Make, Engine: Rat Rod Racer, LS1 & T56
Posts: 5,391
|
|
Not Ranked
Sand blasting is the way to go. You can pick up some blasting cabinets quite cheap these days.
I've got the old setup with a drum of sand and a blasting gun with a syphon hose on it. I do all my blasting out on the paved back yard area then sweep the sand into the cracks in the pavers. You can buy dried filtered sand in 25KG bags and in different grits. Wear a face shield and good dust mask or respirator as it's not nice.
I wouldn't powder coat as it chips easily when hit by stones etc. I agree with Phil, that POR15 is the stuff to use. It seems to make a good bond with the surface and is very hard wearing.
I originally sprayed my suspension components in hammerite Hammered metal finish and it seems to be hard wearing. I added a bit of enamel hardener to it as well. I'll probably repaint everything with POR15 when I pull the body off for painting.
Cheers
__________________
Mike Murphy
Melbourne Australia
|
 Posting Rules
|
You may not post new threads
You may not post replies
You may not post attachments
You may not edit your posts
HTML code is Off
|
|
|
All times are GMT -7. The time now is 10:08 AM.
|
|


 Linear Mode


