Welcome to Club Cobra! The World's largest
non biased Shelby Cobra related site!
- » Representation from nearly all
Cobra/Daytona/GT40 manufacturers
- » Help from all over the world for your
questions
- » Build logs for you and all members
- » Blogs
- » Image Gallery
- » Many thousands of members and nearly 1
million posts!
YES! I want to register an account for free right now!
p.s.: For registered members this ad will NOT show
Main Menu
|
Nevada Classics
|
Advertise at CC
|
April 2024
|
S |
M |
T |
W |
T |
F |
S |
|
1 |
2 |
3 |
4 |
5 |
6 |
7 |
8 |
9 |
10 |
11 |
12 |
13 |
14 |
15 |
16 |
17 |
18 |
19 |
20 |
21 |
22 |
23 |
24 |
25 |
26 |
27 |
28 |
29 |
30 |
|
|
|
|
|
CC Advertisers
|
|
07-27-2008, 05:00 AM
|
|
CC Member
|
|
|
Join Date: Jan 2001
Location: Sunbury,
VIC
Cobra Make, Engine: Rat Rod Racer, LS1 & T56
Posts: 5,391
|
|
Not Ranked
Jag big front brake conversion
Hi All,
Since I finished my rear suspension and big rear brakes I thought I'd turn my attention to the front brakes.
I'd done a HSV rotor conversion some time back and used some generic Commodore calipers. The rotors were 330mm x 28mm and while they performed OK I wanted better.
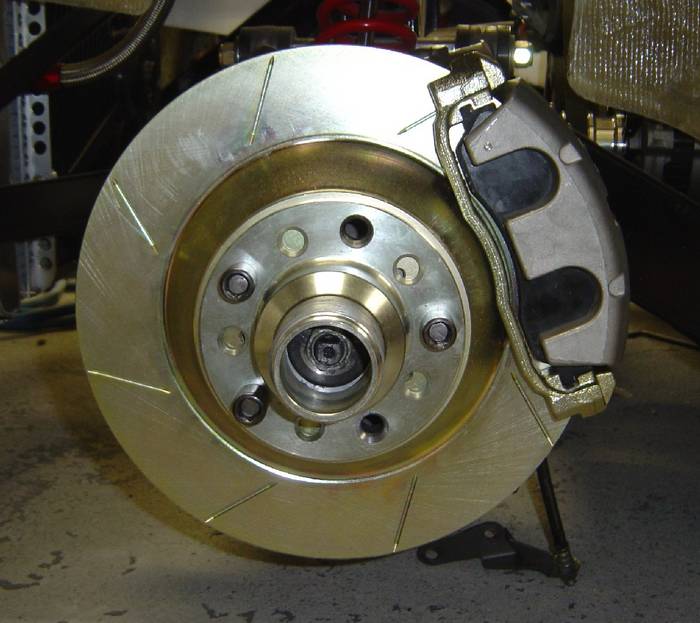
I picked up some nice billet 4piston and 6 piston calipers on a trip to the UK last year. I also bought some 343mm x 32mm rotors off Phil M when he switched to his monster 360mm AP setup.
When I did the first brake conversion I machined up billet aluminium hubs to take the hat style Holden rotor. This style of mounting has some advantages over the Jag setup in that they are easier to service and they allow more airflow into the back of the rotor. The hubs turned out pretty good but there were some things in the initial design I wasn't happy with. The seal in the back could have been better and the bearing shell clearances weren't tight enough and required some loctite bearing retaining compound to hold them in place. I also wanted to work out a better dust cap for the front.
With the new rims for the rear I had some spare Ford patern centers from the old rear rims. Since they are a 3 piece wheel I can unbolt those centers from the 11" rear rims and bolt them into the 8" front rims. This seemed like an ideal oportunity to change to ford stud patern all round (4 1/2" PCD). The Jag fronts are 4 3/4" PCD and as you can see the studs are pretty close to the outside of the hub.
First step to building the new front brakes is some new hubs...
__________________
Mike Murphy
Melbourne Australia
Last edited by Aussie Mike; 07-27-2008 at 07:22 AM..
Reason: spelling
|
-
Advertising
07-27-2008, 05:22 AM
|
|
CC Member
|
|
|
Join Date: Jan 2001
Location: Sunbury,
VIC
Cobra Make, Engine: Rat Rod Racer, LS1 & T56
Posts: 5,391
|
|
Not Ranked
Building a new set of hubs meant buying a couple of billets. Each hub starts as a 6" diameter round that's 5" long. At about $70 each you can't afford to make too many mistakes machining them up.
I thought I'd post up a step by step of machining the hub.
The billet piece is cut from a long length using a bandsaw and the ends aren't real square. The first step is to get it roughly lined up central using a dial indicator.
Here's the billet mounted in the lathe.
Once it's pretty close to square I machine the face square and drill a center hole using a center bit. This gives me a nice square face to mount the piece in the lathe. The center hole lets me support the end of the billet with a live center. That way it won't move around and will produce a more accurate piece.
Here you can see the live center supporting the end of the billet. The live center has a ball race inside it that lets the work piece spin but holds it steady with pressure against the taper on the tip. The outside of the billet is machined down to the diameter I want for the outside of the hub. The smooth machined surface is also a lot more accurate for taking measurements from.
With the billet swapped around and mounted in the chuck against the machined face I check for runout with the dial indicator. This makes sure everything is square. I regularly recheck with the dial indicator especially if the piece is removed from the chuck and switched around.
I've machined the other face and added another center hole. You can see the tapered shoulder on the center drill bit that's designed to match the tip of the live center. Now I'm ready to turn a big lump of alloy into a big pile of swarf.
__________________
Mike Murphy
Melbourne Australia
Last edited by Aussie Mike; 07-27-2008 at 06:07 PM..
Reason: spelling
|
07-27-2008, 05:50 AM
|
|
CC Member
|
|
|
Join Date: Jan 2001
Location: Sunbury,
VIC
Cobra Make, Engine: Rat Rod Racer, LS1 & T56
Posts: 5,391
|
|
Not Ranked
Here's the snout of the hub turned down. This is an important part of the hub as the snout or spiggot takes the load from the wheel. The OD of this is the same as the ID of the pin drive adaptor. It's a snug fit so there's no movement.
The other good thing about using a live center is that you can take a fairly big cut on each pass without fear of the workpiece grabbing the tool and getting pulled out of the chuck. You can quicly remove a lot of material.
The initial machining was done with an indexable tungsten carbide tipped tool. These things are great, each tip has 3 faces and they are pre ground to the righ profiles. They are also very hard so last a long while.
Some jobs requre a piece of tool steel ground to the right shape. I've ground this piece with a rounded end that lets me make a nice radius corner. The radius corner is a lot stronger than a square cut corner as it eliminates the stress riser in the root of the corner. Carroll Smith wrote a very interesting book called Engineer to Win. It has a lot of inforation about why parts fail and how to make them stronger.
Next step is to machine the receses for the bearings. I run a big drill bit in to remove a heap of material quickly.
At this stage a lot of careful measuring and machining is required. My old lathe isn't that accurate any more so I have to sneak up on the right size a little at a time. The bearing recesses are machined to a tight tollerance because the bearing shells are pressed in. This means there is an interference fit and the hole is actually a couple of thousands of an inch smaller than the bearing shell.
The Tungsten carbide tips give a beautiful finish on the part.
__________________
Mike Murphy
Melbourne Australia
Last edited by Aussie Mike; 07-27-2008 at 07:29 AM..
Reason: spelling
|
07-27-2008, 06:00 AM
|
|
CC Member
|
|
|
Join Date: Jan 2001
Location: Sunbury,
VIC
Cobra Make, Engine: Rat Rod Racer, LS1 & T56
Posts: 5,391
|
|
Not Ranked
With all of the machining on the front of the hub finished it's time to switch to the back. The hub is flipped round in the chuck and checked again with the dial indicator. With the live center supporting I machine down the back of the hub. I've used the radius tool on the back as well.
All that material in the center isn't provinding a lot of strength to the hub so it's bored out. Plenty of swarf on the lathe, time for a clean up.
More careful measuring and machining produces the bearing seats for the inner race and a seat for an oil seal to keep the grease in. I've also machined slight tapers leading into the recesses to help guide the bearing cup and seal into position.
With another piece of ground tool steel I've tapered the back of the hub down to where it slides into a cup attached to the spindle. This is designed to keep dust and dirt away from the seal. There is a lip machined on the edge that flings dirt away from the hub it also stops any grease that escapes from migrating up the hub towards the brakes.
__________________
Mike Murphy
Melbourne Australia
Last edited by Aussie Mike; 07-27-2008 at 07:30 AM..
Reason: spelling
|
07-27-2008, 06:12 AM
|
|
Senior Club Cobra Member
|
|
|
Join Date: Feb 2006
Location: Melbourne,
VIC
Cobra Make, Engine: RMC, carb 347 TopLoader and Jag running gear ~ so old school I time it with an hour-glass :D
Posts: 1,293
|
|
Not Ranked
'To travel hopefully is a better thing than to arrive, and the true success is to labour.'
r.l. stevenson
|
07-27-2008, 06:29 AM
|
|
CC Member
|
|
|
Join Date: Jan 2001
Location: Sunbury,
VIC
Cobra Make, Engine: Rat Rod Racer, LS1 & T56
Posts: 5,391
|
|
Not Ranked
That's pretty much everything done on the lathe. The next steps are on the Mill.
In order to make it easier to get the bearing shells out when they wear out I machine a couple of slots behind the bearings that lets me get a drift in behind the race to knock it out.
Here's the outer race.
And here's the inner race. I've used a ball nosed slot drilll so I don't produce any sharp corners at the bottom of the slot.
With the bearings in place it's time for a trial fitting. Everything turned out spot on. You can see the calliper mount I machined from a piece of 25mm flat bar. Radial mounts are much easier to make than lug style mountings. I'll cover the front caliper mounts in another post.
Now it's time to drill the Ford stud pattern. This was a tense moment as I've stuffed this bit up before. After checking and rechecking the PCD and runout on the rotary table I bored 5 holes in the hub.
With the holes in the right place I enlarge them to the right size for the wheel studs to press into. I also machine a recess for the head ot the wheel stud to slot into. This makes for a nice flush back to the wheel hub. I've made the face of the hub 20mm thick for strength. Aluminium isn't as strong as steel hub so I've beefed the hub up in places.
Phil's old rotors had already been drilled out to a Ford stud patern but the center bore of the hat was the smaller Ford size too. I mounted the hat in the 4 jaw chuck as it was too big to fit in the 3 jaw. The 4 jaw takes more time to set up but since each jaw is independently adjustable you can dial things in very accuratly. I didn't want any runout in the discs as this affects wheel ballance, pedal feel and pad wear etc. I bored the hat out to the larger Jag spiggot size.
Here's the hub and rotor mounted with the studs all pressed in place. You can see the back of the hub is flush with the studs in there. Check out how much room there is in the back of the hub and the rotor hat. This all translates into better airflow through the rotor.
All mounted up with the Calliper bolted on and the pin drive adaptor sandwiching the rotor in place. Looks like I got the bolt circle right this time.
Now I've got to duplicate this setup on the other side. I've also got to machine up a little grease/dust cap for the hub. The cap on the pin drive adaptor keeps everything inside but I want to make sure the grease is kept in with the bearings where it's needed.
Cheers
__________________
Mike Murphy
Melbourne Australia
Last edited by Aussie Mike; 07-27-2008 at 07:34 AM..
Reason: spelling
|
07-27-2008, 06:38 AM
|
|
CC Member
|
|
|
Join Date: Jan 2001
Location: Sunbury,
VIC
Cobra Make, Engine: Rat Rod Racer, LS1 & T56
Posts: 5,391
|
|
Not Ranked
I've probably said many times before, I get a lot of enjoyment out making stuff. I guess I could have bought an off the shelf kit and bolted it on. But part of the reason I think a lot of us build these cars is that we put a lot of ourselves into them. It's a challenge to make the parts yourself, to learn new skills, to think something through and then build it.
I've got no formal training in any of this machining stuff. I did 1 year of metal work at high school and never touched a lathe in the whole time. Learning these skills has been a lot of fun and a great mental excercise.
Cheers
__________________
Mike Murphy
Melbourne Australia
Last edited by Aussie Mike; 07-27-2008 at 05:10 PM..
|
07-27-2008, 07:18 AM
|
|
CC Member
|
|
|
Join Date: Aug 2002
Location: Brisbane Australia,
Qld
Cobra Make, Engine: Now built a race cobra.
Posts: 433
|
|
Not Ranked
Lots of fun.
Hi Mike looks like you are enjoying winter . I hope you are going to come and show me how good the new brakes work at the nats . i have only 330 rotors on the new car so i might have a bit of diameter envy though i do have lots of width 35 mm wide . I spent a whole day making one caliper mount for the back yet the front took a couple of hours . nearly there.
went to the v8 clearance sale today it was mostly left over bits from wps team lots of rotors big ones cheap 330 rears $40 a pair and 365 were from $50 a pair but hats were a little expensive $ 250 a pair no front calipers heaps of pads lots of alloy 9 inch centres . i bought a rack of sheet metal with alloy s/s and moly plate and bin if moly of cuts not much else.
I hope they work good for you mike the new race car looks a lot like your did in flat black .
|
07-27-2008, 04:23 PM
|
|
CC Member
|
|
|
Join Date: Jan 2004
Location: Gold Coast,
AUS
Cobra Make, Engine: Wish I had my own PACE 427
Posts: 2,145
|
|
Not Ranked
Thanks for the informative post. As always very impressive stuff. You are an inspiration to us all.
|
07-27-2008, 07:48 PM
|
|
CC Member
|
|
|
Join Date: Jan 2001
Location: Sunbury,
VIC
Cobra Make, Engine: Rat Rod Racer, LS1 & T56
Posts: 5,391
|
|
Not Ranked
Winter in the shed is quite bearable. It was cold wet and raining most of the weekend but I had the heater going and was quite happy. I bought one of those gas fired patio heaters a while back and I just move it to where I'm working and it keeps you toasty warm.
Sounds like some bargains to be had at the V8 clearance sale. I'll have to get along to one some time. I like doing the odd swap meet as you can find some interesting stuff in amongst the junk. I bought a really nice adjustable boring head to suit the INT40 spindle on my mill at the Bendigo swap. I paid about $120 for it from memory which was very cheap for what it was.
I'd often thought about having a go at machining up my own disc hats as there's probably only $50 worth of Ally in each of them. The problem is there's a lot of material to remove and they are a big piece which is difficult to grip.
Machining stuff is great fun. More people should buy a lathe and have a go.
Cheers
__________________
Mike Murphy
Melbourne Australia
|
07-27-2008, 10:16 PM
|
|
CC Member
|
|
|
Join Date: Aug 2001
Location: Melbourne, Australia,
Vic
Cobra Make, Engine: G-Force Mk I, 5L Windsor, TKO 600, enhanced Jag / Koni suspension & LSD Diff.
Posts: 2,298
|
|
Not Ranked
Mighty expensive looking swarf your collecting there Mike!!
Love to have the gear you've got but the missus wants somewhere to park the grumbly door out of the weather and with a cobra in there too (when it finally returns) I haven't enough room for the machining tools. No do I have the lolly at present.
Maybe I need a bigger shed further back on the block but our odd shaped land wont really allow that - bugga!
Anyway good work as usual.
My only concern with all this is how you know there is enough strength in the bits and pieces and you wont see a wheel pass you by some where. How do you factor in for safety performance Mike?
Cheers
Steve
__________________
slowy
|
07-27-2008, 11:24 PM
|
|
CC Member
|
|
|
Join Date: Jan 2001
Location: Sunbury,
VIC
Cobra Make, Engine: Rat Rod Racer, LS1 & T56
Posts: 5,391
|
|
Not Ranked
Quote:
Originally Posted by stephen low
My only concern with all this is how you know there is enough strength in the bits and pieces and you wont see a wheel pass you by some where. How do you factor in for safety performance Mike?
|
That's pretty difficult to do without some computer modeling software or testing a bunch of the parts to destruction. My theory is to base the design on an existing piece from a production car and then beef it up from there. In this case I've looked at both Jaguar and Holden hubs. Both are made from steel but are designed for a 1600KG+ car that gets used and abused for hundreds of thousands of KMs. My design whilst made from aluminium (a weaker material for the equivalent dimensions) is built with thicker sections in critical areas where strength counts.
For example the face of the hub is 20mm thick where most steel hubs aren't much more than half that. The body of the hub between the inner race and the flange is about 10mm larger in diameter than a regular hub and the material section through there is thicker too. This is a critical spot for the strength of the hub as most of the load is transmitted from the flange to the inner bearing race. The placement of the flange face is also set closer to the inner race by about 10mm over the Jag hub which strengthens it further. The further from the inner race the load is the more leverage it has.
I'm confident I won't have any problems with the hub breaking.
Cheers
__________________
Mike Murphy
Melbourne Australia
|
07-28-2008, 01:18 AM
|
|
Senior Club Cobra Member
|
|
|
Join Date: Feb 2006
Location: Melbourne,
VIC
Cobra Make, Engine: RMC, carb 347 TopLoader and Jag running gear ~ so old school I time it with an hour-glass :D
Posts: 1,293
|
|
Not Ranked
Great Post
Really enjoy seeing/reading about the engineering that people are doing.
You must be very satisfied with that result.
The 'how safe is that...?' question is always relevant to the home engineer and sometimes difficult to answer because aware minds know that there is no real substitute for testing - and the other forms of analysis that might be acceptable are generally beyond means or ability of the home engineer, often leaving only opinion and comparison.
Having confidence in home engineering jobs is an interesting question, should we assume that a factory part put to a non-factory intended use is safer/better, can we assume that there has been significant factory testing - particularly where older cars are concerned. Should we be confident because someone else is.
My personal experience has been that home engineering jobs frequently fall into two - somewhat polar - camps. Well/Over-engineered and 'WTF were they thinking'.
LoBelly
|
07-28-2008, 01:18 AM
|
|
CC Member
|
|
|
Join Date: Aug 2001
Location: Melbourne, Australia,
Vic
Cobra Make, Engine: G-Force Mk I, 5L Windsor, TKO 600, enhanced Jag / Koni suspension & LSD Diff.
Posts: 2,298
|
|
Not Ranked
I knew you'd over engineer Mike, it's just that fleeting thought as you dive into that nice right hander on the GOR for example, with the sheer cliff on the left......
__________________
slowy
|
07-28-2008, 01:54 AM
|
|
CC Member
|
|
|
Join Date: Jan 2001
Location: Sunbury,
VIC
Cobra Make, Engine: Rat Rod Racer, LS1 & T56
Posts: 5,391
|
|
Not Ranked
These sort of questions go through my mind every time I look at some part of the car. With my rear arms I'm thinking about what tha fatigue life of the 4130 tube is going to be like? Will the welds become brittle and crack eventually? Are the rod ends I've chosen strong enough? The things that give me confidence is looking at cars already on the road (especially production cars) and the types of components they are using. Take what they have and add a bit of over engineering to be safe.
I was comforted after seeing the arms used in the MoTec Daytonas and see that I'd used larger diameter tube with a thicker wall and larger rod ends. As a car with similar weight and performance to our Cobras I figured I'm probably on the right track.
It's not really feasable for us to do the level of testing a big auto company would do but we can use some sound engineering principles when designing a part. A bit of over engineering doesn't hurt either especially if you aren't chasing every gram of weight.
Cheers
__________________
Mike Murphy
Melbourne Australia
|
07-28-2008, 05:11 AM
|
|
CC Member
|
|
|
Join Date: Jul 2008
Cobra Make, Engine: BBF 545 Stroker Alloy Heads Roller Cam Aluminium Flywheel Twin plate Clutch TKO600 9inch Independent Rear 335x17 Rear 315x17 Front 1140kg
Posts: 292
|
|
Not Ranked
Nice job mike...... Think I'd rather keep my steel ones though I've seen to much alloy fatigue... have you thought about heat treating to up the strength!
|
07-28-2008, 05:40 AM
|
|
CC Member
|
|
|
Join Date: Jan 2001
Location: Sunbury,
VIC
Cobra Make, Engine: Rat Rod Racer, LS1 & T56
Posts: 5,391
|
|
Not Ranked
Yes, I've been thinking about heat treating but I believe the billet is T6 already so micht not be worth it. I've got to check with the aluminium suplier. I have been thinking about getting them anodised though as this will keep the corosion away and toughen up the surface against knocks and scratches.
Cheers
__________________
Mike Murphy
Melbourne Australia
|
07-28-2008, 06:09 AM
|
|
CC Member
|
|
|
Join Date: Aug 2002
Location: Brisbane Australia,
Qld
Cobra Make, Engine: Now built a race cobra.
Posts: 433
|
|
Not Ranked
No Worries.
Hey Mike i would not be worried about the strength of your hubs they will be fine you have done the right thing with radii on the corners and there is no point in heat treating them the alloy is as strong as it will ever get. I went through the same thing with caliper mounts 6 years ago. But anodising them will will make them stronger and give good corrosion resistance.
If you made the flange 10 mm thick then maybe fatigue could be a problem . fatigue is a result of flex and stress like aircraft wings that are made from very hard thin alloy which cracks and fatigues. molly suffers from the same thing in air craft they use tube that is only 35 thou thick very light and strong but prone to fatigue.
so you coming to the nats??
|
07-28-2008, 06:44 PM
|
|
CC Member
|
|
|
Join Date: Jan 2001
Location: Sunbury,
VIC
Cobra Make, Engine: Rat Rod Racer, LS1 & T56
Posts: 5,391
|
|
Not Ranked
I did a bit of research on the alloy I used. It's 2011 which is free machining alloy and it's already been solution heat treated and aged to T6. It's a fairly strong grade of aluminum but anodizing is reccomended as it's more prone to corrosion than some grades.
I'm still on target to get to the nats. Last year work sent me to Belgium so I didn't get to go. I don't want to miss out this year. Really looking forward to catching up.
Once I've finished the front brakes I'll finish building a set of quiet side pipes (quieter than the shorty ones). They are half built so it shouldn't take too long. I'd hate to get all the way to Wakefield only to be turned away for having a car that's too noisy.
After the pipes I'll make a taller roll bar and if I've got time I'll build a new stainless fuel tank.
They will most likely stick me in the race car class as I'll probably still run my aero screen.
Cheers
__________________
Mike Murphy
Melbourne Australia
Last edited by Aussie Mike; 07-28-2008 at 06:47 PM..
|
07-28-2008, 11:42 PM
|
|
CC Member
|
|
|
Join Date: Feb 2002
Location: Alice Springs, central Australia,
NT
Cobra Make, Engine: Classic revival kit (CR3181), gen III engine, T56 6 speed box, AU XR8 lsd diff
Posts: 5,699
|
|
Not Ranked
Thats ok Mike, I will be in race class too (no rego) so atleast you wont finish last.
__________________
Cruising in 5th
---------------------------------------------
Never be afraid to do something new, Remember, Amateurs built the Ark: Professionals built the Titanic.
|
Posting Rules
|
You may not post new threads
You may not post replies
You may not post attachments
You may not edit your posts
HTML code is Off
|
|
|
All times are GMT -7. The time now is 04:10 PM.
|
|