 
 Main Menu
|
|
Nevada Classics
|
|
Advertise at CC
|
| S |
M |
T |
W |
T |
F |
S |
| |
|
|
|
|
1 |
2 |
| 3 |
4 |
5 |
6 |
7 |
8 |
9 |
| 10 |
11 |
12 |
13 |
14 |
15 |
16 |
| 17 |
18 |
19 |
20 |
21 |
22 |
23 |
| 24 |
25 |
26 |
27 |
28 |
29 |
30 |
| 31 |
|
|
|
|
|
|
|
|
CC Advertisers
|
|
 390Likes 390Likes

06-20-2017, 04:43 PM
|
 |
CC Member

|
|
|
Join Date: Aug 2013
Location: Canandaigua,
NY
Cobra Make, Engine: SPF MKII Riverside Racer FIA
Posts: 2,504
|
|

 Not Ranked
Well done!
__________________

|
06-22-2017, 11:02 PM
|
|
Senior Club Cobra Member
|
|
|
Join Date: Dec 2007
Cobra Make, Engine: ERA FIA 'Street' Build
Posts: 2,129
|
|
Neutral
Nice work Glen, great attention to detail. What's next on the list? Are you waiting on any parts or do you have plenty to keep you busy?
|
06-25-2017, 07:05 PM
|
 |
CC Member
|
|
|
Join Date: Aug 2009
Location: Adelaide,
SA
Cobra Make, Engine: AP 289FIA 'English' spec.
Posts: 13,152
|
|
Not Ranked
Thanks Tim. I have almost all required parts now, although there is still a short list of parts that are yet to be supplied by AP.
What's next? I need to fit the diff. and half shafts, then the fuel tank, and then I can start fitting the sheetmetal panels in the boot/trunk. Logically, after that, I should fit the panels under the hood and also start insulating.
Currently I'm doing what should be an easy one - modifying the alloy 'filter' panel so that it will fit in the hood scoop. It's supplied as a blank panel, so I will probably use the ERA FIA hole pattern rather than the larger holes that LP's CSX2259 uses.
Cheers,
Glen
Last edited by xb-60; 06-25-2017 at 07:09 PM..
|
06-25-2017, 07:46 PM
|
 |
CC Member
|
|
|
Join Date: Jan 2004
Location: Queanbeyan,
NSW
Cobra Make, Engine: AP 289 USRRC #98 The Ken Miles Tribute Car
Posts: 1,134
|
|
Not Ranked
 Attachment method
How are you thinking of attaching yours Glen?
__________________
289 FIA Cobras RULE! 
|
06-26-2017, 03:56 AM
|
|
CC Member
|
|
|
Join Date: Aug 2013
Location: Canandaigua,
NY
Cobra Make, Engine: SPF MKII Riverside Racer FIA
Posts: 2,504
|
|
Not Ranked
Quote:
Originally Posted by xb-60

What's next? I need to fit the diff. and half shafts, then the fuel tank, and then I can start fitting the sheetmetal panels in the boot/trunk.
Cheers,
Glen
|
Glen,
Is your build using transverse leaf springs? If it is you will have to check to see if the lower control arms are binding on the rear hubs. On my build the pressure of the transverse leaf springs caused the hubs to bind on the lower control arms, preventing rotating the hubs to install the half-shafts. We had to use a jack on the lower control arm to relieve the pressure from the leaf springs so the hub would spin. While we were there, we installed the rear shocks, as once installed they kept the pressure off the hub and allowed us to remove the jack and that was one less thing in the way.
Good luck with the build, and wear long sleeves while installing those half-shafts, not a lot of working room in their and my forearms are scuffed up pretty well from not wearing long sleeves. 
Jim
__________________
|
06-26-2017, 05:20 PM
|
|
CC Member
|
|
|
Join Date: Aug 2009
Location: Adelaide,
SA
Cobra Make, Engine: AP 289FIA 'English' spec.
Posts: 13,152
|
|
Not Ranked
Quote:
Originally Posted by BJ's Snake
How are you thinking of attaching yours Glen?
|
M4 button head socket screws with Nylocs.
What hole pattern are you using for the airflow?
I'll send a PM with more detail.
Cheers,
Glen
Last edited by xb-60; 06-26-2017 at 05:39 PM..
|
06-26-2017, 05:33 PM
|
|
CC Member
|
|
|
Join Date: Aug 2009
Location: Adelaide,
SA
Cobra Make, Engine: AP 289FIA 'English' spec.
Posts: 13,152
|
|
Not Ranked
Quote:
Originally Posted by 1795
Glen,
Is your build using transverse leaf springs? .....
....Good luck with the build, and wear long sleeves while installing those half-shafts, not a lot of working room in their and my forearms are scuffed up pretty well from not wearing long sleeves.
Jim |
Hi Jim,
No, not transverse leaf. It's a bit more radical under the skin than (hopefully) it appears on the outside.
Here's a shot of the front suspension setup.
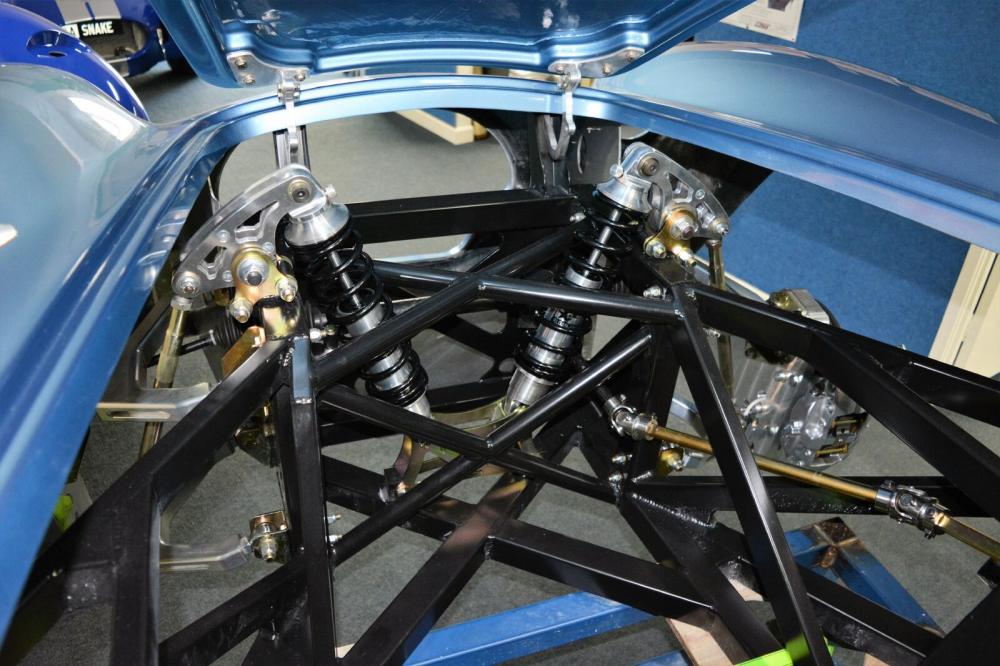
Rear is similar with pushrods as well. I think the diff. fit will be tight, but should be OK with the half-shafts.

Thanks for the thoughts...it's depths of winter here, so will have the long sleeves - and jumper - and overalls.
Cheers,
Glen
Last edited by xb-60; 06-26-2017 at 05:42 PM..
|
06-26-2017, 05:52 PM
|
|
CC Member
|
|
|
Join Date: Aug 2013
Location: Canandaigua,
NY
Cobra Make, Engine: SPF MKII Riverside Racer FIA
Posts: 2,504
|
|
Not Ranked
Glen,
That should be a little easier than mine. Those leaf springs are rather stiff. Easier with coil overs. Good luck.
Jim
__________________
|
06-26-2017, 06:50 PM
|
|
CC Member
|
|
|
Join Date: Jan 2004
Location: Queanbeyan,
NSW
Cobra Make, Engine: AP 289 USRRC #98 The Ken Miles Tribute Car
Posts: 1,134
|
|
Not Ranked
Quote:
Originally Posted by xb-60
M4 button head socket screws with Nylocs.
What hole pattern are you using for the airflow?
I'll send a PM with more detail.
Cheers,
Glen
|
Single row large holes.
Look forward to see your idea of fixing the panel, I was thinking of fibreglassing it in somehow.
Cheers
Brett
__________________
289 FIA Cobras RULE!
|
06-26-2017, 10:49 PM
|
|
CC Member
|
|
|
Join Date: Aug 2009
Location: Adelaide,
SA
Cobra Make, Engine: AP 289FIA 'English' spec.
Posts: 13,152
|
|
Not Ranked
Quote:
Originally Posted by BJ's Snake
...Single row large holes...
|
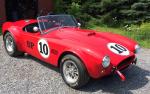
Of course! Ken Miles  how could I forget |
07-09-2017, 10:36 PM
|
|
CC Member
|
|
|
Join Date: Aug 2009
Location: Adelaide,
SA
Cobra Make, Engine: AP 289FIA 'English' spec.
Posts: 13,152
|
|
Not Ranked
OK, it’s a small milestone. The hood scoop grille is complete and installed.
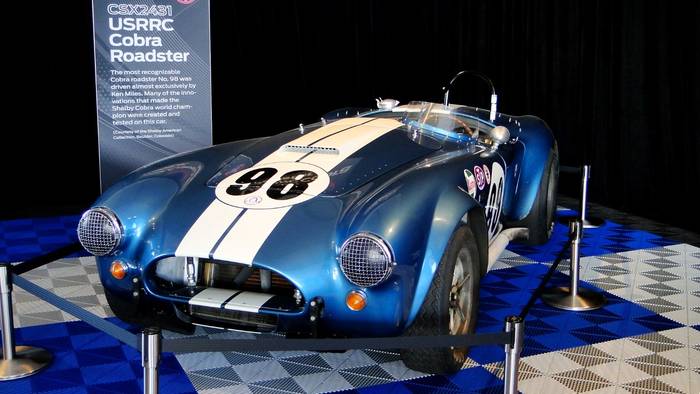
I like to think that the hood scoop grille on CSX2259 (below) is one of those few original parts to survive , so firstly here’s what I wanted mine to look like…

….and here’s what my interpretation looks like on AP2289….
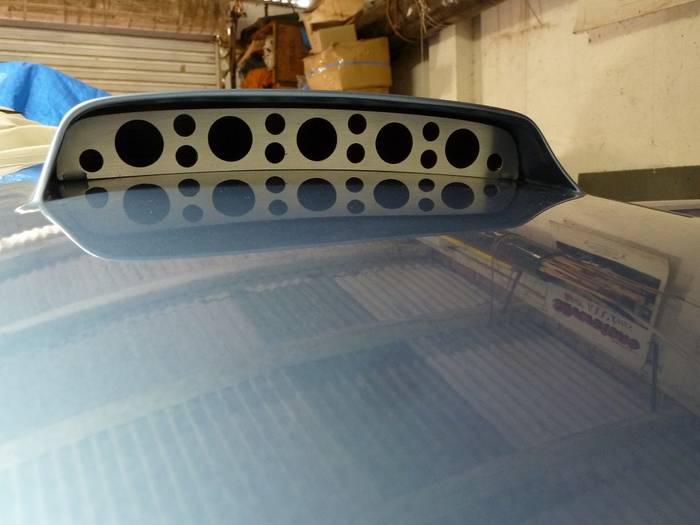
…and…

Cheers,
Glen
Last edited by xb-60; 07-10-2017 at 11:20 PM..
|
07-09-2017, 10:47 PM
|
|
CC Member
|
|
|
Join Date: Jan 2004
Location: Queanbeyan,
NSW
Cobra Make, Engine: AP 289 USRRC #98 The Ken Miles Tribute Car
Posts: 1,134
|
|
Not Ranked
Well done Glen.
__________________
289 FIA Cobras RULE!
|
07-09-2017, 11:31 PM
|
|
Senior Club Cobra Member
|
|
|
Join Date: Dec 2007
Cobra Make, Engine: ERA FIA 'Street' Build
Posts: 2,129
|
|
Not Ranked
Nice work Glen ... how did you make the holes, use a drill press or use something like a Greenlee punch?
|
07-10-2017, 12:22 AM
|
|
CC Member
|
|
|
Join Date: Aug 2009
Location: Adelaide,
SA
Cobra Make, Engine: AP 289FIA 'English' spec.
Posts: 13,152
|
|
Not Ranked
Hi Tim,
Thanks. No, didn't use a punch, just used 25mm and 12mm twist drills for my 2mm sheet 
More to the story of course. I drilled a 25mm hole and a 12mm hole in a piece of 8mm thick mild steel bar and then I clamped the 8mm bar, the 2mm alum. alloy sheet and a short length of hardwood decking (around 70mm x 12mm section) down onto the table of my pedestal drill. The holes in the steel bar served as the guide for the drill bits and the hardwood supplied something solid enough so that the drill wouldn't grab as it slowly drilled through the alloy sheet. I had also marked up the hole positions and drilled 6mm pilot holes, but even still, as it's just an ordinary drill press, each hole position required checking and rechecking a number of times to get it right.
Turned out quite well.
Cheers,
Glen |
07-10-2017, 03:48 AM
|
|
CC Member
|
|
|
Join Date: Aug 2013
Location: Canandaigua,
NY
Cobra Make, Engine: SPF MKII Riverside Racer FIA
Posts: 2,504
|
|
Not Ranked
Turned out very well Glen. You were smart to sandwich that alloy as I imagine that it would have caught in the bit and twisted if you were trying to drill that on it's own.
Moving along nicely.
Jim
__________________
|
07-15-2017, 08:23 PM
|
|
CC Member
|
|
|
Join Date: Aug 2009
Location: Adelaide,
SA
Cobra Make, Engine: AP 289FIA 'English' spec.
Posts: 13,152
|
|
Not Ranked
Photo bucket - what a disappointing outfit!
Looks like I have lost all of my pictures that I placed in Photobucket and linked to my build threads.
I will attempt to rebuild my two build logs.
Cheers
Glen
edit: replaced affected pictures in this thread
Last edited by xb-60; 07-16-2017 at 12:06 AM..
|
08-01-2017, 10:25 PM
|
|
CC Member
|
|
|
Join Date: Aug 2009
Location: Adelaide,
SA
Cobra Make, Engine: AP 289FIA 'English' spec.
Posts: 13,152
|
|
Not Ranked
Doing some prelim work prior to fitting the final drive....under the supervision of the site manager....
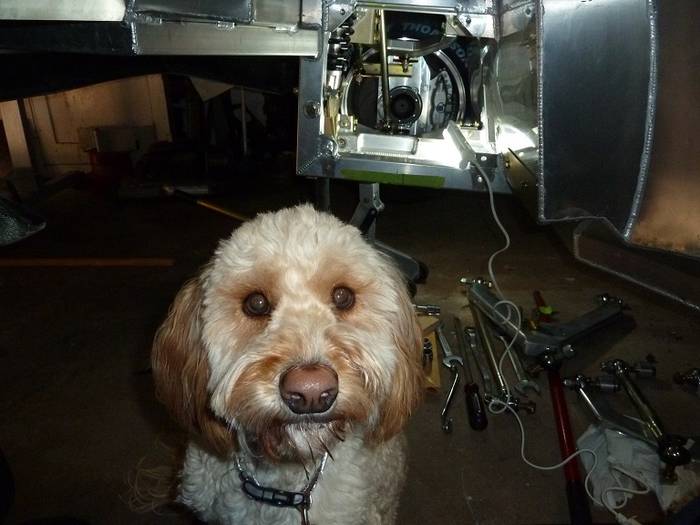
Pity that the whole right rear as well as the coil overs and mounting brackets have to be removed to be able to fit the diff. Darn cold out in the garage too!
Cheers,
Glen |
08-02-2017, 04:23 AM
|
|
CC Member
|
|
|
Join Date: Aug 2013
Location: Canandaigua,
NY
Cobra Make, Engine: SPF MKII Riverside Racer FIA
Posts: 2,504
|
|
Not Ranked
Glen,
I fully understand. I do not look forward to having to having to perform any repairs on the differential or rear brakes (beyond pads), as it requires the removal of a lt of different parts.
My dog sue vises me as well, but she is much more sedentary in it.
Jim
__________________
|
08-20-2017, 12:04 AM
|
|
CC Member
|
|
|
Join Date: Aug 2009
Location: Adelaide,
SA
Cobra Make, Engine: AP 289FIA 'English' spec.
Posts: 13,152
|
|
Not Ranked
Just reminiscing....cluttered as it might seem to be in this picture....
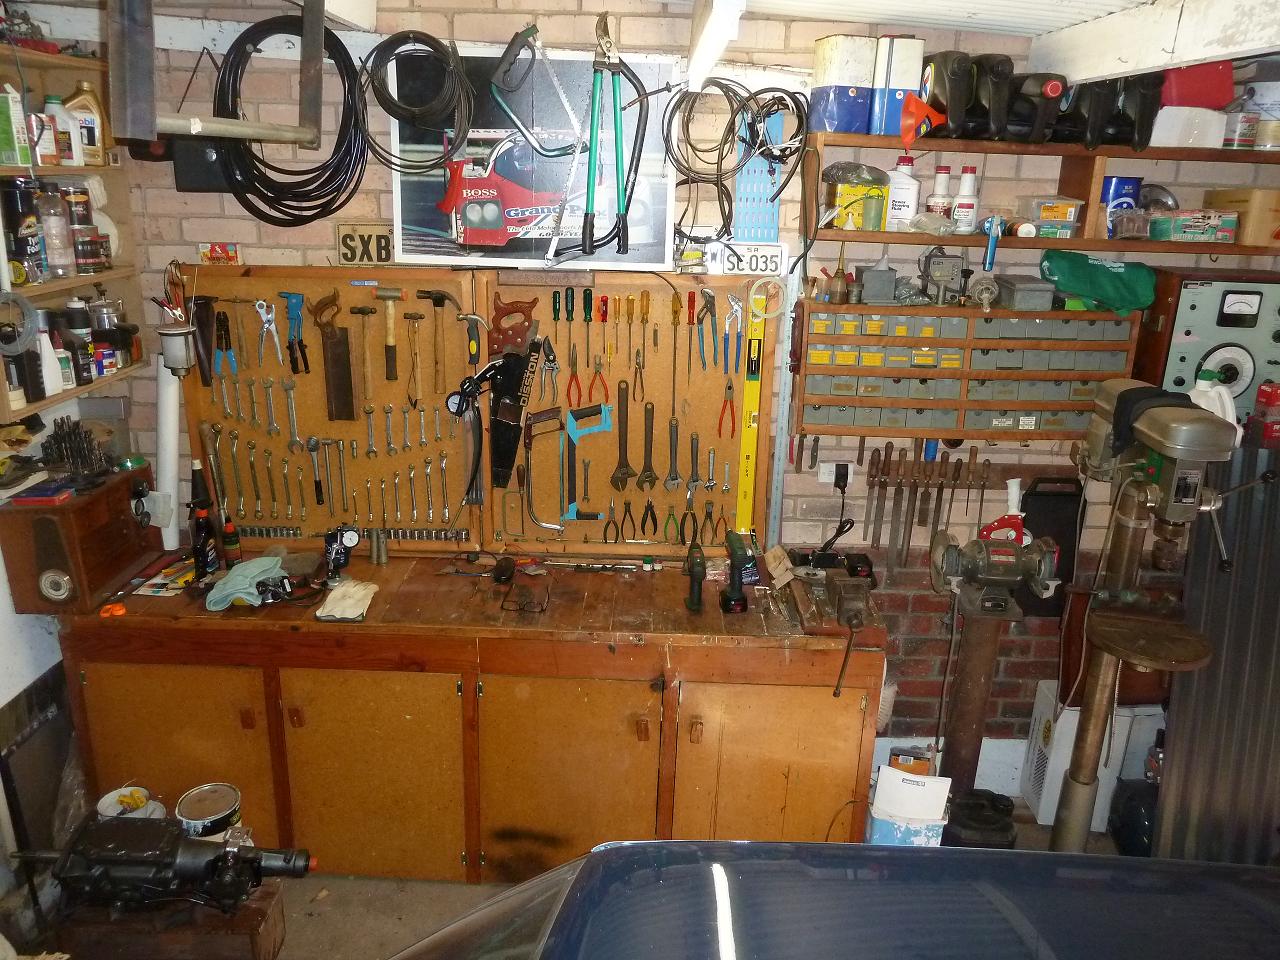
....here's my garage last year before the Alfa moved out and the Cobra moved in. NOW it's REALLY cluttered.
If you look closely you can see the Toploader sitting there....'waiting' for a future time of glory in its next life in a Cobra.
Melodramatic, you might say? Well, it's a cold, wet Sunday afternoon and I don't have a heater out there !
Cheers!
Glen
Last edited by xb-60; 08-20-2017 at 12:06 AM..
|
09-06-2017, 03:17 AM
|
|
CC Member
|
|
|
Join Date: Aug 2009
Location: Adelaide,
SA
Cobra Make, Engine: AP 289FIA 'English' spec.
Posts: 13,152
|
|
Not Ranked
Yep, still cold out here but at least its drier than outside! Got to make some progress though.
As reported elsewhere, the ZF differential is in its cage, however not secured yet
.but thats not holding us (me and Alfie) up.
Moved on to dismantling the LH rear suspension and taking a shot at the track adjustment
its a matter of trial and error, so heres what its looking like at the moment with inner and outer rod-ends adjusted on the lower LH wishbone, and ready to go back in for a trial measurement

Cheers!
Glen |
 Posting Rules
|
You may not post new threads
You may not post replies
You may not post attachments
You may not edit your posts
HTML code is Off
|
|
|
All times are GMT -7. The time now is 11:05 PM.
Links monetized by VigLink
|


 Linear Mode


