 
 Main Menu
|
|
Nevada Classics
|
|
Advertise at CC
|
|
May 2026
|
| S |
M |
T |
W |
T |
F |
S |
| |
|
|
|
|
1 |
2 |
| 3 |
4 |
5 |
6 |
7 |
8 |
9 |
| 10 |
11 |
12 |
13 |
14 |
15 |
16 |
| 17 |
18 |
19 |
20 |
21 |
22 |
23 |
| 24 |
25 |
26 |
27 |
28 |
29 |
30 |
| 31 |
|
|
|
|
|
|
|
|
CC Advertisers
|
|

05-04-2009, 06:38 AM
|
|
CC Member

|
|
|
Join Date: Oct 2003
Posts: 4,078
|
|

 Not Ranked
 Engine Builders-favorite oil pan sealing tips?
I'm about to R&R the Canton pan and windage tray on my Sideoiler for the umpteenth time to stop leaking/seeping at rear gasket area. The block plugs at the rear bulkhead and rear main are not leaking. I've used everything by FelPro, Mr Gasket, Detroit Gasket and am about to try Milodon 40450's. RightStuff, Wrongstuff, HiTack, Lowtack and everything in between has been used without success. I sandwich the tray with a gasket on each side, studs and nuts attach the pan unit. Made steel load-spreading bars for both sides and front/rear. I've also tried no sealant, dry installation. No help. Am considering axle grease on the mating surfaces which works perfectly on the valve covers.
I've done all the easy things like ensuring flat surfaces on the pan and tray, no squishy applications of silicone and I do not overtighten.
Please advise how you send dry motors out the door which don't come back. Name the brands of gaskets and sealants you use. All advice greatly appreciated.
__________________
Chas.
|
-
Advertising

05-04-2009, 07:33 AM
|
 |
CC Member
|
|
|
Join Date: Jul 2001
Location: Senoia,
Ga.
Cobra Make, Engine: 427SO with big twin autolite inlines on custom intake, jag rear, top loader, wembeldon white, guardsmen blue stripes
Posts: 3,155
|
|
Not Ranked
Fel-pro and don't overtighten, also dab a bit of silicon where the block breaks...the rear main and also lower part of timing cover. This worked for me after trials and errors....
And, retighten after a few hours........
__________________
Perry
Remember!, there's a huge difference between a 'parts' changer, and a mechanic.
|
05-04-2009, 09:05 AM
|
 |
Half-Ass Member
|
|
|
Join Date: Jun 2005
Cobra Make, Engine: ERA #732, 428FE (447 CID), TKO600, Solid Flat Tappet Cam, Tons of Aluminum
Posts: 22,025
|
|
Not Ranked
Quote:
Originally Posted by 427 S/O

Fel-pro and don't overtighten, also dab a bit of silicon .......
|
A dab?!? How 'bout two gaskets, a windage tray between them, and black RTV everywhere.... 
 |
05-04-2009, 09:31 AM
|
|
CC Member
|
|
|
Join Date: Jul 2003
Location: West Bloomfield,
MI
Cobra Make, Engine:
Posts: 717
|
|
Not Ranked
Motorcraft gray silicone for use with 6.5-7.3 diesel engines - comes from the Ford dealer in a caulk tube. Clean all surfaces with abrake Cleaner or better yet with thinner. Put the silicone on both sides of the gaskets with your finger - as thin as a coat of paint - you don't want much. I glue the gaskets to the windage tray. A dab at the joints. Assemble with bolts that have the serrated underhead - available from ARP or Mr. Gasket - not studs - studs will loosen 'cuz you can't put enough clamp load on them to keep them tight.
__________________
Survival Motorsports
"I can do that....."

Engine Masters Challenge Entries
91 octane - single 4bbl - mufflers
2008 - 429 cid FE HR - 675HP
2007 - 429 cid FE MR - 659HP
2006 - 434 cid FE MR - 678HP
2005 - 505 cid FE MR - 752HP
|
05-04-2009, 11:37 AM
|
|
CC Member
|
|
|
Join Date: Mar 2001
Location: E BRUNSWICK N.J. USA,
Posts: 3,841
|
|
Not Ranked
Barry R has it right
ERA Chas Chas I do almost that same as Barry R. with sealing a motor. I only use the gray sealer from either Ford or GM. The tube is not cheap. They stole this from Honda years ago. First off are you 100% sure that the surfaces are flat??  It sound like you have had this pan on and off a couple of times. Also the fact that you where trying to improve the sealing of the gasket. I do have a question about your motor, are you running breathers or PVC valve? If you keep getting leaks, it could be from too much pressure in the motor. Anything short of the gray RTV will leak. I run the same setup as you or the oil pan and windage tray. I use a thin bead around the oil pan in the middle and around each bolt hole I use Hi-Tac for the gasket to the windage tray on both sides. This needs time to get tacky and hold to the tray. After 10-15 minutes I glue the other gasket on on the windage tray and let set. Make sure there is NO oil drops coming off the motor or coming down the skirt of the block. A thin bead of RTV around the top gasket between the block and windage tray. You want to give the RTV about 2-3 minutes to skin before installing the whole thing. If your pick up for the oil pump is a problem, Trim the windage tray to clear. I had to reweld mine with the stroker kit in the bottom end of the motor. The rod bolt where hitting the edge of the tray. You need 2 people to do this right. Install 2 front bolts or nuts, 2 rear nuts or bolts, then work your way either way to the front or the back until all bolts or nuts are finger tight with the gasket maken contact with the block. Go 2 times around tightening from one side to the other. to 10 inch pounds. Then make the final torque to spec. Give the motor 24 HOURS to fully CURE the RTV.   Fill with oil and road test. I and used this way for 14 years. The only problem I get is a small rear main seal leak some times. This is due to I over fill the motor for racing. Rick L. PS EVERY SURFACE MUST BE CLEANER THAN AN OPERATING TABLE OR YOU WILL HAVE LEAKS. 

|
05-04-2009, 12:32 PM
|
|
CC Member
|
|
|
Join Date: Feb 2002
Location: Pearland, Texas,
Posts: 60
|
|
Not Ranked
Permatex "The Right Stuff". A little pricey but well worth it.
|
05-04-2009, 03:12 PM
|
|
CC Member
|
|
|
Join Date: Oct 2003
Posts: 4,078
|
|
Not Ranked
Guys,
All your tips greatly appreciated. I have cleaned all the surfaces meticulously today. All of your suggestions and materials have been tried in the recent past except Barry's. Rick has also used the Motorcraft sealant as Barry recommends.
You all have had success with your methods so I've got to go back and start from square one again. I'm missing something.
Will report as results develop. Don't stop sending advice and a big thanks to you all.
__________________
Chas.
|
05-04-2009, 03:49 PM
|
|
Senior Club Cobra Member
|
|
|
Join Date: May 2006
Location: Manteca,
Ca.
Cobra Make, Engine: None, sold it
Posts: 2,439
|
|
Not Ranked
Are you sure that you do not have a small weep hole(crack ) somewhere close to the pan? Hope not.
Terry |
05-04-2009, 04:24 PM
|
|
CC Member
|
|
|
Join Date: Oct 2003
Posts: 4,078
|
|
Not Ranked
No Terry, I'm not sure. But I have been advised about that and examined the block and crankcase as carefully as one can while it's in the car.
Of course, a pressure test of the block is the only sure way to tell but I can't accomplish that just now.
Thanks for a heads-up idea.
__________________
Chas.
|
05-05-2009, 04:59 PM
|
|
CC Member
|
|
|
Join Date: Oct 2003
Posts: 4,078
|
|
Not Ranked
Finally getting somewhere.
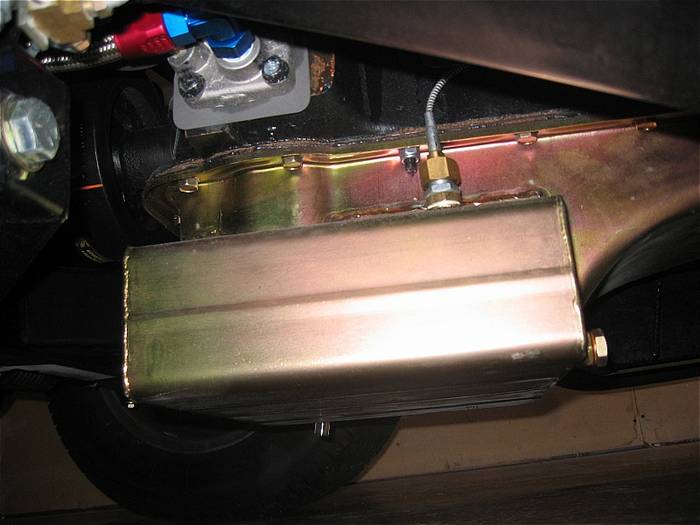
Part I: At this stage, the motor has been sitting with no oil pan on for 2 days.
This is the driver side lower corner of the crankcase. Picture's not great because that's the crank counterweight in the way. You're seeing the oil pressure relief spring. You can see a path of oil from the 'window' of the spring boss which runs onto the pan rail. From there it travels slightly across the entire rear of the block pan rail. Like a dope, I cleaned that area before I took this snap.
There is no oil above or around the spring boss on the block inner wall. Clearly the oil originates from the spring boss. There are no other internal drips including the rear main area. So I really feel this is the origin of the leak.
Part II:Careful cleaning of the windage tray and Canton pan has revealed that their mating surfaces had waves and warps and were not totally flat. The rear corners were actually bent away from the block pan rail. After cleaning the gasket residue, I spent time with a persuader getting the surfaces flat. The flange on the pan was difficult but now lays perfectly flat on the work table.
My big conclusion is that oil from the relief spring seeped down the block wall and when it got to the pan rail, the uneven mating surface of the pan let it leak past. I know-gaskets are supposed to prevent that. I just don't know why they didn't.
THE BIG QUESTION: Guys, is it normal for oil to trickle from the relief spring when the motor hasn't run in 4 months? I want to stress-the engine runs perfectly and oil pressure is generous at all engine speeds.
Thanks to all those who got involved in this soap opera and would beg your patience for a few more thoughts from you all.
__________________
Chas.
|
05-05-2009, 05:41 PM
|
|
CC Member
|
|
|
Join Date: Jul 2003
Location: West Bloomfield,
MI
Cobra Make, Engine:
Posts: 717
|
|
Not Ranked
Normal - that is a place where all the oil from the block will eventually drain while sitting - its a bypass right? The pan does need to be flat - especially when sandwiching a windage tray and two gaskets - so you have your problem identified.
__________________
Survival Motorsports
"I can do that....."
Engine Masters Challenge Entries
91 octane - single 4bbl - mufflers
2008 - 429 cid FE HR - 675HP
2007 - 429 cid FE MR - 659HP
2006 - 434 cid FE MR - 678HP
2005 - 505 cid FE MR - 752HP
|
05-05-2009, 06:54 PM
|
|
CC Member
|
|
|
Join Date: Oct 2003
Posts: 4,078
|
|
Not Ranked
Aaaaaahhhhhhhhhhhhhhh...
__________________
Chas.
|
05-19-2009, 08:27 AM
|
|
CC Member
|
|
|
Join Date: Jul 2008
Location: Driftwood,
TX
Cobra Make, Engine: Contemporary Cobra, 427 side oiler
Posts: 1,850
|
|
Not Ranked
Chas, did you get this back together yet? Has it stopped leaking?
Jim
|
05-19-2009, 04:33 PM
|
|
CC Member
|
|
|
Join Date: Oct 2003
Posts: 4,078
|
|
Not Ranked
El,
Yes I did. I used Barry's Motorcraft silicone recommendation and the Milodon gaskets. The gaskets are very high quality and they're even packaged flat and whole-not folded in half like the FailPros. They have a nice rigid feel and composition.
So far, so good. I ran it lightly at first and and checked the studs and serrated nuts the next day cold. They all needed a quarter turn for snug. The area near the pressure relief valve is bone dry as is the face of the block plate.
Ran the a$$ off it today so will check the floor tomorrow. If any drops you will probably hear my scream in Houston...
PS- The new clutch disc is working really nicely but I can only get reverse about half the time. Don't know why. I set the air gap and adjusted the fork rod about a million times. I'm getting closer.
Thanks for asking.
__________________
Chas.
|
05-20-2009, 06:25 PM
|
|
CC Member
|
|
|
Join Date: Jul 2008
Location: Driftwood,
TX
Cobra Make, Engine: Contemporary Cobra, 427 side oiler
Posts: 1,850
|
|
Not Ranked
Quote:
Originally Posted by ERA Chas
Ran the a$$ off it today so will check the floor tomorrow. If any drops you will probably hear my scream in Houston...
|
Mine was seeping because of a conflict between the Armondo pan and rear main bolts. I just modified the bolt heads a bit further and am about to button it back up using all the preferred methods/parts/special sauces above. I won't jinx us, but if there is screaming from either of us we need to find a watering hole to commiserate; I am in Houston too. |
05-22-2009, 05:56 AM
|
|
CC Member
|
|
|
Join Date: Oct 2003
Posts: 4,078
|
|
Not Ranked
El,
I am in LONG ISLAND. You, in Houston, would hear my scream!
Update: The re-inspection has proven it dry. No screams. Took it out again and put maybe 100 fairly hard miles on it yesterday, (80 degrees) returned and put it on ramps and still dry and clean after cool down.
I did check the nuts again and found they all needed another maybe 1/8th or less turn each, evenly.
For sure the Motorcraft silicone, Milodons and a flat pan rail works.
Unusual that your Armondo is contacted by the main bolts. Did that happen with your previous pan? Does the Armondo have a flat, billet style rail?
My Canton has the stamped ribs and much less contact area that can flex when torqued than a cast or billet pan rail. That's what I hate about it although it's a good RR pan otherwise. It's the same reason I switched from stamped Pentroof valve covers to the cast aluminum Cobras-perfectly flat and no leaks.
Billet Fabrications makes beautiful aluminum pans with wide, flat billet rails-love 'em but too much $$ and I'm nervous about an aluminum pan 3 1/4" from the ground. There's some scary dings on my steel Canton...
Please post your results here.
__________________
Chas.
|
05-22-2009, 10:02 AM
|
|
CC Member
|
|
|
Join Date: Jul 2008
Location: Driftwood,
TX
Cobra Make, Engine: Contemporary Cobra, 427 side oiler
Posts: 1,850
|
|
Not Ranked
Quote:
Originally Posted by ERA Chas
El,I am in LONG ISLAND. You, in Houston, would hear my scream!
|
Gotcha, I mis-read your post.
Quote:
Originally Posted by ERA Chas
Unusual that your Armondo is contacted by the main bolts. Did that happen with your previous pan? Does the Armondo have a flat, billet style rail?Please post your results here.
|
The Armondo rail is built like an OEM pain rail, with the ribs. I haven't called him to ask why the heck it conflicts with the studs, but this is the last time I am R&R'ing and then he's going to get this one back for a chance at a re-do.
I'm putting oil in it today and will run it tonight, so we'll see. |
05-22-2009, 10:39 AM
|
 |
Senior Club Cobra Member
|
|
|
Join Date: May 2007
Location: The Colony,
TX
Cobra Make, Engine: CSX 4973
Posts: 334
|
|
Not Ranked
I'm no expert
But George Anderson is. Here is a tech tip about about the Rear Main Cap Modifications you may require for the windage tray to clear. It is about halfway down the page under the Aviaid pan section. This had to be done to my engine.
http://www.gessford.com/cobraparts/fmisc.htm
__________________
David
|
05-22-2009, 11:45 AM
|
|
CC Member
|
|
|
Join Date: Jul 2008
Location: Driftwood,
TX
Cobra Make, Engine: Contemporary Cobra, 427 side oiler
Posts: 1,850
|
|
Not Ranked
Quote:
Originally Posted by damdfw
But George Anderson is. Here is a tech tip about about the Rear Main Cap Modifications you may require for the windage tray to clear.
|
I had read that previously and asked Armondo about it and he said he had provided for stud and bolt head clearance on his later pans. Apparently not on this one he sent me. |
05-22-2009, 03:27 PM
|
 |
CC Member
|
|
|
Join Date: May 2001
Location: California,
Ca
Cobra Make, Engine: NAF 289 Slabside Early Comp Car with 289 Webers and all the goodies. Cancelling the efforts of several Priuses
Posts: 6,592
|
|
Not Ranked
Sounds like time for a little manipulation with a Ball Peen Hammer??? Or shorten the studs & use 12pt nuts which are a little shorter.
__________________
Rick
As you slide down the Banister of Life, may the splinters never be pointing the wrong way
Last edited by Rick Parker; 05-22-2009 at 03:59 PM..
|
 Posting Rules
|
You may not post new threads
You may not post replies
You may not post attachments
You may not edit your posts
HTML code is Off
|
|
|
All times are GMT -7. The time now is 04:24 PM.
|


 Linear Mode


