 
 Main Menu
|
|
Nevada Classics
|
|
Advertise at CC
|
| S |
M |
T |
W |
T |
F |
S |
| |
|
|
1 |
2 |
3 |
4 |
| 5 |
6 |
7 |
8 |
9 |
10 |
11 |
| 12 |
13 |
14 |
15 |
16 |
17 |
18 |
| 19 |
20 |
21 |
22 |
23 |
24 |
25 |
| 26 |
27 |
28 |
29 |
30 |
|
|
|
|
CC Advertisers
|
|
 3Likes 3Likes

01-28-2015, 05:52 AM
|
|
CC Member

|
|
|
Join Date: Sep 2014
Posts: 29
|
|

 Not Ranked
 Scratch built LeMans 289
Well, I've been lurking on here for a while now & thought it might be time to show you what I'm putting together. I just love the look & rawness of the LeMans 289's and as there's a lot of FIA clones, I figured it'd be a bit more unusual to the normal cars that are out there. The chassis will be 4" diameter & will support the Jaguar indepent front & rear suspension. Front A arms will be scratch built to allow for adjustments. The body will be aluminium over a birdcage frame
I was originally offered a loan of a 289 slabside to use as a buck to make my aluminium body. But after a lot of consideration I thought it might be better to buy a shell & cut & shut that to get the final shape that I wanted. This will then be used as the buck to form the aluminium body & the buck can then be sold on to recoup some of the cost outlayed. The buck will eventually be finished to a high standard & would be ready for paint.
Because I wanted an ali body and I was unable to purchase a fibreglass 289 style shell at a sensible price, to use as the buck, bearing in mind it'll be cut & changed dramatically, it made sense to me at least, to buy a cheap 427 shell & modify that. I bought a Pilgrim bodyshell, but without the inner skins on the hood, trunk & doors and most importantly, the cost was right  There won't be much 427 DNA left in it by the time it's finished anyway.
The body style that I'm going to replicate is a cross between CS 2131 and CSX 2130, taking the styling cues from each that I like. Once the body modifications are done, I'll then make a start on the chassis. The engine will be a 302 stroked to 347 fitted with downdraughts, backed up by a 5 speed trans.
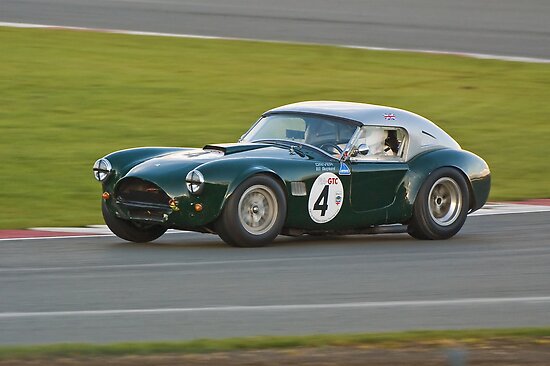
These are the cars for my inspiration. I like the front lower valance and lower grille on 644 CGT & I'll also replicate the rear fenders to look like this car
[IMG]  [/IMG]
I like the front fender lips on 39PH, so again I'm going to replicate those too.
[IMG]  [/IMG]
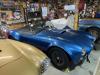
This was the starting point, one cheap 427 bodyshell
[IMG]  [/IMG]
cheers...Nige

|
01-28-2015, 06:07 AM
|
 |
CC Member
|
|
|
Join Date: Apr 2005
Location: Tucson,
AZ
Cobra Make, Engine:
Posts: 5,391
|
|
Not Ranked
Looks like the photo posting is working well! Looking forward to your build thread!
Larry
__________________
Alba gu bràth
|
01-28-2015, 08:25 AM
|
|
CC Member
|
|
|
Join Date: Sep 2014
Posts: 29
|
|
Not Ranked
Hi Larry, it seems that there has to be ten posts before you can put up photos. I'll post up a few more tomorrow showing some of the progress if I get a chance
cheers..Nige
|
01-28-2015, 10:17 AM
|
 |
CC Member
|
|
|
Join Date: Jan 2009
Cobra Make, Engine: N.A.F., 351 cleveland, 9" ford
Posts: 210
|
|
Not Ranked
Looking forward to following your build. Sounds like you know what you want and have a plan to get there, Excellent....
|
01-28-2015, 11:08 AM
|
 |
CC Member
|
|
|
Join Date: Mar 2003
Location: McConnellsburg,
PA
Cobra Make, Engine: ERA FIA #2124
Posts: 687
|
|
Not Ranked
Looking forward to your updates, Nige.
- Allen.
|
01-28-2015, 11:12 AM
|
 |
Senior Club Cobra Member
|
|
|
Join Date: Mar 2005
Location: Manchester,
NH
Cobra Make, Engine: AK1085 (302 Street), HTM111 (427 Comp), CSX2375R (289 Comp) and COB5999 (427 S/C)
Posts: 19,111
|
|
Not Ranked
Me too......  |
01-28-2015, 01:40 PM
|
 |
CC Member
|
|
|
Join Date: Jul 2006
Location: Redding,
CA
Cobra Make, Engine: FFR chassis and suspension, Mr. Bruce 289 FIA body
Posts: 1,066
|
|
Not Ranked
This will be a fun thread to watch. Good luck
|
01-28-2015, 10:56 PM
|
|
CC Member
|
|
|
Join Date: Sep 2014
Posts: 29
|
|
Not Ranked
I guess that some people might wonder why I'm making this buck the hard way, rather than just use a 289 shell, but to be honest one of the reasons was that it was cheaper for me to do it this way, but more importantly I really enjoy modifying things, I guess it's the customiser in me. I used to own a high end bodyshop restoring Porsches & Rolls Royces, prior to selling it & retiring, but I always tried to have an unusual project lurking in the corner for me to play with.
Allen, I've read through your thread numerous times & there's some really helpfull, information that I can use. The only problem that I'm now faced with is whether to paint this car or leave it in bare aluminium. Having seen your car I'm really taken with painting it green, but the strange thing is I don't really like greens as a rule, but your car just looks soooo right. Heck, I'm really confused over how to finish this, but I guess I've a lot of time to think about it 
A friend of mine sent me a template of a 289 grille apperture, so I thought I'd just knock up a quick card template just to see how far out the grille is on the 427 compared to the 289. Surprisingly, it's not far out at all. I know that the bonnet line is lower on the 427 but I was expecting the grilles to be miles different. It looks as if I can get away with just cutting the bottom off the grille, whilst taking out the lower grille & valance & just make a new front valance for it, which should be straight forward enough as there's not many curves to replicate.
[IMG]  [/IMG]
I'm not going to have the lower grille the same as on the FIA's, instead it will be like this with a rolled edge on CSX 2130
[IMG]  [/IMG]
At the moment I'm doing this outdoors as my workshop's full of cars. The weather was good, so I thought I'd make a start on the grille. Using the template I was able to determine the shape of the 289 grille apperture. I formed a piece of mild steel to shape & fitted it using grips. Some holes were also drilled so that the piece could be screwed into place later. This will enable me to remove it easily once finished
[IMG]  [/IMG]
After double checking with the template, and being happy with that, I then made the swage that runs under the top flange & tack welded it to the top piece
[IMG]  [/IMG]
The new panel was then removed & the lower valance of the car was cut off
[IMG]  [/IMG]
The new panel was then ground smooth & given a coat of etch primer for protection & screwed into place
[IMG]  [/IMG]
Once the whole of the front grille & lower valance are tacked together, I'll gel coat the inside of the panels & then lay the fibreglass over that. Once it's all cured, I can then unscrew the steel panel, take it off, and I'm then left with a fibreglass replica of the steel panel bonded to the main shell of the car. By laying it up on the inside of the panel, it should come out pretty smooth & hopefully won't take too much work to get it looking as if it came like that originally. Next it's onto making the lower valance & grille opening  .
Please feel free to ask any questions & I'll try to help
cheers...Nige
Last edited by FIA Cob; 01-29-2015 at 04:01 AM..
|
01-29-2015, 08:37 AM
|
|
CC Member
|
|
|
Join Date: Mar 2003
Location: McConnellsburg,
PA
Cobra Make, Engine: ERA FIA #2124
Posts: 687
|
|
Not Ranked
Nige:
Thanks for the color compliment, but green wouldn't be my first choice either for a FIA...definitely not with the yellow stripe. Like you, others have told me it looks properly fitting to the car, but I can't keep myself from thinking about changing the color. If nothing else, perhaps moving to old english white for the stripe, a change up of the roundals, and another set of FIA wheels with matching white centers. Below are a few other applications of green to establish the color a bit further in our minds... Early days, I know, but a fun topic to discuss, non-the-less.
Great job on nose surgery to this point... I was going to make a "helpful" comment about the upper radi of the opening needing to be a bit larger than what's represented on the template/Pilgrim shell, but I think there's a bit of variation in this area over the COB/CSX cars, so who's to say what's correct... I think yours will certainly look proper enough.
Now back to the colors:
Bill Shepherd's car:
A beautiful GT40 (P1009):

- Allen.
|
01-29-2015, 09:15 AM
|
|
CC Member
|
|
|
Join Date: Dec 2014
Posts: 19
|
|
Not Ranked
Hi Nige,
Spookily, I acquired a 289 GRP bodyshell (was after a 427 btw) over christmas, I think it is a BRA kit, my intention is an original replica, chassis/alloy body, having difficulty with suspension components at the moment.
Anyway, what plans will you use for the chassis, your own version or following the 427 plans?
And, you must be a really competent sheetmetal worker to be talking "polished body"
Fellow Brit, from Brum
Martin
|
01-29-2015, 01:30 PM
|
|
CC Member
|
|
|
Join Date: Sep 2014
Posts: 29
|
|
Not Ranked
Hi Allen, the template was taken from the grille of an FIA replica, so I feel it's going to be close enough to look ok. The piece that I've made has a 90 deg join where they're tacked together, which I can radius off in the gel coat once the sheet metal panel is removed. It's easier & quicker to do it this way than to try & put the radius in the steel.
Those damn greens again, what are you trying to do to me .The colour on Bill Shephards car (I'm assuming it's AC Vineyard green? ) doesn't really do it for me, but that GT40, again, looks about right in my eyes. I'm thinking maybe something that looks black with a tint of green. Oh I don't know, I'll have to have a good hard think on this when the time comes.
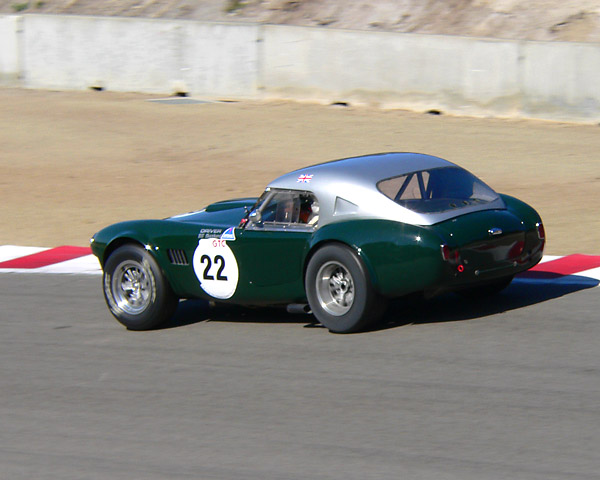
I also like black & this car of Leo Voyazides looks tough.
[IMG]  [/IMG]
Martin, I'm using the 427 chassis plans, albeit with the measurments corrected in places  , but one thing it won't have is a "polished body"  .
I'm a body man by profession & I'm ok with bodywork/ metalwork, but a good friend of mine is a coachbuilder & he'll be doing most of the major aluminium body shaping . What chassis are you using & who's going to make the body for you in aluminium? I'd like to see some pictures of that
cheers...Nige
Last edited by FIA Cob; 01-29-2015 at 10:12 PM..
|
01-29-2015, 01:35 PM
|
|
CC Member
|
|
|
Join Date: Sep 2014
Posts: 29
|
|
Not Ranked
I'll put some photos up later of the front valance assembly
cheers...Nige
|
01-29-2015, 03:07 PM
|
 |
CC Member
|
|
|
Join Date: Jan 2004
Posts: 69
|
|
Not Ranked
Nige - This will be a fun thread to follow. It looks like you are making some fast initial progress. One suggestion, sooner or later you will need a buck to hold the body and sooner may be better. That Pilgram body without the liner panels looks a little flimsy balancing on the tires in your yard. Before any final fit ups it may be best to get the body supported and squared up to ensure you do not build any twists or misalignments into it. Good luck with the build.
Bill
|
01-29-2015, 09:33 PM
|
|
CC Member
|
|
|
Join Date: Sep 2014
Posts: 29
|
|
Not Ranked
Quote:
Originally Posted by glenview289

Nige - This will be a fun thread to follow. It looks like you are making some fast initial progress. One suggestion, sooner or later you will need a buck to hold the body and sooner may be better. That Pilgram body without the liner panels looks a little flimsy balancing on the tires in your yard. Before any final fit ups it may be best to get the body supported and squared up to ensure you do not build any twists or misalignments into it. Good luck with the build.
Bill
|
Hi Bill, thanks for the advice, it's appreciated, but at this stage the whole of the front is fairly rigid & isn't likely to take a twist or warp in any way around the grille area as the compound curves are very rigid. It was only put up on the tyres temporarily, and at the moment it's sat on the floor supported where nescessary .
It'll be coming into the workshop very soon & it'll be mounted to a jig to hold it all in place prior to any real structural modifications taking place.
cheers...Nige
|
01-29-2015, 09:43 PM
|
|
CC Member
|
|
|
Join Date: Sep 2014
Posts: 29
|
|
Not Ranked
The next stage was to take a cardboard template of what would be the front lower valance. Obviously the curvature of the cardboard could only be shaped in one direction, but it would give me a pretty good idea of the shape I needed to transfer to the steel being used
[IMG]  [/IMG]
This was then transferred to a sheet of steel & was the loosely fitted to the body with panel clamps. I later put a slight double curvature in the steelwork to replicate the original, so the next thing on the agenda will be to tack weld it to the lower grille & then cut out the opening for the air duct. Once that's done, I'll be fitting it to the car & laying up the fibreglass. I find it easier to work in steel for stuff like this & then use it as the mould for the 'glass panels. I'll lay up the gelcoat inside the panels I've made & then give it two layers of 450 gramme fibreglass matt & resin. Once cured I can unscrew these new panels & hopefully it should leave a nice fibreglass panel bonded to the original car, fingers crossed & all that stuff.
[IMG]  [/IMG]
The whole thing only took just over two hours work to get it to this stage so I'm very pleased with that.
Cheers..Nige
|
01-29-2015, 10:02 PM
|
|
CC Member
|
|
|
Join Date: Sep 2014
Posts: 29
|
|
Not Ranked
Well, things are moving along in the planning stages and thanks to my friend Alan (CatsX11) I've now got all of the measurements I need...I think.... to transform the 427 shell into a 289. He's managed to scale everything up from photos that I sent him & has given me all of the dimensions that I was unsure of...... Thanks again Alan It's just soooo much harder trying to research all of this from photos instead of having an actual car to walk around & study/measure. I know that I'm making things harder for myself by buying a 427 shell, but I really do enjoy a challenge & having something that makes me think about how to solve problems, I must be mad
Now I've got the measurements, I've made a start start making the lower "letterbox" grille apperture for the front valance, well I was, except I've now had to stop to do "household" stuff grr!!. Because this shell is going to be the buck for the aluminium body, I don't really need to make this piece or fit it to the car, as it'll be made in ali when the shell is being made. I just thought I'd make a quick one from a bit of old steel, just so that I can see what it's going to look like & see if there are any aesthetic problems, before it's made in aluminium. you'll notice that I've added a piece of round bar to the bottom edge to help it hold its curvature.
This is how it looks at the moment & I'll post up the photos of how I did this shortly.
[IMG]  [/IMG]
[IMG]  [/IMG]
Going from Alans measurements, my 427 shell is just under 2" (in old money) wider per side across the rear arches than the 289 shell of 39PH and the tail lights are a similar distance too wide. I now need to plan the best places to cut this so that I end up with a minimal amount of repair work to do, without losing the shape. Planning ,planning, planning, measure, measure cut once.
cheers..Nige
Last edited by FIA Cob; 01-29-2015 at 10:37 PM..
|
01-30-2015, 06:32 AM
|
|
Senior Club Cobra Member
|
|
|
Join Date: Mar 2005
Location: Manchester,
NH
Cobra Make, Engine: AK1085 (302 Street), HTM111 (427 Comp), CSX2375R (289 Comp) and COB5999 (427 S/C)
Posts: 19,111
|
|
Not Ranked
Nice look, love the start
|
02-03-2015, 10:29 AM
|
|
CC Member
|
|
|
Join Date: Sep 2014
Posts: 29
|
|
Not Ranked
Had a bit of spare time so I thought I'd make the oil cooler grille apperture for the lower valance. I don't really need to make this at this time as it will be made from aluminium when the main body gets done, but I just wanted to see what it would look like anyway. Based on the measurements that Alan scaled up, I drew it out onto a piece of card first.
[IMG]  [/IMG]
This will be made from aluminium on the body & will have a wired edge, but for the purposes of just seeing how it looks, I formed a bit of 1/4" bar to mimic the wired edge. I then made the shape of the appertutre by bending it around a 3" hole saw
[IMG]  [/IMG]
I then beveled the edges,so that when it was welded together, I could grind it down without fear of grinding through the weld.
[IMG]  [/IMG]
This was then placed into a bit of angle iron, so that when it was welded together, the joint would butt up perfectly & keep its shape.
[IMG]  [/IMG]
Once joined together it looks like this
[IMG]  [/IMG]
A piece of zintec steel was then formed to shape rolled around a piece of 3" tube.
[IMG][url=http://s238.photobucket.com/user/evilzee28/media/miscellaneous/oilcoolervent008_zps25764001.jpg.html]  [/url[/IMG]
This piece of zintec was then welded together & put into the apperture, which was then tacked to the zintec sheet..

When making a butt joint in steel, I clamp a bit of flat sheet copper behind the joint. No doubt you've found that when trying to weld a butt joint in thin steel, it tends to blow more holes into the steel than it does welds. By placing a piece of copper behind the joint, you can weld the two pieces together, & the copper stops the weld from blowing holes, enabling you to weld the two pieces together as the weld won't adhere to the copper, but it bridges the gap between the joint. (hope that makes sense)
Having ground down the welds, I then calculated the shape of the apperture needed to cut into the front valance. By placing the new panel into that hole, I was then able to figure out the shape of the new panel & trim it accordingly
[IMG]  [/IMG]
[IMG]  [/IMG]
The front valance was taken off the car & offered the oil cooler grille to it so that I could cut out the apperture. After a little bit of trimming here & there I ended up with quite a snug fit.
[IMG]  [/IMG]
[IMG]  [/IMG]
I tacked it loosely into position to make sure it sat in the apprture square & that it was the right angle to the valance
[IMG]  [/IMG]
I left I small amount of metal protruding on the inside to give me a little bit of leeway to put it exactly where I wanted it to go. A few tack welds were then added to hold it in place
[IMG]  [/IMG]
The valance was then offered up to the car to make sure it looked right. Once happy with it, the bottom of the grille that I'd made previously & the new valance were tack welded together. Unfortunately, in my haste to get it together I forgot to photograph this stage Doh!!. Once it was tacked together the whole piece was removed from the car & given a coat of etch primer just to keep the elements at bay until I can get to lay up the 'glass on the inside
The completed valance was then fitted back onto the car with body clamps.
[IMG]  [/IMG]
In this photo you'll see that I tacked a piece of 1/4" bar to the bottom edge of the valance which will add rigidity to the lower part of the valance, whilst also giving it a gentle curve as per the original cars. The bar was welded to the outside of the valance as I'm 'glassing the inside
[IMG] [/IMG]
[IMG]  [/IMG]
I'm pleased with the way this has come out & think it'll look nice when it's all made in aluminium. I've only tacked the lower grille to the oil cooler vent in a few places as it's only on there for me to check that it looks ok. I'll be removing it when it comes to the fibreglass stage. As to the valance, again, it's all only tacked together, but because it's being used as a mould, it doesn't have to be structurally strong. The point at where the lower valance & the grille are joined have been welded at pretty much a sharp angle to each other. On the car they have a radiused edges, but for ease at this time it's not important. The fibreglass will be finished with a sharp edge at this point, but it's far easier to sand it down into a radius than trying to get the steelwork formed into a radius. I could of course just add a small bead of filler inside the panel where they join together which would form a radius on the finished piece. I have to stop myself doing things differently sometimes & keep reminding myself that this is just a buck & it doesn't have to be perfect at this stage. I'll probably alter the angle of the oil cooler vent to the valance when it comes to the final stages as it's out just a fraction in the photos, but that's the major benefit of doing things this way, as it's far easier to rectify a problem in steel or fibreglass than in a sheet of aluminium that's had a lot of work put into it lol.
The next part will be cutting out the raised sidelight plinth & grinding back the inner flanges on the vents on each side of the grille. I can then get to the point of fibreglassing the whole lot together Woo Hoo!!
cheers...Nige |
02-03-2015, 12:53 PM
|
 |
CC Member
|
|
|
Join Date: Jun 2001
Location: Mesa,
AZ
Cobra Make, Engine: ERA #2119 289FIA
Posts: 5,380
|
|
Not Ranked
Beautiful engineering and workmanship!
__________________
Karlos
"In the Land of the Pigs, The Butcher is King"
|
02-03-2015, 10:40 PM
|
|
CC Member
|
|
|
Join Date: Jul 2006
Location: Redding,
CA
Cobra Make, Engine: FFR chassis and suspension, Mr. Bruce 289 FIA body
Posts: 1,066
|
|
Not Ranked
Quote:
Originally Posted by Karl Bebout
Beautiful engineering and workmanship!
|
Ditto that |
 Posting Rules
|
You may not post new threads
You may not post replies
You may not post attachments
You may not edit your posts
HTML code is Off
|
|
|
All times are GMT -7. The time now is 07:04 AM.
Links monetized by VigLink
|


 Linear Mode


